
- SAP Community
- Products and Technology
- Spend Management
- Spend Management Blogs by Members
- SRM UI Add on 1.0 - Custom fields Demystified
Spend Management Blogs by Members
Check out community member blog posts about spend management and SAP Ariba, SAP Fieldglass, and SAP Concur solutions. Post or comment about your experiences.
Turn on suggestions
Auto-suggest helps you quickly narrow down your search results by suggesting possible matches as you type.
Showing results for
former_member18
Active Contributor
Options
- Subscribe to RSS Feed
- Mark as New
- Mark as Read
- Bookmark
- Subscribe
- Printer Friendly Page
- Report Inappropriate Content
05-20-2016
1:29 PM
Few weeks before I have been put into SAP SRM UI5 implementation and I was very excited to say the least. I finally got a chance to work on UI5 in real project. My first task was to add a custom field in UI5 screen, to be more specific on Minicart view.

I took the Extensibility cook provided by SAP and followed the instructions (Although I would say the document is not up to the level of “SAP” documentation in terms of quality of content). I finally managed to complete the task and everything was working fine. Below is the entry in customizing

Everyone was happy except me :smile: :smile:
The question that was making me uncomfortable is this.
We have add some metadata related to custom field in SPRO (in ABAP) and we see the field in UI5 (which is built HTMLS5 and JavaScript etc.). If this was done in ABAP webdynpro, I wouldn’t have written this blog, because we have UI rendering classes in webdynpro which takes all the pain of converting webdynpro layout into something that browser understands. But in case of UI5 that is not the case. The communication between UI5 and ABAP happens through OData (at least pertaining to the case that I am talking here). So, how on earth the data entered in configuration is read from SPRO and taken into JavaScript code and used to build required controls (control here means UI element) and added to the layout. This was the big question???
This blog is a small answer to it. So if you don’t care to know how this is achieved in SAP code, you can stop here. Otherwise you can proceed and get ready for some cool stuff :lol:
First step that I did was to keep HTTP trace for the logged on user in ST05 to see what Odata calls happens when we click on “Shop” from the UI.

In transaction /IWFND/MAINT_SERVICE execute service GETDEFUSRSET for entity set “DefaultUserSettings”. Here I see in field ‘FIELD_EXT_JSON’, contains all the information that we maintain in SPRO. You can go through the class /SRMNXP/CL_DA_DEF_USER_SETTING method GET_EXT_FIELD_FILEP_JSON to know exactly how this data is extracted.

For better understanding, same data is shown here in another editor

This data comes to shopping cart UI5 application /SRMNXP/SHOPPINGCART ( you check different JS files available for this application in SE80 by selecting BSP application) and here by some magic (I will reveal the secrets shortlyJ). I have installed “UI5 Inspector” add-on to my chrome browser. You can get this from below link
https://chrome.google.com/webstore/detail/ui5-inspector/bebecogbafbighhaildooiibipcnbngo?hl=en
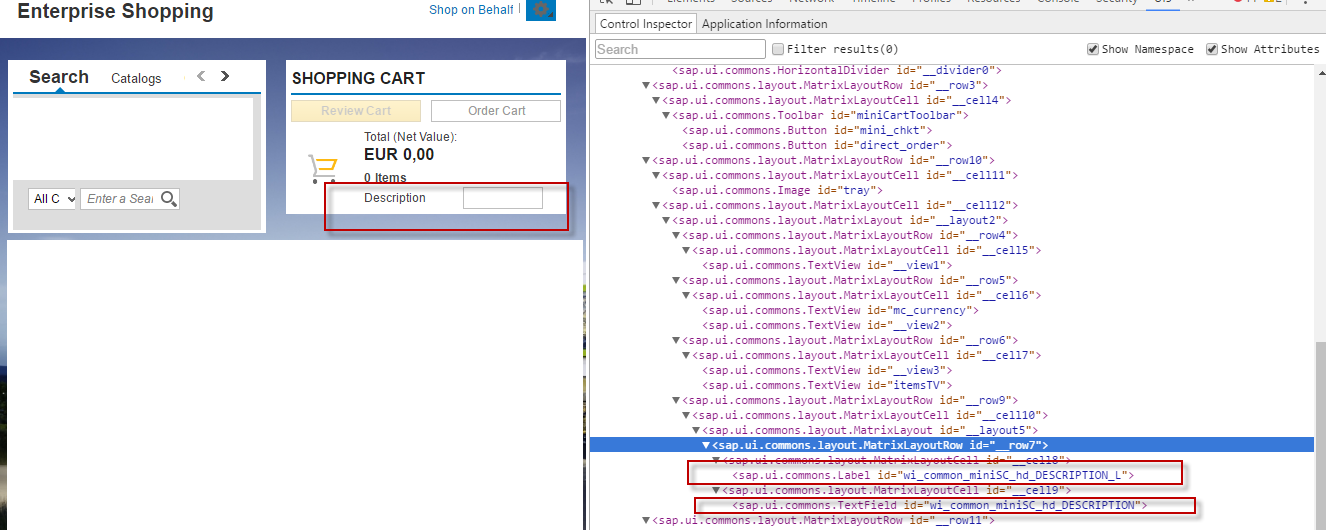
Now login to shopping cart UI5 application either directly from SICF or from NWBC, then click F12 to open debugger and go to UI5 tab at the top right corner of the debugging window. Here you can select the row at right hand side and browser highlights the related UI element on left. I can see there is a label created with id “wi_common_miniSC_hd_DESCRIPTION_L” and input field with id “wi_common_miniSC_hd_DESCRIPTION”.
The view Js file corresponding to minicart is MiniCart.view.js. You can look at the code of this file in SE80 by going to BSP application /SRMNXP/SHOPPINGCART. From within this view calls go to different methods in different Js file. Below I mentioned the important methods in the call stack
Call stack
Js File | method | comment |
| createcontent |
|
buildcontent | At line 216 var ExtObj_min_hdr = Appcc.Extensibility.getViewExtensibilityData( | |
| getViewExtensibilityData | Nothing much!!! |
getViewCustomerLayout | Nothing much here as well!!! | |
getControlDefinitionByJSON | In this method data sent by ODATA call as JSON is parsed and relevant data is extracted and new control is built and added to “control” array | |
generateLayout | Layout data is created for new control ( matrix, vertical layout etc.,) | |
buildcontent | Call comes back to build content method and new control along with the layout is added to the minicart view |
Below I have explained in more detail about the important methods in Extensibility.js
Method getControlDefinitionByJSON
Inside this method Configuration data that is sent as JSON data is analysed. In each JSON element, VFD node is checked. For every entry in VFD node, method generateIdForViewField method is called. Inside this ID of the new control is built by concatenating “view name”, “_” and “field name”. In our case view_name is “wi_common_minisc_hd” and field name is “DECSCRIPTION”. Also based on the values entered in the configuration, different properties of the control are assigned
- ontrol.controlType = json[i].VFD[j].CONTROL_TYPE;
control.text = json[i].VFD[j].TEXT;
control.tooltip = json[i].VFD[j].TOOLTIP;
control.bindingPath = json[i].VFD[j].BINDING_ELEMENT;
control.maxLength = json[i].VFD[j]['MAX_LENGTH'];
Here the search help assignment and search help field mapping is also done. So in short the control in its full avatar is ready once we come out of this method.
Method generateLayout
Next method that gets called is generateLayout. In this method based on the import parameter format, different methods get called. ‘ML’ stands for Matrix layout etc. In our case minicart view is built using MatrixLayout
switch(format)
{
case "ML":
return(this.generateMatrixLayout(controls, sectionHeading, format, bindMetadata, style));
break;
case "VL":
return(this.generateVerticalLayout(controls, sectionHeading, format, bindMetadata, style));
break;
case "RAW":
return controls ;
break;
default:
return(this.generateMatrixLayout(controls, sectionHeading, bindMetadata, style));
}
In generateMatrixLayout method we have another important method called generateControl. In this method, based on the control type (this is entered in configuration), different methods are called. In our case we have maintained ‘TF’ in configuration, which means an Input field.
switch (controlDefinition.controlType)
{
case "TV":
return(this.LG.createTextView(controlDefinition.id ,controlDefinition.text,controlDefinition.tooltip, controlDefinition.bindingPath, format, bindMetadata, style));
case "TF":
return(this.LG.createInputField(controlDefinition.id, controlDefinition.text,controlDefinition.tooltip, controlDefinition.bindingPath, format, bindMetadata, style, controlDefinition.maxLength));
case "CB":
return(this.LG.createCheckBox(controlDefinition.id, controlDefinition.text,controlDefinition.tooltip, controlDefinition.bindingPath, format, bindMetadata, style));
Inside createInputfield method, input field along with label is created (for label ‘_L’ is added at the end of the id to differentiate it from input field ID). So we have label control with ID “wi_common_miniSC_hd_DESCRIPTION_L” and input field control with id “wi_common_miniSC_hd_DESCRIPTION”.
After method generateLayout call comes back to buildcontent method and then createcontent method of MiniCart.view.js. So we came back to the place where we started :smile:
In my Next blog I will try to write about CUSTOM_PRE_EXIT and CUSTOM_POST_EXIT
Keep sharing and keep reading…
- SAP Managed Tags:
- SAP Supplier Relationship Management
1 Comment
You must be a registered user to add a comment. If you've already registered, sign in. Otherwise, register and sign in.
Labels in this area
Related Content
- SAP Ariba Procure to Order 2405 Release Key Innovations in Spend Management Blogs by SAP
- Discover SAP Ariba REST API Try Out feature – an essential yet overlooked tool! in Spend Management Blogs by SAP
- Configuring and Testing REST APIs with SAP Fieldglass - Part 3 - Downloads in Spend Management Blogs by SAP
- Ariba reporting on custom form fields in Spend Management Q&A
- Configuring and Testing REST APIs with SAP Fieldglass - Part 2 - Uploads in Spend Management Blogs by SAP