
- SAP Community
- Products and Technology
- Human Capital Management
- HCM Blogs by Members
- Bidirectional integration between SAP SuccessFacto...
Human Capital Management Blogs by Members
Gain valuable knowledge and tips on SAP SuccessFactors and human capital management from member blog posts. Share your HCM insights with a post of your own.
Turn on suggestions
Auto-suggest helps you quickly narrow down your search results by suggesting possible matches as you type.
Showing results for
former_member71
Explorer
Options
- Subscribe to RSS Feed
- Mark as New
- Mark as Read
- Bookmark
- Subscribe
- Printer Friendly Page
- Report Inappropriate Content
10-23-2021
3:19 PM
This blog is a continuation of the “ Part 1 - Technical configuration for SAP SuccessFactors to Azure Active Directory user provisioning“.
In section, we will focus on the Technical configuration for SuccessFactors Writeback.
Note:
For this demonstration, I have already created an Azure AD tenant and using SAP SuccessFactors & Azure trail account for the POC.
We can use the same API user(SFAPI2) which we created in part1(step 1 to 4) .
Steps need to perform in SAP SuccessFactors
Step :1 SuccessFactors Writeback provisioning app uses certain code values to identify email in Employee Central.
1.1 In SuccessFactors Admin Center, search for Manage business configuration.

1.2 Under HRIS Elements, select emailInfo and click on the Details for the email-type field.

1.3 On the email-type details page, note down the name of the picklist associated with this field. By default, it is ecEmailType. However it may be different in your tenant.

Step :2 Retrieve constant value for emailType
2.1 In SuccessFactors Admin Center, search and open Picklist Center.

2.2 Use the name of the email picklist captured from the previous section (e.g. ecEmailType) to find the email picklist.

2.3 Open the active email picklist.

2.4 On the email type picklist page, select the Business email type.

2.5 Note down the Option ID associated with the Business email. This is the code that we will use with emailType in the attribute-mapping table.

Steps need to perform in Microsoft Azure AD
Step :3 Add the provisioning connector app and configure connectivity to SuccessFactors
To configure SuccessFactors Writeback:
3.1 Login to Azure Portal
3.2 In the left navigation bar, select Azure Active Directory
3.3 Select Enterprise Applications

3.4 Select All Applications and Select Add an application.

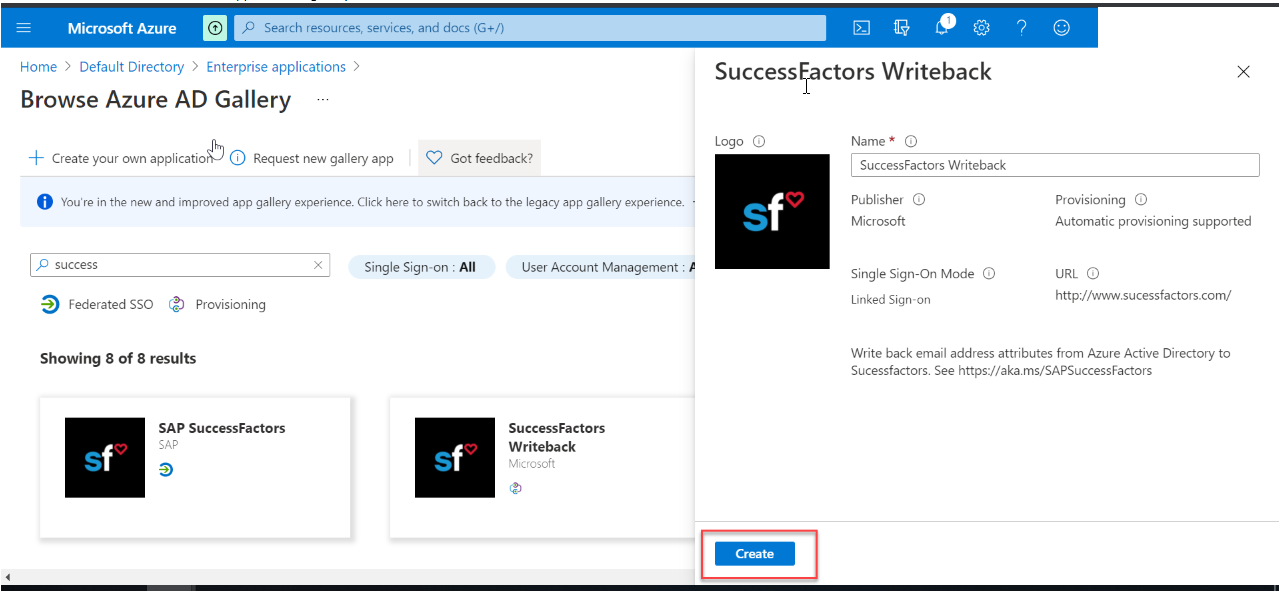
3.5 Search for "SuccessFactors Writeback" and select
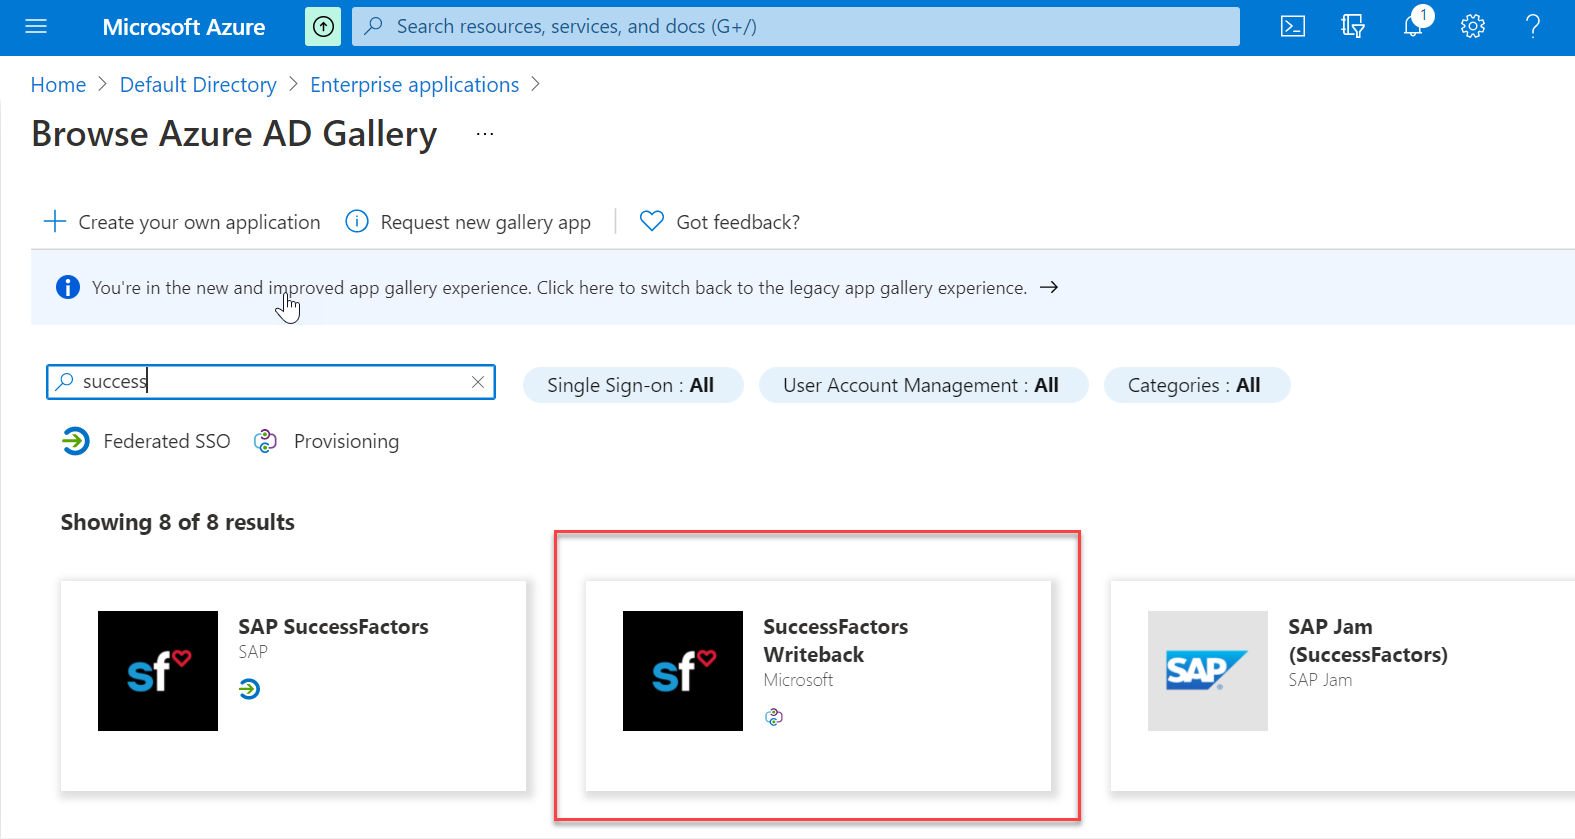
3.6 Click on create and add that app from the gallery.
3.7 Wait till adding the application "SuccessFactors Writeback "
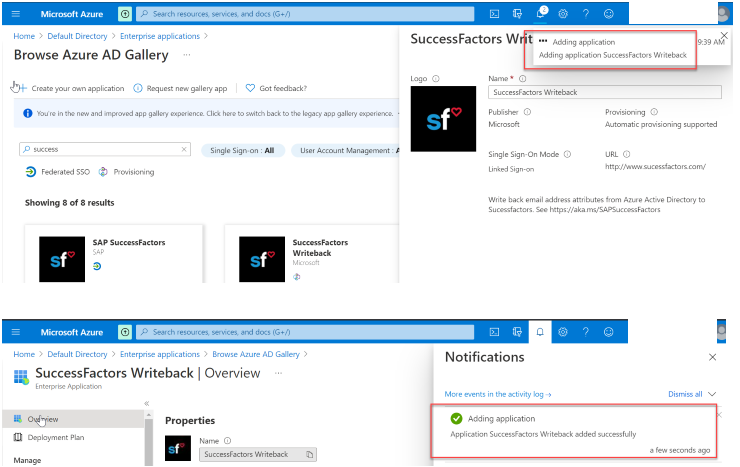
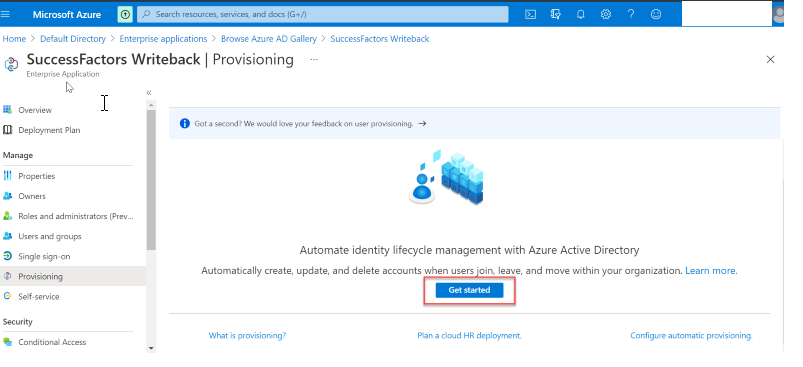
3.8 After the app is added and the app details screen is shown, select Provisioning

3.9 Click on "Get Started "
3.10 Change the Provisioning Mode to Automatic

3.11 Complete the Admin Credentials section as below and test the connection.

3.12 If the connection test succeeds, click the Save button at the top.

3.13 Once the credentials are saved successfully, the Mappings section will display the default mapping. Refresh the page, if the attribute mappings are not visible.


Step 4: Configure attribute mappings
4.1 On the Provisioning tab under Mappings, click Provision Azure Active Directory Users.

4.2 In the Source Object Scope field, you can select which sets of users in Azure AD should be considered for write-back, by defining a set of attribute-based filters. The default scope is "all users in Azure AD".
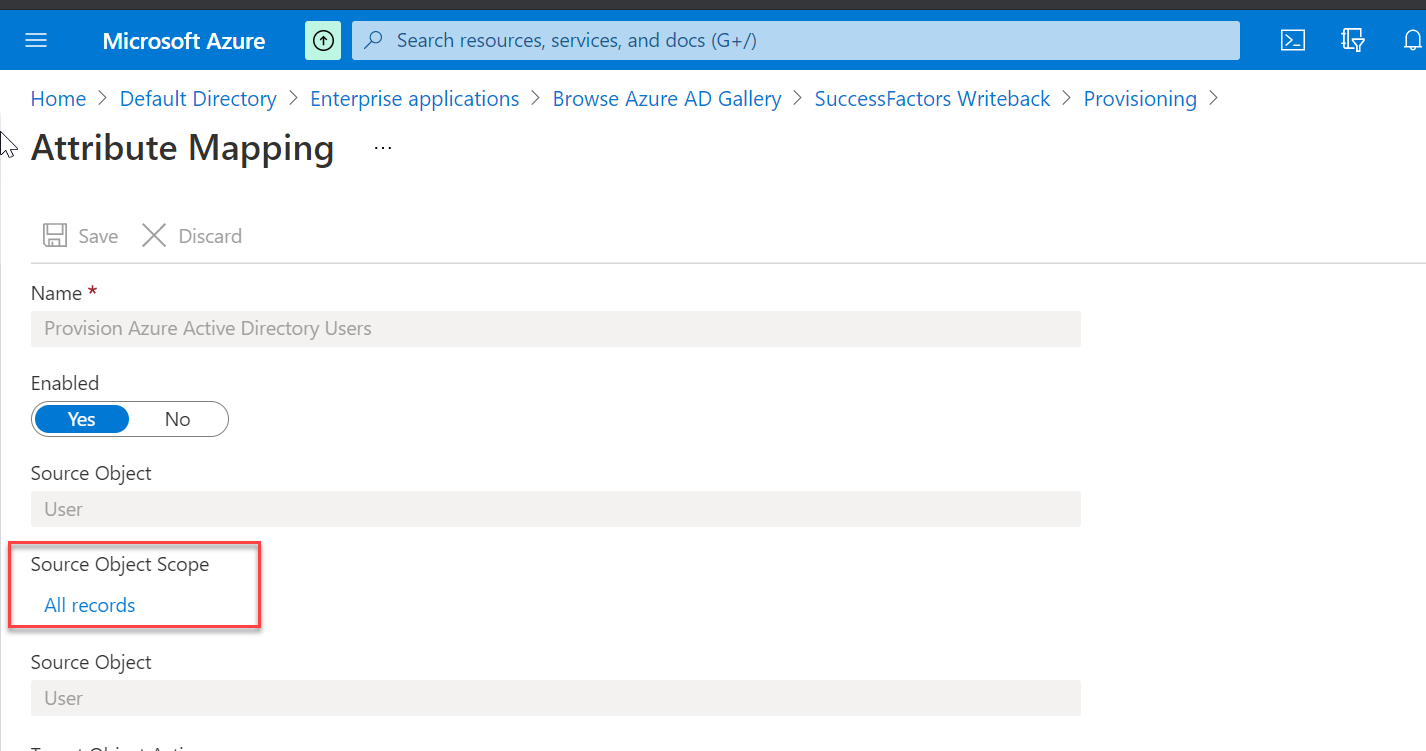
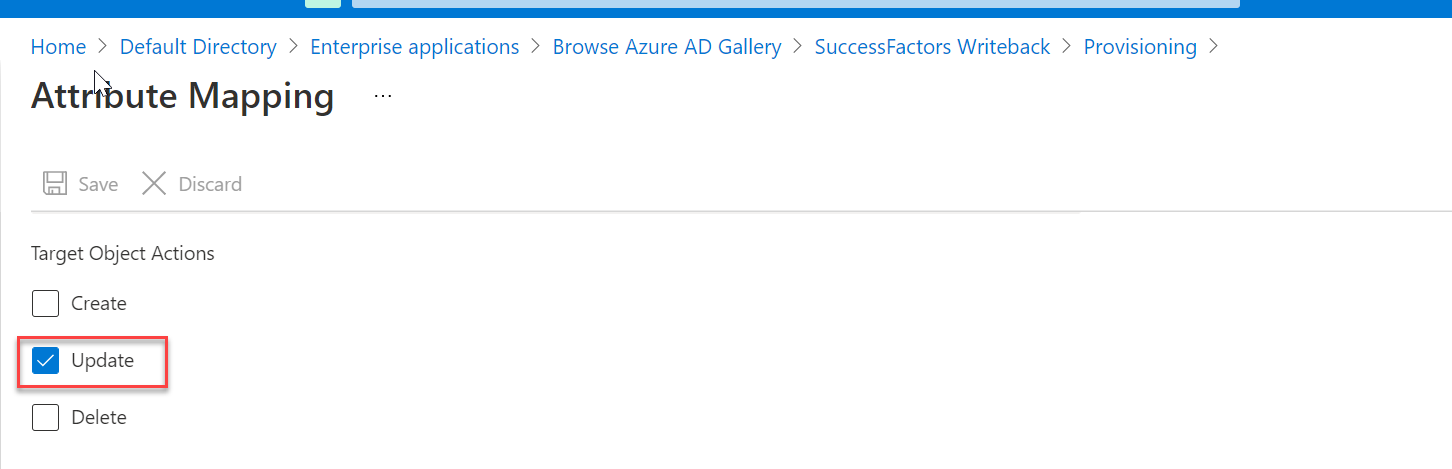
4.3 The Target Object Actions field only supports the Update operation.
 4.4 In the mapping table under Attribute mappings section, we can map the following Azure Active Directory attributes to SuccessFactors. The table below provides guidance on how to map the write-back attributes.
Note : I have selected only email for the update in Azure AD -> SuccessFactors and if you have any other requirement like employeeID or mobile number perform the changes accordingly .
 4.5 Validate and review your attribute mappings.
4.6 Click Save to save the mappings.
Step 5: Enable and launch user provisioning
5.1 In the Provisioning tab, set the Provisioning Status to On.
5.2 Select Scope. You can select from one of the following options:

Option 1: Sync all users and groups: Select this option if you plan to write back mapped attributes of all users from Azure AD to SuccessFactors, subject to the scoping rules defined under Mappings -> Source Object Scope.
Option 2: Sync only assigned users and groups: Select this option if you plan to write back mapped attributes of only users that you have assigned to this application in the Application -> Manage -> Users and groups menu option. These users are also subject to the scoping rules defined under Mappings -> Source Object Scope.
Note : I have selected the option 1 so all users will get synced.
5.3 Click Save.

5.4 This operation will start the initial sync, which can take a variable number of hours depending on how many users are in the Azure AD tenant and the scope defined for the operation. You can check the progress bar to the track the progress of the sync cycle.
 5.5 At any time, check the Provisioning logs tab in the Azure portal to see what actions the provisioning service has performed. The provisioning logs lists all individual sync events performed by the provisioning service.
5.6 Once the initial sync is completed, it will write an audit summary report in the Provisioning tab, as shown below.

11 Comments
You must be a registered user to add a comment. If you've already registered, sign in. Otherwise, register and sign in.
Labels in this area
-
2H 2023 Product Release
1 -
ACCRUAL TRANSFER
1 -
Advanced Workflow
1 -
Anonymization
1 -
BTP
1 -
Business Rules
1 -
Career Development
1 -
Certificate-Based Authentication
1 -
Cloud Platform Integration
1 -
Compensation Information Management
1 -
Compensation Management
1 -
Compliance
2 -
Content
1 -
Conversational AI
2 -
Custom Data Collection
1 -
Data & Analytics
1 -
Data Integration
1 -
Dayforce
1 -
Delimiting Pay Components
1 -
Deprecation
1 -
Employee Central
1 -
Employee Central Global Benefits
1 -
Employee Central Payroll
1 -
Employee Rehires
1 -
external terminal
1 -
external time events
1 -
Generative AI
2 -
Getting Started
1 -
Global Benefits
1 -
H2 2023
1 -
HR
2 -
HR Data Management
1 -
HR Transformation
1 -
ilx
1 -
Incentive Management Setup (Configuration)
1 -
Integration Center
2 -
Integration Suite
1 -
internal mobility
1 -
Introduction
1 -
learning
3 -
LMS
2 -
LXP
1 -
Massively MDF attachments download
1 -
Mentoring
1 -
Metadata Framework
1 -
Middleware Solutions
1 -
OCN
1 -
OData APIs
1 -
ONB USA Compliance
1 -
Onboarding
2 -
Opportunity Marketplace
1 -
Pay Component Management
1 -
Platform
1 -
POSTMAN
1 -
Predictive AI
2 -
Recruiting
1 -
recurring payments
1 -
Role Based Permissions (RBP)
2 -
SAP CPI (Cloud Platform Integration)
1 -
SAP HCM (Human Capital Management)
2 -
SAP HR Solutions
2 -
SAP Integrations
1 -
SAP release
1 -
SAP SuccessFactors
5 -
SAP SuccessFactors Customer Community
1 -
SAP SuccessFactors OData API
1 -
SAP Workzone
1 -
SAP-PAYROLL
1 -
skills
1 -
Skills Management
1 -
Stories in People Analytics
2 -
SuccessFactors
2 -
SuccessFactors Employee central home page customization.
1 -
successfactors onboarding i9
1 -
talent
1 -
Talent Intelligence Hub
2 -
talents
1 -
Tax
1 -
Tax Integration
1 -
Time Accounts
1 -
Workflows
1 -
XML Rules
1
Related Content
- The 1H 2024 Release of SAP SuccessFactors Learning – Release Highlights in Human Capital Management Blogs by Members
- IAS/IPS: conditional provisioning business vs. personal email of user in Human Capital Management Q&A
- Is SAP embedded signature supported for Recruiting Offer letters in Human Capital Management Q&A
- EC Time Sheet - How to stop breaks outside of working hours in Human Capital Management Q&A
- Deprecation of SuccessFactors Learning Token Server in Human Capital Management Q&A
Top kudoed authors
| User | Count |
|---|---|
| 4 | |
| 2 | |
| 2 | |
| 2 | |
| 1 | |
| 1 | |
| 1 | |
| 1 | |
| 1 | |
| 1 |