
- SAP Community
- Products and Technology
- Technology
- Technology Blogs by SAP
- Using Job Scheduler in SAP Cloud Platform [13]: Mu...
Technology Blogs by SAP
Learn how to extend and personalize SAP applications. Follow the SAP technology blog for insights into SAP BTP, ABAP, SAP Analytics Cloud, SAP HANA, and more.
Turn on suggestions
Auto-suggest helps you quickly narrow down your search results by suggesting possible matches as you type.
Showing results for
Product and Topic Expert
Options
- Subscribe to RSS Feed
- Mark as New
- Mark as Read
- Bookmark
- Subscribe
- Printer Friendly Page
- Report Inappropriate Content
10-07-2021
5:00 PM
This blog post shows how to use Jobscheduler in a multitenant scenario, including UI, approuter, security.
This blog post is part of a series that intends to show in an easy step-by-step way how to use the SAP Job Scheduling Service running on SAP Business Technology Platform (aka SAP Cloud Platform).
In the current sub-series of the series, we're trying to shed some light into the dark multi tenant space of multi confusancy.
0. Intro
1. Create MT application1.0. create project
1.1. Frontend app
1.1.1. User Interface
1.1.2. Approuter
1.2. Backend app
2. Run the scenario
Appendix Sample code
Today we’re building a sample application that contains a little bit of everything:
Frontend app with silly UI and approuter.
Backend app with protected endpoints.
There’s nothing new to discuss, we’re only putting everything together which has been introduced earlier.
Scenario
Today’s scenario represents use case 3, where the endpoints are not tenant-specific. Which means that the end-user shouldn’t know anything about jobs and action endpoints.
We’re representing this scenario by defining non-tenant-specific endpoints.
However, in our sample, we cannot hide the job creation, because that would require additional effort in the UI, which we want to keep simple.
As such, please ignore the create-button, even if you click on it.
The diagram shows that the tenant-specific enduser accesses the web application via the tenant-specific approuter URL.
The web app calls the "/createjob endpoint of the provider app, not tenant-specific.
Finally, Jobscheduler calls the "/action" endpoint of the provider app, not tenant-specific.
Note:
For the sake of simplicity, I’m shortening the example URLs.
Please let me use just sapcloud instead of ...cfapps.eu10.hana.ondemand.com
Functionality
- Frontend: a very basic html page represents the user interface.
- Frontend: approuter used as main entry point and for authentication.
- Backend: endpoint for creating jobs.
- Backend: endpoint for action to be invoked by Jobscheduler.
Security
- To allow subscription to the app, the callback requires a scope, which is granted only to SaaS Registry service.
- To access the app UI, the user needs to authenticate, but no dedicated scope is required.
- To access the "/createjob"-endpoint, a scope is required. It needs to be assigned to the tenant-specific user as “role”.
- To invoke the action endpoint, a scope is required, which is granted only to Jobscheduler instance
With other words:
https://muteteapp.sap.com/mtcallback/
-> OAuth protected, requires scope, granted to SaaS Registry
https://customer1-muteterouter.sapcloud/muteteUI.html
-> OAuth protected, no scope
https://muteteapp.sap.com/createjob
-> OAuth protected, requires scope, role must be assigned to user
https://muteteapp.sap.com/action
-> OAuth protected, requires scope, granted to Jobscheduler
Basically, the job creation functionality is hidden from the user.
We don’t have any dynamic user interface, which would allow us to really hide the job creation from user
Thus, we can only rely on a sort of job-admin role:
Normal users don’t have that role, such that they cannot create a job.
Our multitenant application consists of 2 modules, or 2 applications.
One is used to represent the frontend or user interface, the other one is the backend or server app.
The project structure is very much the same like in previous tutorial, we’re only adding a folder and a file for our static web application
We paste the file content which can be found in the Appendix section.
Don't forget to adapt the appid and URLs.
The goal is to provide a user interface which is modelled outside of the backend application (other than we did previously, for reasons of simplicity).
Being separated from the backend or core application, the UI is accessed with tenant-specific URL, but calls the backend-endpoints in non-tenant-specific manner.
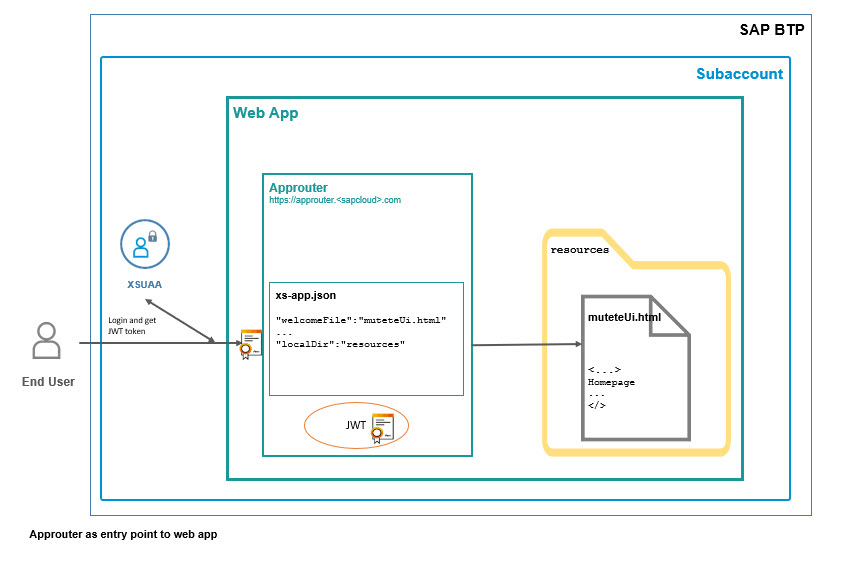
As usual, the web app uses an embedded approuter (muteterouter).
The approuter is the main entry point to the application
In addition, it provides routes which are used to call the endpoints of the backend application (muteteapp).
The flow
Let’s have a look at the flow in detail.
Note:
For the sake of simplicity, I’m shortening the example URLs.
Please let me use just sapcloud instead of ...cfapps.eu10.hana.ondemand.com
When the MT app is subscribed by a tenant, the callback in the backend app (muteteapp) composes the main entry URL.
It points to the tenant-specific URL of the approuter:
https://customer1-muteterouter.sapcloud
Means, the end-user accesses our MT application via the root URL of our approuter.
Approuter has a configured welcome-file, to which it forwards the call.
However, the homepage is configured to require authentication.
This means that, before actually forwarding the user to the welcome-file, the approuter performs the OAuth flow.
First of all, a (tenant-specific) login screen is displayed.
After correct login, the configured welcome-file is opened.
In our example:
https://customer1-muteterouter.sapcloud/muteteUi.html
Typically, the welcome-file is a default index.html file.
However, as usual, I like to make things more explicit, so I've named it muteteUi.html.
Also, a default configuration tells approuter where that file is located (localDir)
In our case, that html file is already the whole UI.
Our homepage offers a button which is used to create a job.
To create a job, the respective endpoint of our backend-application (muteteapp) is called.
The html page uses ajax to call the "/createjob" endpoint.
However, it doesn’t call it directly.
It uses a route, specified in approuter.
Concrete:
The UI calls the following URI:
.../route-me-to/createjob
Example:
https://customer1-muteterouter.sapcloud/route-me-to/createjob
Approuter will replace that URL with the configured target (found in destination)
...targetapp/createjob
Example:
https://muteteapp.sapcloud/createjob
What about security?
When opening the homepage, the user was required to log in.
Approuter has done the OAuth flow and it keeps the JWT token in a session.
When a route is called, approuter can forward the JWT token (if configured).
Like that, the "/createjob" endpoint receives a valid token.
The "/createjob" endpoint uses the forwarded JWT to do a token exchange.
Like that, the job can be generated.
The Job is configured to call the the "/action" endpoint of the backend application (muteteapp).
Jobscheduler calls the endpoint directly, no approuter in between.
The endpoint is protected with Oauth and scope.
This scope is assigned to Jobscheduler via the "grant" statement (see xs-security.json)
This has been a quick roundtrip of all involved URLs and requests.
Now let’s go ahead and view the code.
As mentioned, our user interface is just a small HTML page.
It contains little text and a button.
The button is bound to a javascript function.
That function is meant to call the "/createjob" endpoint via approuter.
We can see that only a relative URL is required for the "url" property.
The value is:
the name of the route (defined in approuter) followed by the original endpoint name (as exposed in backend app).
We don’t need to fetch a JWT token or whatever:
The token is forwarded by approuter.
After successful job creation, we need to somehow notify the UI.
We do so by adding a text element to the UI.
It displays the response of the endpoint (not important).
And that’s already all about the UI.
The relevant points were:
We have an independent UI application that requires login and uses the login-info to call an endpoint of the backend application.
The UI app is tenant-specific, and so is the JWT token.
The application router is a little piece of software that semantically belongs to the UI application and serves:
Approuter is an existing node module, it only needs to be downloaded and configured.
Download is done via the package.json:
Configuration is done in xs-app.json:
Short explanation:
welcomeFile
When the user opens the root URL of approuter, then the approuter will automatically forward the call to the welcome file.
e.g.
In the browser we type
https:// muteterouter.sapcloud
and approuter will extend to
https:// muteterouter.sapcloud/muteteUi.html
This is practical, so the user doesn’t need to care about URLs, he just opens the application.
localDir
Next question is: where does approuter find the welcome file?
The answer: approuter uses a route.
Approuter is designed to serve static files, as such it uses a local folder, relative to the xs-app.json file, to find the static files.
e.g.
We type
https:// muteterouter.sapcloud
then approuter goes to folder
c:\mutete\resources
and finds and opens the file
c:\mutete\resources/muteteUi.html
(of course, the C:\ directory is only an example, it doesn’t exist on the cloud)
Note:
My sample xs-app.json file is longer than actually necessary.
There are default settings which I'm not using, for the sake of clarity:
The default local dir is actually exactly the same as the second route.
authenticationMethod is route as per default.
authenticationType has default value xsuaa as per default.
welcomeFile has default: index.html
Note:
When using a welcome file, then we cannot use a route with root (/) as source.
Because this would overwrite the default which is added implicitly by approuter:
{
“source”: “^/(.*)$”,
“localDir”: “resources”
}
Now let's see how approuter is used in our scenario.
There are 2 flows:
Opening the app and pressing the button.
Flow 1: User opens the app
Yes, in fact: opening the app is already a flow 😉
As already mentioned, the user opens the root URL of approuter:
https:// muteterouter.sapcloud/
Approuter will use the localDir-route to open the welcomeFile.
However, we’ve configured the authenticationType of the route as xsuaa.
As such, approuter won’t open the muteteUI.html file until the user has successfully logged in.
To do the login, approuter has implemented the OAuth flow “authorization code”.
Summarizing, it means that approuter offers a redirect-endpoint which is called by the XSUAA (authorization server) to send the authorization code, which is afterwards exchanged for a JWT token.
To do so, the approuter app needs to be bound to an instance of xsuaa.
Note:
Approuter is able to perform authorization checks.
Means, we can specify a scope (on the route) which would be checked statically by approuter.
But we’re keeping the approuter config simple, so we skipped this option.
After successful login, approuter opens the html file and keeps the JWT token in a session.
Flow 2: User clicks on button
When the user clicks on the button on the UI, then the app fires a request to an HTTP endpoint.
More concrete:
The request goes to the approuter.
It uses a route.
The route specifies that xsuaa authentication is necessary.
The route specifies which destination to use.
Approuter looks into the destination.
Approuter composes the final target URL.
Approuter forwards the JWT token as specified in the destination.
Basically, there are no changes to our good old mutete app which we've been using during the series of tutorials.
We still have the callbacks for the SaaS registration.
We still have the endpoints for creation of job and for execution of action.
We don’t have an "/app" endpoint (representing the homepage) anymore, because we have our dedicated UI as separate app.
We have additional OAuth protection (but nothing new).
And for today, we’re ignoring the old requirement of avoiding third party libraries.
Most visible change: we require that the end-user has a role assigned (see chapter 2).
Let’s have a look at a few details.
xs-security.json
Today we want to protect all endpoints and startpoints of our app.
For that, we define 3 scopes:
- SaaS callbacks:
The callbacks are only called by SaaS registry during subscription of a tenant.
We should protect these endpoints, such that they can’t be invoked by any unwanted user.
It is necessary to "grant" this scope to the SaaS registry service.
- action endpoint
As already done earlier, the action endpoint is meant to be called by Jobscheduler only.
As such it requires a scope that has to be sent by Jobscheduler (and granted)
- createjob endpoint
As of our app design, creation of jobs is done when clicking on a button.
We want to ensure that only a user that has a certain role, should be allowed to create jobs.
As such, we define a scope that is used to protect this endpoint.
In addition, we wrap this scope in a role template.
Like this, we can assign this scope to a user.
See here for syntax of xs-security.json file.
server.js
This file is getting smaller in todays app version, because we’ve removed the UI part and we’re using helper libs.
Environment variables
We’re using the little helper module @Sap/xsenv for parsing the environment variables
The getServices() function uses the given filters (tag equals xsuaa) to find the desired service bindings.
It stores the results in the mentioned properties (myXsuaa and myJobscheduler).
To make clear that these property names are chosen by us, I’ve used these silly names.
MT callbacks
These endpoints are protected with OAuth and the code makes sure that the scope mutetexsappname1234.scopeforsaas is present in the JWT token.
This is the scope which we declared in the xs-security.json file, and granted to the SaaS registry service.
Action endpoint
Here we have same protection, with different scope.
Create job
In case of "/createjob" endpoint, we use the same code for protection (different scope).
Reminder:
This endpoint is invoked with a user token.
Means, the end-user logs into the frontend application and the JWT token is then forwarded to the "/createjob" endpoint, where it is used for token exchange.
The end-user needs to assign the role muteteRole to his user (see next chapter), otherwise the scope check will fail.
Next snippet shows the helper function for job creation which uses the client library offered by Jobscheduler.
It saves us from the need of firing the REST call.
Note:
Please note the special constructor which allows to pass an existing JWT token.
Note:
The createJob() function requires a special structure for the JSON object which is passed as options.
It must have the job property as root element.
After deploying our sample app (with adapted URLs) we can login into the customer subaccount and subscribe to the application.
However, we cannot “Go to application”, because we don’t have the required role yet.
Upps?
Forgot that we protected our app against malicious users…?
Role
To avoid confusion:
We declared a scope and a role template in the security descriptor of our multitenant application.
We deployed this app to our provider account.
Right after deployment, this scope gets visible as “Role” in the cockpit.
But only in the provider subaccount.
However, we use the application from the perspective of a customer (tenant).
When we open the customer subaccount, that new role is not visible.
That makes sense:
It is only visible after we subscribe to the app.
Assign role to customer or user of customer account
OK.
So after subscribing to the app the role gets visible in the customer account.
Now we can do the 3 required steps:
1. Create Role Collection
To create a role collection, press the + button and enter a suitable name.
Then select the role collection and press the “Edit” button above.
2. Add Role to Role Collection.
Search for role name muteteRole, enable the checkbutton and press Add.
3. Assign Role Collection to User
Enter your user into the ID field and select it from suggestion.
Press Save above.
Afterwards our user is allowed to create jobs.
If your mutete app is already open, you need to sign out and sign in again (sorry, we don’t have logout in our app).
User Interface
Finally, we can enjoy our application.
After login, we can press the button and new jobs are generated and we see the information in the UI.
Of course, we can check as well the Jobscheduler dashboard and the run log of the action endpoint job.
This blog post has given an example of how a multitenant application can be written, to work together with Jobscheduler.
In this example, the UI is accessed with JWT token which is used to generate a job.
Endpoints for job creation and execution are located on provider app, i.e. not tenant-specific.
Introduction to Job Scheduler in different multitenancy scenarios
Previous tutorial (no 5) introcucing approuter
Jobscheduler client library for node,js on npmjs and documentation.
Helper lib for reading environment variables from service bindings (xsenv).
Security client library xssec.
Approuter on npmjs including documentation.
Syntax of xs-security.json
See overview blog post for more links.
Note: everything can be copy&pasted, only the property appId and app URLs need to be adapted
xs-security.json
config-saasreg.json
manifest.yml
package.json
xs-app.json
muteteUi.html
package.json
server.js
This blog post is part of a series that intends to show in an easy step-by-step way how to use the SAP Job Scheduling Service running on SAP Business Technology Platform (aka SAP Cloud Platform).
In the current sub-series of the series, we're trying to shed some light into the dark multi tenant space of multi confusancy.
Quicklinks:
Intro Blog Post
Sample Code
Content
0. Intro
1. Create MT application1.0. create project
1.1. Frontend app
1.1.1. User Interface
1.1.2. Approuter
1.2. Backend app
2. Run the scenario
Appendix Sample code
0. Intro
Today we’re building a sample application that contains a little bit of everything:
Frontend app with silly UI and approuter.
Backend app with protected endpoints.
There’s nothing new to discuss, we’re only putting everything together which has been introduced earlier.
Scenario
Today’s scenario represents use case 3, where the endpoints are not tenant-specific. Which means that the end-user shouldn’t know anything about jobs and action endpoints.
We’re representing this scenario by defining non-tenant-specific endpoints.
However, in our sample, we cannot hide the job creation, because that would require additional effort in the UI, which we want to keep simple.
As such, please ignore the create-button, even if you click on it.

The diagram shows that the tenant-specific enduser accesses the web application via the tenant-specific approuter URL.
The web app calls the "/createjob endpoint of the provider app, not tenant-specific.
Finally, Jobscheduler calls the "/action" endpoint of the provider app, not tenant-specific.
Note:
For the sake of simplicity, I’m shortening the example URLs.
Please let me use just sapcloud instead of ...cfapps.eu10.hana.ondemand.com
Functionality
- Frontend: a very basic html page represents the user interface.
- Frontend: approuter used as main entry point and for authentication.
- Backend: endpoint for creating jobs.
- Backend: endpoint for action to be invoked by Jobscheduler.
Security
- To allow subscription to the app, the callback requires a scope, which is granted only to SaaS Registry service.
- To access the app UI, the user needs to authenticate, but no dedicated scope is required.
- To access the "/createjob"-endpoint, a scope is required. It needs to be assigned to the tenant-specific user as “role”.
- To invoke the action endpoint, a scope is required, which is granted only to Jobscheduler instance
With other words:
https://muteteapp.sap.com/mtcallback/
-> OAuth protected, requires scope, granted to SaaS Registry
https://customer1-muteterouter.sapcloud/muteteUI.html
-> OAuth protected, no scope
https://muteteapp.sap.com/createjob
-> OAuth protected, requires scope, role must be assigned to user
https://muteteapp.sap.com/action
-> OAuth protected, requires scope, granted to Jobscheduler
Basically, the job creation functionality is hidden from the user.
We don’t have any dynamic user interface, which would allow us to really hide the job creation from user
Thus, we can only rely on a sort of job-admin role:
Normal users don’t have that role, such that they cannot create a job.
1. Create Multitenant Application
Our multitenant application consists of 2 modules, or 2 applications.
One is used to represent the frontend or user interface, the other one is the backend or server app.
The project structure is very much the same like in previous tutorial, we’re only adding a folder and a file for our static web application
1.0. Create Project
We paste the file content which can be found in the Appendix section.
Don't forget to adapt the appid and URLs.

1.1. Frontend app
The goal is to provide a user interface which is modelled outside of the backend application (other than we did previously, for reasons of simplicity).
Being separated from the backend or core application, the UI is accessed with tenant-specific URL, but calls the backend-endpoints in non-tenant-specific manner.
As usual, the web app uses an embedded approuter (muteterouter).
The approuter is the main entry point to the application
In addition, it provides routes which are used to call the endpoints of the backend application (muteteapp).
The flow
Let’s have a look at the flow in detail.
Note:
For the sake of simplicity, I’m shortening the example URLs.
Please let me use just sapcloud instead of ...cfapps.eu10.hana.ondemand.com
When the MT app is subscribed by a tenant, the callback in the backend app (muteteapp) composes the main entry URL.
It points to the tenant-specific URL of the approuter:
https://customer1-muteterouter.sapcloud
Means, the end-user accesses our MT application via the root URL of our approuter.
Approuter has a configured welcome-file, to which it forwards the call.
However, the homepage is configured to require authentication.
This means that, before actually forwarding the user to the welcome-file, the approuter performs the OAuth flow.
First of all, a (tenant-specific) login screen is displayed.
After correct login, the configured welcome-file is opened.
In our example:
https://customer1-muteterouter.sapcloud/muteteUi.html
Typically, the welcome-file is a default index.html file.
However, as usual, I like to make things more explicit, so I've named it muteteUi.html.
Also, a default configuration tells approuter where that file is located (localDir)
In our case, that html file is already the whole UI.
Our homepage offers a button which is used to create a job.
To create a job, the respective endpoint of our backend-application (muteteapp) is called.
The html page uses ajax to call the "/createjob" endpoint.
However, it doesn’t call it directly.
It uses a route, specified in approuter.
Concrete:
The UI calls the following URI:
.../route-me-to/createjob
Example:
https://customer1-muteterouter.sapcloud/route-me-to/createjob
Approuter will replace that URL with the configured target (found in destination)
...targetapp/createjob
Example:
https://muteteapp.sapcloud/createjob
What about security?
When opening the homepage, the user was required to log in.
Approuter has done the OAuth flow and it keeps the JWT token in a session.
When a route is called, approuter can forward the JWT token (if configured).
Like that, the "/createjob" endpoint receives a valid token.
The "/createjob" endpoint uses the forwarded JWT to do a token exchange.
Like that, the job can be generated.
The Job is configured to call the the "/action" endpoint of the backend application (muteteapp).
Jobscheduler calls the endpoint directly, no approuter in between.
The endpoint is protected with Oauth and scope.
This scope is assigned to Jobscheduler via the "grant" statement (see xs-security.json)
This has been a quick roundtrip of all involved URLs and requests.
Now let’s go ahead and view the code.
1.1.1. User Interface
As mentioned, our user interface is just a small HTML page.
<body>

    <h1>Homepage</h1>

    <h3>List of Products</h3>

    <p>... </p>

    <p><button type=”button” onclick=”callCreateJob()”>Create Job</button></p>

</body>
It contains little text and a button.
The button is bound to a javascript function.
That function is meant to call the "/createjob" endpoint via approuter.
function callCreateJob(){

  $.ajax({

    url: `/route-me-to/createjob`,

    success: function(data){

        const p = document.createElement("P")

        p.appendChild(document.createTextNode("-> Received response: " + data))

        document.body.appendChild(p)

    }

  })

}
We can see that only a relative URL is required for the "url" property.
The value is:
the name of the route (defined in approuter) followed by the original endpoint name (as exposed in backend app).
We don’t need to fetch a JWT token or whatever:
The token is forwarded by approuter.
After successful job creation, we need to somehow notify the UI.
We do so by adding a text element to the UI.
It displays the response of the endpoint (not important).
And that’s already all about the UI.
The relevant points were:
We have an independent UI application that requires login and uses the login-info to call an endpoint of the backend application.
The UI app is tenant-specific, and so is the JWT token.
1.1.2. Approuter
The application router is a little piece of software that semantically belongs to the UI application and serves:
- as main single entry point to the UI-app
- as handler for user-login (JWT token)
- as middleware for outgoing calls
Approuter is an existing node module, it only needs to be downloaded and configured.
Download is done via the package.json:
{

    "dependencies": {

        "@sap/approuter": "latest"

    },

    "scripts": {

        "start": "node node_modules/@sap/approuter/approuter.js"
Configuration is done in xs-app.json:
{

  "welcomeFile": "muteteUi.html",

  "authenticationMethod": "route",

    "routes": [

      {

        "source": "^/route-me-to/(.*)$",

        "target": "$1",

        "destination": "destination_mutete",

        "authenticationType": "xsuaa"

      },

      {

        "source": "^/(.*)$",

        "localDir": "resources",

        "authenticationType": "xsuaa"

      }
Short explanation:
welcomeFile
When the user opens the root URL of approuter, then the approuter will automatically forward the call to the welcome file.
e.g.
In the browser we type
https:// muteterouter.sapcloud
and approuter will extend to
https:// muteterouter.sapcloud/muteteUi.html
This is practical, so the user doesn’t need to care about URLs, he just opens the application.
localDir
Next question is: where does approuter find the welcome file?
The answer: approuter uses a route.
Approuter is designed to serve static files, as such it uses a local folder, relative to the xs-app.json file, to find the static files.
e.g.
We type
https:// muteterouter.sapcloud
then approuter goes to folder
c:\mutete\resources
and finds and opens the file
c:\mutete\resources/muteteUi.html
(of course, the C:\ directory is only an example, it doesn’t exist on the cloud)
Note:
My sample xs-app.json file is longer than actually necessary.
There are default settings which I'm not using, for the sake of clarity:
The default local dir is actually exactly the same as the second route.
authenticationMethod is route as per default.
authenticationType has default value xsuaa as per default.
welcomeFile has default: index.html
Note:
When using a welcome file, then we cannot use a route with root (/) as source.
Because this would overwrite the default which is added implicitly by approuter:
{
“source”: “^/(.*)$”,
“localDir”: “resources”
}
Now let's see how approuter is used in our scenario.
There are 2 flows:
Opening the app and pressing the button.
Flow 1: User opens the app
Yes, in fact: opening the app is already a flow 😉
As already mentioned, the user opens the root URL of approuter:
https:// muteterouter.sapcloud/
Approuter will use the localDir-route to open the welcomeFile.
However, we’ve configured the authenticationType of the route as xsuaa.
As such, approuter won’t open the muteteUI.html file until the user has successfully logged in.
To do the login, approuter has implemented the OAuth flow “authorization code”.
Summarizing, it means that approuter offers a redirect-endpoint which is called by the XSUAA (authorization server) to send the authorization code, which is afterwards exchanged for a JWT token.
To do so, the approuter app needs to be bound to an instance of xsuaa.
Note:
Approuter is able to perform authorization checks.
Means, we can specify a scope (on the route) which would be checked statically by approuter.
But we’re keeping the approuter config simple, so we skipped this option.
After successful login, approuter opens the html file and keeps the JWT token in a session.
Flow 2: User clicks on button
When the user clicks on the button on the UI, then the app fires a request to an HTTP endpoint.
More concrete:
The request goes to the approuter.
It uses a route.
The route specifies that xsuaa authentication is necessary.
The route specifies which destination to use.
Approuter looks into the destination.
Approuter composes the final target URL.
Approuter forwards the JWT token as specified in the destination.

1.2. Backend app
Basically, there are no changes to our good old mutete app which we've been using during the series of tutorials.
We still have the callbacks for the SaaS registration.
We still have the endpoints for creation of job and for execution of action.
We don’t have an "/app" endpoint (representing the homepage) anymore, because we have our dedicated UI as separate app.
We have additional OAuth protection (but nothing new).
And for today, we’re ignoring the old requirement of avoiding third party libraries.
Most visible change: we require that the end-user has a role assigned (see chapter 2).
Let’s have a look at a few details.
xs-security.json
Today we want to protect all endpoints and startpoints of our app.
For that, we define 3 scopes:
- SaaS callbacks:
The callbacks are only called by SaaS registry during subscription of a tenant.
We should protect these endpoints, such that they can’t be invoked by any unwanted user.
It is necessary to "grant" this scope to the SaaS registry service.
- action endpoint
As already done earlier, the action endpoint is meant to be called by Jobscheduler only.
As such it requires a scope that has to be sent by Jobscheduler (and granted)
- createjob endpoint
As of our app design, creation of jobs is done when clicking on a button.
We want to ensure that only a user that has a certain role, should be allowed to create jobs.
As such, we define a scope that is used to protect this endpoint.
In addition, we wrap this scope in a role template.
Like this, we can assign this scope to a user.
{

    "xsappname": "mutetexsappname",

    "tenant-mode": "shared",

    "scopes": [

        {

            "name": "$XSAPPNAME.scopeforaction",

            "description": "Scope required by action endpoint",

            "grant-as-authority-to-apps": ["$XSSERVICENAME(myJobschedulerInstance)"]

        },

        {

            "name": "$XSAPPNAME.scopeforcreatejob",

            "description": "Scope required by createjob endpoint"

        },

        {

            "name": "$XSAPPNAME.scopeforsaas",

            "description": "Scope required by subscription callbacks",

            "grant-as-authority-to-apps": [

                "$XSAPPNAME(application,sap-provisioning,tenant-onboarding)"

            ]

        }

    ],

    "role-templates": [{

        "name": "muteteRole",

        "description": "Role for mutete users, allows to create jobs",

        "scope-references": ["$XSAPPNAME.scopeforcreatejob", "uaa.user"]

    }]

}
See here for syntax of xs-security.json file.
server.js
This file is getting smaller in todays app version, because we’ve removed the UI part and we’re using helper libs.
Environment variables
We’re using the little helper module @Sap/xsenv for parsing the environment variables
const xsenv = require('@sap/xsenv')

const myServiceBindings = xsenv.getServices({

   myJobscheduler: {tag: 'jobscheduler'},

   myXsuaa: {tag: 'xsuaa'}

})
The getServices() function uses the given filters (tag equals xsuaa) to find the desired service bindings.
It stores the results in the mentioned properties (myXsuaa and myJobscheduler).
To make clear that these property names are chosen by us, I’ve used these silly names.
MT callbacks
These endpoints are protected with OAuth and the code makes sure that the scope mutetexsappname1234.scopeforsaas is present in the JWT token.
This is the scope which we declared in the xs-security.json file, and granted to the SaaS registry service.
 app.put('/mtcallback/:tenant_id', passport.authenticate('JWT', {session: false}), (req, res) => {

   if (!req.authInfo.checkScope(UAA_CREDENTIALS.xsappname + '.scopeforsaas')) {

      res.status(403).end('Forbidden')

   }else{

      . . .
Action endpoint
Here we have same protection, with different scope.
app.get('/action', passport.authenticate('JWT', {session: false}), (req, res) => {

   if (!req.authInfo.checkScope(UAA_CREDENTIALS.xsappname + '.scopeforaction')) {
Create job
In case of "/createjob" endpoint, we use the same code for protection (different scope).
Reminder:
This endpoint is invoked with a user token.
Means, the end-user logs into the frontend application and the JWT token is then forwarded to the "/createjob" endpoint, where it is used for token exchange.
The end-user needs to assign the role muteteRole to his user (see next chapter), otherwise the scope check will fail.
app.get('/createjob',  passport.authenticate('JWT', {session: false}), async (req, res) => {

   const authInfo = req.authInfo

   if (! authInfo.checkScope(UAA_CREDENTIALS.xsappname + '.scopeforcreatejob')) {
Next snippet shows the helper function for job creation which uses the client library offered by Jobscheduler.
It saves us from the need of firing the REST call.
Note:
Please note the special constructor which allows to pass an existing JWT token.
Note:
The createJob() function requires a special structure for the JSON object which is passed as options.
It must have the job property as root element.
const scheduler = new jobschedulerClient.Scheduler({token: jwtToken})

var options = {

   job: {

      name: `MuteteJob_${new Date().getMilliseconds()}`,

      action: `https://${APP_URI}/action`,

      active: true,

      httpMethod: 'GET',

      schedules: [{

         time: 'now',

         active: 'true'

      }]

   }

}


scheduler.createJob(options, function (error, body) {

   resolve({jobName: body.name,

            jobID: body._id

   })

})
2. Run the Scenario
After deploying our sample app (with adapted URLs) we can login into the customer subaccount and subscribe to the application.
However, we cannot “Go to application”, because we don’t have the required role yet.
Upps?
Forgot that we protected our app against malicious users…?
Role
To avoid confusion:
We declared a scope and a role template in the security descriptor of our multitenant application.
We deployed this app to our provider account.
Right after deployment, this scope gets visible as “Role” in the cockpit.
But only in the provider subaccount.

However, we use the application from the perspective of a customer (tenant).
When we open the customer subaccount, that new role is not visible.
That makes sense:
It is only visible after we subscribe to the app.
Assign role to customer or user of customer account
OK.
So after subscribing to the app the role gets visible in the customer account.
Now we can do the 3 required steps:
1. Create Role Collection
To create a role collection, press the + button and enter a suitable name.

Then select the role collection and press the “Edit” button above.
2. Add Role to Role Collection.
Search for role name muteteRole, enable the checkbutton and press Add.
3. Assign Role Collection to User
Enter your user into the ID field and select it from suggestion.
Press Save above.

Afterwards our user is allowed to create jobs.
If your mutete app is already open, you need to sign out and sign in again (sorry, we don’t have logout in our app).
User Interface
Finally, we can enjoy our application.
After login, we can press the button and new jobs are generated and we see the information in the UI.

Of course, we can check as well the Jobscheduler dashboard and the run log of the action endpoint job.
Summary
This blog post has given an example of how a multitenant application can be written, to work together with Jobscheduler.
In this example, the UI is accessed with JWT token which is used to generate a job.
Endpoints for job creation and execution are located on provider app, i.e. not tenant-specific.
Links
Introduction to Job Scheduler in different multitenancy scenarios
Previous tutorial (no 5) introcucing approuter
Jobscheduler client library for node,js on npmjs and documentation.
Helper lib for reading environment variables from service bindings (xsenv).
Security client library xssec.
Approuter on npmjs including documentation.
Syntax of xs-security.json
See overview blog post for more links.
Appendix 3: All Sample Project Files
Note: everything can be copy&pasted, only the property appId and app URLs need to be adapted

Root folder
xs-security.json
{

    "xsappname": "mutetexsappname",

    "tenant-mode": "shared",

    "scopes": [

        {

            "name": "$XSAPPNAME.scopeforaction",

            "description": "Scope required by action endpoint",

            "grant-as-authority-to-apps": ["$XSSERVICENAME(myJobschedulerInstance)"]

        },

        {

            "name": "$XSAPPNAME.scopeforcreatejob",

            "description": "Scope required by createjob endpoint"

        },

        {

            "name": "$XSAPPNAME.scopeforsaas",

            "description": "Scope required by subscription callbacks",

            "grant-as-authority-to-apps": [

                "$XSAPPNAME(application,sap-provisioning,tenant-onboarding)"

            ]

        }

    ],

    "role-templates": [{

        "name": "muteteRole",

        "description": "Role for mutete users, allows to create jobs",

        "scope-references": ["$XSAPPNAME.scopeforcreatejob", "uaa.user"]

    }]

}
config-saasreg.json
{

  "appId": "mutetexsappname!t17916",

  "appName": "muteteSaasregAppname",

  "appUrls": {

    "getDependencies" : "https://muteteapp.cfapps.sap.hana.ondemand.com/mtcallback/dependencies",

    "onSubscription" : "https://muteteapp.cfapps.sap.hana.ondemand.com/mtcallback/{tenantId}"

  },

  "displayName": "MUTETE with Approuter and Jobscheduler"

}
manifest.yml
---

applications:

  - name: muteteapp

    path: app

    routes:

    - route: muteteapp.cfapps.sap.hana.ondemand.com

    services:

      - muteteXsuaa

      - muteteSaasreg

      - myJobschedulerInstance

  - name: muteterouter

    routes:

    - route: muteterouter.cfapps.sap.hana.ondemand.com

    - route: jobschedulertest-muteterouter.cfapps.sap.hana.ondemand.com

    - route: d038368-muteterouter.cfapps.sap.hana.ondemand.com

    path: approuter

    buildpack: nodejs_buildpack

    env:

      destinations: >

        [

          {

            "name":"destination_mutete",

            "url":"https://muteteapp.cfapps.sap.hana.ondemand.com",

            "forwardAuthToken": true

          }

        ]

      TENANT_HOST_PATTERN: "^(.*)-muteterouter.cfapps.sap.hana.ondemand.com"

    services:

      - muteteXsuaa
Frontend folder
package.json
{

    "dependencies": {

        "@sap/approuter": "latest"

    },

    "scripts": {

        "start": "node node_modules/@sap/approuter/approuter.js"

    }

}
xs-app.json
{

  "welcomeFile": "muteteUi.html",

  "authenticationMethod": "route",

    "routes": [

      {

        "source": "^/route-me-to/(.*)$",

        "target": "$1",

        "destination": "destination_mutete",

        "authenticationType": "xsuaa"

      },

      {

        "source": "^/(.*)$",

        "localDir": "resources",

        "authenticationType": "xsuaa"

      }

    ]

}
muteteUi.html
<html>

  <head>

    <script src = "https://code.jquery.com/jquery-3.6.0.min.js"></script>

    <script>

      function callCreateJob(){

        $.ajax({

          url: `/route-me-to/createjob`,

          success: function(data){

              const p = document.createElement("P")

              p.appendChild(document.createTextNode("-> Received response: " + data))

              document.body.appendChild(p)

          }

        })

      }

    </script>

  </head>


  <body>

    <h1>Homepage</h1>

    <h3>List of Products</h3>

    <p>... </p>

    <p><button type="button" onclick="callCreateJob()">Create Job</button></p>

  </body>

</html>
Backend folder
package.json
{

    "dependencies": {

        "@sap/jobs-client": "latest",

        "@sap/xsenv": "latest",

        "@sap/xssec": "latest",

        "express": "^4.16.2",

        "passport": "^0.4.0"

    }

}
server.js
const xsenv = require('@sap/xsenv')

const myServiceBindings = xsenv.getServices({

   myJobscheduler: {tag: 'jobscheduler'},

   myXsuaa: {tag: 'xsuaa'}

})

const UAA_CREDENTIALS = myServiceBindings.myXsuaa

const JOB_CREDENTIALS = myServiceBindings.myJobscheduler

const VCAP_APP = JSON.parse(process.env.VCAP_APPLICATION)

const APP_URI = VCAP_APP.application_uris[0]


const jobschedulerClient = require('@sap/jobs-client')

const express = require('express')

const app = express()

app.use(express.json())

const passport = require('passport')

const xssec = require('@sap/xssec')

const JWTStrategy = xssec.JWTStrategy

passport.use('JWT', new JWTStrategy(UAA_CREDENTIALS))

app.use(passport.initialize())


/* App server */

app.listen(process.env.PORT, () => {})


/* App endpoints */


app.get('/createjob',  passport.authenticate('JWT', {session: false}), async (req, res) => {

   const authInfo = req.authInfo

   if (! authInfo.checkScope(UAA_CREDENTIALS.xsappname + '.scopeforcreatejob')) {

      res.status(403).end('Forbidden. Missing authorization for creating jobs.')

   }else{

      const exchangedToken = await doTokenExchange(authInfo.getAppToken(), authInfo.getSubdomain())// tenant-specific

      const result = await createJob(exchangedToken)

      res.send(`Job created for user ${authInfo.getGivenName()}:${JSON.stringify(result)}`)

   }

})


app.get('/action', passport.authenticate('JWT', {session: false}), (req, res) => {

   if (!req.authInfo.checkScope(UAA_CREDENTIALS.xsappname + '.scopeforaction')) {

      res.status(403).end('Forbidden')

   }else{

      res.send(`Job for tenant ${req.authInfo.getZoneId()} subdomain: ${req.authInfo.getSubdomain()}`)

   }

})


/* Multi Tenancy callbacks */


 app.put('/mtcallback/:tenant_id', passport.authenticate('JWT', {session: false}), (req, res) => {

   if (!req.authInfo.checkScope(UAA_CREDENTIALS.xsappname + '.scopeforsaas')) {

      res.status(403).end('Forbidden')

   }else{

      const appHost = req.hostname.replace('muteteapp','muteterouter')

      const subDomain = req.body.subscribedSubdomain

      const subscriberAppURL = `https://${subDomain}-${appHost}`

      res.status(200).send(subscriberAppURL)

   }

})


app.delete('/mtcallback/:tenant_id', passport.authenticate('JWT', {session: false}), (req, res) => {

   if (!req.authInfo.checkScope(UAA_CREDENTIALS.xsappname + '.scopeforsaas')) {

      res.status(403).end('Forbidden')

   }else{

      res.status(200).end('unsubscribed')

   }

})


app.get('/mtcallback/dependencies', passport.authenticate('JWT', {session: false}), (req, res) => {

   if (!req.authInfo.checkScope(UAA_CREDENTIALS.xsappname + '.scopeforsaas')) {

      res.status(403).end('Forbidden')

   }else{

      res.status(200).json([{'xsappname': JOB_CREDENTIALS.uaa.xsappname }])

   }

})


/* HELPER */


async function doTokenExchange (jwt, subdomain){

   return new Promise ((resolve, reject) => {

      xssec.requests.requestUserToken(jwt, JOB_CREDENTIALS.uaa, null, null, subdomain, null, (error, token)=>{

         resolve(token)

      })

   })

}


async function  createJob(jwtToken) {

   return new Promise ((resolve, reject) => {

      const scheduler = new jobschedulerClient.Scheduler({token: jwtToken})

      var options = {

         job: { // mandatory property, required by jobscheduler client lib

            name: `MuteteJob_${new Date().getMilliseconds()}`,

            action: `https://${APP_URI}/action`,

            active: true,

            httpMethod: 'GET',

            schedules: [{

               time: 'now',

               active: 'true'

            }]

         }

      }


      scheduler.createJob(options, function (error, body) {

         resolve({jobName: body.name,

                  jobID: body._id

         })

      })

   })

}
- SAP Managed Tags:
- SAP BTP, Cloud Foundry runtime and environment,
- SAP Business Technology Platform
Labels:
2 Comments
You must be a registered user to add a comment. If you've already registered, sign in. Otherwise, register and sign in.
Labels in this area
-
ABAP CDS Views - CDC (Change Data Capture)
2 -
AI
1 -
Analyze Workload Data
1 -
BTP
1 -
Business and IT Integration
2 -
Business application stu
1 -
Business Technology Platform
1 -
Business Trends
1,661 -
Business Trends
91 -
CAP
1 -
cf
1 -
Cloud Foundry
1 -
Confluent
1 -
Customer COE Basics and Fundamentals
1 -
Customer COE Latest and Greatest
3 -
Customer Data Browser app
1 -
Data Analysis Tool
1 -
data migration
1 -
data transfer
1 -
Datasphere
2 -
Event Information
1,400 -
Event Information
66 -
Expert
1 -
Expert Insights
178 -
Expert Insights
293 -
General
1 -
Google cloud
1 -
Google Next'24
1 -
Kafka
1 -
Life at SAP
784 -
Life at SAP
12 -
Migrate your Data App
1 -
MTA
1 -
Network Performance Analysis
1 -
NodeJS
1 -
PDF
1 -
POC
1 -
Product Updates
4,577 -
Product Updates
340 -
Replication Flow
1 -
RisewithSAP
1 -
SAP BTP
1 -
SAP BTP Cloud Foundry
1 -
SAP Cloud ALM
1 -
SAP Cloud Application Programming Model
1 -
SAP Datasphere
2 -
SAP S4HANA Cloud
1 -
SAP S4HANA Migration Cockpit
1 -
Technology Updates
6,886 -
Technology Updates
416 -
Workload Fluctuations
1
Related Content
- Now available: starter kit for genAI on SAP BTP in Technology Blogs by SAP
- Scheduled Report shows successful status; but Mail server never Receives... Where's the problem? in Technology Q&A
- How to use AI services to translate Picklists in SAP SuccessFactors - An example in Technology Blogs by SAP
- IoT - Ultimate Data Cyber Security - with Enterprise Blockchain and SAP BTP 🚀 in Technology Blogs by Members
- SAP Signavio is the highest ranked Leader in the SPARK Matrix™ Digital Twin of an Organization (DTO) in Technology Blogs by SAP
Top kudoed authors
| User | Count |
|---|---|
| 30 | |
| 23 | |
| 10 | |
| 7 | |
| 6 | |
| 6 | |
| 5 | |
| 5 | |
| 5 | |
| 4 |