
- SAP Community
- Products and Technology
- Technology
- Technology Blogs by SAP
- Using Job Scheduler in SAP Cloud Platform [12]: Mu...
Technology Blogs by SAP
Learn how to extend and personalize SAP applications. Follow the SAP technology blog for insights into SAP BTP, ABAP, SAP Analytics Cloud, SAP HANA, and more.
Turn on suggestions
Auto-suggest helps you quickly narrow down your search results by suggesting possible matches as you type.
Showing results for
Product and Topic Expert
Options
- Subscribe to RSS Feed
- Mark as New
- Mark as Read
- Bookmark
- Subscribe
- Printer Friendly Page
- Report Inappropriate Content
09-22-2021
1:28 PM
This blog post shows how to use approuter and Jobscheduler in a multitenant scenario.
This blog post is part of a series that intends to show in an easy step-by-step way how to use the SAP Job Scheduling Service (Jobscheduler) running on SAP Business Technology Platform (aka SAP Cloud Platform).
In the current sub-series of the series, we're trying to shed some light into the dark multi tenant space of multi confusancy.
0. Intro
1. Create MT application
2. Run the scenario
Appendix Sample code
Today we’re adding the Application Router to our sample application.
Today’s scenario represents use case 3, where the job creation is done under the hood and the endpoints are not tenant-specific.
Prerequisite for such scenario: user must login to the application, such that we can read the tenant-info from JWT token.
In the previous tutorial, we used hardcoded user/password, in order to fetch a user-token via resource-owner OAuth flow.
Today we can remove that workaround, we use approuter instead, which takes care to display a proper login screen.
And we learn how approuter supports multitenancy
As usual, the sample is as minimalistic as possible:
No real user interface.
Our approuter defines only one route.
We skip the createjob-endpoint.
Usually, we would call the createjob-endpoint from the UI-layer and use a route in approuter.
However, we leave this scenario for the next tutorial.
Again, today’s tutorial is a follow-up of previous blog posts and we only explain some new details.
Today we need chapter for project creation, because we need additional files for approuter.
In our project, we’re actually creating 2 applications, our mutete app and the (standalone) approuter.
We create the following files and folders:
C:\mutete
- config-saasreg.json
- manifest.yml
- xs-security.json
- C:\mutete\app
- package.json
- server.js
- C:\mutete\approuter
- package.json
- xs-app.json
The full code can be found in the Appendix section.
For your convenience, I give you a screenshot of my project:
In case you’ve never used an approuter, you can go through this blog post for beginners.
The typical setup would be:
A webapplication has an index.html file and more resources.
These are stored in a resource folder.
To protect the app and to handle OAuth flows, an approuter definition is embedded into the app folder.
The webapp is then accessed through the approuter URL which does the login and routes the user to the index.html file.
However, today we want to keep our project as simple as possible.
Therefore we skip the webapp.
We access our MT app through approuter-URL, but it routes to our minimalistic “homepage”, the main entry endpoint which we already know.
And this is the only route which we define.
Furthermore, we don't define a route to /action endpoint.
The /createjob endpoint is completely removed.
Why?
I believe:
less routes, less configuration, less code -> less confusion.
Next tutorial will be more complete and for today we can use the excuse:
anyways we wanted to hide the job creation from the user.
So now the user doesn’t see how the job is generated, because we automatically generate it when the homepage is loaded.
Doesn’t make sense, I know.
manifest.yml
Let’s have a look at the manifest file:
We can see that approuter is deployed as separate application.
We define a default route but also the subscriber route (which we already know, because it is our test-subaccount).
We have a binding to the same instance of XSUAA which we’re using for mutete.
And we define a destination which points to our mutete app (homepage endpoint).
This destination will be used by our route in the approuter configuration.
Important: the flag that indicates that the JWT token, which is issued during login, should be forwarded to this destination.
Note:
As you probably know, this quick way of creating a destination is useful for testing, but not the recommended way.
And we can see an environment variable, which is required by approuter:
Approuter is an application which runs in Cloud Foundry (usually embedded in a UI webapp).
As such, it is invoked via a route
https://muteteapprouter.cfapps.sap.com
In a multitenant scenario, the subscriber is added to the route:
https://<subdomain>-muteteapprouter.cfapps.sap.com
e.g.
https://customer1-muteteapprouter.cfapps.sap.com
To support multitenancy, approuter needs to know the subdomain.
As such, it extracts it from the URL.
However, developers can choose how to compose the URL of subscribers (it is coded in the saas-callback).
As such, we need to tell approuter, HOW we’ve composed the subscriber-URL.
And this is the reason, why approuter needs the tenant-host pattern.
It is just required to tell approuter WHERE in the URL we’ve put the subdomain.
In our example, we stick to the usual recommendation, we add the subdomain in the beginning of the normal app URL:
subdomain-muteteapprouter.cfapps……
e.g.
customer1subdomain-muteteapprouter.cfapps……
customer2subdomain-muteteapprouter.cfapps……
jobschedulertest-muteteapprouter.cfapps……
As such, we use the (usual) pattern:
^(.*)-muteteapprouter.cfapps.sap.hana.ondemand.com
Note:
Approuter needs to be bound to an instance of XSUAA, to handle the OAuth flow.
As soon as the xsuaa instance is configured with tenant-mode as “shared”, then the approuter requires that the env variable TENANT_HOST_PATTERN is set. Otherwise it throws an error on startup.
Furthermore, the value of this variable needs a capturing group.
Like this, approuter does as much as possible to enforce proper configuration to support multi tenancy.
package.json
In the approuter folder we can find the package.json file.
It takes care of downloading the existing approuter (node module) and starting it.
Such that after deploy, approuter will be loading the configuration and running.
Configuration
The configuration of approuter is done in the xs-app.json file.
Here we declare and configure the routes.
We have only one route, which we use to open the homepage.
As source property I’ve chosen a URL segment (/toapp/) which sounds stupid, but it makes clear that it is a route.
So whenever anybody opens the this approuter URL:
https://subdomain-muteteapprouter.sap.hana.ondemand.com/toapp/
Then the approuter will forward him to
https://mutete.cfapps.sap.hana.ondemand.com/app
(which is the value of the destination)
The config file also contains the security configuration.
In our snippet, we say that each route configures its own security setting.
In our route we choose xsuaa.
Note:
Both security settings are defaults and can be omitted.
However, I like to be explicit, so I’ve added both redundant lines.
What does approuter do?
Approuter supports multi tenancy in the following way:
It knows how to extract the tenant from the URL, so it can call the tenant-specific XSUAA to do the user-login.
It is similar to what we’ve been doing in the course of our tutorials.
The following screenshots give an idea of how approuter works:
It uses the pattern to retrieve the tenant from the URL.
Then it makes it available internally, via middleware:
After introducing the approuter in our multitenant application, there isn’t much left to explain in our mutete code.
config-saasreg.json
The multi tenancy configuration - as defined in the config-saasreg.json file, still points to our mutete app URL, not to the approuter.
The reason is simple: approuter URL is the main entry point for the application, but the SaaS registry needs to call the application which hosts all the code.
It is the mutete application which has the knowledge of all tenants and which would open a connection to a database in order to store tenant-specific data, etc
As such, the callback URLs remain the same.
manifest.yml
The mutete section of our manifest contains almost no changes.
Only note:
We don’t need tenant-specific URLs anymore for mutete (because of use case 3 scenario)
Note that only for approuter we declared tenant-specific route, as the main entry point to our app needs to be tenant-specific.
server.js
There's no new code in our server.js file, so let's just have a look at small differences.
Saas registry callbacks:
When we deploy our MT app to Cloud Foundry, 2 applications with routes will be created in our provider space.
Our mutete app, represents the "backend" or "core" app.
And approuter represents the "user interface" or "presentation" layer.
The mutete app is bound to the SaaS registry service instance.
After deploy, both apps are started, but nothing happens until a sweet customer subscribes to our app.
He subscribes to the backend mutete, because this one is bound to saas reg.
Mutete receives the call in the subscription callback.
So what happens now?
According to our setup, the main entry point to our MT application is the approuter.
As such, in the “create subscription” callback, we have to provide the approuter URL, with concatenated customer-subdomain (tenant-specific)
Note:
The URL which we provide, points to the approuter and a route (/toapp/)
Remember that this route will forward the call to the /app endpoint of our backend-mutete app (our homepage).
And remember that this route is configured with authentication type as xsuaa.
Note:
Don’t you agree that it is helpful when things are clearly named (toapp) and explicitly mentioned (authenticationType) in the code?
So when we see toapp we understand at first sight, no need to spend time with searching for endpoint, etc
Note:
The callback points to approuter, but usually approuter will host a webapp with own index.html file.
Instead of forwarding to /app, usually we would forward to the static html file.
Let’s try that in the next tutorial.
Note:
Usually, the callback endpoints would be protected with a scope.
That scope would need to be granted to the SaaS service.
We’re skipping this again, as our focus is not MT, it is Jobscheduler.
Homepage:
Today we can protect our /app endpoint with OAuth.
This has been made possible by adding approuter in front of the endpoint.
Like that, approuter will execute the OAuth flow called “Authorization Code”.
Resulting in a JWT token issued after proper user-login.
Two things we need to remember here:
1) In the subscription callback, we said that the main entry point is the approuter/toapp/ route.
The route is configured with authenticatonType: xsuaa
The target of the route is a destination which points to our mutete/app endpoint
2) The destination is configured with forwardToken: true
As a consequence, in our /app endpoint, we’re called with the JWT token of the user-login.
We can read the user info from the token and display it in our homepage:
Note:
We can see that we don’t need to retrieve the JWT token from the authorization header anymore.
Reason: we’re adding the “authenticate” middleware which uses the JWTStrategy of @Sap/xssec.
This adds the object authInfo to the request (if JWT token validation succeeds)
One more comment on the /app endpoint:
Today we’re doing the token exchange and the job creation directly in the /app endpoint.
That’s of course not nice, but enough for today’s tutorial.
Usually, we’d have an interaction in the UI. Then we’d call the /createjob endpoint.
We did that in previous tutorial in workaround-manner.
In next tutorial, we want to have small UI and use approuter calling /createjob with forwarded JWT token.
Note:
Again we’re skipping scope check here.
Note:
When looking at above code, we can see that we’re not relying on the URL anymore for retrieving the customer subdomain.
After deploying our sample app (with adapted URLs) we can login in the customer subaccount, subscribe and “Go to application”.
A login screen is displayed.
In my example, this is the login screen, where an identity provider has to be chosen:
After login, our homepage is opened.
Below screenshot shows it:
We can see that the user name is displayed and that the Browser shows the URL of the tenant-specific approuter with route.
And a job has been generated.
We go to the Jobscheduler dashboard to verify the job generation.
The dashboard shows that a tenant-specific job has been generated.
And the job has been executed successfully, which can be verified in the Run Logs.
Today we’ve created a basic example which contains approuter and jobscheduler in a multitenant scenario.
We’ve learned how approuter supports multi tenancy.
We’ve learned how to connect approuter to our mutete app.
In the next tutorial we’re going to try a more complete scenario, including webapp, routes, security.
Approuter in the multitenancy documentation.
Approuter documentation home.
Introduction to Job Scheduler in different multitenancy scenarios
The previous tutorial.
See overview blog post for more links.
Note: everything can be copy&pasted, only the property appId and app URLs need to be adapted
manifest.yml
xs-security.json
config-saasreg.json
Approuter
package.json
xs-app.json
mutete
package.json
server.js
This blog post is part of a series that intends to show in an easy step-by-step way how to use the SAP Job Scheduling Service (Jobscheduler) running on SAP Business Technology Platform (aka SAP Cloud Platform).
In the current sub-series of the series, we're trying to shed some light into the dark multi tenant space of multi confusancy.
Quicklinks:
Intro Blog
Sample Code
Content
0. Intro
1. Create MT application
2. Run the scenario
Appendix Sample code
0. Intro
Today we’re adding the Application Router to our sample application.
Today’s scenario represents use case 3, where the job creation is done under the hood and the endpoints are not tenant-specific.
Prerequisite for such scenario: user must login to the application, such that we can read the tenant-info from JWT token.
In the previous tutorial, we used hardcoded user/password, in order to fetch a user-token via resource-owner OAuth flow.
Today we can remove that workaround, we use approuter instead, which takes care to display a proper login screen.
And we learn how approuter supports multitenancy

As usual, the sample is as minimalistic as possible:
No real user interface.
Our approuter defines only one route.
We skip the createjob-endpoint.
Usually, we would call the createjob-endpoint from the UI-layer and use a route in approuter.
However, we leave this scenario for the next tutorial.
Again, today’s tutorial is a follow-up of previous blog posts and we only explain some new details.
1. Create Multitenant Application
Today we need chapter for project creation, because we need additional files for approuter.
1.0. Create Project
In our project, we’re actually creating 2 applications, our mutete app and the (standalone) approuter.
We create the following files and folders:
C:\mutete
- config-saasreg.json
- manifest.yml
- xs-security.json
- C:\mutete\app
- package.json
- server.js
- C:\mutete\approuter
- package.json
- xs-app.json
The full code can be found in the Appendix section.
For your convenience, I give you a screenshot of my project:

1.1. Approuter
In case you’ve never used an approuter, you can go through this blog post for beginners.
The typical setup would be:
A webapplication has an index.html file and more resources.
These are stored in a resource folder.
To protect the app and to handle OAuth flows, an approuter definition is embedded into the app folder.
The webapp is then accessed through the approuter URL which does the login and routes the user to the index.html file.
However, today we want to keep our project as simple as possible.
Therefore we skip the webapp.
We access our MT app through approuter-URL, but it routes to our minimalistic “homepage”, the main entry endpoint which we already know.
And this is the only route which we define.
Furthermore, we don't define a route to /action endpoint.
The /createjob endpoint is completely removed.
Why?
I believe:
less routes, less configuration, less code -> less confusion.
Next tutorial will be more complete and for today we can use the excuse:
anyways we wanted to hide the job creation from the user.
So now the user doesn’t see how the job is generated, because we automatically generate it when the homepage is loaded.
Doesn’t make sense, I know.
manifest.yml
Let’s have a look at the manifest file:
applications:

  - name: mutete

    . . .

    services:

      - muteteXsuaa

      - muteteSaasreg

      - myJobschedulerInstance

  - name: muteteapprouter

    routes:

    - route: muteteapprouter.cfapps.sap.hana.ondemand.com

    - route: jobschedulertest-muteteapprouter.cfapps.sap.hana.ondemand.com

    . . .

    env:

      destinations: >

        [

          {

            "name":"destination_mutete",

            "url":"https://mutete.cfapps.sap.hana.ondemand.com/app",

            "forwardAuthToken": true

          }

        ]

      TENANT_HOST_PATTERN: "^(.*)-muteteapprouter.cfapps.sap.hana.ondemand.com"

    services:

      - muteteXsuaa
We can see that approuter is deployed as separate application.
We define a default route but also the subscriber route (which we already know, because it is our test-subaccount).
We have a binding to the same instance of XSUAA which we’re using for mutete.
And we define a destination which points to our mutete app (homepage endpoint).
This destination will be used by our route in the approuter configuration.
Important: the flag that indicates that the JWT token, which is issued during login, should be forwarded to this destination.
Note:
As you probably know, this quick way of creating a destination is useful for testing, but not the recommended way.
And we can see an environment variable, which is required by approuter:
TENANT_HOST_PATTERN: "^(.*)-muteteapprouter.cfapps.sap.hana.ondemand.com"Approuter is an application which runs in Cloud Foundry (usually embedded in a UI webapp).
As such, it is invoked via a route
https://muteteapprouter.cfapps.sap.com
In a multitenant scenario, the subscriber is added to the route:
https://<subdomain>-muteteapprouter.cfapps.sap.com
e.g.
https://customer1-muteteapprouter.cfapps.sap.com
To support multitenancy, approuter needs to know the subdomain.
As such, it extracts it from the URL.
However, developers can choose how to compose the URL of subscribers (it is coded in the saas-callback).
As such, we need to tell approuter, HOW we’ve composed the subscriber-URL.
And this is the reason, why approuter needs the tenant-host pattern.
It is just required to tell approuter WHERE in the URL we’ve put the subdomain.
In our example, we stick to the usual recommendation, we add the subdomain in the beginning of the normal app URL:
subdomain-muteteapprouter.cfapps……
e.g.
customer1subdomain-muteteapprouter.cfapps……
customer2subdomain-muteteapprouter.cfapps……
jobschedulertest-muteteapprouter.cfapps……
As such, we use the (usual) pattern:
^(.*)-muteteapprouter.cfapps.sap.hana.ondemand.com
Note:
Approuter needs to be bound to an instance of XSUAA, to handle the OAuth flow.
As soon as the xsuaa instance is configured with tenant-mode as “shared”, then the approuter requires that the env variable TENANT_HOST_PATTERN is set. Otherwise it throws an error on startup.
Furthermore, the value of this variable needs a capturing group.
Like this, approuter does as much as possible to enforce proper configuration to support multi tenancy.
package.json
In the approuter folder we can find the package.json file.
    "dependencies": {

        "@sap/approuter": "latest"

    },

    "scripts": {

        "start": "node node_modules/@sap/approuter/approuter.js"
It takes care of downloading the existing approuter (node module) and starting it.
Such that after deploy, approuter will be loading the configuration and running.
Configuration
The configuration of approuter is done in the xs-app.json file.
Here we declare and configure the routes.
    "authenticationMethod": "route",

    "routes": [

        {

            "authenticationType": "xsuaa",

            "source": "^/toapp/(.*)$",

            "target": "$1",

            "destination": "destination_mutete"
We have only one route, which we use to open the homepage.
As source property I’ve chosen a URL segment (/toapp/) which sounds stupid, but it makes clear that it is a route.
So whenever anybody opens the this approuter URL:
https://subdomain-muteteapprouter.sap.hana.ondemand.com/toapp/
Then the approuter will forward him to
https://mutete.cfapps.sap.hana.ondemand.com/app
(which is the value of the destination)
The config file also contains the security configuration.
In our snippet, we say that each route configures its own security setting.
In our route we choose xsuaa.
Note:
Both security settings are defaults and can be omitted.
However, I like to be explicit, so I’ve added both redundant lines.
What does approuter do?
Approuter supports multi tenancy in the following way:
It knows how to extract the tenant from the URL, so it can call the tenant-specific XSUAA to do the user-login.
It is similar to what we’ve been doing in the course of our tutorials.
The following screenshots give an idea of how approuter works:

It uses the pattern to retrieve the tenant from the URL.
Then it makes it available internally, via middleware:

1.2. Mutete application
After introducing the approuter in our multitenant application, there isn’t much left to explain in our mutete code.
config-saasreg.json
The multi tenancy configuration - as defined in the config-saasreg.json file, still points to our mutete app URL, not to the approuter.
"appUrls": {

   "getDependencies" : https://mutete.cfapps.sap.hana.ondemand.com/mtcallback/dependencies,
The reason is simple: approuter URL is the main entry point for the application, but the SaaS registry needs to call the application which hosts all the code.
It is the mutete application which has the knowledge of all tenants and which would open a connection to a database in order to store tenant-specific data, etc
As such, the callback URLs remain the same.
manifest.yml
The mutete section of our manifest contains almost no changes.
Only note:
We don’t need tenant-specific URLs anymore for mutete (because of use case 3 scenario)
Note that only for approuter we declared tenant-specific route, as the main entry point to our app needs to be tenant-specific.
applications:

  - name: mutete

  . . .

    routes:

    - route: mutete.cfapps.sap.hana.ondemand.com
server.js
There's no new code in our server.js file, so let's just have a look at small differences.
Saas registry callbacks:
When we deploy our MT app to Cloud Foundry, 2 applications with routes will be created in our provider space.
Our mutete app, represents the "backend" or "core" app.
And approuter represents the "user interface" or "presentation" layer.
The mutete app is bound to the SaaS registry service instance.
After deploy, both apps are started, but nothing happens until a sweet customer subscribes to our app.
He subscribes to the backend mutete, because this one is bound to saas reg.
Mutete receives the call in the subscription callback.
So what happens now?
According to our setup, the main entry point to our MT application is the approuter.
As such, in the “create subscription” callback, we have to provide the approuter URL, with concatenated customer-subdomain (tenant-specific)
 app.put('/mtcallback/:tenant_id', (req, res) => {

   const appHost = req.hostname.replace('mutete','muteteapprouter')

   const subDomain = req.body.subscribedSubdomain

   const subscriberAppURL = `https://${subDomain}-${appHost}/toapp/`


   res.status(200).send(subscriberAppURL)
Note:
The URL which we provide, points to the approuter and a route (/toapp/)
Remember that this route will forward the call to the /app endpoint of our backend-mutete app (our homepage).
And remember that this route is configured with authentication type as xsuaa.
Note:
Don’t you agree that it is helpful when things are clearly named (toapp) and explicitly mentioned (authenticationType) in the code?
So when we see toapp we understand at first sight, no need to spend time with searching for endpoint, etc
Note:
The callback points to approuter, but usually approuter will host a webapp with own index.html file.
Instead of forwarding to /app, usually we would forward to the static html file.
Let’s try that in the next tutorial.
Note:
Usually, the callback endpoints would be protected with a scope.
That scope would need to be granted to the SaaS service.
We’re skipping this again, as our focus is not MT, it is Jobscheduler.
Homepage:
Today we can protect our /app endpoint with OAuth.
This has been made possible by adding approuter in front of the endpoint.
Like that, approuter will execute the OAuth flow called “Authorization Code”.
Resulting in a JWT token issued after proper user-login.
Two things we need to remember here:
1) In the subscription callback, we said that the main entry point is the approuter/toapp/ route.
The route is configured with authenticatonType: xsuaa
The target of the route is a destination which points to our mutete/app endpoint
2) The destination is configured with forwardToken: true
As a consequence, in our /app endpoint, we’re called with the JWT token of the user-login.
We can read the user info from the token and display it in our homepage:
app.get('/app', passport.authenticate('JWT', {session: false}), async function(req, res){

   const authInfo = req.authInfo

   . . .

   res.send(`<h1>Homepage</h1> Job created for user ${authInfo.getGivenName()} :<p>${JSON.stringify(result)}</p>`)
Note:
We can see that we don’t need to retrieve the JWT token from the authorization header anymore.
Reason: we’re adding the “authenticate” middleware which uses the JWTStrategy of @Sap/xssec.
This adds the object authInfo to the request (if JWT token validation succeeds)
One more comment on the /app endpoint:
app.get('/app', passport.authenticate('JWT', {session: false}), async function(req, res){

   const authInfo = req.authInfo

   const exchangedToken = await doTokenExchange(authInfo.getAppToken(), authInfo.getSubdomain())// tenant-specific

   const result = await createJob(exchangedToken)


   res.send(`<h1>Homepage</h1> Job created for user ${authInfo.getGivenName()} :<p>${JSON.stringify(result)}</p>`)
Today we’re doing the token exchange and the job creation directly in the /app endpoint.
That’s of course not nice, but enough for today’s tutorial.
Usually, we’d have an interaction in the UI. Then we’d call the /createjob endpoint.
We did that in previous tutorial in workaround-manner.
In next tutorial, we want to have small UI and use approuter calling /createjob with forwarded JWT token.
Note:
Again we’re skipping scope check here.
Note:
When looking at above code, we can see that we’re not relying on the URL anymore for retrieving the customer subdomain.
2. Run the Scenario
After deploying our sample app (with adapted URLs) we can login in the customer subaccount, subscribe and “Go to application”.
A login screen is displayed.
In my example, this is the login screen, where an identity provider has to be chosen:

After login, our homepage is opened.
Below screenshot shows it:

We can see that the user name is displayed and that the Browser shows the URL of the tenant-specific approuter with route.
And a job has been generated.
We go to the Jobscheduler dashboard to verify the job generation.
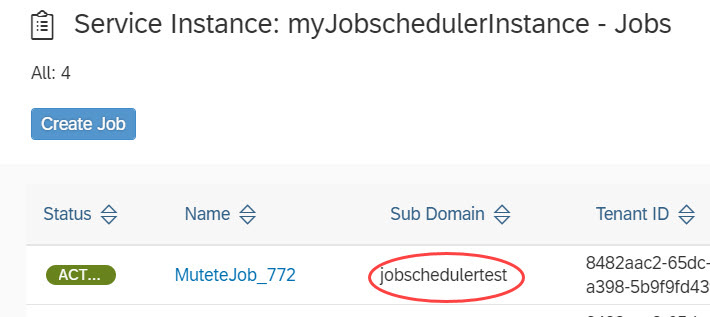
The dashboard shows that a tenant-specific job has been generated.
And the job has been executed successfully, which can be verified in the Run Logs.
Summary
Today we’ve created a basic example which contains approuter and jobscheduler in a multitenant scenario.
We’ve learned how approuter supports multi tenancy.
We’ve learned how to connect approuter to our mutete app.
Next Steps
In the next tutorial we’re going to try a more complete scenario, including webapp, routes, security.
Links
Approuter in the multitenancy documentation.
Approuter documentation home.
Introduction to Job Scheduler in different multitenancy scenarios
The previous tutorial.
See overview blog post for more links.
Appendix: All Sample Project Files
Note: everything can be copy&pasted, only the property appId and app URLs need to be adapted
manifest.yml
---

applications:

  - name: mutete

    path: app

    routes:

    - route: mutete.cfapps.sap.hana.ondemand.com

    memory: 128M

    services:

      - muteteXsuaa

      - muteteSaasreg

      - myJobschedulerInstance

  - name: muteteapprouter

    routes:

    - route: muteteapprouter.cfapps.sap.hana.ondemand.com

    - route: jobschedulertest-muteteapprouter.cfapps.sap.hana.ondemand.com

    path: approuter

    buildpack: nodejs_buildpack

    memory: 256M

    env:

      destinations: >

        [

          {

            "name":"destination_mutete",

            "url":"https://mutete.cfapps.sap.hana.ondemand.com/app",

            "forwardAuthToken": true

          }

        ]

      TENANT_HOST_PATTERN: "^(.*)-muteteapprouter.cfapps.sap.hana.ondemand.com"

    services:

      - muteteXsuaa
xs-security.json
{

    "xsappname": "mutetexsappname",

    "tenant-mode": "shared",

    "scopes": [

        {

            "name": "$XSAPPNAME.mutetescope",

            "description": "Scope required by mutete app endpoint",

            "grant-as-authority-to-apps": ["$XSSERVICENAME(myJobschedulerInstance)"]

        }

    ]

}
config-saasreg.json
{

  "appId": "mutetexsappname!t17916",

  "appName": "muteteSaasregAppname",

  "appUrls": {

    "getDependencies" : "https://mutete.cfapps.sap.hana.ondemand.com/mtcallback/dependencies",

    "onSubscription" : "https://mutete.cfapps.sap.hana.ondemand.com/mtcallback/{tenantId}"

  },

  "displayName": "MUTETE with Approuter and Jobscheduler"

}
Approuter
package.json
{

    "dependencies": {

        "@sap/approuter": "latest"

    },

    "scripts": {

        "start": "node node_modules/@sap/approuter/approuter.js"

    }

}
xs-app.json
{

    "authenticationMethod": "route",

    "routes": [

        {

            "authenticationType": "xsuaa",

            "source": "^/toapp/(.*)$",

            "target": "$1",

            "destination": "destination_mutete"

        }

    ]

}
mutete
package.json
{

    "dependencies": {

        "@sap/xssec": "^3.0.10",

        "passport": "^0.4.0",

        "express": "^4.16.2",

        "node-fetch": "2.6.2"

    }

}
server.js
const VCAP_SERVICES = JSON.parse(process.env.VCAP_SERVICES);

const UAA_CREDENTIALS = VCAP_SERVICES.xsuaa[0].credentials;

const JOB_CREDENTIALS = VCAP_SERVICES.jobscheduler[0].credentials;

const VCAP_APP = JSON.parse(process.env.VCAP_APPLICATION);

const APP_URI = VCAP_APP.application_uris[0];


const fetch = require('node-fetch')

const express = require('express')

const app = express()

app.use(express.json())

const passport = require('passport');

const xssec = require('@sap/xssec');

const JWTStrategy = xssec.JWTStrategy;

passport.use('JWT', new JWTStrategy(UAA_CREDENTIALS));

app.use(passport.initialize());


/* App server */

app.listen(process.env.PORT, () => {});


/* App endpoints */


app.get('/app', passport.authenticate('JWT', {session: false}), async function(req, res){

   const authInfo = req.authInfo

   const exchangedToken = await doTokenExchange(authInfo.getAppToken(), authInfo.getSubdomain())// tenant-specific

   const result = await createJob(exchangedToken)


   res.send(`<h1>Homepage</h1> Job created for user ${authInfo.getGivenName()} :<p>${JSON.stringify(result)}</p>`)

});


app.get('/action', passport.authenticate('JWT', {session: false}), (req, res) => {

   res.send(`Job for tenant ${req.authInfo.getZoneId()} subdomain: ${req.authInfo.getSubdomain()}`);

});


/* Multi Tenancy callbacks */


 app.put('/mtcallback/:tenant_id', (req, res) => {

   const appHost = req.hostname.replace('mutete','muteteapprouter')

   const subDomain = req.body.subscribedSubdomain

   // app URL points to approuter as entry page for MT application. Note: the /toapp is a route, not an endpoint

   const subscriberAppURL = `https://${subDomain}-${appHost}/toapp/`

   res.status(200).send(subscriberAppURL)

});


app.delete('/mtcallback/:tenant_id', (req, res) => {

    res.status(200).end('unsubscribed')

});


app.get('/mtcallback/dependencies', (req, res) => {

    const dependencies = [{'xsappname': JOB_CREDENTIALS.uaa.xsappname }]

    res.status(200).json(dependencies);

});


/* HELPER */


async function doTokenExchange (jwt, subdomain){

   return new Promise ((resolve, reject) => {

      xssec.requests.requestUserToken(jwt, JOB_CREDENTIALS.uaa, null, null, subdomain, null, (error, token)=>{

         resolve(token)

      })

   })

}


async function  createJob(jwtToken) {

   const requestBody = {

      name: `MuteteJob_${new Date().getMilliseconds()}`,

      action: `https://${APP_URI}/action`,

      active: true,

      httpMethod: 'GET',

      schedules: [{

         time: 'now',

         active: 'true'

      }]

   }


   const options = {

      method: 'POST',

      body: JSON.stringify(requestBody),

      headers: {

          Authorization: 'Bearer ' + jwtToken,

          'Content-Type': 'application/json'

      }

   }

   const response = await fetch(`${JOB_CREDENTIALS.url}/scheduler/jobs`, options)

   const responseJson = await response.json();

   return {jobName: responseJson.name,

           jobID: responseJson._id

   }

}
- SAP Managed Tags:
- Node.js,
- SAP BTP, Cloud Foundry runtime and environment,
- Cloud,
- SAP Business Technology Platform
Labels:
You must be a registered user to add a comment. If you've already registered, sign in. Otherwise, register and sign in.
Labels in this area
-
ABAP CDS Views - CDC (Change Data Capture)
2 -
AI
1 -
Analyze Workload Data
1 -
BTP
1 -
Business and IT Integration
2 -
Business application stu
1 -
Business Technology Platform
1 -
Business Trends
1,658 -
Business Trends
91 -
CAP
1 -
cf
1 -
Cloud Foundry
1 -
Confluent
1 -
Customer COE Basics and Fundamentals
1 -
Customer COE Latest and Greatest
3 -
Customer Data Browser app
1 -
Data Analysis Tool
1 -
data migration
1 -
data transfer
1 -
Datasphere
2 -
Event Information
1,400 -
Event Information
66 -
Expert
1 -
Expert Insights
177 -
Expert Insights
296 -
General
1 -
Google cloud
1 -
Google Next'24
1 -
Kafka
1 -
Life at SAP
780 -
Life at SAP
13 -
Migrate your Data App
1 -
MTA
1 -
Network Performance Analysis
1 -
NodeJS
1 -
PDF
1 -
POC
1 -
Product Updates
4,577 -
Product Updates
342 -
Replication Flow
1 -
RisewithSAP
1 -
SAP BTP
1 -
SAP BTP Cloud Foundry
1 -
SAP Cloud ALM
1 -
SAP Cloud Application Programming Model
1 -
SAP Datasphere
2 -
SAP S4HANA Cloud
1 -
SAP S4HANA Migration Cockpit
1 -
Technology Updates
6,873 -
Technology Updates
420 -
Workload Fluctuations
1
Related Content
- Job Scheduler for in Technology Q&A
- Integrating with SAP Datasphere Consumption APIs using SAML Bearer Assertion in Technology Blogs by SAP
- "BI platform CMS system database.unx": is the error-message of a failed-schedule available? in Technology Q&A
- Interplay between Vite and SAP Approuter in Technology Blogs by SAP
- How Data Anonymization in SAP HANA secure Generative AI applications through SAP Datasphere in Technology Blogs by SAP
Top kudoed authors
| User | Count |
|---|---|
| 36 | |
| 25 | |
| 17 | |
| 13 | |
| 8 | |
| 7 | |
| 6 | |
| 6 | |
| 6 | |
| 6 |