ListReport
For space requirements this blog has been split in 5 parts:
Now that you have seen how to create a Smart Template application, let's see how to configure its ListReport page with SAP Web IDE.
1 - Open your SAP Web IDE and go into your STDemo app
2 - Create a new folder named annotations under webapp

3 - Right click on this new folder and choose New --> Create Annotation.

4 - Create a new annotation by choosing its name (i.e. annotation1.xml) and by selecting the service data source (in this case GWSAMPLE_BASIC), then click on Next

5 - Click on Finish
6 - If you double click on the manifest.json file, you can check that now a new annotation is present in the app and that it has been tied to the metadata.xml file for the selected service

7 - Right click on the new annotation annotation1.xml and choose Open with --> Annotation Modeler

8 - The AM opens. Now we need to choose for which entity set we want to create an annotation. Since ProductSet is the entity set we have chosen as Data Binding OData collection, this is the one automatically proposed. Keep this choice and click on Annotate

9 - A new annotation is created for ProductSet. What we want is to display a list of all members belonging to this collection, so we need to add to this annotation file a new UI.LineItem annotation term: it will take care of displaying this list. Click on the "+" sign located on the Local Annotations row

10 -Add a new UI.LineItem annotation term and click on OK

11 - Once this term has been added, we need to define columns for this table. So click on the "+" sign on the UI.LineItem row

12 - Add a UI.DataField annotation term and click on OK

13 - Do the same for 4 times more. You should have now 5 UI.DataFields added to the UI.LineItem annotation term
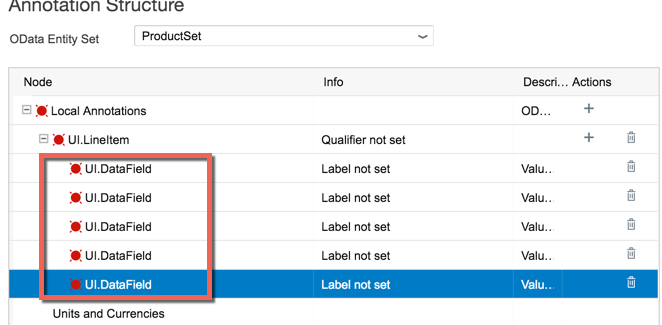
14 - Select the first one and bind it to the ProductID value, then click on Apply

15 - Do the same for the other UI.DataFields assigning them to Name, Category, Description and Price

16 - If you start now the application, you will be able to see the ListReport page fully populated

17 - We have not finished yet: we would like to place a filter bar on top of this UI.LineItem component being able to filter by ProductID and Category. Let's go again on the AM and click on the "+" sign aside the Local Annotations row. Select the UI.SelectionFields annotation term and click on OK

18 - Choose first the ProductID field, then click on Add Path and specify Category as well. Then click on the Apply button

19 - Save the annotation

20 - Refresh or restart the application and you should be able to see two search fields just in the page header

21 - As last step in this chapter, we would like to add a button on top of the UI.LineItem object. We would like, with this button, to execute some special Function Import coming from the backend. These functions, if present, are listed in the metadata.xml file. Click on the "+" sign on the UI.LineItem annotation and add a new UI.DataFieldForAction component.
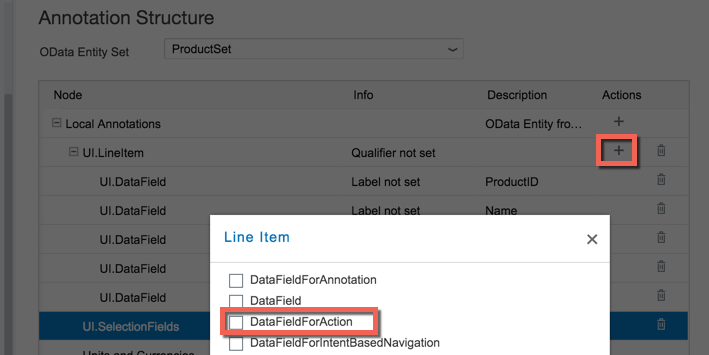
22 - Define a label for this component and select as action the RegenerateAllData function; then click on Apply. As you can see here this is a special function which has its specification in the metadata.xml file. You just need a button to call it. This function is executed on the backend service.
NOTE: Pay attention that in this case this function does nothing here: it's just an example to show how you can attach a button which triggers an action on the backend service

23 - This is how the final layout looks like with the new button

Let's continue with the next part where we'll learn how to add a Object Page to our application which is displayed when you click on one of the ListReport's rows: How to use Smart Templates with SAP Web IDE - Object Page!
