

- SAP Community
- Products and Technology
- Technology
- Technology Blogs by SAP
- Developing with XS Advanced: Create a SAP HANA bas...
Technology Blogs by SAP
Learn how to extend and personalize SAP applications. Follow the SAP technology blog for insights into SAP BTP, ABAP, SAP Analytics Cloud, SAP HANA, and more.
Turn on suggestions
Auto-suggest helps you quickly narrow down your search results by suggesting possible matches as you type.
Showing results for
Advisor
Options
- Subscribe to RSS Feed
- Mark as New
- Mark as Read
- Bookmark
- Subscribe
- Printer Friendly Page
- Report Inappropriate Content
03-28-2016
4:40 PM
TinyWorld - Part 3
Create a SAP HANA based client-server application
Hello again!
In part 2 (Get started with the SAP Web IDE for SAP HANA) of this TinyWorld tutorial we learned how to create a project, and create, build and run application modules. Here, in part 3, we will extend our application to actually do something more useful.
NOTE: In the following, you will need to update the MTA descriptor file – mta.yaml. The YAML syntax is indentation-sensitive, and you should always use spaces, never tabs. The role of the mta.yaml file is further explained in part 7 (Under the hood).
Advanced HANA development
Using the CDS graphical editor
You can use the CDS text editor, introduced in part 2, to create large and complex data models, but you can also use the CDS graphical editor, side by side with the text editor. Right-click tinyf.hdbcds > "Open with > Graphical Editor" to see:

Click the (left-most) Add-Entity icon to create a new entity, and call it country. This will bring up the columns and associations wizard. Click the "+" to add a new column (field), rename it name, change the Data Type to "String", enter a length of 100 and mark it as a key column.
Then click the "Associations" tab, and add a new association. Rename it partof. Under "Target Entity", select the world entity. Now click "< Back" to the main tree view; you should have the following model:

Save it (CTRL/S). You can switch to the CDS text editor tab to see the same mode in text form:
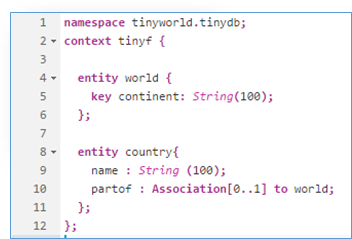
We created a data-model with two associated entities. Next: rebuild it (see part 2 for details). You will notice in the console that only this file is incrementally built, since the other files didn't change.
Using the HANA Run Time Tools
Open the HANA RTT in your browser (see part 1, A TinyWorld Tutorial - Introduction , where it was introduced). To review the tables we just created, you may first need to bind to the HANA database container in which they were created:

Press the "Search HDI Containers" icon, and bind to the appropriate tinyworld workspace container (called something like <your user name>…tinyworld-hdi-container). Now, open the "Catalog > workspace… > Tables", and you will see the two tables that we just created, respectively called "tinyworld.tinydb::tinyf.world" and "tinyworld.tinydb::tinyf.country". You can now open the SQL console (right click on your container and select Open SQL Console) , and enter some data, for instance:
INSERT INTO "tinyworld.tinydb::tinyf.world" VALUES ('Europe');
INSERT INTO "tinyworld.tinydb::tinyf.world" VALUES ('Asia');
INSERT INTO "tinyworld.tinydb::tinyf.country" VALUES ('Spain', 'Europe');
INSERT INTO "tinyworld.tinydb::tinyf.country" VALUES ('Japan', 'Asia');
INSERT INTO "tinyworld.tinydb::tinyf.country" VALUES ('Denmark', 'Europe');
(Run it by pressing ![]() in the toolbar). You can check it out, for instance like this:
in the toolbar). You can check it out, for instance like this:
SELECT * FROM "tinyworld.tinydb::tinyf.country" WHERE "partof.continent" = 'Europe'Adding a Calculation View to the model
In this step, we use the SAP HANA modeler to graphically add a Calculation View to show only European countries.
Navigate to the src/ subfolder of the tinydb/ module folder, right-click "> New > Calculation View". Call it, for instance myview, select “Data Category” as “Dimension” from the dropdown and click "CREATE". Wait a few seconds, until you see:

From the toolbar, click the ![]() (Create Projection) icon once, and then (without holding the mouse button) move your mouse to an empty space below the existing projection on the canvas and click again, to create a new projection, called Projection_1. Select it, and "drag" the little arrow that appears on the right to the bottom of Projection, to connect them:
(Create Projection) icon once, and then (without holding the mouse button) move your mouse to an empty space below the existing projection on the canvas and click again, to create a new projection, called Projection_1. Select it, and "drag" the little arrow that appears on the right to the bottom of Projection, to connect them:

Now, let's create the projection in order to show the results only for European countries. Select the Projection_1 node. On the "mapping" tab on the right, click the "+"; a search wizard will appear. Enter tiny to search for the tables that we created in part 2. Select tinyworld.tinydb::tinyf.country in the search results, and click "Ok". We first want to connect the "Data Sources" to the "Output Columns": select the table and click the ![]() (Add to Output) icon:
(Add to Output) icon:

Next, click on the "FILTER EXPRESSION" tab, open the "Columns" element, and then double-click partof_continent. In the Operators selector click once on "=". The expression appears at the top; complete it by typing 'Europe':

Next, select the Projection node on the left, and in its MAPPING tab, select and drag name from "Data Sources" to "Output Columns" with your mouse.
Finally, to support anonymous users, select the "Semantics" node at the top of the graph, select the "VIEW PROPERTIES" tab, and change Apply Privileges from "SQL Analytical Privileges" to empty.
Save the calculation view (CTRL/S), and rebuild the tinydb module again. This accomplishes our task: we created a view that shows only the name of only European countries.
Using OData
One of the most common usage patterns is to expose a data model via the OData protocol (see: www.odata.org). This is very easy to do with the Web IDE, by means of adding a single file to our small Node.js module.
In the folder tree (navigation pane), right-click the tinyjs/lib/ folder, create a "New > File" and call it euro.xsodata. Note that the suffix is important – it determines how the file will be treated in the HANA database. In the editor, type:
service {
"tinyworld
.tinydb::myview" as "euro" keys generate local "ID";
}
Then save the file. We just defined a new OData service named euro.xsodata, and defined an entity euro, based on the myview Calculation View (using the name of the HANA table, which is prepended by the namespace). The euro entity uses an auto-generated key called ID.
Before we can run the OData Service, we need to create dependency from the Node.js module that exposes the OData service, and the underlying HDB module, on which it depends.
Open the mta.yaml MTA descriptor, and look for the tinyjs module. You will see something like this:

Append the following text to the attributes of the tinyjs module:
# ------- dependency on DB
requires:
- name: tinydb
- name: hdi-container
#---------------- exposes SERVICE URL to consumers
provides:
- name: tinyjs_api
properties:
service_url: ${default-url}
# ----
NOTE: The YAML syntax is indentation-sensitive and does not allow usage of tabs. Make sure that you use spaces only.
Next, open the file tinyjs/server.js, and uncomment the line that establishes the connection to the HANA database. It should look like this:
// configure HANA
options = xsjs.extend(options, xsenv.getServices({ hana: {tag: "hana"} }));
Save all files, and run the Node.js module again (right-click tinyjs/ "> Run > Run as Node.js Application").
Testing the OData service
Since we didn't change the code of index.xsjs yet, you will see the same "It's a tiny JS World!" message again, but now we also have an OData service, which we can actually test using an OData URL:
In the browser tab, where the hello-world message is showing, replace the URL suffix /index.xsjs with
/euro.xsodata/euro?$format=json
If all works as expected, you will see the output (based on the manual entries we made above), as follows:

Using the OData service with SAP UI5
The above URL test tells us that the OData service is up and running. Let’s now write a small UI5 application that uses the same OData service programmatically.
Double-click to again open the existing tinyui/resources/index.html file, replace its content with the following UI5 code, and save:
<!DOCTYPE HTML><head><meta http-equiv="X-UA-Compatible" content="IE=Edge" />
<title>DevXdemo</title>
<script src="https://sapui5.hana.ondemand.com/resources/sap-ui-core.js"
id="sap-ui-bootstrap" data-sap-ui-libs="sap.ui.commons, sap.ui.table" data-sap-ui-theme="sap_bluecrystal">
</script>
<script>
var oModel = new sap.ui.model.odata.ODataModel("/euro.xsodata", true);
var oTable = new sap.ui.table.Table({ title: "European Countries" });
oTable.addColumn(new sap.ui.table.Column({ label: "Country Name", template: "name" }));
oTable.setModel(oModel); oTable.bindRows("/euro"); oTable.placeAt("content");
</script>
</head>
<body class='sapUiBody'> <div id='content'></div> </body>
</html>
What does this app do? We define a model (oModel), bound to /euro.xsodata. Then, we create a table with a single column, bound to the name field of the entity /euro. The table is initialized and displayed in an HTML context.
We need to one additional requirement in order to run a UI5 application on XS Advanced, and that is to set up a destination for the XS Advanced "approuter", which handles cross-references to other URLs. Here we have a cross-reference to the URL of the euro.xsodata OData service of the tinyjs module. Here are the two steps:
- In the mta.yaml MTA descriptor, find the tinyui module section and append the following:
# -- requires tinyjs service URL
requires:
- name: tinyjs_api
group: destinations
properties:
name: tinyjs_be
url: ~{service_url}
2. Open the file tinyui/xs-app.json (you can right-click "Beautify" it in the editor) and add the following entry to the "routes" array (inside the square brackets):
{"source": "^/euro.xsodata/.*$", "destination": "tinyjs_be"}
We now defined a dependency between the tinyui and tinyjs modules, and specified a destination route to the OData service. Save both files and run tinyui/ again from the toolbar or by right-clicking the folder tinyui/ "> Run > Run as > Web Application".
After a while, the following table will appear in another tab of your browser:

Summary of part 3
We learned how to use the Web IDE and its HANA-specific tools to build a HANA-based client-server application, with a UI module that access the database via OData. In the next two parts of this tutorial (Add SAP HANA business logic and Add business logic with Node.js) we will add some business logic to our application.
Other parts of this TinyWorld tutorial:
Part 1: A TinyWorld Tutorial - Introduction
The basic tutorial
Part 2: Get started with the SAP Web IDE for SAP HANA
Part 3: Create a SAP HANA based client-server application
Part 4: Add SAP HANA business logic
Part 5: Add business logic with Node.js
Advanced topics
Part 6: Create Node.js unit tests
Part 7: Under the hood
Part 8: Source control
Part 9: Application life cycle
Part 10: Add authentication
Part 11: Add authorization
- SAP Managed Tags:
- SAP HANA
53 Comments
- « Previous
-
- 1
- 2
- Next »
You must be a registered user to add a comment. If you've already registered, sign in. Otherwise, register and sign in.
Labels in this area
-
ABAP CDS Views - CDC (Change Data Capture)
2 -
AI
1 -
Analyze Workload Data
1 -
BTP
1 -
Business and IT Integration
2 -
Business application stu
1 -
Business Technology Platform
1 -
Business Trends
1,661 -
Business Trends
88 -
CAP
1 -
cf
1 -
Cloud Foundry
1 -
Confluent
1 -
Customer COE Basics and Fundamentals
1 -
Customer COE Latest and Greatest
3 -
Customer Data Browser app
1 -
Data Analysis Tool
1 -
data migration
1 -
data transfer
1 -
Datasphere
2 -
Event Information
1,400 -
Event Information
65 -
Expert
1 -
Expert Insights
178 -
Expert Insights
280 -
General
1 -
Google cloud
1 -
Google Next'24
1 -
Kafka
1 -
Life at SAP
784 -
Life at SAP
11 -
Migrate your Data App
1 -
MTA
1 -
Network Performance Analysis
1 -
NodeJS
1 -
PDF
1 -
POC
1 -
Product Updates
4,577 -
Product Updates
330 -
Replication Flow
1 -
RisewithSAP
1 -
SAP BTP
1 -
SAP BTP Cloud Foundry
1 -
SAP Cloud ALM
1 -
SAP Cloud Application Programming Model
1 -
SAP Datasphere
2 -
SAP S4HANA Cloud
1 -
SAP S4HANA Migration Cockpit
1 -
Technology Updates
6,886 -
Technology Updates
408 -
Workload Fluctuations
1
Related Content
- ABAP Cloud Developer Trial 2022 Available Now in Technology Blogs by SAP
- Hack2Build on Business AI – Highlighted Use Cases in Technology Blogs by SAP
- Switch on gCTS (for existing packages) in Technology Blogs by SAP
- When to Use Multi-Off in 3SL in Technology Blogs by SAP
- Consolidation Extension for SAP Analytics Cloud – Automated Eliminations and Adjustments (part 1) in Technology Blogs by Members
Top kudoed authors
| User | Count |
|---|---|
| 13 | |
| 11 | |
| 10 | |
| 9 | |
| 9 | |
| 7 | |
| 6 | |
| 5 | |
| 5 | |
| 5 |