
- SAP Community
- Groups
- Interest Groups
- Application Development
- Blog Posts
- Standard tabs Re-arrangement in Standard SAP Trans...
Application Development Blog Posts
Learn and share on deeper, cross technology development topics such as integration and connectivity, automation, cloud extensibility, developing at scale, and security.
Turn on suggestions
Auto-suggest helps you quickly narrow down your search results by suggesting possible matches as you type.
Showing results for
former_member17
Active Contributor
Options
- Subscribe to RSS Feed
- Mark as New
- Mark as Read
- Bookmark
- Subscribe
- Printer Friendly Page
- Report Inappropriate Content
03-16-2016
12:49 PM
Hello All,
Good Time to you all.
Its always pleasure sharing knowledge and when it comes to SCN its more than that. Just like my other blogs i hope this will serve you better.
Introduction:
In this Blog we are going to discuss on how to rearrange standard tabs in standard transactions, this is basically done based on the customer requirement. Sometimes all the tabs arranged in header and item level may not suit the customer requirement which leads to this custom solution.
Steps for Achieving the Requirement:
This method basically is achieved through simple configuration steps. This method can be achieved by both technical and functional consultants as it does not require more technical knowledge. Moreover this methods does not affect the transaction performance.
Let us see the example below for contract transactions VA41, VA42 and VA43.
Step 1: Find the Program name:
Get into the required transaction and find the program name of the same using the below navigation:
VA43 --> System --> Status --> Program (Screen). You will get the screen as shown below,

Step 2: Enter to T-Code SE11 / Se12:
Give the table name as TAXITABS and display the field values,

Step 3: Check for the table contents:
Proceed further and check for the table entries, in the field AGIDV give the program name taken from step 1 as shown below, and Screen group as KO(For header tabs at transaction level).

Step 4: Save the File:
In the next screen where you see the entries, save the file as shown below, This step is basically to take a back up of the existing data which will help for our reference in future in case we go wrong anywhere in our process.
Use Navigation: System --> List --> Save -->Local File

Step 5: Sequencing the tabs in Header and Item:
Go into the transaction SM30 and give view name as V_TAXITABS and click on maintain button,

Step 6:Header and item tabs Difference
Now click on position button and provide the program name fetched from step 1 and screen group name as KO for header, For item tabs it would be PO. Change the tab positions of the header tabs by re-ordering the function codes and description values alone.

Step 7: Rearranged tabs:
Now if you view the tabs at transaction level we can find that the tabs are arranged at the sequence based on the ordering we have done above in step 6,

Step 8: Steps for adding entries to TR:
Open the T-Code SM30 and give the view name as V_TAXITABS and click on Transport Button as shown below,

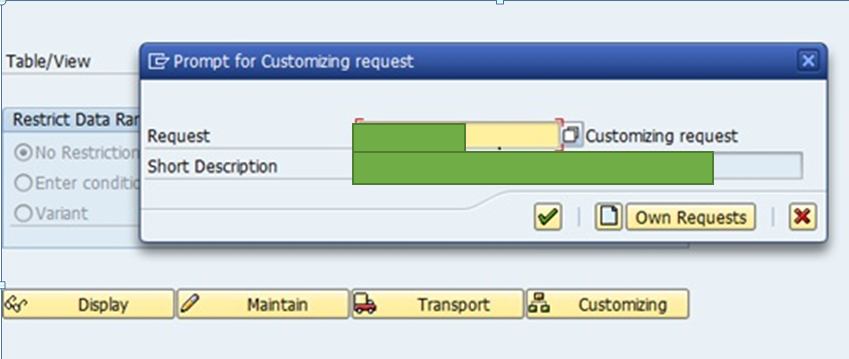
Step 9: Enter the TR Details:
Enter all the TR related entries ad per the client standards as shown below,
Step 10: Select the Desired entries:
Select all the header related rearranged entries based on the variant and click on include request button above.

So far we have achieved the requirement of rearranging the header tabs and moving the same into a TR.
Step 11: Rearranging at item level:
Open any contract at change mode VA42.

Step 12:Drag as per the required sequence:
As a next step simply drag the columns and place it as per the desired sequence and then click on configuration table (Marked in Red Below).

Step 13:Variant Assignment:
On clicking on the configuration icon, you will get a pop up as below, Provide suitable variant name in the field Variant and click on create.
Do not change the basic setting variant which is present by default.

Step 14:Administration:
Click on the administration button as marked below,

Step 15:Activation of the changes:
In the next screen you will be getting an pop as shown below, click on the activate button and close, click on save in the subsequent screen.

On finishing the above step you can find the position of the field as per the requirement,

Step 16:Adding the item changes to the TR
Go to SM30 and give the view name as TCVIEW and click on transport as shown below,

In the next screen provide the TR details and click tick icon.

In the next screen select all the entries with respect to the variant and click on include requests button.

As a result all the changes related to header and item are moved to the TR which can be then moved to different systems and can be check for the changes.
By this we achieve this requirement of rearranging the tabs.
Important Notes:
1) If there are several transactions that use the same program then the changes would reflect in all those transactions, hence please be aware of those details before doing the changes.
2) Certain fields in the above transactions are hidden to prevent the client information.
3) While creating the TR ensure that it is a customizing TR.
Conclusion:
Hope the blog was very useful and informative. If you have any doubts regarding the blog kindly get back. Requesting you to provide your valuable comments and ratings on the same which will be a motivating factor for more better blogs from my end.
EXTENSION (Blogs Relevant to this Blog):
Apart from rearranging tabs if you want to add Additional tabs to the standard transactions without access key, you can check out my Blog below. Hope it helps.
Adding extra tabs in standard transactions for sales and contracts without access key.
Lets Learn, Share and Collaborate!!! :smile: :smile: :smile:
Thanks and Regards,
Satish Kumar Balasubramanian
- SAP Managed Tags:
- ABAP Extensibility
6 Comments
You must be a registered user to add a comment. If you've already registered, sign in. Otherwise, register and sign in.
Labels in this area
-
A Dynamic Memory Allocation Tool
1 -
ABAP
8 -
abap cds
1 -
ABAP CDS Views
14 -
ABAP class
1 -
ABAP Cloud
1 -
ABAP Development
4 -
ABAP in Eclipse
1 -
ABAP Keyword Documentation
2 -
ABAP OOABAP
2 -
ABAP Programming
1 -
abap technical
1 -
ABAP test cockpit
7 -
ABAP test cokpit
1 -
ADT
1 -
Advanced Event Mesh
1 -
AEM
1 -
AI
1 -
API and Integration
1 -
APIs
8 -
APIs ABAP
1 -
App Dev and Integration
1 -
Application Development
2 -
application job
1 -
archivelinks
1 -
Automation
4 -
BTP
1 -
CAP
1 -
CAPM
1 -
Career Development
3 -
CL_GUI_FRONTEND_SERVICES
1 -
CL_SALV_TABLE
1 -
Cloud Extensibility
8 -
Cloud Native
7 -
Cloud Platform Integration
1 -
CloudEvents
2 -
CMIS
1 -
Connection
1 -
container
1 -
Debugging
2 -
Developer extensibility
1 -
Developing at Scale
4 -
DMS
1 -
dynamic logpoints
1 -
Eclipse ADT ABAP Development Tools
1 -
EDA
1 -
Event Mesh
1 -
Expert
1 -
Field Symbols in ABAP
1 -
Fiori
1 -
Fiori App Extension
1 -
Forms & Templates
1 -
General
1 -
Getting Started
1 -
IBM watsonx
1 -
Integration & Connectivity
10 -
Introduction
1 -
JavaScripts used by Adobe Forms
1 -
joule
1 -
NodeJS
1 -
ODATA
3 -
OOABAP
3 -
Outbound queue
1 -
Product Updates
1 -
Programming Models
13 -
Restful webservices Using POST MAN
1 -
RFC
1 -
RFFOEDI1
1 -
SAP BAS
1 -
SAP BTP
1 -
SAP Build
1 -
SAP Build apps
1 -
SAP Build CodeJam
1 -
SAP CodeTalk
1 -
SAP Odata
1 -
SAP UI5
1 -
SAP UI5 Custom Library
1 -
SAPEnhancements
1 -
SapMachine
1 -
security
3 -
text editor
1 -
Tools
17 -
User Experience
5
Top kudoed authors
| User | Count |
|---|---|
| 4 | |
| 3 | |
| 3 | |
| 2 | |
| 2 | |
| 2 | |
| 2 | |
| 2 | |
| 1 | |
| 1 |