
- SAP Community
- Products and Technology
- Technology
- Technology Blogs by SAP
- Getting started with SAP Analytics Cloud, Embedded...
Technology Blogs by SAP
Learn how to extend and personalize SAP applications. Follow the SAP technology blog for insights into SAP BTP, ABAP, SAP Analytics Cloud, SAP HANA, and more.
Turn on suggestions
Auto-suggest helps you quickly narrow down your search results by suggesting possible matches as you type.
Showing results for
Advisor
Options
- Subscribe to RSS Feed
- Mark as New
- Mark as Read
- Bookmark
- Subscribe
- Printer Friendly Page
- Report Inappropriate Content
09-02-2021
9:16 AM
Intro
At Getting started with SAP Analytics Cloud, Embedded Edition (BTP service). Part I we have stopped after browser access to SAP Analytics Cloud, embedded edition. In this PART II we will continue the setup of live-connection to SAP HANA Cloud.
On my opinion, the most difficult part has been done in Part I. Now we can continue to setup SAP HANA Cloud database artifacts using SAP Business Application Studio. If you have your data source configured then you need to setup HANA Analytics Adapter, SAP HANA Cloud security and integrate HANA with SAP Analytics Cloud tenant using API (via Postman).
What will we done next:
- (optional, if not created before) Start SAP HANA Cloud service in SAP BTP cockpit (Feature Set B)
- (optional, if not created before) SAP HANA objects development in SAP Business Application Studio
- create Table and load data.
- create Calculation View
- Create SAP HANA Analytics Adapter and configure it
- Configure SAP HANA Cloud for user access and setup SSO
- Create a live connection to SAP HANA
- Create a Model and a Story based on live-connection.
1. Start SAP HANA Cloud service in SAP BTP cockpit (Feature Set B)
Note: please skip if you already have enabled your SAP HANA Cloud, SAP HANA Schemas & HDI containers and SAP Business Application Studio services activated.
- Go to your Global Account -> Entity Assignments. Select your subaccount (in my case the same where SAP Analytics Cloud, embedded edition has been already deployed). Then click "Configure Entitlements"
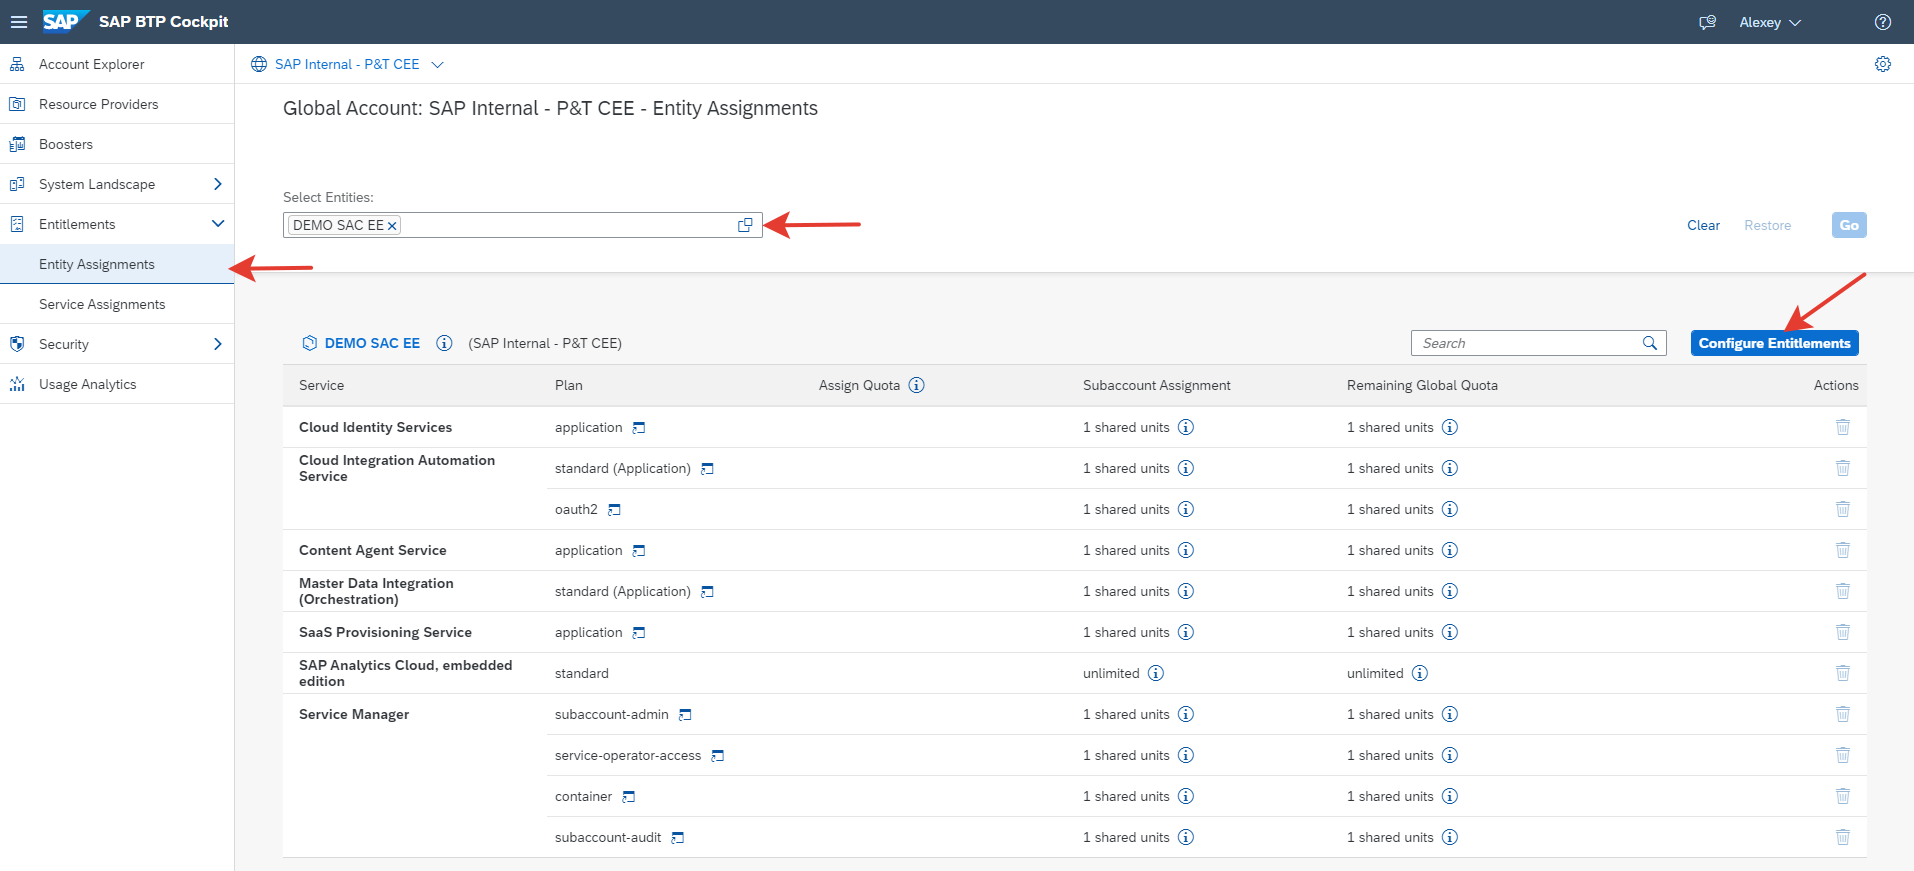
- Then click on "Add Service Plans" and in pop-up window select 3 services: SAP HANA Cloud, SAP HANA Schemas and HDI Containers, SAP Business Application Studio and Add them.
Note: For SAP Business Application Studio you can select either Free or Standard Edition. When you select free plan you will have maximum 2 workspaces of which only 1 can be running. In this case Standard plan will not be available until you have deletes Free tier plan.


 After you have added Service Plans you need to save changes.
 - Go to your Subaccount -> Cloud Foundry -> Space

and Create a new instance of SAP Hana Cloud

- Fill the next steps:
1. SAP HANA Cloud Instance Name and DBADMIN password
 2. SAP HANA Cloud Memory size
 3. SAP HANA Cloud Availability Zone and Replicas

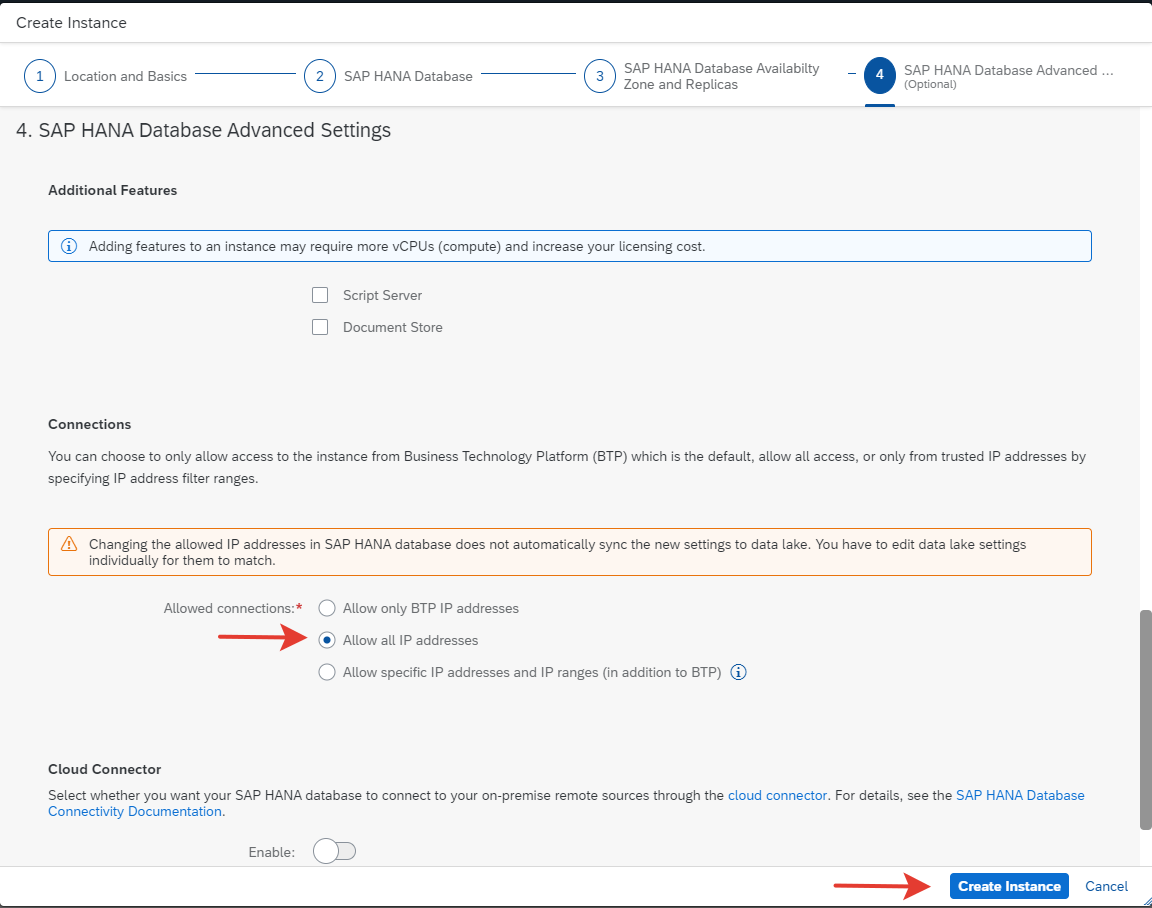
4. If the data will be consumed only by SAP Analytics Cloud (either enterprise/standalone or embedded edition) you can use "Allow only BTP IP addresses" (by default) because they are hosted in the same data center (AWS as common case). In other case you can later return to the settings via HANA cockpit and change this setting.
2. Setup SAP Business Application Studio and SAP HANA development
I offer to learn Tutorials on SAP Developers in the next order:
- Set Up SAP Business Application Studio for Development (10 min)
- Configure the Development Environment in SAP Business Application Studio (15 min)
- Create an SAP HANA Database Project (15 min)
- Create a Calculation View with Differential Privacy in SAP HANA Cloud (20 min)
- Create a Calculation View of Type Cube in the SAP HANA Cloud (10 min)
If you execute all of them you will have as the result "PERFORMANCE_SALARIES" calculation view in your schema. You need to know your Schema's name as you will want to access it in the next steps.

3. Create SAP HANA Analytics Adapter and configure it
The basis of this step is a YouTube clip Cloud the Easy Way – Using Application Studio to Deploy the HAA (Hana Analytics Adapter) (starting 2:04) by philip.mugglestone and blog post based on this YouTube clip by ian.henry.
After learning them you should understand how to deploy HAA. You should apply them with some remarks.
Note: By the way the post says:
With SAP Analytics Cloud Wave 2020.20, this manual configuration is no longer required... Warning, the steps below are only required if you do not have the new connection type.
But as previously described, SAP Analytics Cloud, embedded edition doesn't has "SAP HANA Cloud" as a connection type. So we have to learn how to use "Direct" connection type with the usage of HANA Analytics Adapter.
I will not duplicate the content, just take some notes below:
- Open SAP Business Application Studio
Note: use Dev Space "Full Stack Cloud Application" instead "SAP Native Cloud Application" - Hana Analytics Adapter Configuration
Note 1: you can also use command
yo saphanaacademy-haa:update
to update later some settings of an existing project via the sub-generator. It will try to rewrite mta.yaml file, so you'd better keep the file closed while processing.
Note 2: The name of HDI container to be used we can see in the end of Step2.

Note 3: While running generator/wizard you will have a different questionnaire then in referenced blogs/clip (generator is being updated). My example is below

? What project name would you like? haa_demo

? Would you like to create a new directory for this project? Yes

? What is the name of your HDI container? sacee_hanadev-hdidb-ws-lsftg

? Would you like authorization? Yes

? What is the hostname of the client application that will be accessing HAA? Use * for wildcard. o5igqcrambbaktmuo3s3pc2.eu10.sac.ondemand.com

? Would you like HAA to propagate the application user to SAP HANA Cloud? Yes

? Would you like HAA to connect to SAP HANA Cloud via JWT-based SSO (this implies shadow users in SAP HANA Cloud)? Yes
- Create Role Collection
Note: You may skip it cause the Role was created automatically.


- Assign Role to Cloud Platform Users
- Verify Access to InA using Application URLs
Note 1: You can copy your HAA URL from SAP Business Application Studio console.
Note 2: HAA works fine. But
# Heartbeat URL Path
/sap/bc/ina/service/v2/HeartBeat
and
## GetServerInfo URL Path
/sap/bc/ina/service/v2/GetServerInfo
will both return an error "authentication failed":
{"Messages":[{"Type":2,"Number":0,"Text":"com.sap.db.jdbc.exceptions.SQLInvalidAuthorizationSpecExceptionSapDB: [10]: authentication failed"}]}
- SAP Analytics Cloud Connection
Note: this step is not applicable for SAP Analytics Cloud, embedded edition.
Then we will start setup security setting of SAP HANA Cloud to use SSO while accessing the data from SAP Analytics Cloud.
4. Configure SAP HANA Cloud for user access and setup SSO
[Intro]
Here I refer to the help documentation (SAP Analytics Cloud standalone) for Direct Connection with SSO and blog post "Getting Started with SAP HANA Cloud using the HANA Analytics Adapter (HAA)" by denys.kempen where I find useful SQL statements in the section "Update HAA for SSO" and "Create Named User".
Notes:
1. After you have read official documentation you can understand how significantly efforts was reduced with the help of Hana Cloud Academy and its HAA generator (previous step) .
2. We will use existing users in SAP BTP & Analytics Cloud which also mean we should create a SAP HANA Cloud shadow users. This is an overall schema (printable version) of authorizations we will leverage on:

3. Meanwhile the official help documentation implies that you have a standalone IdP (either by SAP or 3rd Party). For the holistic identity management you do need an Identity Provider either by SAP (SAP IAS is provided for SAP BTP Clients) or by 3rd party's (MS, Azure...). This strategy should make the process much easier.

There are some article about 3rd party SAML Identity Providers for SAP Analytics Cloud Enterprise you can find. Taking in mind some specific of embedded edition, it might be relevant to find a time and show the process in separate article.
4. Denys is using SQL to process the steps. It is useful to automate the process via SQL scripts. I will show all steps here using browser access to HANA Cloud Cockpit.
[Trust configuration]
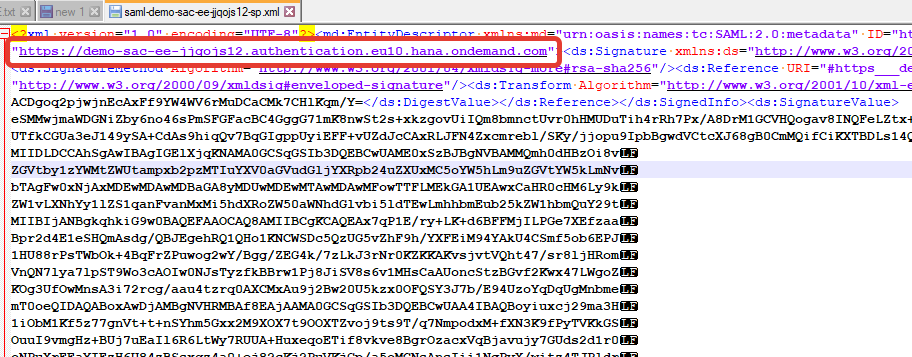
- You need to find Authentication URL for your subaccount, It is possible to do by 2 ways:
- File with Secret Keys we downloaded from SAP Analytics Cloud, embedded edition:

- From Trust Configuration of your SAP BTP subaccount:

- File with Secret Keys we downloaded from SAP Analytics Cloud, embedded edition:
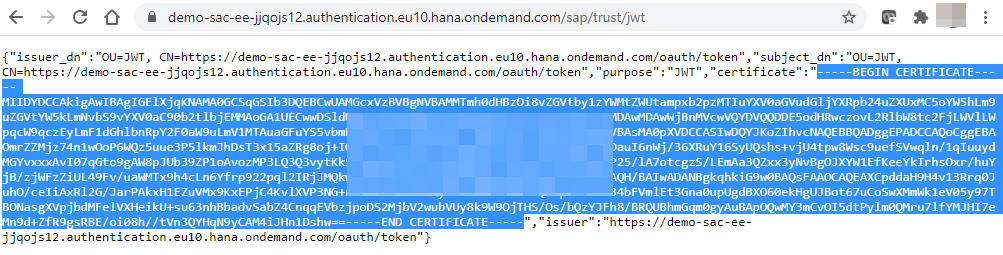
- To the URL above we are adding
/sap/trust/jwt
to get JWT certificate.
 We will need the part starting
-----BEGIN CERTIFICATE-----
and ending
-----END CERTIFICATE----- - Open your SAP HANA Cloud Cockpit (one of the option how to do it is to navigate to Global Account -> Subaccount -> Space)
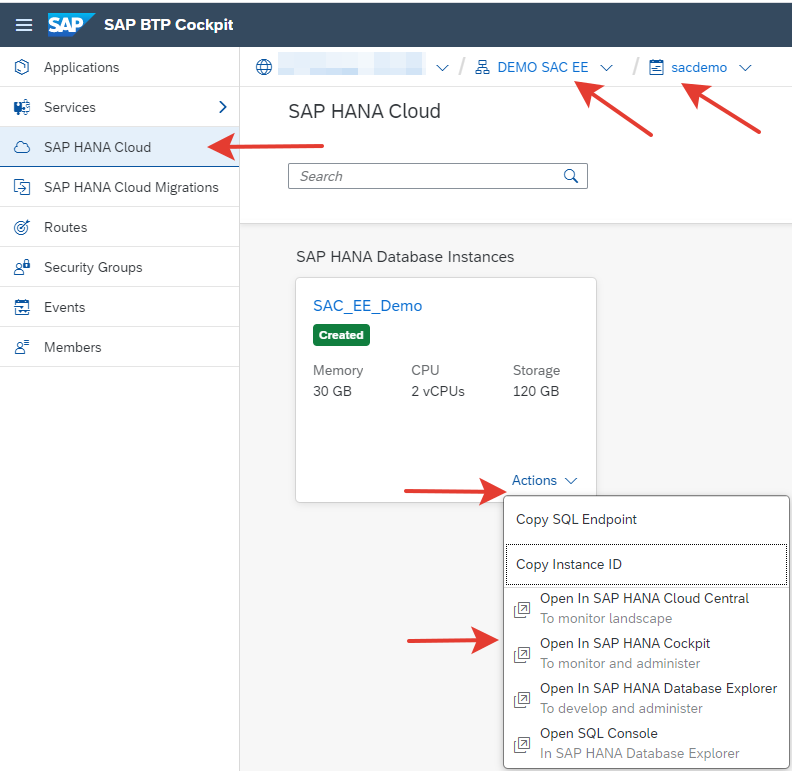 While working with Cockpit we need View "Security and User Management" and sections "User&Role Management" and "Trust Configuration"

- At first go to "Certificate store" and import JWT certificate and click Import

You need to copy your JWT (separate browser tab)
 and Paste into the text block:
 Then click OK
 - Navigate to "Certificate Collections" and create one
 Add Certificate created before


Note: if you go to Edit Purpose now, you will be unable to select option needed.


- Navigate to "JWT Identity Providers" and create a new one
 Issuer URL is also available at /sap/trust/jwt

- Now return to "Certificate Collections", select one and click Edit Purpose. You need to select "JWT" and JWT IdP you have created before

- Navigate to "User Management" and create a user

User name options

Go to Authentication tab and select your JWT provider and map the User to an external identity (email if you use a default SAP ID Services for SAP Analytics Cloud)

- Control point. Go to Hana Analytics Adapter URL.
# Heartbeat URL Path
/sap/bc/ina/service/v2/HeartBeat
and you can see the response and your HANA user name.
 What is an important to understand. It means SAP BTP user authorization ("applicationUser") presented as an e-mail of the user you logged in SAP BTP) was successfully bounded with an existing HANA user ("userName").
Remember HAA setting you have set before:
? What project name would you like? haa_demo

? Would you like to create a new directory for this project? Yes

? What is the name of your HDI container? sacee_hanadev-hdidb-ws-lsftg

? Would you like authorization? Yes

? What is the hostname of the client application that will be accessing HAA? Use * for wildcard. o5igqcrambbaktmuo3s3pc2.eu10.sac.ondemand.com

? Would you like HAA to propagate the application user to SAP HANA Cloud? Yes

? Would you like HAA to connect to SAP HANA Cloud via JWT-based SSO (this implies shadow users in SAP HANA Cloud)? Yes
If the question before the last one was "No" then "applicationUser" will be the same as ""userName" of HANA.
Note: If you have lost your HAA URL, find it in SAP BTP Cockpit -> Global Account -> Subaccount -> Space -> Routes. Click on your HAA application.


- The same with
## GetServerInfo URL Path
/sap/bc/ina/service/v2/GetServerInfo
it returns you info about your SAP HANA Cloud instance.
[Roles and Privileges]
- Open your HANA user and assign the next roles

- Click "Assign Roles" then "Edit" and "Add"

Find and select "<Your HDI name>::access_role" and "<Your HDI name>::external_priviledges_role" and click "Save"


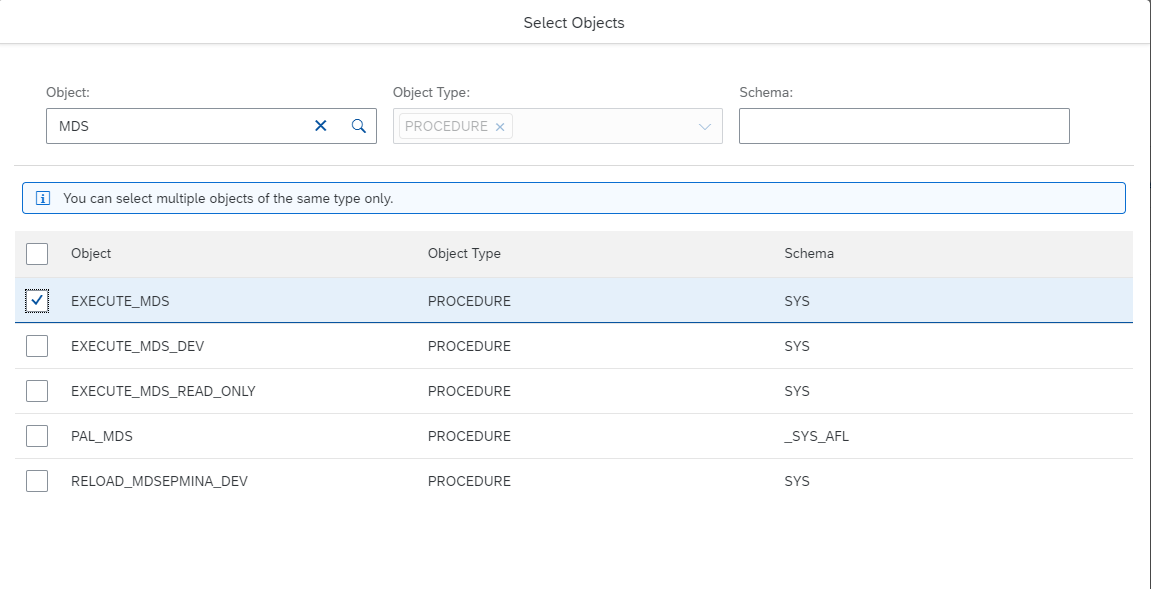
- Click "Assign Privileges" and Add Object

- We need to provide an access to Schema "_SYS_BI" with Select privilege.


- And access to Procedure "Execute_MDS" with Execute privilege

5. Create a live connection to SAP HANA
- You need to open Collection "0003. SAC Embedded Live Connection" in Postman (the same link to GitHub as in Part I). Edit Patch request "AddLiveConnection"

"Host" is your HANA Analytics Adapter URL.
- Run the collection

- If it's went well you can see your results
- In Postman's console

- In SAP Analytics Cloud, embedded edition

- In Postman's console
6. Create a Model and a Story based on live-connection
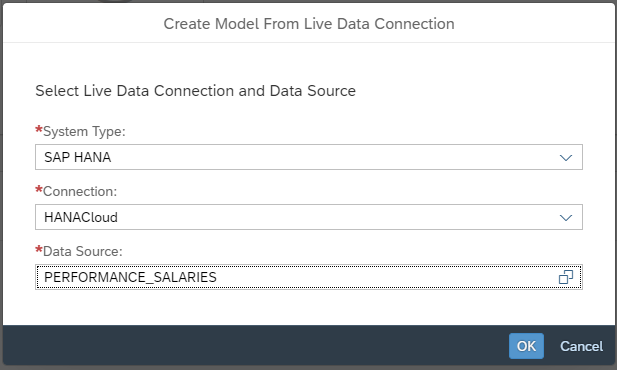
- In SAP Analytics Cloud, embedded edition open a "Modeler" and Create "Live Data Model"

- Select all options and you have your live-model created

Save your model and create a Story
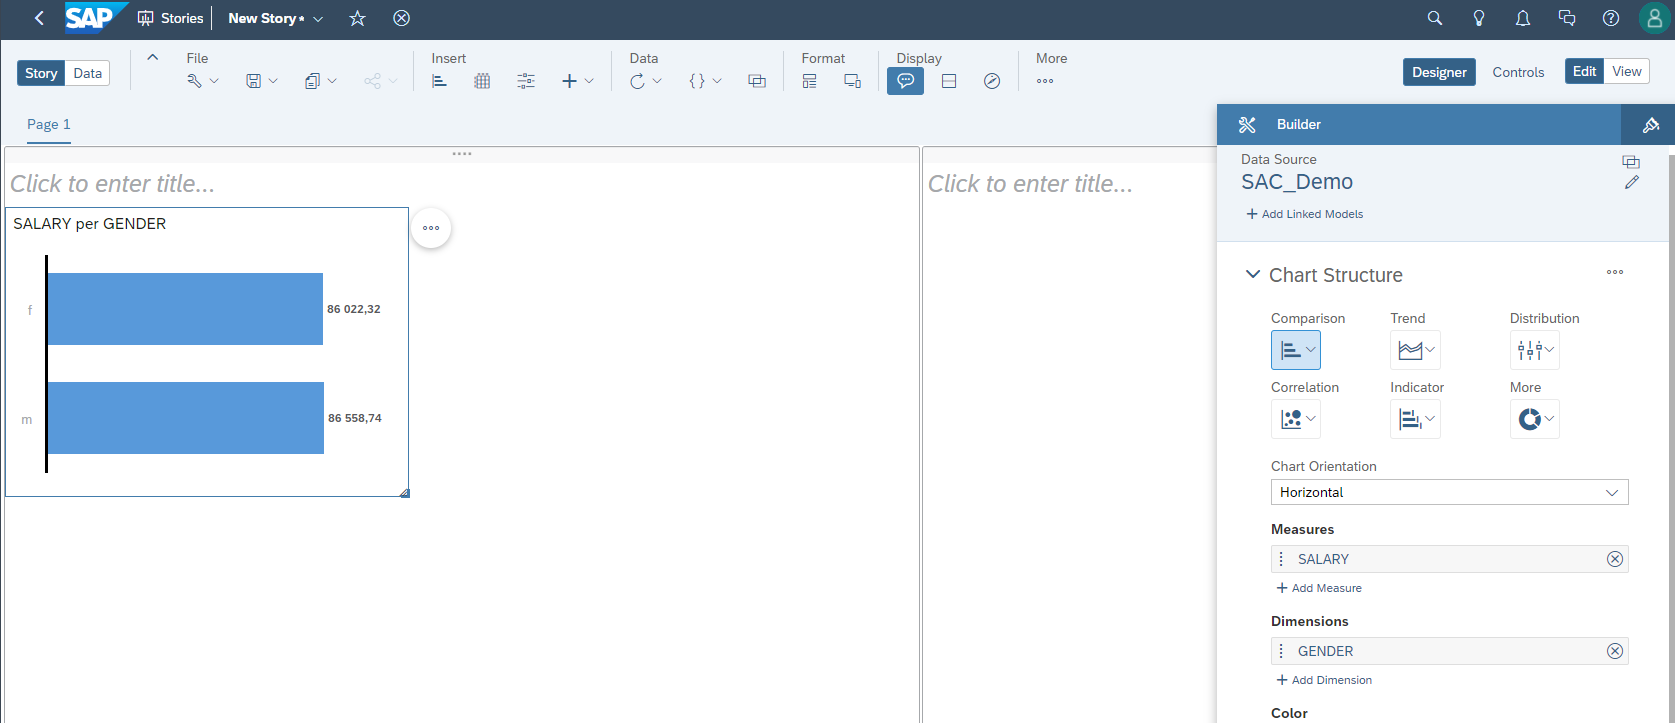 Everything works!
[Conclusion]
What you have learnt during this Part II:
- How to Start SAP HANA Cloud and SAP Business Application Studio services in SAP BTP cockpit (Feature Set B)
- You passed Tutorials for SAP Development where you worked with SAP Business Application Studio to create HANA DB project with tables and calculations view.
- You know how to create SAP HANA Analytics Adapter and what setup you need to proceed.
- You configured SAP HANA Cloud
- How to create a user and provide trust to SAP BTP JWT Identity Provider.
- What Roles and Privileges are needed to provide access to your Calculation View.
- You created a live connection to SAP HANA as Direct type via Postman
To demonstrate everything is working I've create a model and a simple story based on the existing live-connection.
Hope, you like this post. Please comment and share your thoughts!
- SAP Managed Tags:
- SAP Analytics Cloud,
- SAP HANA Cloud,
- SAP HANA Info Access
Labels:
4 Comments
You must be a registered user to add a comment. If you've already registered, sign in. Otherwise, register and sign in.
Labels in this area
-
ABAP CDS Views - CDC (Change Data Capture)
2 -
AI
1 -
Analyze Workload Data
1 -
BTP
1 -
Business and IT Integration
2 -
Business application stu
1 -
Business Technology Platform
1 -
Business Trends
1,658 -
Business Trends
91 -
CAP
1 -
cf
1 -
Cloud Foundry
1 -
Confluent
1 -
Customer COE Basics and Fundamentals
1 -
Customer COE Latest and Greatest
3 -
Customer Data Browser app
1 -
Data Analysis Tool
1 -
data migration
1 -
data transfer
1 -
Datasphere
2 -
Event Information
1,400 -
Event Information
66 -
Expert
1 -
Expert Insights
177 -
Expert Insights
296 -
General
1 -
Google cloud
1 -
Google Next'24
1 -
Kafka
1 -
Life at SAP
780 -
Life at SAP
13 -
Migrate your Data App
1 -
MTA
1 -
Network Performance Analysis
1 -
NodeJS
1 -
PDF
1 -
POC
1 -
Product Updates
4,577 -
Product Updates
342 -
Replication Flow
1 -
RisewithSAP
1 -
SAP BTP
1 -
SAP BTP Cloud Foundry
1 -
SAP Cloud ALM
1 -
SAP Cloud Application Programming Model
1 -
SAP Datasphere
2 -
SAP S4HANA Cloud
1 -
SAP S4HANA Migration Cockpit
1 -
Technology Updates
6,873 -
Technology Updates
420 -
Workload Fluctuations
1
Related Content
- Demystifying the Common Super Domain for SAP Mobile Start in Technology Blogs by SAP
- Improving Time Management in SAP S/4HANA Cloud: A GenAI Solution in Technology Blogs by SAP
- IoT - Ultimate Data Cyber Security - with Enterprise Blockchain and SAP BTP 🚀 in Technology Blogs by Members
- Accelerate Business Process Development with SAP Build Process Automation Pre-Built Content in Technology Blogs by SAP
- Unify your process and task mining insights: How SAP UEM by Knoa integrates with SAP Signavio in Technology Blogs by SAP
Top kudoed authors
| User | Count |
|---|---|
| 36 | |
| 25 | |
| 17 | |
| 13 | |
| 8 | |
| 7 | |
| 7 | |
| 6 | |
| 6 | |
| 6 |