- SAP Community
- Products and Technology
- Enterprise Resource Planning
- ERP Blogs by Members
- An approach for fixing delimiter issues in LMS CSV...
- Subscribe to RSS Feed
- Mark as New
- Mark as Read
- Bookmark
- Subscribe
- Printer Friendly Page
- Report Inappropriate Content
Overview:
Currently comma separated values files (CSV) in the Learning Management System (LMS) can cause issues and require additional formatting for countries that do not use a comma as their list separator. Many countries outside the US use a semicolon (;) as their list separator. This means that when the CSV is initially interpreted by their version of excel, with the regional settings of their computer, the best case is users have to go through an extra step of doing a text to column with a comma delimiter to use the report. The worst case is an unusable report because of a character that causes the text to columns to malfunction, which misaligns all the data. It is the case of the unusable report that led to the research and eventual solution found for this post.
Items Needed for Solution:
- Access to Export and Import Reports from your LMS instance.
- Latest version of Plateau Report Designer (PRD) and a basic working knowledge of the program.

Note: You do not need to be an expert at PRD to apply this fix to reports. There is no SQL involved in the solution. You not need JDBC access to the database you are fixing since there is no SQL to test. You will simply be able to import the .ZIP PRD file and run the report to verify the solution works as intended. If you need some basic information or want to become familiar with the Plateau Report Designer, there is an article here.
Actions:
Choose the CSV report you want to export from your instance. We are going to export the Learning History (CSV) for our example. You will navigate to the Learning Admin -> Reports and find the report you want to export. For the purposes of the example of this solution the Learning History (CSV) report will be used.

Note: Make sure you have changed the default file name to something new before you open in PRD. This will help prevent your from importing your changes over the standard report in your instance.
If you are familiar with custom reporting I will outline the steps broadly here. You may not need the more in-depth walk through provided in this section below and you can skip to the examples after reviewing these steps:
- Export the report, rename it and load into PRD.
- Insert a header row above the first row of labels.
- Merge all of the header row into one large box/column.
- Insert a label into the new large header box and name it sep=
- Save your report and import it as a new custom report for testing.
The first step is covered above with the choice and picture of the Learning History (CSV) report chosen for the example and the export button next to it is highlighted.
Next you will want to open the report in your PRD tool. Go into the outline view (red 1 below) and click inside a cell so you can see all of the table row selectors appear (red 2 below.)
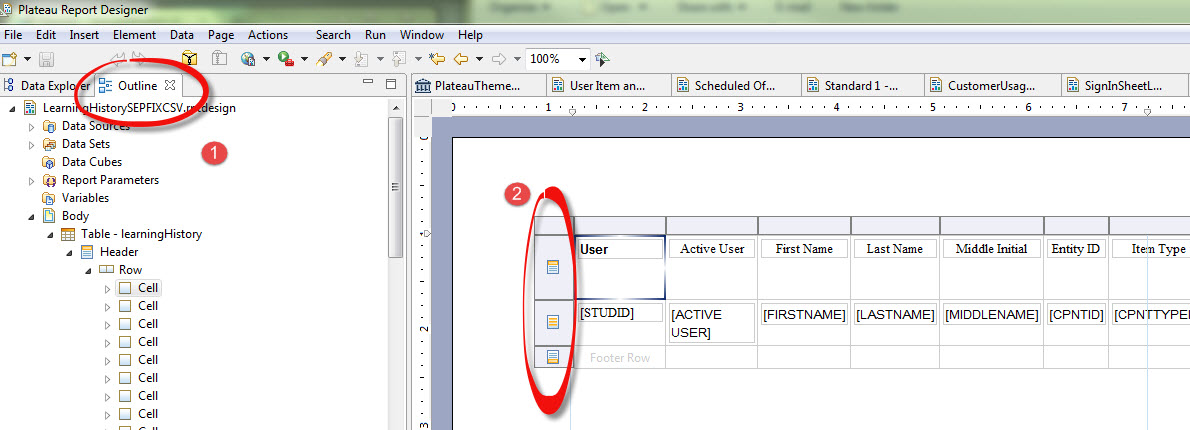
You are going to select the first rows' selector to highlight the entire row. Then you will left click and go down to Insert -> Row -> Above (pictured below.)

This will add a header row above the row you selected. Make sure it is a header row and not a detail row. It should look like the following image:
Next you will want to select the first box of the header row and slide over all the way to the last column of the header row and hold shift and select the last box. Once this is done the row will be highlighted in blue (Note: This is not the same if you try to use the entire row selector. You must select the first box and last while holding shift before you click on the last box.) If you have done the selection correctly you will see a merge option (not grayed out/pictured below) when you right click in the boxes you have highlighted, you want all of these boxes merged into one large box.

Once you have the single header box, right click inside it and go to Insert -> Label.

You then need to enter the name of the label which should be sep=

This is the actual fix to the report. You now need to save the report, save the zip and import it back into your instance. Please remember to NOT overwrite your existing standard SF reports as a best practice. If you renamed the file as mentioned above this should not be an issue or option.
Samples and Testing:
To test the regional settings were changed to have the list separator as a semicolon, and then the old learning history report and the updated learning history reports were run to show the difference in the outputs when opened in excel.
If you want to do your own tests to change your settings for list separator go to your windows control panel -> region and language (or regional settings) -> additional settings then change the list separator to ; (These steps may vary depending on your version of operating system)

Original Learning History (CSV) with a semicolon as a delimiter:

Learning History (CSV) Separation Fix applied with semicolon set as delimeter:

With the fix applied the column are automatically set and the sep= header is not shown. For some versions of excel for Macintosh the sep= may appear, but it does not affect the behavior of the report and can simply be removed. So far no windows versions of excel seem to display it.
Conclusion:
This problem with separators is a known issue that people on the support forums have notified Successfactors (SF) of and requested a fix be applied to the standard SF reports. It is currently being considered by SF for implementation according the the forums as well as an enhancement request from users. The solution provided above is something that can be used to bridge this gap until SF implements their own fix.
If you implement this solution and there is an issue I have not covered I would ask that you please leave them it in the comments. Also, if there is something I did not go into enough detail on, please feel free to comment and I will answer them as quickly as possible. This solution is written for someone with basic PRD experience, so the howto of importing and exporting the report are not covered in-depth.
I hope to be providing some more PRD reporting samples and howtos for basic issues that arise in the future. If you have any suggestion for basic/common problems or requests please feel free to comment or contact me.
For convenience you can download the .zip history report via dropbox here.
Thanks for your attention and feedback,
Dwayne Phillips - Veritas Prime
- SAP Managed Tags:
- SAP Landscape Transformation,
- HCM (Human Capital Management)
You must be a registered user to add a comment. If you've already registered, sign in. Otherwise, register and sign in.
-
"mm02"
1 -
A_PurchaseOrderItem additional fields
1 -
ABAP
1 -
ABAP Extensibility
1 -
ACCOSTRATE
1 -
ACDOCP
1 -
Adding your country in SPRO - Project Administration
1 -
Advance Return Management
1 -
AI and RPA in SAP Upgrades
1 -
Approval Workflows
1 -
ARM
1 -
ASN
1 -
Asset Management
1 -
Associations in CDS Views
1 -
auditlog
1 -
Authorization
1 -
Availability date
1 -
Azure Center for SAP Solutions
1 -
AzureSentinel
2 -
Bank
1 -
BAPI_SALESORDER_CREATEFROMDAT2
1 -
BRF+
1 -
BRFPLUS
1 -
Bundled Cloud Services
1 -
business participation
1 -
Business Processes
1 -
CAPM
1 -
Carbon
1 -
Cental Finance
1 -
CFIN
1 -
CFIN Document Splitting
1 -
Cloud ALM
1 -
Cloud Integration
1 -
condition contract management
1 -
Connection - The default connection string cannot be used.
1 -
Custom Table Creation
1 -
Customer Screen in Production Order
1 -
Data Quality Management
1 -
Date required
1 -
Decisions
1 -
desafios4hana
1 -
Developing with SAP Integration Suite
1 -
Direct Outbound Delivery
1 -
DMOVE2S4
1 -
EAM
1 -
EDI
2 -
EDI 850
1 -
EDI 856
1 -
EHS Product Structure
1 -
Emergency Access Management
1 -
Energy
1 -
EPC
1 -
Find
1 -
FINSSKF
1 -
Fiori
1 -
Flexible Workflow
1 -
Gas
1 -
Gen AI enabled SAP Upgrades
1 -
General
1 -
generate_xlsx_file
1 -
Getting Started
1 -
HomogeneousDMO
1 -
IDOC
2 -
Integration
1 -
Learning Content
2 -
LogicApps
2 -
low touchproject
1 -
Maintenance
1 -
management
1 -
Material creation
1 -
Material Management
1 -
MD04
1 -
MD61
1 -
methodology
1 -
Microsoft
2 -
MicrosoftSentinel
2 -
Migration
1 -
MRP
1 -
MS Teams
2 -
MT940
1 -
Newcomer
1 -
Notifications
1 -
Oil
1 -
open connectors
1 -
Order Change Log
1 -
ORDERS
2 -
OSS Note 390635
1 -
outbound delivery
1 -
outsourcing
1 -
PCE
1 -
Permit to Work
1 -
PIR Consumption Mode
1 -
PIR's
1 -
PIRs
1 -
PIRs Consumption
1 -
PIRs Reduction
1 -
Plan Independent Requirement
1 -
Premium Plus
1 -
pricing
1 -
Primavera P6
1 -
Process Excellence
1 -
Process Management
1 -
Process Order Change Log
1 -
Process purchase requisitions
1 -
Product Information
1 -
Production Order Change Log
1 -
Purchase requisition
1 -
Purchasing Lead Time
1 -
Redwood for SAP Job execution Setup
1 -
RISE with SAP
1 -
RisewithSAP
1 -
Rizing
1 -
S4 Cost Center Planning
1 -
S4 HANA
1 -
S4HANA
3 -
Sales and Distribution
1 -
Sales Commission
1 -
sales order
1 -
SAP
2 -
SAP Best Practices
1 -
SAP Build
1 -
SAP Build apps
1 -
SAP Cloud ALM
1 -
SAP Data Quality Management
1 -
SAP Maintenance resource scheduling
2 -
SAP Note 390635
1 -
SAP S4HANA
2 -
SAP S4HANA Cloud private edition
1 -
SAP Upgrade Automation
1 -
SAP WCM
1 -
SAP Work Clearance Management
1 -
Schedule Agreement
1 -
SDM
1 -
security
2 -
Settlement Management
1 -
soar
2 -
SSIS
1 -
SU01
1 -
SUM2.0SP17
1 -
SUMDMO
1 -
Teams
2 -
User Administration
1 -
User Participation
1 -
Utilities
1 -
va01
1 -
vendor
1 -
vl01n
1 -
vl02n
1 -
WCM
1 -
X12 850
1 -
xlsx_file_abap
1 -
YTD|MTD|QTD in CDs views using Date Function
1
- « Previous
- Next »
- SAP Fiori for SAP S/4HANA - Technical Catalog Migration – How the migration process works in Enterprise Resource Planning Blogs by SAP
- Linking a SAP Build app to Microsoft Teams in Enterprise Resource Planning Blogs by Members
- Linking SAP Flexible Workflow to Microsoft Teams in Enterprise Resource Planning Blogs by Members
- Artificial Intelligence and Technologies in SAP S/4HANA Cloud Public Edition 2402 in Enterprise Resource Planning Blogs by SAP
- Finance in SAP S/4HANA Cloud Public Edition 2402 in Enterprise Resource Planning Blogs by SAP
| Subject | Kudos |
|---|---|
|
|
|
|
|
|
|
|
|
|
|
|
|
|
|
|
|
|
|
| User | Count |
|---|---|
| 2 | |
| 2 | |
| 2 | |
| 2 | |
| 2 | |
| 1 | |
| 1 | |
| 1 | |
| 1 | |
| 1 |