
- SAP Community
- Products and Technology
- Additional Blogs by SAP
- A Simple HCI to SAP Cloud Connector to On-Premise ...
Additional Blogs by SAP
Turn on suggestions
Auto-suggest helps you quickly narrow down your search results by suggesting possible matches as you type.
Showing results for
Former Member
Options
- Subscribe to RSS Feed
- Mark as New
- Mark as Read
- Bookmark
- Subscribe
- Printer Friendly Page
- Report Inappropriate Content
03-03-2016
10:58 AM
A Simple HCI to SAP Cloud Connector to On-Premise Scenario.
Pre-requisites systems setup and requirements:
- SAP Cloud Connector (SCC) (for windows/linux/Mac) installed in your on-premise system landscape.
- On-Premise system (ERP/CRM/..).
- HCI IFLMAP node Tenant subscribed to an SAP HCP account (sibling/customer account).
- Your user should be a member of this SAP HCP tenant with “Cloud Connector Admin” role. This role can be removed later after the SSL tunnel setup.
- Cloud connector must have internet access to the SAP HANA Cloud Platform landscape host, either directly or via HTTPS proxy.
- Cloud connector must have direct access to the internal system.
Configuration steps overview:
- In SCC add the HCP Account to establish SSL Tunnel between the SAP HCP account and SCC.
- In SCC Create On-Premise system host name mapping to virtual host name. This is to create https/http/RFC channel between On-Premise system and SCC. In our scenario create https channel.
- In HCI create simple iflow to do a “Get” http call using the virtual host URL and receive the response to mail receiver.
Configuration Scenario:

A. Configuration Step 1:
In SCC add the HCP Account to establish SSL Tunnel between the SAP HCP account and SCC.
- Login to SCC with your user/password as shown in Figure 1. In case you have forward proxy setup please maintain the forward proxy setting. (Go-to Settings -> https proxy) Refer Figure 1.1
Figure 1

Figure 1.1

2. Add the HCP account name to create SSL Tunnel as shown in the figure 2 below.
- Go to Account Dashboard
- Choose Add
- Supply the inputs and save it. (HCP Account name can be taken from the HCI tenant from HCP account page as shown in figure 4 in appendix below).
- After the inputs are saved should get an entry in the Account Dashboard as shown in the figure 3 below.
Figure 2
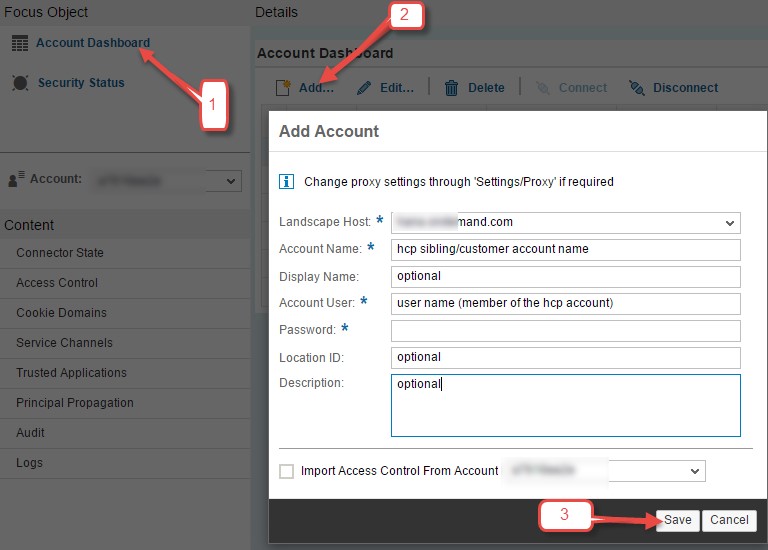
Figure 3

Appendix for configuration step 1:
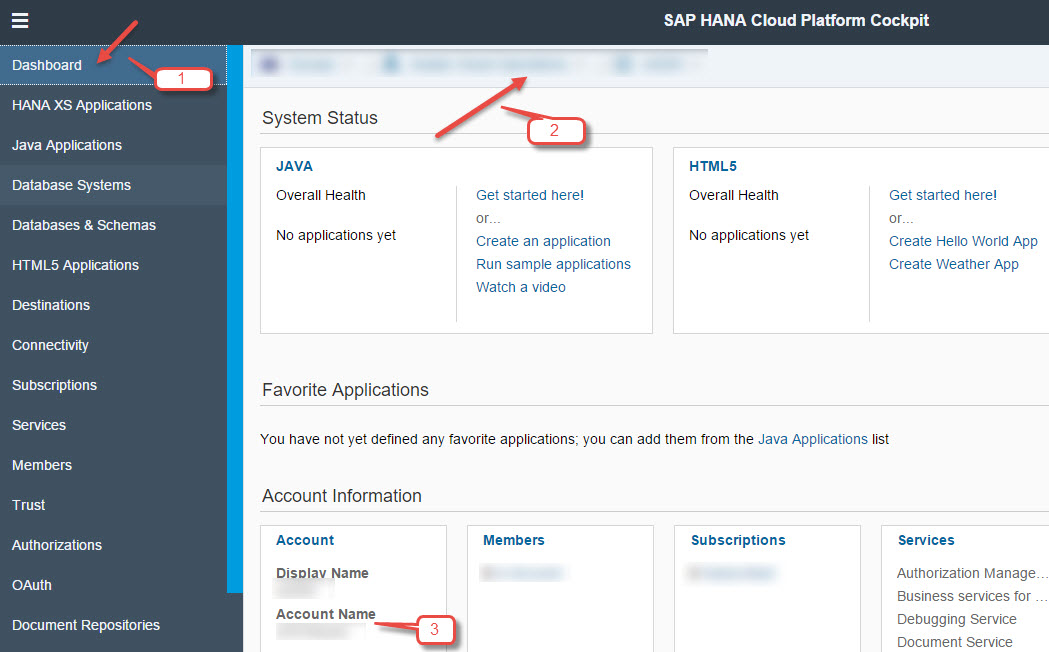
- Go to HCP account page (account.hana.ondemand.com) and navigate to the dashboard of your HCP account take the account id as shown in the Figure 4.
Figure 4
2. When you get this authorization problem while adding the HCP Account Please ensure your user should be a member of this HCP Account with "Cloud Connector Admin" role. This role shall be removed after this SSL Tunnel setup.
Figure 5

B. Configuration Step 2:
In SCC Create On-Premise system host name mapping to virtual host name. This is to create https/http/RFC channel between On-Premise system and SCC. In our scenario create https channel.
- Select the account name created in the above configuration step from drop down menu. Refer figure 6.
- Select the Access Control. Refer figure 6.
- Select “Add“ from “Mapping Virtual to Internal System”. Refer figure 6.
- Choose the Backend type as ABAP system and Proceed to Next step in the wizard. Refer figure 6.
- Select Protocol as “https”. Refer figure 7.
- Enter the “internal host name” and port number of the on-premise system. This can be taken from the abap system using tcode: smicm ; Menu “Go to” and choose “Services” Refer figure 8 and 9.
- Enter the arbitrary name and port for the virtual host and port. Refer figure 10.
- Choose the Principal type “None”. Refer Figure 11.
- Enter the description that is optional.
- Finish the step with check box ticked “Check availability of internal host”. Refer figure 12.
- Should get an entry as shown in the figure 13.
- Add the service URL resource path of the backend system as shown in figure 14.
- Finally should see the icon turns to green color as shown in figure 15.
- Go-to your HCP Account page “account.hana.ondemand.com”. Choose your HCP Account and see under “Connectivity” menu the Cloud connector status is connected and the available exposed backend systems from HCP Cloud. Refer figure 16.
Figure 6

Figure 7

Figure 8

Figure 9

Figure 10

Figure 11

Figure 12

Figure 13

Figure 14

Figure 15
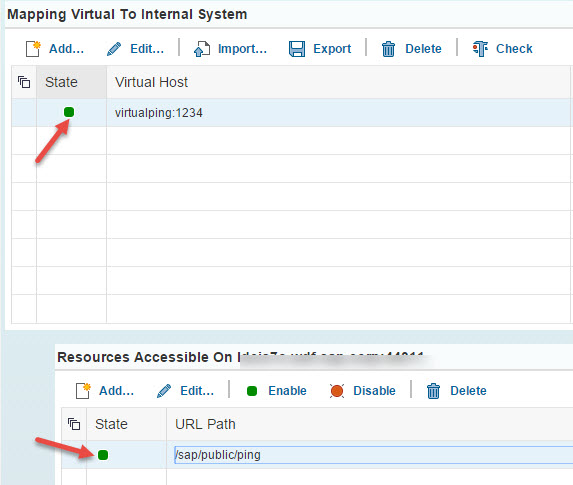
Figure 16

C. Configuration Step 3:
In HCI create simple iflow to do a “Get” http call using the virtual host URL and receive the response to the mail receiver.
- Create a simple “request-reply” iflow to do an http call to the On-premise via SCC as shown below. Refer figure 17.
- The “Request-Reply” to Http adapter address is the virtual host URL that is configured in SCC. Refer figure 18.
- The Proxy type should be “On-Premise”. Refer figure 18.
- Receiver Mail adapter is configured to receive the response of the on-premise system. The receiver adapter shall be any.
- Deploy this iflow to the HCI tenant subscribed under the HCP Sibling account that is connected to SCC.
- Please note the MPL log as it should show the http call pointing to the virtual URL. (HCI Tenant->Message monitoring->Properties) Refer figure 19.
- Go-to SAP Cloud Connector page and notice the “Connector State” and the “Connections” after your successful request from HCI iflow to SCC. Refer figure 20.
- Check the Audit log of the SAP Cloud connector and note the access allowed via SCC for the virtual host URL and its resource “/sap/public/ping”. Refer figure 21.
Figure 17

Figure 18

Figure 19

Figure 20

Figure 21

Troubleshooting Steps:
When you get error in HCI Message log as shown here:
- HTTP response '403: Forbidden' when communicating with http://virtualping:1234/sap/public/ping
Proposed solution:
Since the called or mapped URL is “https” https://hostname/sap/public/ping the sap cloud connector has to trust the Certificate Authority or the issuer of this backend service URL.
Steps to add the Certificate Authority into the Trust store of the SCC.
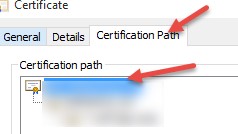
- Download the Certificate Authority by following the steps:
- Select the Lock gree icon (in google chrome) prefixed to the URL.
- Select the “Connection” tab and “Certificate information” link.
- Click on the “Certificate path” tab and Double click the top root certificate.
- Go-to “Details” tab of the root certificate and “Copy to file” and export it to the default format.


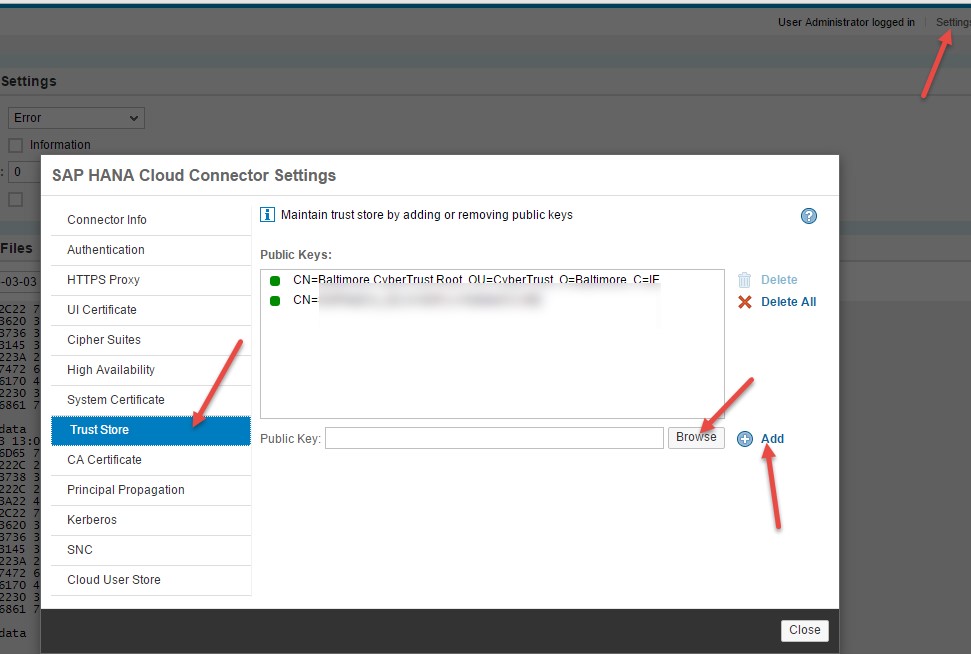
2. Go-to SCC page -> Settings -> Trust Store
3. Browse the Certificate Authority certificate that was downloaded above and Add it to the truststore as shown in the picture below.
References to SAP Cloud Connector guides.
6 Comments
Related Content
- ABAP Cloud Developer Trial 2022 Available Now in Technology Blogs by SAP
- It has never been easier to print from SAP with Microsoft Universal Print in Technology Blogs by Members
- How to build SOAP service in SAP Cloud Integration in Technology Blogs by Members
- How to Extend Order Integration from SAP Order Management Foundation to SAP S/4HANA in CRM and CX Blogs by SAP
- Single Sign On to SAP Cloud Integration (CPI runtime) from an external Identity Provider in Technology Blogs by SAP