In my first blog about the SAP Design Studio scorecard component, I have talked about some basic configurations of the scorecard component. In this blog, I will further discuss the formatting features of the scorecard component. As the scorecard component has a rich set of formatting properties, I will not be able to demonstrate all of them here. For detailed information, please refer to the SAP office document.
This is the scorecard sample I am going to configure in this blog.
And this is the data source assigned to the above scorecard component.

Please note that all the configurations in this blog are in the Additional Properties view. Here is the workflow I am going to follow in this demo:
- Group Header configuration
- “Header Layout” and “Column Properties” of Column configuration
- “Column Content” and “Cell Layout” of Column configuration
So, here are the Step-by-Step configurations:
1. Generate the initial scorecard component with “up to Sales Organization” as the value of “Select Dimension” in the “Dimension for Row Scope” section. Please see my first blog for details on this.

2. Now, I am ready to configure the scorecard component to make it look better. As mentioned, I am going to start with the group header first and then move on to each column.
If it’s not already displayed, click on the “Show Group Header” link.

A list of generated headers should be displayed.

3. While pressing the “Ctrl” key on the keyboard, select the headers “HEADER_1” and “HEADER_2”. Click on the “Group” button to group them together.

4. In the “Header Content” tab of the newly created group header “HEADER_1”, enter “Sales Org” in the field “Group Text”.

5. Similarly, group the headers “HEADER_3”, “HEADER_4” and “HEADER_5” with “Sales Info” as the “Group Text”.

6. Next, I am going to format the “Header Layout” of the group header “HEADER_1” by replacing the default values of following properties:
Group Background: #0080FF
Group Border Right: 1px solid #dddddd
Group Font Size: 16px
Group Font Weight: Bold
Group Font color: white
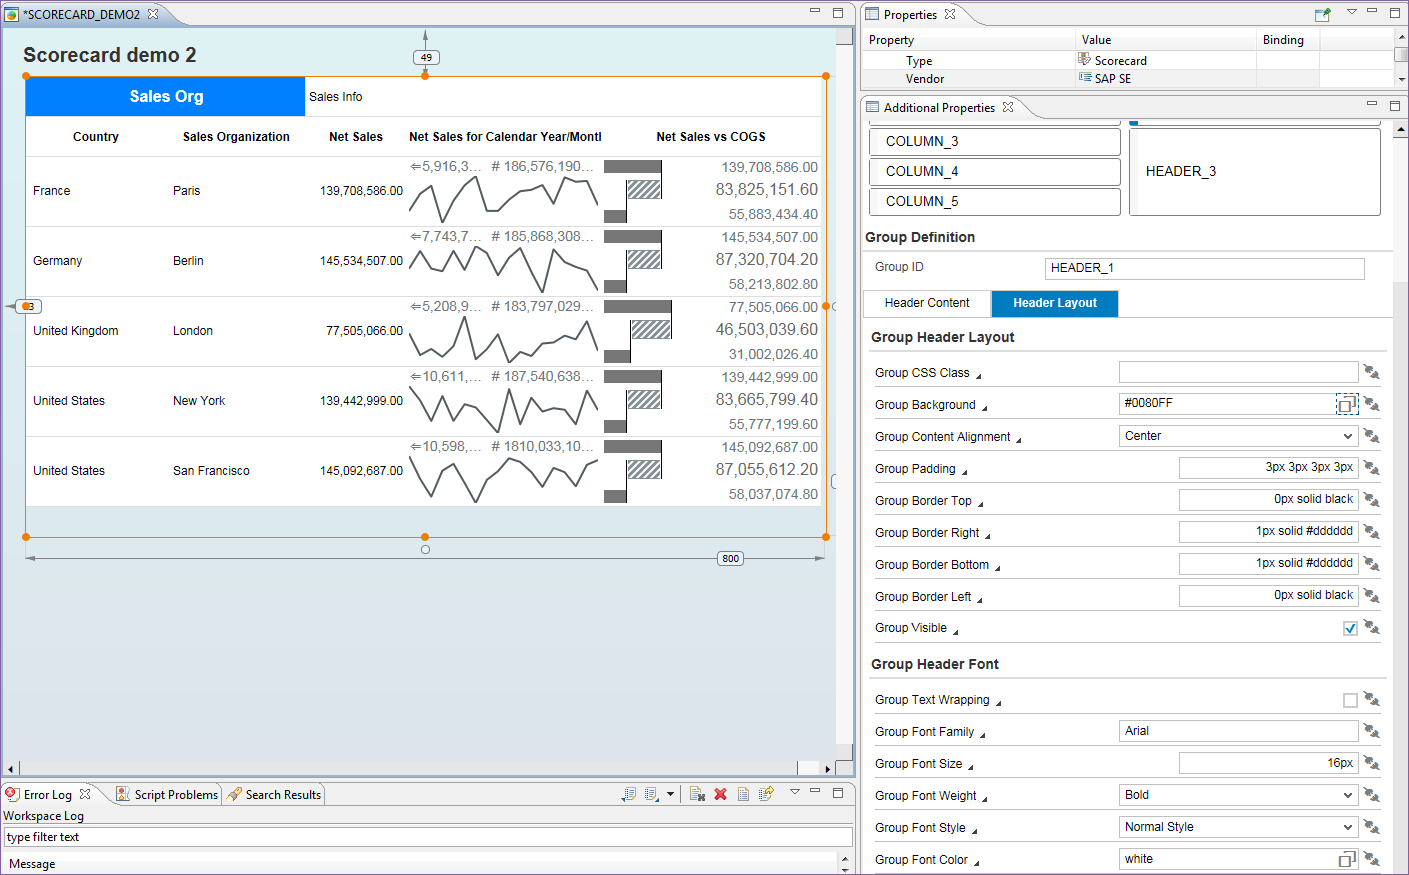
7. Similarly, I configure the group header “HEADER_3” except the “Group Border Right” property.

8. After done with the group headers, let’s work on the columns.
In the “Header Layout” tab of the “COLUMN_1” to “COLUMN_5”:
Header Background: #0080FF
Header Font Weight: Bold
Header Font Color: white
In addition, for the “COLUMN_2”,
Header Text Wrapping: check
In the “Column Properties” tab of the “COLUMN_2”
Column Width in Pixels: change from 140 to 100

The scorecard component looks like this at the moment.

9. As I finished the “Header Layout” and Column Properties” configurations of the group headers and column headers, I am ready to format the “Column Content” and “Cell Layout” for each column. I will try to configure different properties for each column.
COLUMN_1:
Column Content:
Icon: Click on the "Conditional Binding (Toggle)" button to set the “Bind Type” and use conditional formatting for the country flag icons as shown in the screenshot. Click on the "Add New Conditional Definition" button to specify the values of countries and upload the country flag images.
Display Mode: Text with Icon
Cell Layout:
Cell Font Weight: Bold

COLUMN_2:
Cell Layout:
Cell Background: similarly, use conditional formatting for the two US cities to set the background color to “#FFFF80”, as I want to highlight them. Notice that I am using complex binding to realize the conditional formatting at the cell level.
Cell Border Right: 1px solid #dddddd
Cell Border Left: 1px solid #dddddd
Cell Font Weight: Bold

COLUMN_3:
Column Content:
Decimal Place: 0
Prefix: €
Cell Layout:
Cell Font Weight: Bold
Cell Font Style: Italic Style
Cell Font Size: use the conditional formatting to set the font size to “15px”
Cell Font Color: use the conditional formatting to set the font color to “red”
COLUMN_4:
Cell Template in the “Selected Column Definition” section: Trend Chart, Columns
Column Content:
Actual Color: Good
Decimal Place: 0
Show Value Count: uncheck
Cell Layout:
Cell Background: #80FFFF
COLUMN_5:
Column Content:
Actual Color: Error
At this point, I have finished all the formatting configurations for this demo scorecard component.
In summary, I have covered some of the major formatting properties of the scorecard component in this blog. Hope this blog serves the demonstration purpose. Please stay tune for the next blog of this scorecard component series.
Happy Holidays! :smile:
