
- SAP Community
- Products and Technology
- Technology
- Technology Blogs by SAP
- Your First Extension: Part 5 - Making Your Compone...
Technology Blogs by SAP
Learn how to extend and personalize SAP applications. Follow the SAP technology blog for insights into SAP BTP, ABAP, SAP Analytics Cloud, SAP HANA, and more.
Turn on suggestions
Auto-suggest helps you quickly narrow down your search results by suggesting possible matches as you type.
Showing results for
Advisor
Options
- Subscribe to RSS Feed
- Mark as New
- Mark as Read
- Bookmark
- Subscribe
- Printer Friendly Page
- Report Inappropriate Content
12-18-2015
9:29 AM
This is part of a tutorial series on creating extension components for Design Studio.
We now have a primitive gauge component. It is static, however, and we'd like to make it dynamic. There are a couple of ways that we can do this. One is to use data binding and bind the gauge value directly to one of the measures in a data source. We'll cover that in the next installment. This time, we're going to make the gauge scriptable. Specifically, we're going to make some of its properties available for display and modification via the Design Studio scripting language.
Extending the Design Studio scripting language to make a component scriptable is a fairly simple process:
- You write your JavaScript; that you want to execute in Design Studio's script engine.
- You package this JavaScript into a domain specific language, called Zen Template Language (ZTL).
- This ZTL gets packaged into a file, called contribution.ztl. contribution.ztl goes into the same directory as contribution.xml.
This is an example of a ZTL snippet:
class com.sap.sample.customcomponent.Customcomponent extends Component {
void customMehtod() {* //Some Javascript *}
}
At first glance, ZTL looks like Java. If you are familiar with Java, it looks like you are creating new subclass, called Customcomponent and that this is extending Component . Apparently, the new class is implementing a new method, called customMethod() and probably inheriting a number of others. So far, so Java. Then you look inside the brackets and you have JavaScript. Clearly, this won't work as a Java class, at least out of the box. What the Design Studio framework is using the information parsed from the Javaesque wrapper to extend the Editor's syntax library. How exactly it does this is not in any publicly exposed API, however, you can interact with it by understanding the anatomy of a ZTL method declaration.
Anatomy of a ZTL Method Declaration
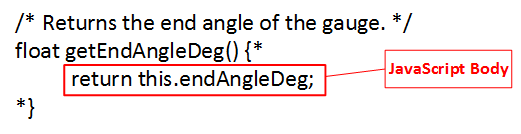
Let's examine two methods; a setter for the start angle of the gauge and a getter for the end angle.
/* Returns the end angle of the gauge. */
float getEndAngleDeg() {*
return this.endAngleDeg;
*}
/* Sets the start angle of the gauge. */
void setStartAngleDeg(/* New angle */ float newAngle) {*
this.startAngleDeg = newAngle;
*}
The comment block at the top of any method declaration becomes the documentation text for the method, in the Design Studio script editor.

The return value type and method name. There are five values return types; void (nothing will be returned), String, int, float and boolean. Yes, String is capitalized, while the other return types are not.

If it has input parameters, then you can put a comment block in to add a description of the parameters in the designer.

If it has input parameters, then these also need to go into the parenthesis, following the method name.

The parse-enclosure separates the ZTL from the JavaScript payload. The Design Studio SDK framework will know to treat everything between {* and *} as JavaScript.

Of course, you need the actual JavaScript as well. Remember that it operates within the context of the component, so this is the component. An important point to remember here is that this JavaScript code does *not* run in the user's browser. In runs in Design Studio's JavaScript engine, which means that you only have access to raw JavaScript and nothing from the component's DOM.
This gives us the added script methods, when we are working with the component in the designer. We also have full documentation for these methods.

Extending SCNGauge
SCNGauge has several properties, but we don't want to expose all of them to scripting at runtime:
- The offset properties and outerRadius are not shown in the designer, because they are calculated. For the same reason, we'll not expose them to the Design Studio scripting language either.
- The outer radius is calculated. Unless we want to implement the appropriate defensive error checking - and we don't want to in this tutorial - it is best not to allow the designer to set the inner radius via script. Let's leave that to the design time, where she already gets a warning if she tries to use an invalid value.
- As with outer radius, we'd have to implement quite a bit of defensive programming if we exposed these to scripting. In fact, we spent the last four installments implementing a padding visualizer in the additional properties sheet to help with design. Let's also leave these out.
This leaves us with three properties, that we'll be creating getters and setters for:
- startAngleDeg
- endAngleDeg
- colorCode
We don't have Color available as one of the data type options, but a string will suffice. Following the rules defined above, the six methods (3 getters and 3 setters) are straightforward. The entire contribution.ztl file is 33 lines long; including comfortable line spacing.
class com.sap.sample.scngauge.SCNGauge extends Component {
/* Returns the end angle of the gauge. */
float getEndAngleDeg() {*
return this.endAngleDeg;
*}
/* Sets the end angle of the gauge. */
void setEndAngleDeg(/* New angle */ float newAngle) {*
this.endAngleDeg = newAngle;
*}
/* Returns the start angle of the gauge. */
float getStartAngleDeg() {*
return this.startAngleDeg;
*}
/* Sets the start angle of the gauge. */
void setStartAngleDeg(/* New angle */ float newAngle) {*
this.startAngleDeg = newAngle;
*}
/* Returns the current color of the gauge. */
String getColor() {*
return this.colorCode;
*}
/* Sets the current color of the gauge. */
void setColor(/* New color */ String newColor) {*
this.colorCode = newColor;
*}
}
That's it! We don't have to edit any files other than contribution.ztl.
Testing
When we test, we'll leave these three properties (or set them if needed in the properties pane):
- Start Angle = -90.0
- End Angle = 90.0
- Color = blue
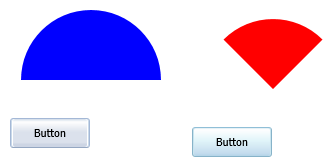
We'll add a button to our app.

In the On Click event of the button, we can now add the following script (and the value help should work for method calls). It will set the starting and ending angles to 45 degrees to the left and right (respectively) of the 12 O'Clock position and turn the gauge red.
SCNGAUGE_1.setStartAngleDeg(-45.0);
SCNGAUGE_1.setEndAngleDeg(45.0);
SCNGAUGE_1.setColor("red");
When we test it at runtime, we should first see the image below, left; a blue semicircle. When we click on the button, it should turn into a red quarter circle.
As always, the completed extension (as of part 5) is available as a Github repository.
- SAP Managed Tags:
- SAP BusinessObjects Design Studio
2 Comments
You must be a registered user to add a comment. If you've already registered, sign in. Otherwise, register and sign in.
Labels in this area
-
ABAP CDS Views - CDC (Change Data Capture)
2 -
AI
1 -
Analyze Workload Data
1 -
BTP
1 -
Business and IT Integration
2 -
Business application stu
1 -
Business Technology Platform
1 -
Business Trends
1,661 -
Business Trends
88 -
CAP
1 -
cf
1 -
Cloud Foundry
1 -
Confluent
1 -
Customer COE Basics and Fundamentals
1 -
Customer COE Latest and Greatest
3 -
Customer Data Browser app
1 -
Data Analysis Tool
1 -
data migration
1 -
data transfer
1 -
Datasphere
2 -
Event Information
1,400 -
Event Information
65 -
Expert
1 -
Expert Insights
178 -
Expert Insights
283 -
General
1 -
Google cloud
1 -
Google Next'24
1 -
Kafka
1 -
Life at SAP
784 -
Life at SAP
11 -
Migrate your Data App
1 -
MTA
1 -
Network Performance Analysis
1 -
NodeJS
1 -
PDF
1 -
POC
1 -
Product Updates
4,577 -
Product Updates
330 -
Replication Flow
1 -
RisewithSAP
1 -
SAP BTP
1 -
SAP BTP Cloud Foundry
1 -
SAP Cloud ALM
1 -
SAP Cloud Application Programming Model
1 -
SAP Datasphere
2 -
SAP S4HANA Cloud
1 -
SAP S4HANA Migration Cockpit
1 -
Technology Updates
6,886 -
Technology Updates
409 -
Workload Fluctuations
1
Related Content
- When to Use Multi-Off in 3SL in Technology Blogs by SAP
- How to build SOAP service in SAP Cloud Integration in Technology Blogs by Members
- Experiencing Embeddings with the First Baby Step in Technology Blogs by Members
- What’s New in SAP Analytics Cloud Release 2024.07 in Technology Blogs by SAP
- Asset Manager 2210 Extend SAMXXXX_WORKORDER_GENERIC by new entity - zombie entries in List in Technology Q&A
Top kudoed authors
| User | Count |
|---|---|
| 14 | |
| 12 | |
| 10 | |
| 10 | |
| 9 | |
| 7 | |
| 6 | |
| 5 | |
| 5 | |
| 5 |