
- SAP Community
- Products and Technology
- Technology
- Technology Blogs by SAP
- How to connect SAP Mobile Documents (HCP edition) ...
Technology Blogs by SAP
Learn how to extend and personalize SAP applications. Follow the SAP technology blog for insights into SAP BTP, ABAP, SAP Analytics Cloud, SAP HANA, and more.
Turn on suggestions
Auto-suggest helps you quickly narrow down your search results by suggesting possible matches as you type.
Showing results for
former_member18
Participant
Options
- Subscribe to RSS Feed
- Mark as New
- Mark as Read
- Bookmark
- Subscribe
- Printer Friendly Page
- Report Inappropriate Content
12-08-2015
3:14 PM
Part II: How to modify the existing connection of SAP Mobile Documents to an on-premise ABAP System to use a named-user connection
In the first part you have set up a connection from SAP Mobile Documents to your on-premise ABAP system with a service user con.... In this part I will describe what changes you need to make for the connection to use the named user in the backend. The forwarding of the user logon to the backend is called Principal Propagation.
In order to be able to use Principal Propagation, a trust needs to be created between the SAP HANA Cloud Connector and the ABAP System. For this we use a technology called SNC (Secure Network Communication).
After the trust is established, you can configure the Cloud Connector to use Principal Propagation. Technically, the Cloud Connector will issue short-lived client certificates for each user upon request to the backend system. For the ABAP system to accept these certificates, you need to configure the acceptance of client certificates in the ABAP system. Are you still with me??
These are the things you need to do:
1. Enable SNC for the ABAP System
2. Enable SNC for the HANA Cloud Connector
3. Establish Trust between ABAP System and Cloud Connector
4. Enable Principal Propagation in the HANA Cloud Connector (to issue client certificates)
5. Enable Client Certificate Authentication on the ABAP System
6. Modify the Destination in HCP Cockpit to use Principal Propagation
7. Have a beer, if you managed to get it done!
For your reference, have a look at the official Cloud Connector documentation.
1. Enable SNC for the ABAP System
1a) Enable SNC
To enable SNC for the Cloud Connector, you need to perform similar steps as described by Gregor Wolf in his blog:
For your reference see also the official SAP Documentation for using the SAPCRYPTOLIB on AS ABAP
However, life has become a lot easier in the ABAP world as of release 7.31. As of this release you can use transaction SNCWIZARD to enable SNC for the ABAP system.
1b) Export ABAP SNC certificate
After you have configured SNC, you now need to export the ABAP SNC certificate (to import it later into the PSE of the Cloud Connector).
Open transaction STRUST
Switch to Change Mode
Double click on the certificate.
Double click on the Subject Entry
Click the export certificate icon.

Save it on the file system. You will need the certificate file to add to the PSE of the cloud connector.

2. Enable SNC for the HANA Cloud Connector
In this chapter, I will explain how to prepare the Cloud Connector to be ready for the secure connection with the ABAP system.
2a) Create a dedicated Cloud Connector user
First, create new windows user for Cloud Connector.

Assign this user to the Cloud Connector Service


2b) Get SAPCRYPTOLIB
The secure connection requires security stuff (the experts call it SAPCRYPTOLIB) to be downloaded from the Support Portal. The SAPCRYPTOLIB containts the cryptographic functions that are required to establish a secure connection.
Download the Sapcryptolib from the Support Portal:
https://support.sap.com/swdc - Go to "Search for Software"
Search for "sapcryptolib"
As I use Windows, I downloaded the following (with the latest Patch Level)

2c) Download SAPCAR
In case you have SAPCAR somewhere already, you can skip this step.
SAPCAR is the tool to unzip the downloaded .sar file.
As you searched the download center for "sapcryptolib" in the previous step, you now search for "sapcar" and download the latest version for the operating system.
Put both files in one folder. For ease of use, I renamed the one file to "sapcryptolib.sar" and the other to "sapcar.exe".
Open the Command prompt in this folder and use the following command to extract the content in sapcryptolib.sar:

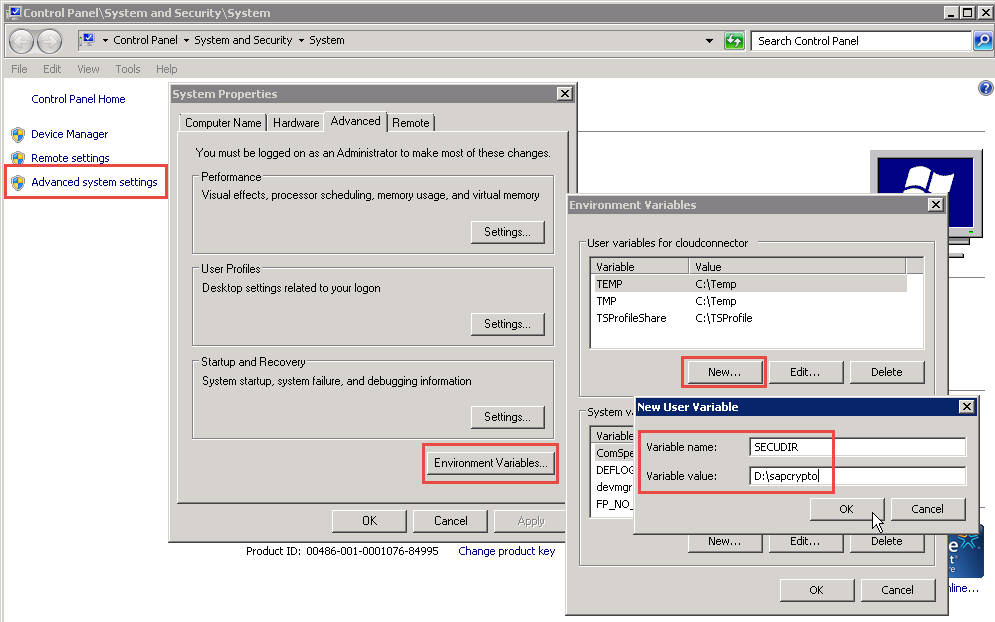
2d) Set SECUDIR Environment Variable
How does the Cloud Connector know, where the security stuff is stored?
The SECUDIR variable is used for the cloud connector user to be able to access the security credentials for SNC during runtime.
This is my description for the steps on Windows 2008R2:
Log on with the user you have created for the cloud connector to run on
(in our case the user name is cloudconnector)
Right-click on Computer (on the desktop)
Select Properties

2e) Create PSE for the Cloud Connector
Make sure you are logged in with Admin rights to the Windows machine.
Open a Command Prompt Window with Administrative Rights (right click on Command Prompt, run as Administrator).

Navigate to the folder in which you have put the files sapcrypto.dll and sapgenpse.exe.
Enter the following command to set a temporary environment variable for the pse-file and the credentials file to be stored at the right location:
Set = <path where you put the files sapcrypto.dll and sapgenpse>

Enter the following command:
sapgenpse gen_pse -v -p <path and name of PSE file to be created>
When prompted, enter a password to protect access to the PSE.

As a result, the file .pse is created in the folder.
2f) Create Credentials File
The next step is to create a so-called credentials file for the user that the cloud connector is running on. With this, that user will be able to access the pse-file during runtime.
Enter command:
sapgenpse seclogin -p <path to pse file> -O <user that the cloud connector runs with>
sapgenpse seclogin -p d:\sapcrypto\CC.pse -O cloudconnector
As a result, a file called cred_v2 is created in the folder.
2g) Export own certificate
To export your own certificate to establish the trust to the ABAP system, perform the following command:
sapgenpse export_own_cert -o <certificate file to be created> - p <pse file>

This is the file, you will need to import into the ABAP PSE.
2h) Perform SNC Settings in Cloud Connector
The required steps are described in the Cloud Connector documentation:
https://help.hana.ondemand.com/help/frameset.htm?f09eefe71d1e4d4484e1dd4b121585fb.html
These are the settings for my implementation (you can set the QoP Level according to your security requirements):

3. Establish Trust between ABAP system and Cloud Connector
At this stage, you have prepared the security requirements (in our case the configuration of SNC) for both communication partners, ABAP and the Cloud Connector.
Now they are ready to trust each other. To establish the actual trust, the certificate of each party needs to be imported into the PSE of the other party (I will not go into additional crypto basics here!).
3a) Import the ABAP SNC Certificate into Cloud Connector PSE
Open a command prompt window in the folder in that you have placed the PSE and credentials file of the cloud connector. To import the ABAP SNC certificate, enter the following command:
sapgenpse maintain_pk -v -a <SNC certificate file of the ABAP server> -p <PSE file of the Cloud Connector>
Example (in my case):
sapgenpse maintain_pk -v -a ABA_SNC.crt -p CC.pse
As a result the Cloud Connector PSE now also contains the SNC certificate of the ABAP System.
3b) Import the Cloud Connector SNC Certificate into ABAP System PSE
Log on to the ABAP System
Open transaction STRUST
Switch to Change Mode
Open the node SNC SAPCRYPTOLIB
Double click on the (green) entry in folder SNC SAPCryptolib
In the Menu select certificate - Import
Browse to the certificate file you have exported from the Cloud Connector PSE
Click on Add to Certificate List

The certificate should now appear in the certificate list.
Do not forget to click SAVE!
3c) Maintain Access Control List for SNC connections
The ABAP uses an additional security measure to protect access. To enable the SNC communication for the Cloud Connector you need to maintain the ACL for SNC connections. See the documentation (Step 1) for further details.
These are the settings I did for my implementation (transaction SNC0):

4. Enable the Cloud Connector to issue Certificates
Follow the steps described in the documentation.
My configuration looks like this:

5. Enable Client Certificate Authentication on the ABAP System
5a) Upload Sample Certificate
Details on how to enable certificate Authentication can be found in the official documentation (Step 2)
I chose to configure the certificate mapping. Details are described here.

Tip: You can generate the sample certificate using the UI of the SAP Cloud Connector as shown in the screenshot below:

5b) Maintain table USREXTID
There has to be a mapping of each certificate to the user in the ABAP system. In our case, the certificate name follows the structure that you have maintained in the Cloud Connector. So in this case, in the ABAP system the mapping can be automated:
Go to transaction SE38 - Call report RSUSREXT
https://help.sap.com/saphelp_nw70ehp2/helpdata/en/a8/f11960daa149958bd73c9b1b20095a/content.htm
6. Modify Destination in HCP Cockpit
To enable Principal Propagation, you need to modify the destination in the HCP Cockpit.
In the HCP Cockpit, go to Destinations.
Click the pencil icon to change the entry:

Remove User and Password values and enter them in the fields Repository User and Repository Password.
Add the property jco.destination.auth_type and set the value to PrincipalPropagation

You can find further details about the parameters in the official documentation.
Now you can test, if the connection in the Mobile Documents Web UI works. If yes, congratulations!
You can now proceed to the next section.
7. Have a beer, if you managed to get it done!
I guess you know the required steps! :smile:
- SAP Managed Tags:
- SAP Document Center,
- MAN (Manufacturing),
- Mobile,
- Security
- Android
- apple
- business suite
- Cloud
- content management
- Data Protection
- data security
- DMS
- document
- Documents
- enterprise mobility
- enterprise portal (ep)
- Fiori
- hcp
- Human Capital Management
- industries
- iOS
- ipad
- iphone
- knowledge management
- manufacturing
- mcm
- meint
- Mobile
- mobile content management
- mobile docs
- mobile documents
- mobile secure
- Mobile Security
- mobile solution
- mobile solutions
- mobility
- netweaver java
- netweaver portal
- OpenText
- plm
- sap document center
- sap mobile
- sap mobile documents
- SAP Mobile Platform
- sap mobility
- sap portal
- SAPHANACLOUD
- saphcp
- Security
- smd
- tablet
- wpc
2 Comments
You must be a registered user to add a comment. If you've already registered, sign in. Otherwise, register and sign in.
Labels in this area
-
ABAP CDS Views - CDC (Change Data Capture)
2 -
AI
1 -
Analyze Workload Data
1 -
BTP
1 -
Business and IT Integration
2 -
Business application stu
1 -
Business Technology Platform
1 -
Business Trends
1,658 -
Business Trends
91 -
CAP
1 -
cf
1 -
Cloud Foundry
1 -
Confluent
1 -
Customer COE Basics and Fundamentals
1 -
Customer COE Latest and Greatest
3 -
Customer Data Browser app
1 -
Data Analysis Tool
1 -
data migration
1 -
data transfer
1 -
Datasphere
2 -
Event Information
1,400 -
Event Information
66 -
Expert
1 -
Expert Insights
177 -
Expert Insights
297 -
General
1 -
Google cloud
1 -
Google Next'24
1 -
Kafka
1 -
Life at SAP
780 -
Life at SAP
13 -
Migrate your Data App
1 -
MTA
1 -
Network Performance Analysis
1 -
NodeJS
1 -
PDF
1 -
POC
1 -
Product Updates
4,577 -
Product Updates
343 -
Replication Flow
1 -
RisewithSAP
1 -
SAP BTP
1 -
SAP BTP Cloud Foundry
1 -
SAP Cloud ALM
1 -
SAP Cloud Application Programming Model
1 -
SAP Datasphere
2 -
SAP S4HANA Cloud
1 -
SAP S4HANA Migration Cockpit
1 -
Technology Updates
6,873 -
Technology Updates
420 -
Workload Fluctuations
1
Related Content
- Start page of SAP Signavio Process Insights, discovery edition, the 4 pillars and documentation in Technology Blogs by SAP
- Demystifying the Common Super Domain for SAP Mobile Start in Technology Blogs by SAP
- What’s new in Mobile development kit client 24.4 in Technology Blogs by SAP
- Accelerate Business Process Development with SAP Build Process Automation Pre-Built Content in Technology Blogs by SAP
- ABAP Cloud Developer Trial 2022 Available Now in Technology Blogs by SAP
Top kudoed authors
| User | Count |
|---|---|
| 37 | |
| 25 | |
| 17 | |
| 13 | |
| 7 | |
| 7 | |
| 7 | |
| 6 | |
| 6 | |
| 6 |