
- SAP Community
- Products and Technology
- Technology
- Technology Blogs by SAP
- How I do self-study on a given Fiori control - par...
Technology Blogs by SAP
Learn how to extend and personalize SAP applications. Follow the SAP technology blog for insights into SAP BTP, ABAP, SAP Analytics Cloud, SAP HANA, and more.
Turn on suggestions
Auto-suggest helps you quickly narrow down your search results by suggesting possible matches as you type.
Showing results for
Advisor
Options
- Subscribe to RSS Feed
- Mark as New
- Mark as Read
- Bookmark
- Subscribe
- Printer Friendly Page
- Report Inappropriate Content
10-23-2015
11:46 AM
- Prerequisite for you to perform the exercises this tutorial
- Tutorial Index - how I do self study on the following topics
- Part1 - this blog
- Part2 - Control renderer
- Part3 - Html native event VS UI5 semantic event
- Part4 - Control metadata
- Part5 - Control instance data - how are function setXXX() and getXXX() implemented
- Part6 - Control data binding under the hood
- Part7 - Implementations for different binding mode: OneWay, TwoWay, OneTime
- Part8 - Control ID
- Part9 - Control internationalization support
- Part10 - Button control in XML view
- Part11 - Button control and its underlying DOM
- Content of this blog
- Step1 - create a sample application with only one button control
- Step2 - Find out what needs to look into: Button-dbg.js & ButtonRenderer-dbg.js
- Step3 - figure out the logic of Modules in UI5
- Step4 - how the button instance is created
As a Fiori developer it is essential to not only learn how to use a given Fiori control provided by UI5 control library, but also understand how the control orchestrates with UI5 runtime under the hood, which makes us more calm when we deal with control issues. In the series of the tutorial I just use the button control ( sap.ui.commons.Button ) as example to demonstrate my self-study approach. If you have better one, please kindly share with me.
My favorite study approach is, as always, debugging. The first task is to identify what needs to be debugged. If you choose a complex Fiori application with a tons of control and the button is just one among them, you can easily get lost during the debugging. My preferred style is to create a most simple Fiori application containing exactly the only button control.
Prerequisite for you to perform the exercises this tutorial
You have to switch on UI5 debug mode via combination key "shift+alt+ctrl+p", in order to expected files downloaded from Chrome network tab:
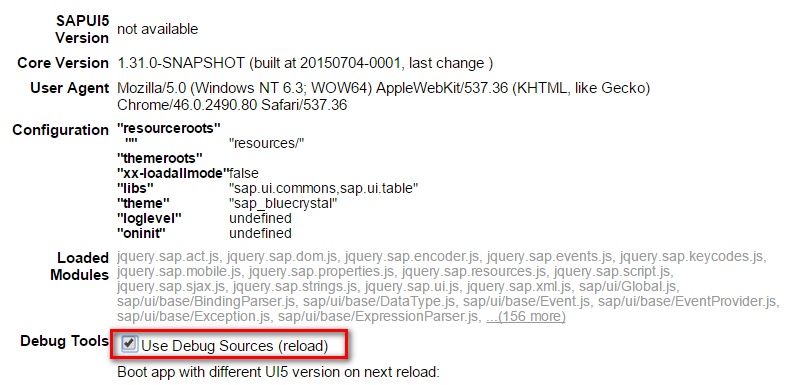
For detail reasons please kindly refer to andreas.kunz 's comment in this blog:
"In productive use, for performance reasons, all controls of a library are also available in the library-preload.json file, which is loaded initially (and can be loaded asynchronously). It contains each control/module as a string, which is then parsed into JavaScript on demand. So this avoids many HTTP requests and thus improves performance."
Tutorial Index - how I do self study on the following topics
Part1 - this blog
Part2 - Control renderer
Part3 - Html native event VS UI5 semantic event
Part4 - Control metadata
Part5 - Control instance data - how are function setXXX() and getXXX() implemented
Part6 - Control data binding under the hood
Part7 - Implementations for different binding mode: OneWay, TwoWay, OneTime
Part8 - Control ID
Part9 - Control internationalization support
Part10 - Button control in XML view
Part11 - Button control and its underlying DOM
Content of this blog
Step1 - create a sample application with only one button control
You can find the source code how to create a button and register press event handling from this link .
I just embedded the code into an html page so the final page for debugging is listed below:
Step2 - Find out what needs to look into: Button-dbg.js & ButtonRenderer-dbg.js
Run this simple application in your webserver and you see Button as expected. In development tool, Sources tab, you see lots of js and css files are loaded by framework automatically. To be exact, they are loaded by sap-ui-core-dbg.js if you switched on debugger mode.

Back to our aim, we need to look into the two files related to button control: Button-dbg.js and ButtonRenderer-dbg.js.

Switch to Network tab, the download of these two fields are triggered by line 11 in our own html and then the call is delegated to UI5 framework code.
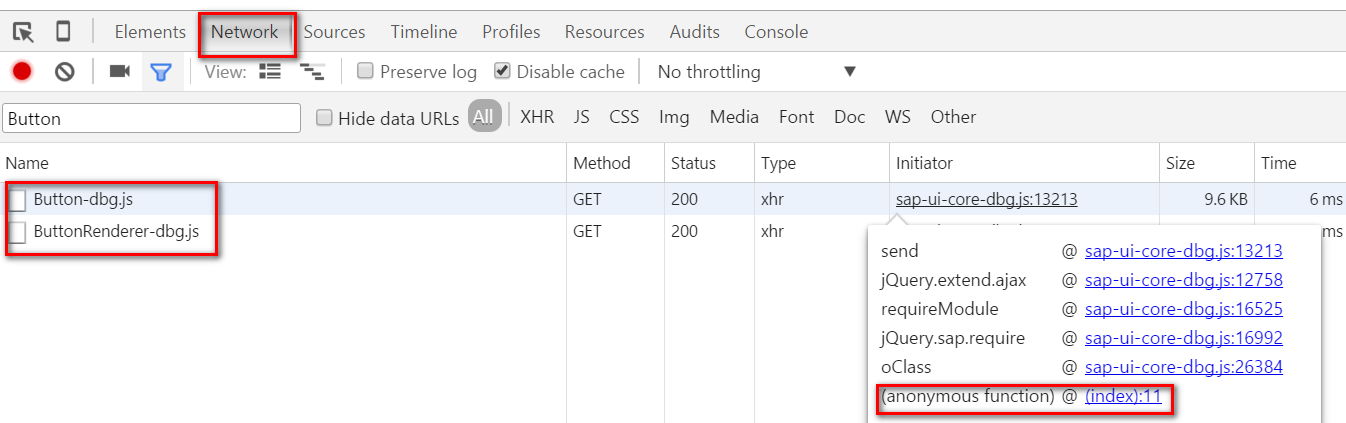
Set a breakpoint in line 11 and re-launch the application. Breakpoint is triggered.
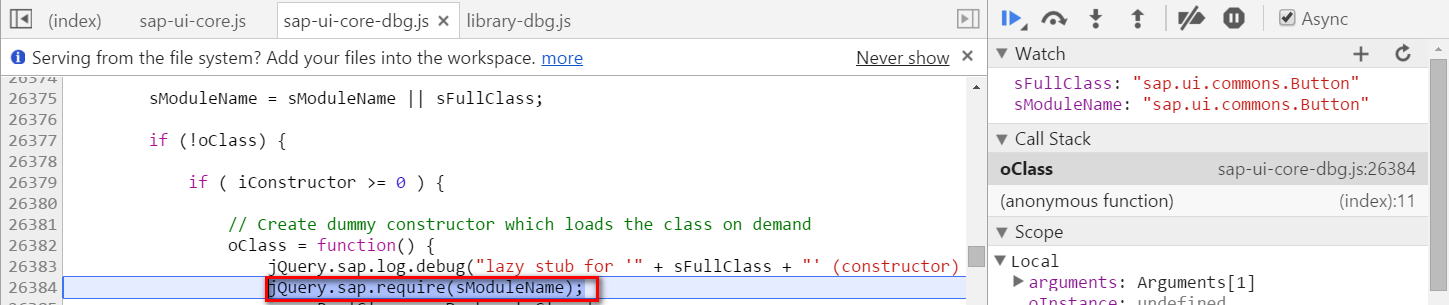
Step3 - figure out the logic of Modules in UI5
Click F11 to step into:

From the code below we can understand the UI5 framework uses a lazy load working style: the corresponding js file for a given control is never initially loaded until the control is really used in the code ( or explicitly required by "jQuery.sap.require("XXXX")" ).
Step into line 26384 again:
Step into line 16992 again:

After the corresponding js file for a required control is loaded, it will be executed and the output is a js object, we call it a "module". All modules are centrally maintained in the array mModules as listed below. Each module has a state field with possible status INITIAL, LOADED, READY, FAILED, PRELOADED. In my example, since the button control is required for the first time, so the module has status INITIAL.

- Line 16514: mark module state as LOADING
- Line 16517: determine whether we need to load the normal version of js, or the debug version. The flag for debug mode is stored via the field sap-ui-loaddbg in global object window.
- Line 16520: get url of module converted from module name
- Line 16525 use AJAX to load the module

This is an synchronous AJAX call ( async = false ). In its success handler, the module state is changed to LOADED, according with the module data filled. Now the execModule is called in line 16543.

The source code of Button.js is passed in to the native function, eval(), of window object.

After requireModule is executed, button module is ready for use ( state = 4 - READY ).

Step4 - how the button instance is created
Basically speaking the button instance is first created via factory method newObject as a template and then enriched with the user settings passed via arguments object.

Check the source code of Button.js, we can find one line:
var Button = Control.extend("sap.ui.commons.Button", .... );
It unveils the fact that the Button is an extension of Control, or let's borrow the OO concept, it "inherits" from Control class.
Also Control is an extension of Element:

And Element is an extension of ManagedObject:

And ManagedObject is an extension of EventProvider:

And EventProvider is an extension of BaseObject:

The root of this long prototype chain is Metadata.
As a result the constructor of each node in the prototype chain will be called, one nested by one, when the leaf node in the chain, Button, is initialized.
The inheritance relationship from chain root to leaf is:
BaseObject -> EventProvider -> ManagedObject -> Element -> Control.
Just compare the classic OO language like JAVA and C++, the mechanism here is logically the same. For the Button itself, it gains most of common features which other controls have as well, with the help of this prototype chain. Then the Button control only needs to implement its specific features which are different with other controls ( for example, to deal with mouse and keyboard event ).

If you would like to know technically how prototype chain is built, please read this blog: Understand extend function in Component.js in Fiori application.
In next part we will analyze how a button is rendered in Fiori UI.
11 Comments
You must be a registered user to add a comment. If you've already registered, sign in. Otherwise, register and sign in.
Labels in this area
-
ABAP CDS Views - CDC (Change Data Capture)
2 -
AI
1 -
Analyze Workload Data
1 -
BTP
1 -
Business and IT Integration
2 -
Business application stu
1 -
Business Technology Platform
1 -
Business Trends
1,661 -
Business Trends
87 -
CAP
1 -
cf
1 -
Cloud Foundry
1 -
Confluent
1 -
Customer COE Basics and Fundamentals
1 -
Customer COE Latest and Greatest
3 -
Customer Data Browser app
1 -
Data Analysis Tool
1 -
data migration
1 -
data transfer
1 -
Datasphere
2 -
Event Information
1,400 -
Event Information
64 -
Expert
1 -
Expert Insights
178 -
Expert Insights
273 -
General
1 -
Google cloud
1 -
Google Next'24
1 -
Kafka
1 -
Life at SAP
784 -
Life at SAP
11 -
Migrate your Data App
1 -
MTA
1 -
Network Performance Analysis
1 -
NodeJS
1 -
PDF
1 -
POC
1 -
Product Updates
4,577 -
Product Updates
326 -
Replication Flow
1 -
RisewithSAP
1 -
SAP BTP
1 -
SAP BTP Cloud Foundry
1 -
SAP Cloud ALM
1 -
SAP Cloud Application Programming Model
1 -
SAP Datasphere
2 -
SAP S4HANA Cloud
1 -
SAP S4HANA Migration Cockpit
1 -
Technology Updates
6,886 -
Technology Updates
403 -
Workload Fluctuations
1
Related Content
- Corporate Git Setup on SAP BTP versus connecting to Corporate Git directly from SAP BAS in Technology Q&A
- Comprehensive Guideline to SAP VMS in Technology Blogs by Members
- Upload Excel using SAP RAP Only in Technology Blogs by Members
- Part 4 - SAP MDG – A Stepping Stone for SAP S/4HANA Journey in Technology Blogs by Members
- Read PDF form as binary data in S/4 HANA Public Cloud in Technology Q&A
Top kudoed authors
| User | Count |
|---|---|
| 12 | |
| 10 | |
| 9 | |
| 7 | |
| 7 | |
| 7 | |
| 6 | |
| 6 | |
| 5 | |
| 4 |