
- SAP Community
- Products and Technology
- Technology
- Technology Blogs by SAP
- Install ABAP Platform 1909 - Dev Edition on an Azu...
Technology Blogs by SAP
Learn how to extend and personalize SAP applications. Follow the SAP technology blog for insights into SAP BTP, ABAP, SAP Analytics Cloud, SAP HANA, and more.
Turn on suggestions
Auto-suggest helps you quickly narrow down your search results by suggesting possible matches as you type.
Showing results for
Advisor
Options
- Subscribe to RSS Feed
- Mark as New
- Mark as Read
- Bookmark
- Subscribe
- Printer Friendly Page
- Report Inappropriate Content
04-30-2021
3:50 PM
Welcome to the second instalment of this tutorial series. In this part, we are going to focus on the installation and access to the ABAP platform.
I will reiterate the process blueprint to help follow the steps we need to achieve to complete this installation. Since we tackled Step 1 of the blueprint in Part 1 of this series, we will continue from step 2 in this part.
Process blueprint
Step 2: Prepare the data drive on your ubuntu instance.
To render the disk we created in Part 1 usable, we will have to partition, format, and mount this disk on our virtual machine. To start this process, let us first find out which disks are available on our system and their mount points. After you have successfully created an SSH connection to the virtual machine as we did in the last step of Part 1, run the command
The output should look like the image below. The highlighted line with the 256G size is our line of interest. Take a note of the letters (sdb) as we will need it for the next few commands.
Now that we have found our disk of interest, it is now time to partition and format our disk.
Run the following commands and substitute the letters in the command according to what you received in your output. So if your disk had letters sdc on the line of interest, you have to place sdc in place of <letters> in the commands below
This is how it should look in your terminal
Now that our disk is partitioned and formatted, let us mount the disk on our virtual machine.
To mount the disk, run the following commands.
The above commands should look like this in your terminal
To make our mount permanent so that it persists after subsequent reboots, we will have to edit the fstab with the UUID of our drive. To find out the UUID, we will have to run the command:
The output should look like the image below. Note down the UUID on the line that matched the letters of your drive as demonstrated.
With the UUID copied, edit the line below with your UUID and keep it in a notepad to be used in the next step.
And example of what should be in your notepad is
Now that you have your UUID line in your notepad, let us move ahead to edit the fstab file.
Type the command below in your terminal
In the second line of the file that opens in your terminal, paste the line in your notepad as demonstrated in the terminal below.
You can now exit by hitting the CTRL+X key combination on your keyboard. When asked to “Save the modified buffer?”, hit the ‘y’ key on your keyboard.
Finally you can hit the ‘Enter’ key on your keyboard to save the file when you see ‘File Name to write: /etc/fstab’.
We have now successfully mounted our drive to persist after reboots. Our next step is to verify if our mount was successful. To ensure this, run the command below in the terminal:
The output should look like what is shown in the image
Finally, let us change the ownership of the datadrive to our current user. You do this by running the command below:
Step 3: Install docker and move docker data directory to the prepared data drive.
Since we are installing docker for a test environment and will most likely not be using our system in a production setting, we will be using the get.docker.com official scripts to install docker. To do this, run the commands below in your terminal.
The commands above and their output should look like this.
Ending with
Since we would like to use docker with our current user, let us run the usermod command below
Let’s switch our attention now to changing the data directory of docker to the datadrive we created earlier. To achieve this, let us first stop the docker service by running the command below and then create a file called daemon.json in the /etc/docker directory.
When the file opens up in the nano text editor, copy and paste the following content in the file and save the file by using the key combination CTRL+X followed by the ‘y’ key and finally the ‘Enter’ key on the keyboard.
After successfully saving the daemon.json file, we now have to copy everything from the old docker data directory to our new data directory which is /datadrive. To achieve this, run the command
After the copy is completed, we can now safely rename the old docker data directory by running the command and then finally restart the docker service.
With this step complete, we have officially installed docker and changed the default data directory to our own drive. Let us now reboot our virtual machine to ensure all the services will run completely after a reboot.
The connection will be closed and you will be returned to your terminal. Wait for about 30 seconds to a minute for your virtual machine to reboot and SSH into the virtual machine again as shown below.
After logging in successfully into the virtual machine, we can now try to login into docker to ensure our installation is still working correctly. To do this, use the command below and enter your dockerhub username and password when it is requested.
If you are presented Login Succeeded in the terminal, that’s a good sign which means you are on the final stretch to getting your ABAP Platform up and running.
Step 4: Install ABAP Platform 1909 Dev Edition with docker.
After our successful login, we are going to define some limits for our docker installation to prevent us from running into the Cannot continue because of insufficient system limits configuration! Error. To do this, copy and paste the following into your terminal. It is recommended you do this step just once to prevent duplication of the lines in the sysctl configuration file.
We are now ready to start the actual ABAP platform installation with docker. We will do that by running the command below. It is worth noting that the system expects the host name to be vhcala4hci, all other host names will prevent the system from starting.
The command above will take about an hour to complete and when it’s done, the output will look like the image below. Once the command is complete, the output will look like below.
While we wait for the installation to see the output below, let us head on to Azure once again to open the ports necessary to access our system.
Step 5: Open the necessary ports on Azure.
Since we are now waiting for the installation to complete in the terminal, let us switch to the browser and open the azure portal to our virtual machine. Once we are on the virtual machine overview page of azure portal, click on the Networking link as highlighted below.
On the Networking detail page, click the Add inbound port rule button.
A side window will open up and you will have to enter the values pelow both in Destination port ranges and the Name text boxes as shown below. You have to repeat this process for all the ports listed below.
After the process is done for all the ports listed above the final output should look like
It cannot be stressed enough that for a production system, the Source of the requests should be limited to prevent unwanted accesses to the system but for our test system. It is fine to play ‘fast and loose’ with it in the spirit of experimentation.
Now that we have successfully opened up our ports, let us head back to the terminal to check up on the progress of the installation.
Step 6: Generate a new license for your installation.
If you can see Have fun! In the terminal as shown above at the end of Step 4, and you have your ports open as shown in step 5, let us now try to create a connection to our ABAP instance. To achieve this, open SAP GUI and click the Create button as highlighted below.
After clicking the create button, give the description a4h, choose the Advanced tab and select the Expert Settings checkbox. You can then fill in the connection parameters textarea. The format is
The IP address to be used here is the same IP address you use to SSH into your virtual machine and this can also be found as the Public IP address in Azure. Finally you can click Save after filling in the connection parameters.
The connection you created should now be visible in your connections page in SAP GUI. Double click the a4h to open the logon screen for the connection.
When the connection opens up in SAP GUI, try to logon with the developer account. The username for the developer account is DEVELOPER and the password is Ldtf5432 you can leave the Client as is: 001. If you try to logon with these credentials you will see an error in the status bar “Logon not possible (error in license check)”. This is no cause for alarm as we will go through the steps to generate and install a license.
We can still logon to our installation with the SAP* user. To do this use the credentials: username SAP* and password Ldtf5432 as shown below.
Once you are logged in successfully, enter the transaction slicense as shown in the image below and execute.
You will see two expired licenses and an Active Hardware Key which is very important for generating our license keys. So go ahead and write down the hardware key in any notepad application available.
To generate a new license for your installation let us head on over to the minisap license website. Select the license in the Available SAP Systems that matches our installation which is A4H - SAP NetWeaver AS ABAP 7.4 and above (Linux / SAP HANA) in our case.
Scroll down to the bottom of the page and you will see a section asking for your personal information and hardware key. Fill in the personal information and supply the hardware key we copied earlier. Agree to the license agreement and then click the Generate button.
A license text file will automatically be downloaded to your downloads folder. Open your downloads folder and find the download text file most likely named A4H_Multiple.txt. Once you find the file, open the folder side by side to the SAP GUI as we will be dragging and dropping the license file. After opening the folder containing the license file side by side, click the Install License button in SAP GUI, denoted by 1in the image below. When the dialog File dialog opens up, drag the license file from the and drop it in the file dialog, denoted by 2 in the image below. Finally click the Open button to install the license.
If everything went smoothly, you should receive a prompt that says “2 SAP license key(s) successfully installed.”
We now have a valid license and can try logging in with the DEVELOPER account again. To do this, we must first log of from the SAP* user. To log off, select System in SAP GUI and choose Log Off in the drop down menu as shown in the image below and choose Yes when asked to confirm.
Finally login in with the developer credentials provided earlier, username: DEVELOPER, password: Ldtf5432 as shown below.
You should now have access to your ABAP Platform 1909 Developer Edition and a long journey of experimentation ahead of you.
This brings us to the end of the tutorial series. I had a great time putting this post together and hope to help a reader get up and running in ABAP in little or no time. To find more information regarding logging into SAP HANA Studio or using the SAP Cloud Connector your ABAP instance please visit the dockerhub page and search for the specific term.
If you run into any issues while following this blog or have any edits or additions please drop a message in the comment section and I will get back to you.
Hope you had a great time following this post.
Happy Coding!!!
I will reiterate the process blueprint to help follow the steps we need to achieve to complete this installation. Since we tackled Step 1 of the blueprint in Part 1 of this series, we will continue from step 2 in this part.
Process blueprint
- Create and login into an ubuntu instance on Azure.
- Prepare the data drive on your ubuntu instance.
- Install docker and move docker data directory to the prepared data drive.
- Install ABAP Platform 1909 Dev Edition with docker.
- Open the necessary ports on Azure.
- Access your ABAP instance in SAP GUI and generate a new license.
Step 2: Prepare the data drive on your ubuntu instance.
To render the disk we created in Part 1 usable, we will have to partition, format, and mount this disk on our virtual machine. To start this process, let us first find out which disks are available on our system and their mount points. After you have successfully created an SSH connection to the virtual machine as we did in the last step of Part 1, run the command
lsblk -o NAME,HCTL,SIZE,MOUNTPOINT | grep -i "sd"The output should look like the image below. The highlighted line with the 256G size is our line of interest. Take a note of the letters (sdb) as we will need it for the next few commands.

Image 1: List all drives and mount points
Now that we have found our disk of interest, it is now time to partition and format our disk.
Run the following commands and substitute the letters in the command according to what you received in your output. So if your disk had letters sdc on the line of interest, you have to place sdc in place of <letters> in the commands below
sudo parted /dev/<letters> --script mklabel gpt mkpart xfspart xfs 0% 100%

sudo mkfs.xfs /dev/<letters>1

sudo partprobe /dev/<letters>1
This is how it should look in your terminal

Image 2: Partition and format disk
Now that our disk is partitioned and formatted, let us mount the disk on our virtual machine.
To mount the disk, run the following commands.
sudo mkdir /datadrive

sudo mount /dev/<letters>1 /datadrive
The above commands should look like this in your terminal

Image 3: Create and mount datadrive directory
To make our mount permanent so that it persists after subsequent reboots, we will have to edit the fstab with the UUID of our drive. To find out the UUID, we will have to run the command:
sudo blkidThe output should look like the image below. Note down the UUID on the line that matched the letters of your drive as demonstrated.

Image 4: Note down UUID of disk
With the UUID copied, edit the line below with your UUID and keep it in a notepad to be used in the next step.
UUID=<paste_your_UUID_here> /datadrive xfs defaults,nofail 1 2And example of what should be in your notepad is
UUID=19060fbb-68f1-42b3-9849-90ba57085d89 /datadrive xfs defaults,nofail 1 2Now that you have your UUID line in your notepad, let us move ahead to edit the fstab file.
Type the command below in your terminal
sudo nano /etc/fstab
Image 5: Open fstab file
In the second line of the file that opens in your terminal, paste the line in your notepad as demonstrated in the terminal below.

Image 6: Exit by CTRL+X
You can now exit by hitting the CTRL+X key combination on your keyboard. When asked to “Save the modified buffer?”, hit the ‘y’ key on your keyboard.

Image 7: Save buffer by hitting y key
Finally you can hit the ‘Enter’ key on your keyboard to save the file when you see ‘File Name to write: /etc/fstab’.

Image 8: Write fstab
We have now successfully mounted our drive to persist after reboots. Our next step is to verify if our mount was successful. To ensure this, run the command below in the terminal:
lsblk -o NAME,HCTL,SIZE,MOUNTPOINT | grep -i "sd"The output should look like what is shown in the image

Image 9: Check permanent mount point
Finally, let us change the ownership of the datadrive to our current user. You do this by running the command below:
sudo chown -R $USER /datadrive
Image 10: Change datadrive directory owner
Step 3: Install docker and move docker data directory to the prepared data drive.
Since we are installing docker for a test environment and will most likely not be using our system in a production setting, we will be using the get.docker.com official scripts to install docker. To do this, run the commands below in your terminal.
mkdir dockerinstall

cd dockerinstall

curl -fsSL https://get.docker.com -o get-docker.sh

sudo sh get-docker.sh
The commands above and their output should look like this.

Image 11: Docker installation
Ending with

Image 12: Ending of output for docker installation
Since we would like to use docker with our current user, let us run the usermod command below
sudo usermod -aG docker $USER
Image 13; Add your current user to the docker group
Let’s switch our attention now to changing the data directory of docker to the datadrive we created earlier. To achieve this, let us first stop the docker service by running the command below and then create a file called daemon.json in the /etc/docker directory.
sudo service docker stop

cd /etc/docker/

sudo nano daemon.json
Image 14: Open daemon.json file
When the file opens up in the nano text editor, copy and paste the following content in the file and save the file by using the key combination CTRL+X followed by the ‘y’ key and finally the ‘Enter’ key on the keyboard.
{

   "data-root": "/datadrive"

}
Image 15: Paste content in daemon.json file
After successfully saving the daemon.json file, we now have to copy everything from the old docker data directory to our new data directory which is /datadrive. To achieve this, run the command
sudo rsync -aP /var/lib/docker/ /datadrive
Image 16: Copy files to datadrive directory
After the copy is completed, we can now safely rename the old docker data directory by running the command and then finally restart the docker service.
sudo mv /var/lib/docker /var/lib/docker.old

sudo service docker start
Image 17: Start docker service
With this step complete, we have officially installed docker and changed the default data directory to our own drive. Let us now reboot our virtual machine to ensure all the services will run completely after a reboot.
sudo reboot
Image 18: Reboot virtual machine
The connection will be closed and you will be returned to your terminal. Wait for about 30 seconds to a minute for your virtual machine to reboot and SSH into the virtual machine again as shown below.

Image 19: SSH into virtual machine again
After logging in successfully into the virtual machine, we can now try to login into docker to ensure our installation is still working correctly. To do this, use the command below and enter your dockerhub username and password when it is requested.
docker login
Image 20: Login into dockerhub
If you are presented Login Succeeded in the terminal, that’s a good sign which means you are on the final stretch to getting your ABAP Platform up and running.
Step 4: Install ABAP Platform 1909 Dev Edition with docker.
After our successful login, we are going to define some limits for our docker installation to prevent us from running into the Cannot continue because of insufficient system limits configuration! Error. To do this, copy and paste the following into your terminal. It is recommended you do this step just once to prevent duplication of the lines in the sysctl configuration file.
echo 'fs.file-max=20000000' | sudo tee -a sudo /etc/sysctl.conf

echo 'fs.aio-max-nr=18446744073709551615' | sudo tee -a sudo /etc/sysctl.conf

echo 'vm.max_map_count=2147483647' | sudo tee -a sudo /etc/sysctl.conf

sudo sysctl -p
Image 21: Configure sysctl
We are now ready to start the actual ABAP platform installation with docker. We will do that by running the command below. It is worth noting that the system expects the host name to be vhcala4hci, all other host names will prevent the system from starting.
docker run \

      --stop-timeout 3600 \

      --sysctl kernel.shmmax=21474836480 \

      --sysctl kernel.shmmni=32768 \

      --sysctl kernel.shmall=5242880 \

      --sysctl kernel.msgmni=1024 \

      --sysctl kernel.sem="1250 256000 100 8192" \

      --ulimit nofile=1048576:1048576 \

      -i --name a4h -h vhcala4hci \

      -p 3200:3200 \

      -p 3300:3300 \

      -p 8443:8443 \

      -p 30213:30213 \

      -p 30215:30215 \

      -p 50000:50000 \

      -p 50001:50001 store/saplabs/abaptrial:1909 -agree-to-sap-license
Image 22: Run docker to install ABAP
The command above will take about an hour to complete and when it’s done, the output will look like the image below. Once the command is complete, the output will look like below.

Image 23: End of output for docker run
While we wait for the installation to see the output below, let us head on to Azure once again to open the ports necessary to access our system.
Step 5: Open the necessary ports on Azure.
Since we are now waiting for the installation to complete in the terminal, let us switch to the browser and open the azure portal to our virtual machine. Once we are on the virtual machine overview page of azure portal, click on the Networking link as highlighted below.

Image 24: Click Networking link
On the Networking detail page, click the Add inbound port rule button.

Image 25: Add inbound port rules
A side window will open up and you will have to enter the values pelow both in Destination port ranges and the Name text boxes as shown below. You have to repeat this process for all the ports listed below.
Destination port range 3200       Name: Port_3200

Destination port range 3300       Name: Port_3300

Destination port range 8443       Name: Port_8443

Destination port range 30213      Name: Port_30213

Destination port range 30215      Name: Port_30215

Destination port range 50000      Name: Port_50000

Destination port range 50001      Name: Port_50001
Image 26: Fill in details for port rules
After the process is done for all the ports listed above the final output should look like

Image 27: All inbound ports added
It cannot be stressed enough that for a production system, the Source of the requests should be limited to prevent unwanted accesses to the system but for our test system. It is fine to play ‘fast and loose’ with it in the spirit of experimentation.
Now that we have successfully opened up our ports, let us head back to the terminal to check up on the progress of the installation.
Step 6: Generate a new license for your installation.
If you can see Have fun! In the terminal as shown above at the end of Step 4, and you have your ports open as shown in step 5, let us now try to create a connection to our ABAP instance. To achieve this, open SAP GUI and click the Create button as highlighted below.

Image 28: Click on create connection
After clicking the create button, give the description a4h, choose the Advanced tab and select the Expert Settings checkbox. You can then fill in the connection parameters textarea. The format is
conn=/H/<your_ip_address>/S/3200The IP address to be used here is the same IP address you use to SSH into your virtual machine and this can also be found as the Public IP address in Azure. Finally you can click Save after filling in the connection parameters.

Image 29: Add connection parameters
The connection you created should now be visible in your connections page in SAP GUI. Double click the a4h to open the logon screen for the connection.

Image 30: Double click a4h
When the connection opens up in SAP GUI, try to logon with the developer account. The username for the developer account is DEVELOPER and the password is Ldtf5432 you can leave the Client as is: 001. If you try to logon with these credentials you will see an error in the status bar “Logon not possible (error in license check)”. This is no cause for alarm as we will go through the steps to generate and install a license.

Image 31: License check error
We can still logon to our installation with the SAP* user. To do this use the credentials: username SAP* and password Ldtf5432 as shown below.

Image 32: Login with SAP*
Once you are logged in successfully, enter the transaction slicense as shown in the image below and execute.
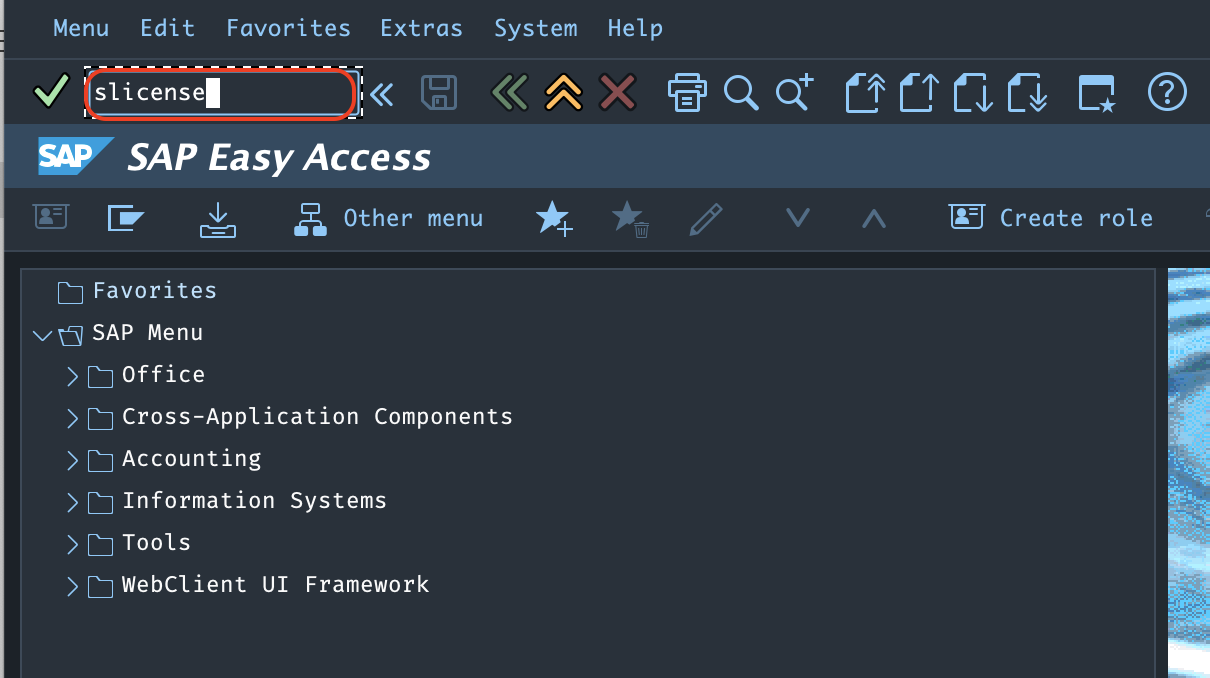
Image 33: Enter slicense transaction.
You will see two expired licenses and an Active Hardware Key which is very important for generating our license keys. So go ahead and write down the hardware key in any notepad application available.

Image 34: Copy hardware key
To generate a new license for your installation let us head on over to the minisap license website. Select the license in the Available SAP Systems that matches our installation which is A4H - SAP NetWeaver AS ABAP 7.4 and above (Linux / SAP HANA) in our case.

Image 35: Choose a4h SAP system
Scroll down to the bottom of the page and you will see a section asking for your personal information and hardware key. Fill in the personal information and supply the hardware key we copied earlier. Agree to the license agreement and then click the Generate button.

Image 36: Agree to and generate license
A license text file will automatically be downloaded to your downloads folder. Open your downloads folder and find the download text file most likely named A4H_Multiple.txt. Once you find the file, open the folder side by side to the SAP GUI as we will be dragging and dropping the license file. After opening the folder containing the license file side by side, click the Install License button in SAP GUI, denoted by 1in the image below. When the dialog File dialog opens up, drag the license file from the and drop it in the file dialog, denoted by 2 in the image below. Finally click the Open button to install the license.

Image 37: Drag and drop license file
If everything went smoothly, you should receive a prompt that says “2 SAP license key(s) successfully installed.”

Image 38: License installed
We now have a valid license and can try logging in with the DEVELOPER account again. To do this, we must first log of from the SAP* user. To log off, select System in SAP GUI and choose Log Off in the drop down menu as shown in the image below and choose Yes when asked to confirm.


Image 39: Log off system
Finally login in with the developer credentials provided earlier, username: DEVELOPER, password: Ldtf5432 as shown below.

Image 40: Login with developer account
You should now have access to your ABAP Platform 1909 Developer Edition and a long journey of experimentation ahead of you.

Image 41: Successful login into ABAP Platform 1909 Dev Edition
This brings us to the end of the tutorial series. I had a great time putting this post together and hope to help a reader get up and running in ABAP in little or no time. To find more information regarding logging into SAP HANA Studio or using the SAP Cloud Connector your ABAP instance please visit the dockerhub page and search for the specific term.
If you run into any issues while following this blog or have any edits or additions please drop a message in the comment section and I will get back to you.
Hope you had a great time following this post.
Happy Coding!!!
Labels:
3 Comments
You must be a registered user to add a comment. If you've already registered, sign in. Otherwise, register and sign in.
Labels in this area
-
ABAP CDS Views - CDC (Change Data Capture)
2 -
AI
1 -
Analyze Workload Data
1 -
BTP
1 -
Business and IT Integration
2 -
Business application stu
1 -
Business Technology Platform
1 -
Business Trends
1,658 -
Business Trends
93 -
CAP
1 -
cf
1 -
Cloud Foundry
1 -
Confluent
1 -
Customer COE Basics and Fundamentals
1 -
Customer COE Latest and Greatest
3 -
Customer Data Browser app
1 -
Data Analysis Tool
1 -
data migration
1 -
data transfer
1 -
Datasphere
2 -
Event Information
1,400 -
Event Information
66 -
Expert
1 -
Expert Insights
177 -
Expert Insights
299 -
General
1 -
Google cloud
1 -
Google Next'24
1 -
Kafka
1 -
Life at SAP
780 -
Life at SAP
13 -
Migrate your Data App
1 -
MTA
1 -
Network Performance Analysis
1 -
NodeJS
1 -
PDF
1 -
POC
1 -
Product Updates
4,577 -
Product Updates
344 -
Replication Flow
1 -
RisewithSAP
1 -
SAP BTP
1 -
SAP BTP Cloud Foundry
1 -
SAP Cloud ALM
1 -
SAP Cloud Application Programming Model
1 -
SAP Datasphere
2 -
SAP S4HANA Cloud
1 -
SAP S4HANA Migration Cockpit
1 -
Technology Updates
6,873 -
Technology Updates
422 -
Workload Fluctuations
1
Related Content
- How to embed SWZ portal into an iFrame? in Technology Blogs by SAP
- Consuming SAP with SAP Build Apps - Mobile Apps for iOS and Android in Technology Blogs by SAP
- Demystifying the Common Super Domain for SAP Mobile Start in Technology Blogs by SAP
- App to automatically configure a new ABAP Developer System in Technology Blogs by Members
- How to use AI services to translate Picklists in SAP SuccessFactors - An example in Technology Blogs by SAP
Top kudoed authors
| User | Count |
|---|---|
| 40 | |
| 25 | |
| 17 | |
| 13 | |
| 7 | |
| 7 | |
| 7 | |
| 6 | |
| 6 | |
| 6 |