
- SAP Community
- Products and Technology
- Technology
- Technology Blogs by SAP
- Develop an Online OData Mobile Application Using t...
Technology Blogs by SAP
Learn how to extend and personalize SAP applications. Follow the SAP technology blog for insights into SAP BTP, ABAP, SAP Analytics Cloud, SAP HANA, and more.
Turn on suggestions
Auto-suggest helps you quickly narrow down your search results by suggesting possible matches as you type.
Showing results for
Advisor
Options
- Subscribe to RSS Feed
- Mark as New
- Mark as Read
- Bookmark
- Subscribe
- Printer Friendly Page
- Report Inappropriate Content
04-27-2021
1:53 AM
Introduction
In the previous two blog posts, we discussed the Flows component of SAP BTP SDK for Android and FlowStateListener. In this post, were going to demonstrate how to use the Flows component to develop an online OData mobile app for Android and understand how to configure the Flows component.
This post will teach you how to:
- Use the onboarding screens in the Fiori component of the SAP BTP SDK for Android.
- Configure the Flows component to only use QR code scanning for application activation.
- Implement a usage content screen in the onboarding process.
- Listen to the flow states using FlowStateListener.
- Understand different flow types.
- Display a paginated customer list after the onboarding/restore flow.
Prerequisites
Download the SAP BTP SDK for Android and install it using the install script.
Generate the Project
The sample app will use Android Studio 4.1.2 and SAP BTP SDK for Android 3.3.1. First lets create a project in Android Studio: select Empty Activity, Kotlin, then Finish.
When we run the app on a simulator, the application will look like this:


Now let’s replace the screen with the LaunchScreen of the Fiori component of SAP BTP SDK for Android.
Change the Launch Screen
To use the screens and widgets in the Fiori component of SAP BTP SDK for Android, we need to add dependencies into the project.
First, we add the version number of SAP BTP SDK for Android to the build.gradle file of the project.
buildscript {

    ext.kotlin_version = "1.4.31"

    ext.sap_sdk_version = "3.3.1"
And in allprojects → repositories, add the following:
allprojects {

    repositories {

        google()

        jcenter()

        mavenLocal()

}
Then in the build.gradle file of the app module, we add the dependencies:
implementation "com.sap.cloud.android:fiori:$sap_sdk_version"

implementation "com.sap.cloud.android:onboarding:$sap_sdk_version"
We also need to add this into the android section to enable view binding:
buildFeatures {

    viewBinding true

}
Now we're ready to change the implementation in MainActivity. First, we need to change the layout file. Replace the TextView with:
<com.sap.cloud.mobile.fiori.onboarding.LaunchScreen

    android:id="@+id/launchScreen"

    android:layout_width="match_parent"

    android:layout_height="match_parent"

    app:layout_constraintBottom_toBottomOf="parent"

    app:layout_constraintLeft_toLeftOf="parent"

    app:layout_constraintRight_toRightOf="parent"

    app:layout_constraintTop_toTopOf="parent" />
Then replace the onCreate function in MainActivity with the following. Make changes to the string and drawable resources accordingly.
private lateinit var binding: ActivityMainBinding


override fun onCreate(savedInstanceState: Bundle?) {

    super.onCreate(savedInstanceState)

    binding = ActivityMainBinding.inflate(layoutInflater)

    setContentView(binding.root)

    val settings = LaunchScreenSettings.Builder()

        .setDemoButtonVisible(false)

        .setHeaderLineLabel(getString(R.string.welcome_screen_headline_label))

        .setPrimaryButtonText(getString(R.string.welcome_screen_primary_button_label))

        .setFooterVisible(true)

        .setUrlTermsOfService("http://www.sap.com")

        .setUrlPrivacy("http://www.sap.com")

        .addInfoViewSettings(

            LaunchScreenSettings.LaunchScreenInfoViewSettings(

                R.drawable.ic_android_white_circle_24dp,

                getString(R.string.application_name),

                getString(R.string.welcome_screen_detail_label)

            )

        )

        .build()

    binding.launchScreen.apply {

        initialize(settings)

        setPrimaryButtonOnClickListener {

                    }

    }
Before we run the app on the simulator, lets also change the theme of this app. Open the themes.xml file and change the parent style to:
<style name="Theme.MyApplication" parent="Onboarding.Default.Light.Theme">Now when we run the app, it will look like this:

In MainActivity, we first create a LaunchScreenSettings instance to provide the customized properties, then feed it into LaunchScreen to initialize the screen. For all the onboarding screens in the Fiori component, we use the same process to let the client code provide customized settings.
Start Onboarding
Now let’s handle the Get Started button click. Upon clicking the button, were going to launch the onboarding flow with the following configuration settings:
- The mobile app only uses QR code scanning for application activation, so the Discovery Service activation step should not appear in the onboarding process.
- The mobile app should have a usage collection consent screen so that the usage service can only be started with the user’s consent.
To accomplish this, we must first add dependencies to the Foundation and Flows components of the SAP BTP SDK for Android in the build.gradle of the app module.
implementation "com.sap.cloud.android:foundation:$sap_sdk_version"

implementation "com.sap.cloud.android:flowsv2:$sap_sdk_version"
In AndroidManifest.xml, we change android:allowBackup to false:
<application

    android:allowBackup="false"

    android:icon="@mipmap/ic_launcher"
Add the following code to setPrimaryButtonOnClickListener as the click event handler:
setPrimaryButtonOnClickListener {

    val flowContext = FlowContext(

        appConfig = AppConfig.Builder().applicationId("app_id").build(),

        flowOptions = FlowOptions(

            activationOption = ActivationOption.QR_ONLY

        ),

        flowRequestCode = 100

    )

    Flow.start(this@MainActivity, flowContext)

}
To start the onboarding flow, we will need an instance of FlowContext with the necessary information in it. Here we provide the AppConfig with only the application ID, so that the Flows component will include the activation steps to get the complete AppConfig from either the Discovery Service or QR code scanning (because the provided information is not sufficient to let the Flows component know how to authenticate the user).
We specify QR_ONLY as the activation method, otherwise the Flows component will display a screen for the user to choose between the Discovery Service and QR code scanning. If you want to use the Discovery Service for activation, then the application ID must be correct. But in this example, since were using QR code scanning, it does not matter.
flowRequestCode is designed for cases where the client code might start different flows and then monitor them to execute different logic, as needed, in the same Activity or Fragment.
To implement user consent for usage data collection during the onboarding process, we also need create an Application and initialize the UsageService in it.
class SampleApplication : Application() {

    var appConfig : AppConfig? = null


    override fun onCreate() {

        super.onCreate()

        initServices()

    }


    private fun initServices() {

        val services = mutableListOf<MobileService>()

        services.add(UsageService())

        SDKInitializer.start(this, * services.toTypedArray())

    }

}
In the onCreate function of SampleApplication, we can enable the features the mobile app wants to use using SDKInitializer. With the help of the state management capability in the SAP BTP SDK for Android, the enabled services know when to do the right thing, for example, retrieving client policies from the mobile server only after OkHttpClient is ready. In this example, we only initialize the UsageService. This lets the Flows component know that the usage service is enabled so that the usage consent screen will be required as part of the onboarding flow.
After creating the class, we need to change AndroidManifest.xml to add android:name to the Application node.
<application

    android:name=".SampleApplication"

    android:allowBackup="false"
Now we can run the app on a simulator:
- Upon clicking the Get Started button, we will see the EULA
- After clicking the Agree button, a QR scan screen is displayed automatically.
- We then need to enable the passcode after the authentication step.
- The usage consent screen is the last step of the onboarding flow.
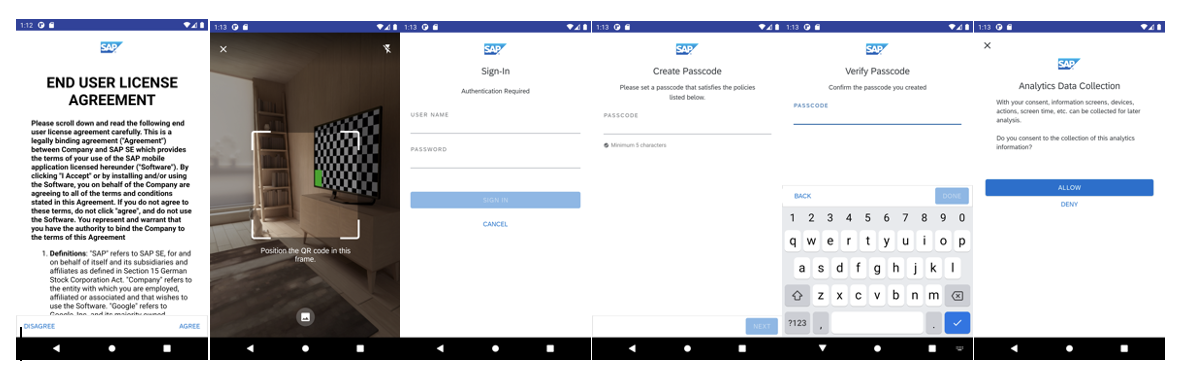
After the flow finishes you will see the MainActivity again. If you click the Get Started button again, you will see the Sign In screen without changing any code, because the Flows component has built-in logic to switch from the onboarding to the restore flow automatically.
But how do you navigate to your business screen activity after the onboarding/restore flow? To do this, we can override the onActivityResult function of MainActivity:
override fun onActivityResult(requestCode: Int, resultCode: Int, data: Intent?) {

    super.onActivityResult(requestCode, resultCode, data)

    if (requestCode == 100 && resultCode == RESULT_OK) {

        Intent(this, CustomersActivity::class.java).apply {

            addFlags(Intent.FLAG_ACTIVITY_CLEAR_TASK or Intent.FLAG_ACTIVITY_NEW_TASK)

            startActivity(this)

        }

    }

}
Before launching the app on a simulator again, create a new activity, CustomersActivity, in Android Studio using New Activity -> Empty Activity and unchecking Launcher Activity in the wizard. We will use this to show a paginated customer list.
Paginated Customer List
Now let’s implement the CustomersActivity to show a paginated list of customers from the OData service using the Android Jetpack Paging 3 component.
To do this, we first need to add the implementation and the OData gradle plugin dependencies in build.gradle of the app module.
At the top of the build.gradle file of the app module, we add:
buildscript {

    repositories {

        google()

        maven { url "http://nexus.wdf.sap.corp:8081/nexus/content/repositories/build.snapshots" }

    }

    dependencies {

        classpath "com.sap.cloud.android:odata-android-gradle-plugin:$sap_sdk_version"

    }

}
Below the plugins section, we add:
apply plugin: 'com.sap.odata.android'Below the android section, we add:
odata {

    verbose true

    services {

        espmcontainer {

            schemaFile file("src/main/res/raw/com_sap_edm_sampleservice_v2.xml")

            packageName "com.sap.cloud.android.odata.espmcontainer"

            serviceClass "ESPMContainer"

        }

    }

}
Copy com_sap_edm_sampleservice_v2.xml into the res/raw folder. This is the metadata file of the OData service were going to consume. You can get this file by generating an online OData app with the SAP BTP SDK for Android Wizard.
Finally, we add the implementation dependencies:
implementation "com.sap.cloud.android:odata:$sap_sdk_version"We can now sync the project and rebuild it. You will then see that the proxy classes are generated in the java (generated) folder.

We will need add one more dependency to use the Android Jetpack Paging 3 component.
def paging_version = "3.0.0-beta02"

implementation "androidx.paging:paging-runtime-ktx:$paging_version"
To use the Android Jetpack Paging 3 component, we follow the recommended architecture and need to put the following things in place:
- Define a service, ODataService in our sample code, which has the ability to retrieve a list of customers with the specified page number and size.
- Define a PagingSource, CustomerPagingSource, which calls into ODataService to get the paginated customers.
- Define a CustomerRepository, which calls CustomerPagingSource, and returns the paginated customers in a Kotlin flow.
- Define a CustomerViewModel to return the Kotlin flow.
- Define a RecyclerView to show the list. It will need an adapter, view holder, etc.
Then observe the CustomerViewModel to populate the customer when they‘re retrieved from the mobile server.
The ODataService will have an OnlineODataProvider in it, which needs the OData service URL. We know the URL will be in the instance of AppConfig after the activation step of the onboarding flow, but how can the client code get this completed AppConfig?
Let’s define a FlowStateListener and override the onAppConfigRetrieved function that will be called both in the onboarding flow after the activation step, and in the restore flow after the user unlocks the app, and then save it into SampleApplication so that ODataService can get it from SampleApplication.
Here is the SampleFlowStateListener:
class SampleFlowStateListener(private val application: Application): FlowStateListener() {

    override fun onAppConfigRetrieved(appConfig: AppConfig) {

        (application as SampleApplication).appConfig = appConfig

    }

}
Modify the button click handler in MainActivity:
setPrimaryButtonOnClickListener {

    val flowContext = FlowContext(

        appConfig = AppConfig.Builder().applicationId("app_id").build(),

        flowOptions = FlowOptions(

            activationOption = ActivationOption.QR_ONLY

        ),

        flowRequestCode = 100,

        flowStateListener = SampleFlowStateListener(application)

    )

    Flow.start(this@MainActivity, flowContext)

}
There are many other callback functions in FlowStateListener, among them onFlowFinished, which can also be used to monitor the flow finish event and then navigate to other screens to replace the onActivityResult function.
Here are all the predefined flow types in the Flows component:
enum class FlowType {

    ONBOARDING,

    FORGOT_PASSCODE,

    CREATE_ACCOUNT,

    TIMEOUT_UNLOCK,

    RESTORE,

    VERIFY_PASSCODE,

    CHANGEPASSCODE,

    RESET

}
- RESET has a dedicated callback function, onApplicationReset, where onFlowFinished will not be called for RESET.
- FORGOT_PASSCODE and CREATE_ACCOUNT are basically the same as ONBOARDING but the Flows component will check whether the authenticated user is the user who forgot the passcode or not for the FORGOT_PASSCODE flow and will check whether a user was already onboarded for the CREATE_ACCOUNT flow.
- TIMEOUT_UNLOCK is basically the same as RESTORE but will only be called inside the Flows component when the app is brought back to foreground and the user needs unlock the app again. For this case, please be aware that the Flows component will use the current topmost Activity to start the flow, and it’s not feasible to have onActivityResult for all the activities. In this case, monitoring onFlowFinished for special cases is recommended. For example, when the TIMEOUT_UNLOCK flow finishes and the user switch happens, the app can navigate to the home screen for every user instead of showing the new user the screen which the previous user visited last time.
- VERIFY_PASSCODE is a trimmed version of RESTORE. It only checks the passcode without notifying the client code of the flow states (while the restore flow would).
We’re not going to dive into the details of how to implement the paginated customer list because the Android developer site provides good documentation on how to use the Paging 3 component.
After completing these steps, the final mobile app will look this after the onboarding/restore flow:

If you have any questions, please leave them here: https://answers.sap.com/tags/73555000100800001281
- SAP Managed Tags:
- SAP Mobile Services,
- SAP BTP SDK for Android
Labels:
2 Comments
You must be a registered user to add a comment. If you've already registered, sign in. Otherwise, register and sign in.
Labels in this area
-
ABAP CDS Views - CDC (Change Data Capture)
2 -
AI
1 -
Analyze Workload Data
1 -
BTP
1 -
Business and IT Integration
2 -
Business application stu
1 -
Business Technology Platform
1 -
Business Trends
1,658 -
Business Trends
92 -
CAP
1 -
cf
1 -
Cloud Foundry
1 -
Confluent
1 -
Customer COE Basics and Fundamentals
1 -
Customer COE Latest and Greatest
3 -
Customer Data Browser app
1 -
Data Analysis Tool
1 -
data migration
1 -
data transfer
1 -
Datasphere
2 -
Event Information
1,400 -
Event Information
66 -
Expert
1 -
Expert Insights
177 -
Expert Insights
295 -
General
1 -
Google cloud
1 -
Google Next'24
1 -
Kafka
1 -
Life at SAP
780 -
Life at SAP
13 -
Migrate your Data App
1 -
MTA
1 -
Network Performance Analysis
1 -
NodeJS
1 -
PDF
1 -
POC
1 -
Product Updates
4,577 -
Product Updates
341 -
Replication Flow
1 -
RisewithSAP
1 -
SAP BTP
1 -
SAP BTP Cloud Foundry
1 -
SAP Cloud ALM
1 -
SAP Cloud Application Programming Model
1 -
SAP Datasphere
2 -
SAP S4HANA Cloud
1 -
SAP S4HANA Migration Cockpit
1 -
Technology Updates
6,873 -
Technology Updates
419 -
Workload Fluctuations
1
Related Content
- CAP Autentication error in Technology Q&A
- Consuming SAP with SAP Build Apps - Mobile Apps for iOS and Android in Technology Blogs by SAP
- Demystifying the Common Super Domain for SAP Mobile Start in Technology Blogs by SAP
- What’s new in Mobile development kit client 24.4 in Technology Blogs by SAP
- Developing & Deploying the UI5 App to Cloud Foundry and Accessing from App-router End-to-End Steps in Technology Blogs by Members
Top kudoed authors
| User | Count |
|---|---|
| 36 | |
| 25 | |
| 17 | |
| 13 | |
| 8 | |
| 7 | |
| 6 | |
| 6 | |
| 6 | |
| 6 |