
- SAP Community
- Products and Technology
- Technology
- Technology Blogs by SAP
- Trading Partner Management Part 4 - Trading Partne...
Technology Blogs by SAP
Learn how to extend and personalize SAP applications. Follow the SAP technology blog for insights into SAP BTP, ABAP, SAP Analytics Cloud, SAP HANA, and more.
Turn on suggestions
Auto-suggest helps you quickly narrow down your search results by suggesting possible matches as you type.
Showing results for
piyush_chougaon
Explorer
Options
- Subscribe to RSS Feed
- Mark as New
- Mark as Read
- Bookmark
- Subscribe
- Printer Friendly Page
- Report Inappropriate Content
09-16-2015
7:17 AM
What is purpose of trading partner profile?
Trading partner profile provides a central access to the following partner related information and configuration:
- Identity and classification parameters such as partner name, partner type, classification details and so on. This data also get passed to monitoring so that you can create User Defined Search Attributes and perform a search based on these parameters.
- Defining certificate rollover from NWA key store
- Custom parameters such as functional profiles
- Details on agreements that are defined for specific trading partners
- Details of EDI run time parameters such as encoding, intending and so on that are used to configure generic converter module

General tab
- The general tab page consists of information that are partner specific and the classification categories. These details can be using during local message monitoring for searching EDI messages via UDS
- The figure below describes important fields that needs to be configured
- You need to create a Profile for your own organization. This can be achieved by selecting the Partner Type as self. This is needed during runtime, while creating Agreements and also an essential part for monitoring.

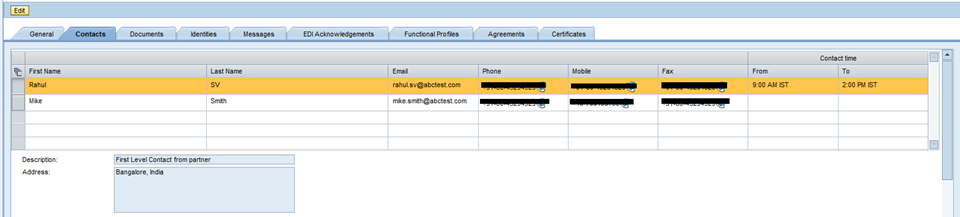
Contacts tab
- This tab page you provide the details of the trading partners such as e-mail, phone, mobile and so on
- You can provide multiple contacts and provide a short description about the contact along with the address in two separate fields
Note: This information is NOT used during runtime
Documents tab
- In this tab page you provide the references to existing documents
- You can provide short description on each saved documents and edit them as per your requirement
- Though TPM does not provides you a Document Management system, the reference to documents provides you a central screen for accessing all partner related data

Identities tab
- You provide the details such as identifier, agency code, and agency scheme for identifying business partners.
- There is a F4 help from which you can choose the standard agencies.
- You can also define your own custom identifiers (eg. SupplierNo, CustomerNo etc)
- Predefined UDFs in message mapping provides you the access to these identities (ie. you can provide one identifier code, agency qualifier code and target qualifier code to get the right unique identifier value for the partner.
Important ℹ :This is the core of TPM during runtime and monitoring. Please make sure you define the correct values in identities. You cannot define same values for a given combination of Agency Code and identifier for multiple partners.

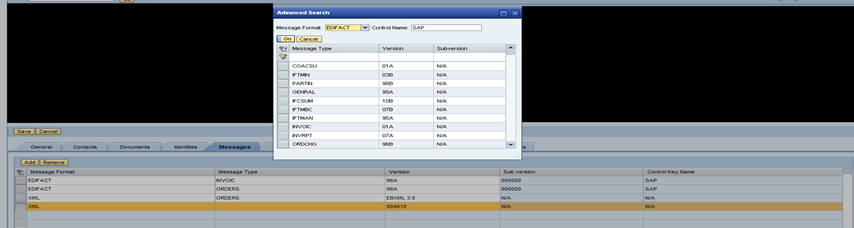
Messages tab
- This provides a consolidated view on messages that are getting exchanged between the trading partners
- In the message format column press F4 and select the required EDI message format and select relevant message type.
- You can add the following EDI formats currently (EDIFACT, EANCOM, X12, TRADACOMS, Odette). The values in the drop down will appear only if you imported the correct required content via EDI Content Manager.
- You can also select XML messages and manually type the Message Type and Version value. You can use this feature to defined agreements based on XML and use the functional profile for different conditions for XML related scenarios.
- This information is not used during runtime however it is a mandatory step before defining an agreement.
EDI acknowledgement tab
- This functionality enables the processing of EDI acknowledgements, such as EDIFACT, EANCOM and ANSI X12, for inbound and outbound EDI communications. Select and save the settings as per the requirement that can be used during runtime.

- For Inbound, settings are same as provided by EDI Separator receiver channel. You can configure it now based on individual partners. For Outbound, values will be used by Generic Converter module during time to set the corresponding fields in a EDI message.
How to access information during runtime?
- You have to use TPMContentAccessModule as first module on the sender channel during runtime in your Integrated Configuration scenario. This module will automatically read the EDI message information for sender and receiver identifiers, find the corresponding TPM Partners and fill the correct dynamic headers for acknowledgment processing as defined in TPM
- You use the following module parameters during runtime:
- edi.encoding module parameter enables the module to identify the format used to encode the incoming EDI message
- enable.ediAckProfile module parameter to apply TPM settings to EDI separator adapter and set it to true
- Enable the check box “Read from dynamic headers” in EDI Separator receiver channel. If no values are there in dynamic headers, EDI Separator receiver channel will use the current default configuration from the channel.
Functional Profile tab
- In this tab page you can add functional profiles that are specific to a trading partner.
- In the functional profile column press F4 and select the relevant functional profile and save the changes. For more information about functional profiles, refer Trading Partner Management Part 3 - Functional Profile.
- By clicking the link you can only view the functional profile. As functional profiles are reusable and can be used across multiple partners, you cannot change it from the partner screen.
- This information is not used during run time but is an essential step if you want to define agreements.

Agreements tab
- You use this functionality to store partner agreements. You choose Create to create agreement and then save the changes.
For more information about agreements, refer Trading Partner Management Part 5 - Trading Partner Agreement.

Certificates tab
- You can define the automatic certificate Rollovers for NWA certificates in Profiles > Certificate section.
- Currently, you can only view the certificate profiles related to a specific trading partner in the Certificate Tab of Partner Profile. You can also add, edit and store certificates in Profiles > Certificate section.
- By default, the expiry time of certificate is selected as Rollover time. You can customize this time according to your need.
- You cannot add/store a new certificate form this screen. You can only access the certificates that have already been uploaded in NWA.
- After Rollover, new certificate replace the old active certificate. You can also define the backup view to archive the replaced certificate.

Related Links
See the following links for more information:
- SAP Managed Tags:
- SAP Process Integration
You must be a registered user to add a comment. If you've already registered, sign in. Otherwise, register and sign in.
Labels in this area
-
ABAP CDS Views - CDC (Change Data Capture)
2 -
AI
1 -
Analyze Workload Data
1 -
BTP
1 -
Business and IT Integration
2 -
Business application stu
1 -
Business Technology Platform
1 -
Business Trends
1,661 -
Business Trends
87 -
CAP
1 -
cf
1 -
Cloud Foundry
1 -
Confluent
1 -
Customer COE Basics and Fundamentals
1 -
Customer COE Latest and Greatest
3 -
Customer Data Browser app
1 -
Data Analysis Tool
1 -
data migration
1 -
data transfer
1 -
Datasphere
2 -
Event Information
1,400 -
Event Information
64 -
Expert
1 -
Expert Insights
178 -
Expert Insights
273 -
General
1 -
Google cloud
1 -
Google Next'24
1 -
Kafka
1 -
Life at SAP
784 -
Life at SAP
11 -
Migrate your Data App
1 -
MTA
1 -
Network Performance Analysis
1 -
NodeJS
1 -
PDF
1 -
POC
1 -
Product Updates
4,577 -
Product Updates
324 -
Replication Flow
1 -
RisewithSAP
1 -
SAP BTP
1 -
SAP BTP Cloud Foundry
1 -
SAP Cloud ALM
1 -
SAP Cloud Application Programming Model
1 -
SAP Datasphere
2 -
SAP S4HANA Cloud
1 -
SAP S4HANA Migration Cockpit
1 -
Technology Updates
6,886 -
Technology Updates
402 -
Workload Fluctuations
1
Related Content
- Empowering Retail Business with a Seamless Data Migration to SAP S/4HANA in Technology Blogs by Members
- Top Picks: Innovations Highlights from SAP Business Technology Platform (Q1/2024) in Technology Blogs by SAP
- It has never been easier to print from SAP with Microsoft Universal Print in Technology Blogs by Members
- Comprehensive Guideline to SAP VMS in Technology Blogs by Members
- Part 2:- SAP Basis OS support on SUSE Linux for beginners in Technology Blogs by Members
Top kudoed authors
| User | Count |
|---|---|
| 12 | |
| 9 | |
| 7 | |
| 7 | |
| 7 | |
| 6 | |
| 6 | |
| 6 | |
| 6 | |
| 4 |