
- SAP Community
- Products and Technology
- Technology
- Technology Blogs by SAP
- Expose SAP Data Warehouse Cloud artefacts as OData...
Technology Blogs by SAP
Learn how to extend and personalize SAP applications. Follow the SAP technology blog for insights into SAP BTP, ABAP, SAP Analytics Cloud, SAP HANA, and more.
Turn on suggestions
Auto-suggest helps you quickly narrow down your search results by suggesting possible matches as you type.
Showing results for
former_member27
Explorer
Options
- Subscribe to RSS Feed
- Mark as New
- Mark as Read
- Bookmark
- Subscribe
- Printer Friendly Page
- Report Inappropriate Content
03-18-2021
2:53 PM
Overview
In this blog post, I will cover on how to expose SAP Data Warehouse Cloud artefacts as OData v4 services using SAP Cloud Application Programming Model which can be consumed by any application using the OData Service url. The tool we will be using for the development is SAP Business Application Studio to build our cloud application – SAP Business Application Studio is a new SAP Cloud Platform service in SAP Cloud Foundry which offers a modern development environment tailored for efficient development of business applications for the SAP Intelligent Enterprise.
Prerequisites
- SAP Business Technology Platform (SAP BTP) Core Account on Cloud Foundry
- SAP Data Warehouse Cloud account details with database artefacts (tables/views)
- Subscription of SAP Business Application Studio
Solution
As a pre-req, we need an SAP Data Warehouse Cloud space which has the tables/views that need to be exposed as OData Services. Also, we need some other details from the Space, these will be used later to create User Provided Instance in SAP BTP and also during the application development:
Launch the SAP Data Warehouse Cloud and click on the respective Space:
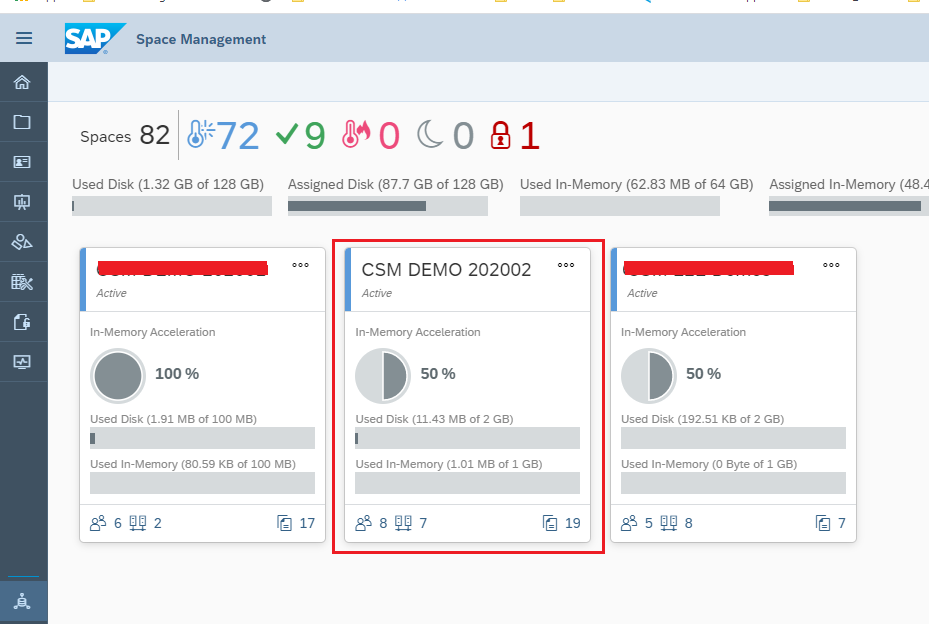
Get the following details:
1. Database Id: Can be found from the information icon at the left bottom of SAP Data Warehouse Cloud Space home screen:

2. Credentials for the User Provided Instance which is provided by the SAP Data Warehouse Cloud Space: Go to the Space -> Database Access (section) -> Database Users -> Click on the information button and copy the credentials (you will also need to get the password when this is added to SAP BTP as a user-Provided service).

Click on the Information icon shown above to get the following details:

3. HDI Container:
You will need to get access to HDI Container in the SAP Data Warehouse Cloud space.
In the Schema Access area, go to HDI Containers and click Enable Access. A pop-up window appears informing you that you need to open a support ticket so we can map the HDI containers with your SAP Data Warehouse Cloud space.
The support ticket needs to raised on DWC-SM component and the details that are needed are the following:
DWC Tenant ID - can get from Information button in left bottom corner icon
HC Org ID: The SAP BTP org id
HC Space ID: The SAP BTP space id

4. Name of SAP Data Warehouse Cloud Artefact (Tables/View):
In this case SFLIGHT_CV to be exposed as OData Service - Check the view in the Data Builder section of the SAP Data Warehouse Cloud space:

Once we have captured the above details from SAP Data Warehouse Cloud, we can move to SAP Business Technology Platform (SAP BTP) space and create a User Provided Service instance using which we can get access to SAP Data Warehouse Cloud artefacts:
To do that, to the Service -> Instances in your SAP BTP Subaccount space and create the instance as the following:
Step 1:

Step 2 (Paste the credentials obtained from the SAP Data Warehouse Cloud space):

Keep a note of the service Instance name (UPS_DWC_SPACE_CSMDEMO202002) as this will be needed during our development.
Now we can launch the SAP Business Application Studio where we will do the development of our Cloud Business Application.
Go the SAP BTP Subaccount -> Services -> Instances and Subscriptions and launch the SAP Business Application Studio:

In the Business Application Studio screen, create a Dev Space of type "SAP Cloud Business Application" and choose the extensions "SAP HANA Tools":

Once the Dev Space is created and in Running state, click on the Dev Space to enter into the Development IDE which will have all the runtimes installed according to the type of Dev Space chosen.
In the Launch screen of the Dev Space, at the bottom of the screen we should see "The organization and space for the CF has not been set". Click on that to connect it to your SAP BTP Cloud Foundry Space using the cloud foundry end point and the other credentials.

Now we can starting creating a "Project from Template" from the "Welcome" screen we see above. We will create a project of type "CAP Project":

Click on Next and Enter the project details (project name dwc_btp_odata) and add the extra features:

Click on finish the the SAP Business Application Studio will restart itself to point to the newly created project workspace.
Once the project is created, we need to modify the mta.yaml to ensure 2 things:
- Add a resource dependency to the SAP BTP user-provided service instance to enable this project to be able to consume the SAP Data Warehouse Cloud artefacts.
- The resource dependency of the current project's HDI container should point to the SAP HANA Cloud Instance underneath SAP Data Warehouse Cloud as the Target Container.
The changes in the SERVER MODULE of the mta.yaml:

The changes needed in the DB deployer module of the mta.yaml:

The changes needed in the resources section of the mta.yaml file (the config schema that is specified in the hdi-container will be used when deploying via the mtar deployment method):

The final mta.yaml file after all the changes would have the following code:
## Generated mta.yaml based on template version 0.4.0

## appName = dwc_btp_odata

## language=nodejs; multiTenant=false

## approuter=

_schema-version: '3.1'

ID: dwc_btp_odata

version: 1.0.0

description: "A simple CAP project."

parameters:

  enable-parallel-deployments: true


build-parameters:

  before-all:

   - builder: custom

     commands:

      - npm install --production

      - npx -p @sap/cds-dk cds build --production


modules:

 # --------------------- SERVER MODULE ------------------------

 - name: dwc_btp_odata-srv

 # ------------------------------------------------------------

   type: nodejs

   path: gen/srv

   requires:

    # Resources extracted from CAP configuration

    - name: dwc_btp_odata-db

    - name: dwc_hdi_container_service

   provides:

    - name: srv-api      # required by consumers of CAP services (e.g. approuter)

      properties:

        srv-url: ${default-url}


 # -------------------- SIDECAR MODULE ------------------------

 - name: dwc_btp_odata-db-deployer

 # ------------------------------------------------------------

   type: hdb

   path: gen/db

   parameters:

     buildpack: nodejs_buildpack

   requires:

    # 'hana' and 'xsuaa' resources extracted from CAP configuration

    - name: dwc_btp_odata-db

      properties:

       TARGET_CONTAINER: ~{hdi-service-name}

    - name: dwc_hdi_container_service

      group: SERVICE_REPLACEMENTS

      properties:

       key: ServiceName_1

       service: ~{the-service-name}


resources:

 # services extracted from CAP configuration

 # 'service-plan' can be configured via 'cds.requires.<name>.vcap.plan'

# ------------------------------------------------------------

 - name: dwc_btp_odata-db

# ------------------------------------------------------------

   type: com.sap.xs.hdi-container

   parameters:

    config:

      database_id: 9ee99a70-9d98-481d-ab94-00b0417b66c5

      schema: DWC_ODATA_CONTAINER

    service: hana  # or 'hanatrial' on trial landscapes

    service-plan: hdi-shared

   properties:

     hdi-service-name: ${service-name}

# The user provided service created in BTP to be able to access the DWC space database user

# ------------------------------------------------------------

 - name: dwc_hdi_container_service

# ------------------------------------------------------------

   type: org.cloudfoundry.existing-service

   parameters:

     service-name: UPS_DWC_SPACE_CSMDEMO202002

   properties:

     the-service-name: ${service-name}
As soon as we make the above changes, in the left hand explorer for "SAP HANA PROJECTS", we should be able to see the db project shows 2 database connections (one for the current project's HDI container which will be should be present in the HANA Cloud instance underneath SAP Data Warehouse Cloud and the other for the cloud foundry existing service instance).
With this, we have prepared our project to be able to consume the SAP Data Warehouse Cloud artefacts as well as deploy the DB artefacts in the SAP HANA Cloud Instance underneath SAP Data Warehouse Cloud.
We can now move on to creating the Database Model.
Create a hdbgrants file (dwc_access.hdbgrants) in the db -> cfg folder (create a cfg folder under the db folder first) - the .hdbgrants configuration file enables you to assign privileges to the owner of the synonym object and the application users (consumers) of the synonym's target objects in the same way as you would with the SQL grant statement.
{

	"UPS_DWC_SPACE_CSMDEMO202002": {

		"object_owner": {

			"roles": [],

			"container_roles": [],

			"object_privileges": [

                {

				  "type": "VIEW",

				  "name": "SFLIGHT_CV",

				  "privileges_with_grant_option": [

				    "SELECT"

				  ]

				}

			]

		}

	}

}
We now create a synonym to be able to access the SAP Data Warehouse Cloud View SFLIGHT_CV. Create a hdbsynonym file in the db->src folder (dwc_access.hdbsynonym):
{

  "DWC_SFLIGHT_CV": {

    "target": {

      "schema": "CSMDEMO202002",

      "object": "SFLIGHT_CV"

    }

  }

}
Now create a cds file (schema.cds) in the db folder - the CDS entity will point to the existing SFLIGHT_CV view using the synonym file. The entity fully qualified name should match with that of the name used in the synonym file (the entity fully qualified name would be <namespace>_<entity_name>:
The annotation @CDS.persistence.exists lets the CAP Model know that there is an entity already existing with the same name and it should not create a new Entity.
namespace DWC;


@cds.persistence.exists

Entity SFLIGHT_CV {

    key    MANDT: String(3);

    key    CARRID: String(3);

    key    CONNID: String(4);

    key    FLDATE: String(8) ;

           PRICE: Decimal (5,2);

           CURRENCY: String(5) ;

}
The database model is now ready. We can now create the service model which will expose the above CDS entity as OData service.
Create a cds file in srv folder (service.cds):
using DWC as db from '../db/schema';


service FlightService {

    entity SFLIGHT_CV as select from db.SFLIGHT_CV;

}
We are now done with the database and server changes. We need to perform 1 last step to prepare our project to deploy the CDS entities as HANA Tables in the HDI Container. To do that, open the package.json file under the main project folder and add the following line to the cds section:
"hana" : { "deploy-format": "hdbtable" }
The package.json file would look like:
{

    "name": "dwc_btp_odata",

    "version": "1.0.0",

    "description": "A simple CAP project.",

    "repository": "<Add your repository here>",

    "license": "UNLICENSED",

    "private": true,

    "dependencies": {

        "@sap/cds": "^4",

        "express": "^4",

        "@sap/hana-client": "^2.6.61"

    },

    "devDependencies": {

        "sqlite3": "5.0.0"

    },

    "scripts": {

        "start": "cds run"

    },

    "cds": {

        "requires": {

            "db": {

                "kind": "sql"

            }

        },

        "hana": {

            "deploy-format": "hdbtable"

        }

    }

}
Now we are ready to build and deploy the project to SAP BTP.
There are 2 ways we can deploy our application to SAP BTP: Using Command Line Interface or using the graphical way to deploy the mtar file. The latter is only a 2 step process while first one has few steps that we need to perform manually. Here I have described both the ways to deploy the project (output of bo.
Method 1: Deploy Application using CLI
1st step is to clean and build the project. For that open a new Terminal in SAP Business Application Studio using Terminal -> New Terminal
Execute the following 2 commands:
- export NODE_ENV=production
- cds build/all --clean
The 2nd command will generate a "gen" folder with all the relevant db artefacts that need to be deployed in the HDI container of the SAP HANA Cloud instance underneath the SAP Data Warehouse Cloud.
To deploy the generated DB project in the HDI container, first we need to create the HDI container. To do that, we create a hana hdi-shared type service instance in SAP BTP account This service will create the HDI container in the SAP HANA Cloud instance underneath SAP Data Warehouse Cloud and will be the container for all our DB objects.
To create the service, execute the following command in the terminal:
cf create-service hana hdi-shared <service_name>
The service name is the name that have been defined in the resources required in the mta.yaml file (in this example it is dwc_btp_odata-db).
Now we need to bind both the Database Connections in the SAP HANA PROJECTS section to their respective services.
For the 1st Database Connection (dwc_btp_odata-db), Click on the plug icon (bind) against the connection name, it will bring a pop-up where you need to choose the service to which you will bind it (it will be the same name service that we just created):

Now we can bind the other connection (dwc_hsi_container_service) to the existing cloud foundry user-provided service instance by clicking on the bind icon against that connection:

The DB project already highlights on the pending deployments. So now we can deploy the DB objects to the HDI container (dwc_btp_odata-db) and it will solve its dependency on the existing service on its own:

The DB objects are now created and deployed on the SAP HANA Cloud Instance underneath the SAP Data Warehouse Cloud, we can now push the db and the srv application to SAP BTP using the following 2 commands:
- cf push -f gen/db -k 256M - This command will be deploy the db-deployer application in SAP BTP
- cf push -f gen/srv --random-route -k 320M - This command will generate a random url to the odata service and will be deployed as an application in SAP BTP space:
Using the above steps, we have been able to deploy our application to SAP BTP using command line interface from SAP Business Application Studio.
Method 2: Deploy Application using Mtar file
In this method, after you are done creating the database and server models and the changes to the package.json file, the deployment of the application can be performed using the following 2 steps:
1st build the mta.yaml file (using right click on mta.yaml file -> "Build MTA Project":

This above step will open a new terminal and start building the project. Once successful, it will generate the gen folder, and also a .mtar file under mta_archives folder.
The 2nd step is to Deploy the .mtar file that got generated (right click on the mtar file -> "Deploy MTA Archive"):

The above step will perform all the necessary tasks in a terminal automatically. The steps will be the same as what we performed using the command line interface. In the background, it cleans and builds the project, creates the hana hdi-shared service on the SAP HANA Cloud Instance underneath SAP Data Warehouse Cloud, creates the DB and the SRV applications and binds these applications to the services according to the definition of the mta.yaml file.
After performing either of the above 2 methods to deploy the application to SAP BTP, we can now go to the Applications Section of the SAP BTP Space and should be able to see the applications:

You can go into the srv application and there you will get a link to the launch it:

Clicking on the link will take you to the page where you can see the services we created in the application:
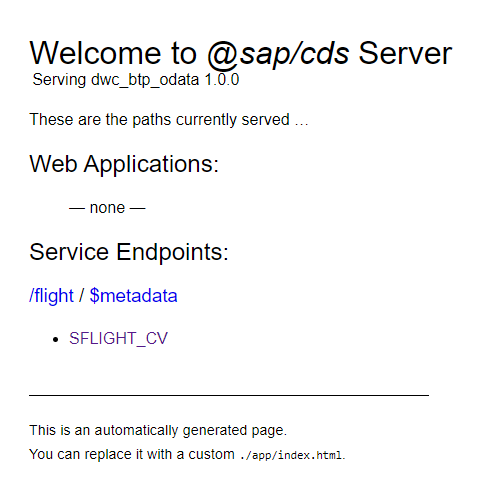
Click on SFLIGHT_CV which will display the data from the SAP Data Warehouse Cloud artefact:

Just as a Note, this OData Service is not using any authentication mechanism, so exposing the OData service will be available to be accessed by any one in the internet using the http url. You can use any authentication mechanism to control the usage of the OData Service.
To replicate the above scenario, you can use the sample code at https://github.com/i056119/dwc_btp_odata
There are a few modifications needed in the mta.yaml file (like the database_id, schema name of of target db objects and the user provided service name that will be created in SAP BTP). And for the hdbgrants, hdnsynonym and cds files for db and srv should be aligned with the entity that you want to expose from SAP Data Warehouse Cloud.
Conclusion
With this, we have been able to successfully create an OData Service that exposes the artefacts from SAP Data Warehouse Cloud.
Thanks and Regards,
Radha
- SAP Managed Tags:
- SAP Analytics Cloud,
- SAP Business Application Studio,
- SAP Datasphere,
- SAP Business Technology Platform
Labels:
11 Comments
You must be a registered user to add a comment. If you've already registered, sign in. Otherwise, register and sign in.
Labels in this area
-
ABAP CDS Views - CDC (Change Data Capture)
2 -
AI
1 -
Analyze Workload Data
1 -
BTP
1 -
Business and IT Integration
2 -
Business application stu
1 -
Business Technology Platform
1 -
Business Trends
1,661 -
Business Trends
88 -
CAP
1 -
cf
1 -
Cloud Foundry
1 -
Confluent
1 -
Customer COE Basics and Fundamentals
1 -
Customer COE Latest and Greatest
3 -
Customer Data Browser app
1 -
Data Analysis Tool
1 -
data migration
1 -
data transfer
1 -
Datasphere
2 -
Event Information
1,400 -
Event Information
64 -
Expert
1 -
Expert Insights
178 -
Expert Insights
281 -
General
1 -
Google cloud
1 -
Google Next'24
1 -
Kafka
1 -
Life at SAP
784 -
Life at SAP
11 -
Migrate your Data App
1 -
MTA
1 -
Network Performance Analysis
1 -
NodeJS
1 -
PDF
1 -
POC
1 -
Product Updates
4,577 -
Product Updates
330 -
Replication Flow
1 -
RisewithSAP
1 -
SAP BTP
1 -
SAP BTP Cloud Foundry
1 -
SAP Cloud ALM
1 -
SAP Cloud Application Programming Model
1 -
SAP Datasphere
2 -
SAP S4HANA Cloud
1 -
SAP S4HANA Migration Cockpit
1 -
Technology Updates
6,886 -
Technology Updates
408 -
Workload Fluctuations
1
Related Content
- 体验更丝滑!SAP 分析云 2024.07 版功能更新 in Technology Blogs by SAP
- What’s New in SAP Analytics Cloud Release 2024.08 in Technology Blogs by SAP
- SAP 分析云 2024.06 版新功能抢先看 in Technology Blogs by SAP
- Customers and Partners are using SAP BTP to Innovate and Extend their SAP Applications in Technology Blogs by SAP
- What’s New in SAP Analytics Cloud Release 2024.07 in Technology Blogs by SAP
Top kudoed authors
| User | Count |
|---|---|
| 13 | |
| 10 | |
| 10 | |
| 7 | |
| 6 | |
| 5 | |
| 5 | |
| 5 | |
| 5 | |
| 4 |