
- SAP Community
- Products and Technology
- Technology
- Technology Blogs by SAP
- How to install Hybrid Application Toolkit (HAT) on...
Technology Blogs by SAP
Learn how to extend and personalize SAP applications. Follow the SAP technology blog for insights into SAP BTP, ABAP, SAP Analytics Cloud, SAP HANA, and more.
Turn on suggestions
Auto-suggest helps you quickly narrow down your search results by suggesting possible matches as you type.
Showing results for
Advisor
Options
- Subscribe to RSS Feed
- Mark as New
- Mark as Read
- Bookmark
- Subscribe
- Printer Friendly Page
- Report Inappropriate Content
07-13-2015
4:43 PM
*** This blog post is outdated. We have reached end-of-maintenance for HAT local add-on. You can no longer download this tool from the SAP Store. We no longer support this tool. You are strongly advised to make use of our Cloud Build Service provided through Mobile Services. More information can be found here: https://blogs.sap.com/2018/08/16/announcing-end-of-maintenance-for-hybrid-app-toolkit-local-add-on-l... ***
Introduction
Today I'm gonna show you how to install the Hybrid Application Toolkit (HAT) on a Windows machine. Hybrid Application Toolkit (from now on simply HAT) is the tool which allows you to deploy SAP Hybrid applications on mobile devices. Hybrid application (also known as Kapsel applications) can be created by using SAP Web IDE and then deployed on mobile devices with this tool. In order to get more information on this tool and on SAP Web IDE I suggest you to give a look to this page (SAP Web IDE - Overview). Here you can find a lot of other useful resources for SAPUI5 application development.
This blog is just for Windows: if you want to know how to do the same on Mac please also follow this blog: How to install Hybrid Application Toolkit (HAT) on Mac.
HAT installation is NodeJS based: it guides you through all the steps for a successful result. However in order to avoid the needing to start the installation and then going back and forth installing the missing components, with this blog, I'm giving you a sort of good starting point so that when you start the HAT installation it will be as smooth as possible and you will be no longer required to leave the installation process for installing other mandatory software.
This blog has been split in 3 parts:
| Link | Content |
|---|---|
| Part1 | Install JDK, Android SDK and Apache ANT |
| Part2 | Install NodeJS, Cordova, Kapsel, Git, Plugman and configure environment variables |
| Part3 | Install HAT and test it |
Prerequisites
In this blog I would like to start with a very blank Windows machine, so I'm gonna show you how to install all the needed tools for SAPUI5 application development. We will go through the installation of the following components:
- Java JDK 8
- Android SDK rel. 24.4.1
- Apache Ant 1.9.6
- SAP Kapsel Plugin SP10 PL1
- Node.JS v.0.12.7
- Git client
- Hybrid Application Toolkit 1.9.7
- Cordova 5.2.0
- Plugman
The prerequisites here are nothing more then the following ones:
- Windows 8.1 64bit
- Google Chrome browser
- An account on the SAP HANA Trial Landscape accessible by this link (SAP HANA Cloud Platform)
Further recommendations:
- UAC must be set as by default

- All the commands in the Terminal window must be executed WITHOUT administrator's rights, otherwise you won't be able to perform HAT setup.
Getting started
As I said, for your comfort, I will start from the very beginning, so with a very blank machine. I've split the complete how-to-guide over 3 parts. This is the complete list of the steps we will go through:
Part 1:
- Install Java Development Kit (JDK)
- Install Android SDK
- Install Apache Ant
Part 2:
- Download and install SAP Kapsel Plugin
- Configure some environment variables (JAVA_HOME, ANT_HOME, KAPSEL_HOME, ANDROID_HOME and PATH)
- Install a GIT client
- Install Node.js
- Install Kapsel CLI
- Install Cordova
- Install Plugman
Part 3:
- Download HAT
- Setup HAT
- Run HAT and test its connectivity with SAP Web IDE
- Deploy your first Kapsel app to local Hybrid App Toolkit
So, let's focus here just on the first part!
Install Java Development Kit (JDK)
Java Development Kit is required by the Android SDK, so as first step we need to install this component. In this guide I'm using JDK 8, but 7 is fine as well.
1) Go to JDK download page "Java SE Development Kit 8 - Downloads", accept the license agreement and download the JDK according to your Windows platform (32 or 64 bit)

2) Once the download is finished double click on the downloaded file to start the installation

3) Leave all by default and click Next at every step. When you reach the step where you can change the installation path, take note of this path because it will be required later when you are going to configure the JAVA_HOME system variable

4) When the installation finishes, you can check that all worked fine by opening a Terminal window and typing the command "java -version". You should get something like this

Install Android SDK
For the Android SDK you can go to the following URL: Download Android Studio and SDK Tools | Android DevelopersNow you have two possibilities:
- download the complete Android Studio suite which contains in bundle the Android SDK
- download the stand-alone version of SDK without the Android Studio.
In this guide, I'll follow the second approach, but the first one is fine as well: just write down the path where the bundled SDK tool is installed.
1) Go to the download URL and click on Other Download Options

2) Choose the recommended download option (for Windows), which is the one by the installer

3) Once the download is finished, double click on the downloaded file to start the installation

4) Accept the UAC request by clicking on Yes
5) Click on Next on the Welcome screen
6) Click on Next on the screen where the current installed Java version is verified
7) Choose if you want to install this just for you or for everyone and click on Next
😎 Take note of the installation path (it will be required later) and click on Next

9) Click on Install
10) When the installation is completed click on Next
11) Choose to Start the SDK Manager and click on Finish
12) The SDK manager starts: if you get an error like this, it's because most probably you are behind a firewall and you need to configure your proxy settings; so click on Close and read the APPENDIX to this section named Configure proxy for Android SDK Manager.
If you have no "Failed to fetch" error, you can continue with next step

13) Now you need to specify the packages you want to install. For this H2G we will choose to install Android 5.1.1 (API 22). This because, at moment, this is the highest supported Android version by the latest Kapsel plugin. You can install newer versions of Android, but the installation process will always check and require the presence of API 22 to work. In my case these are the packages I'm going to install:
Tools
Android SDK Tools (it comes already installed)
Android SDK Platform-Tools
Android SDK Build-Tools
Android 5.1.1 (API 22)
SDK Platform
ARM EABI v7a System Image
Android 4.4.2 (API 19)
SDK Platform
ARM EABI v7a System Image
Extras
Android Support Repository
Android Support Library
Google Play Services
Google Repository
Google USB Driver
I've just 11 packages to install. Click on the Install 11 packages button

NOTE: After the installation of Google USB Driver, in order to have it fully working with your mobile device, you have to follow the instructions reported at this link: OEM USB Drivers | Android Developers
14) Select the root Android SDK License, click on Accept License and then on Install

15) The installation of the required packages starts. It might require some time depending on your network speed, so be patient. If you get an error saying "Stopping ADB server failed (code -1)" at the beginning of the installation process, don't worry, it's normal!
16) When the installation finishes, you might need to restart your Android SDK manager

17) We need to create an Android Virtual Device(AVD) in order to test our Android applications. Of course, this shouldn't be mandatory, because I could test my applications just by using my Android phone, but at moment the HAT setup looks for it, so we need to configure it. In the future probably this won't be a mandatory step.
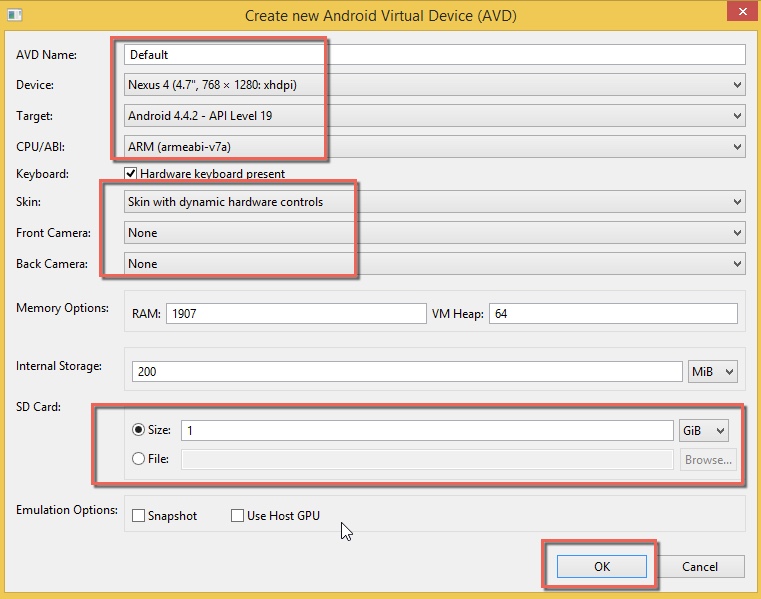
In order to create your first AVD, select Tools --> Manage AVDs, click on the Device Definitions tab, select a suitable device for your Android emulator (i.e. Nexus 4) and click on Create AVD

18) Specify the required parameters (this is just an example and click on OK)
19) When the summary screen appears click on OK
20) You should be able to get your emulator in the list

21) You can close the tool.
NOTE: Using the Android Emulator with this kind of ARM processor might result very slow. I suggest you to use (if possible) Virtual Machine Acceleration as explained here. In this way you can have a better emulated device for your development.
Install Apache Ant
For the Apache Ant software installation, you can download it from Apache Ant - Binary Distributions
The latest version at the time I'm writing this guide is 1.9.6.
1) Download this version

2) Select the downloaded zip file, right click on it and choose Extract All

3) Just put the extracted folder on your C: drive's root. A subfolder will be automatically created

4) Rename the new folder simply with "apache-ant"

Good job so far! Please continue with the part 2 of this H2G!
APPENDIX
Configure proxy for Android SDK Manager
1) Click on Tools --> Options

2) Enter your proxy settings (i.e. for SAP Network proxy:8080)

3) Close SDK Manager and reload it by double clicking on the SDK Manager executable

- SAP Managed Tags:
- SAPUI5,
- SAP Enterprise Portal,
- Mobile
Labels:
29 Comments
You must be a registered user to add a comment. If you've already registered, sign in. Otherwise, register and sign in.
Labels in this area
-
ABAP CDS Views - CDC (Change Data Capture)
2 -
AI
1 -
Analyze Workload Data
1 -
BTP
1 -
Business and IT Integration
2 -
Business application stu
1 -
Business Technology Platform
1 -
Business Trends
1,661 -
Business Trends
88 -
CAP
1 -
cf
1 -
Cloud Foundry
1 -
Confluent
1 -
Customer COE Basics and Fundamentals
1 -
Customer COE Latest and Greatest
3 -
Customer Data Browser app
1 -
Data Analysis Tool
1 -
data migration
1 -
data transfer
1 -
Datasphere
2 -
Event Information
1,400 -
Event Information
65 -
Expert
1 -
Expert Insights
178 -
Expert Insights
280 -
General
1 -
Google cloud
1 -
Google Next'24
1 -
Kafka
1 -
Life at SAP
784 -
Life at SAP
11 -
Migrate your Data App
1 -
MTA
1 -
Network Performance Analysis
1 -
NodeJS
1 -
PDF
1 -
POC
1 -
Product Updates
4,577 -
Product Updates
330 -
Replication Flow
1 -
RisewithSAP
1 -
SAP BTP
1 -
SAP BTP Cloud Foundry
1 -
SAP Cloud ALM
1 -
SAP Cloud Application Programming Model
1 -
SAP Datasphere
2 -
SAP S4HANA Cloud
1 -
SAP S4HANA Migration Cockpit
1 -
Technology Updates
6,886 -
Technology Updates
408 -
Workload Fluctuations
1
Related Content
- Menu not getting created in Technology Q&A
- SAP HANA Cloud Vector Engine: Quick FAQ Reference in Technology Blogs by SAP
- explore the business continuity recovery sap solutions on AWS DRS in Technology Blogs by Members
- SAP SABRIX UPGRADE in Technology Blogs by Members
- How to test a Windows Failover cluster? in Technology Blogs by SAP
Top kudoed authors
| User | Count |
|---|---|
| 13 | |
| 10 | |
| 10 | |
| 7 | |
| 6 | |
| 5 | |
| 5 | |
| 5 | |
| 4 | |
| 4 |