
- SAP Community
- Products and Technology
- Technology
- Technology Blogs by SAP
- Fiori Launchpad Sites (Part 1): Developing & Manag...
Technology Blogs by SAP
Learn how to extend and personalize SAP applications. Follow the SAP technology blog for insights into SAP BTP, ABAP, SAP Analytics Cloud, SAP HANA, and more.
Turn on suggestions
Auto-suggest helps you quickly narrow down your search results by suggesting possible matches as you type.
Showing results for
former_member19
Active Participant
Options
- Subscribe to RSS Feed
- Mark as New
- Mark as Read
- Bookmark
- Subscribe
- Printer Friendly Page
- Report Inappropriate Content
05-02-2015
1:15 AM
Now that the Fiori Launchpad (FLP) is available on the HANA Cloud Platform (HCP) Trial accounts its a good time to try out the end to end development and consumption scenario with the new Fiori launchpad Sites.
In the first part of this blog we will focus on:
- Generating a business application using SAP Web IDE based on Northwind public OData services.
- Deploying our application to the HCP repository
- Registering our application to Fiori Launchpad and creating a Static Tile for it
In the 2nd part of this blog we will see how to
- Create a Dynamic Tile for our application
- Develop and configure a Custom Tile for our application.
By the end of this blog (if you make it... ) your Fiori Launchpad site will have 3 tiles - one of each type:

Launching the generated business application:

Prerequisites
- You have registered for a trial account for SAP HANA Cloud Platform
- Set up connectivity to Northwind (the destination file is attached bellow):
How to use Northwind OData service with SAP Web IDE - Enabled Fiori Launchpad on Portal Service and created a new Fiori Launchpad site
SAP Fiori Launchpad Joins HANA Cloud Platform Trial
| Explanation | Screen Shot |
|---|---|
|   |
1) Creating Categories, Content Packages & Groups for FLP Site
In Fiori Launchpad, apps belongs to specific Categories (for classification and availability for the end user catalogs),
Content Packages (for the purpose of role-based access) and are arranged in Tile Groups
(read more in Creating Content for Launchpad Sites)
| Explanation | Screen Shot |
|---|---|
|  |
Create a new Category
|  |
Create a new Content package
|  |
Create a new Tile Group
| 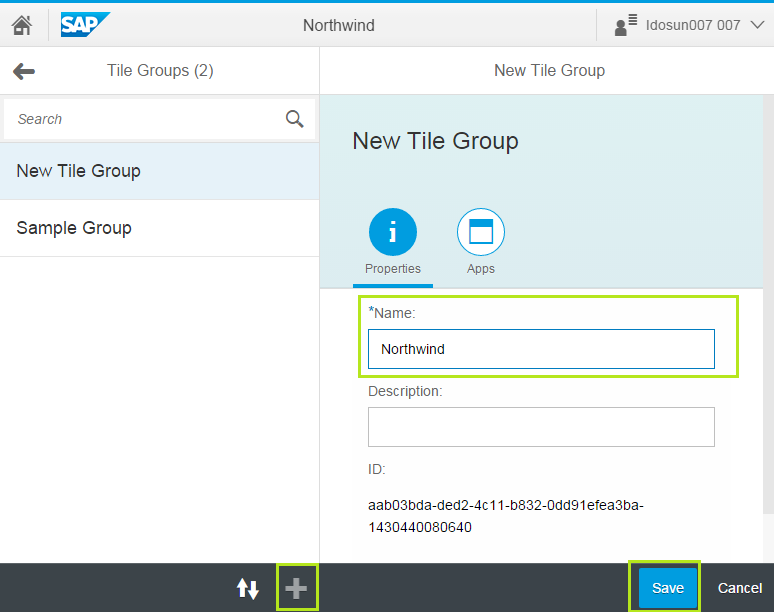 |
2) Generating the ‘Employees’ Fiori application
After we enabled connection from our HCP account to the Northwind OData services we can use the SAP Web IDE templates to generate applications that consume its data.
| Explanation | Screen Shot |
|---|---|
Open SAP Web IDE from your HCP account cockpit | See Opening SAP Web IDE |
Create a new project
|  |
In the Template Selection screen
* For consistency please stick to the suggested names | 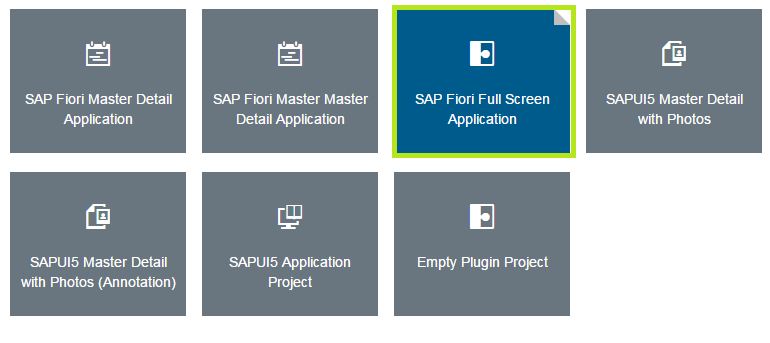 |
In the Data Connection screen
|  |
In the Template Customization screen bind the OData properties to the UI controls. Page 1 Section
| 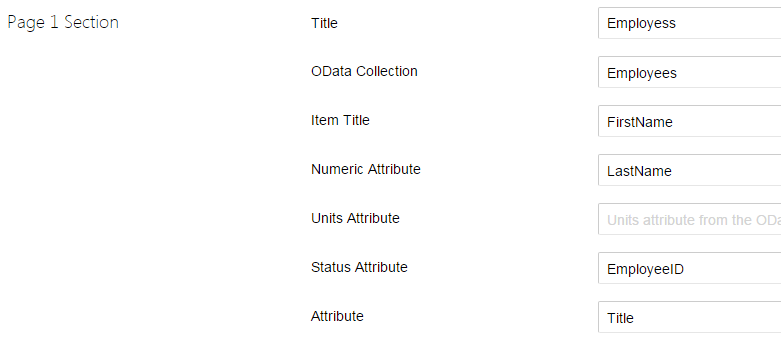 |
Page 2 Section Select the properties for the detail header
Navigation Section
Click Next and Finish to generate the project code. |  |
Preview the Application
The employees application is launched displaying OData retrieved from the Northwind service |   |
To complete the integration of our employees application with the Fiori Launchpad site we need to "proxify" our service URLs to overcome cross domain issues. This is achieved by adding a prefix to the service URL: jQuery.sap.getModulePath("< app id >") + "< service url >"
| Explanation | Screen Shot |
|---|---|
Edit the code
|  |
|  |
For more information - Integrating Apps in the Launchpad .
3) Deploying & Registering the application to FLP with a Static Tile
Now its time to deploy the employees applications to our HCP account. A dedicated versionised Git repository is allocated to every application we deploy. We can choose to activate any version of our application to make it public. After deployment we will register the application to Fiori Launchpad.
| Explanation | Screen Shot |
|---|---|
Deploy the application
In the Login to SAP HCP dialog box
|  |
In the Deploy Application Dialog box
|  |
Register application to SAP Fiori Launchpad
|  |
In the General Information screen
| |
In the Tile Configuration screen
|  |
In the Assignment screen
|  |
The app (and its static tile) are now available in the your Launchpad Site's Content catalog.
How did that happen? In Part 1 we created a Content Package (named Northwind) and assigned our new Fiori Launchpad Site to it. Registering our employees application to the same content package makes it available in the assigned sites under the registered category.
| Explanation | Screen Shot |
|---|---|
Preview & add content to the Launchpad Site
|  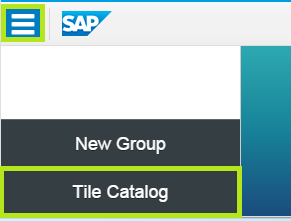 |
|  |
The tile we created for our employee application is a Static Tile. It contains a fixed set of fields like the title, subtitle, info and and icon. More on tiles in the following link: Tile Properties
As inspiring as the Static Tile may be, you might want to add more data to your tile or totally customize it and turn it into a small informative application. We will see how to do that in sections 4 and 5 of the 2nd part of this blog.
- SAP Managed Tags:
- SAP Cloud Portal service
- Cloud
- cloud computing
- cloud portal
- cloudportal
- custom
- custom tile
- dynamic
- dynamic tile
- faas
- Fiori
- fiori launch pad
- fiori launchpad
- fiori tile
- fiorilaunchpad
- fiorilaunchpadhtml
- flp
- flponhcp
- git
- hana cloud portal
- hcp
- HTML5
- netweaver cloud
- netweaver portal
- northwind
- nwcloudportal
- nwcp
- OData
- open social
- portal
- sap netweaver cloud portal
- sap portal
- SAP Web IDE
- sapcloud
- SAPHANACLOUD
- saphanacloudplatform
- saphcp
- SAPUI5
- tile
- UI5
- webide
12 Comments
You must be a registered user to add a comment. If you've already registered, sign in. Otherwise, register and sign in.
Labels in this area
-
ABAP CDS Views - CDC (Change Data Capture)
2 -
AI
1 -
Analyze Workload Data
1 -
BTP
1 -
Business and IT Integration
2 -
Business application stu
1 -
Business Technology Platform
1 -
Business Trends
1,661 -
Business Trends
87 -
CAP
1 -
cf
1 -
Cloud Foundry
1 -
Confluent
1 -
Customer COE Basics and Fundamentals
1 -
Customer COE Latest and Greatest
3 -
Customer Data Browser app
1 -
Data Analysis Tool
1 -
data migration
1 -
data transfer
1 -
Datasphere
2 -
Event Information
1,400 -
Event Information
64 -
Expert
1 -
Expert Insights
178 -
Expert Insights
273 -
General
1 -
Google cloud
1 -
Google Next'24
1 -
Kafka
1 -
Life at SAP
784 -
Life at SAP
11 -
Migrate your Data App
1 -
MTA
1 -
Network Performance Analysis
1 -
NodeJS
1 -
PDF
1 -
POC
1 -
Product Updates
4,577 -
Product Updates
326 -
Replication Flow
1 -
RisewithSAP
1 -
SAP BTP
1 -
SAP BTP Cloud Foundry
1 -
SAP Cloud ALM
1 -
SAP Cloud Application Programming Model
1 -
SAP Datasphere
2 -
SAP S4HANA Cloud
1 -
SAP S4HANA Migration Cockpit
1 -
Technology Updates
6,886 -
Technology Updates
403 -
Workload Fluctuations
1
Related Content
- Fiori Elements App - With Intent Based Navigation doesn't get rendered in Technology Q&A
- Consuming CAPM Application's OData service into SAP Fiori Application in Business Application Studio in Technology Blogs by Members
- Value Unlocked! How customers benefit from SAP HANA Cloud in Technology Blogs by SAP
- Harnessing the Power of SAP HANA Cloud Vector Engine for Context-Aware LLM Architecture in Technology Blogs by SAP
- How to call a Rest API in a Fiori App and show the result in a List in Technology Q&A
Top kudoed authors
| User | Count |
|---|---|
| 12 | |
| 10 | |
| 9 | |
| 7 | |
| 7 | |
| 7 | |
| 6 | |
| 6 | |
| 5 | |
| 4 |