
- SAP Community
- Products and Technology
- Technology
- Technology Blogs by SAP
- New features for Windows in SAP Mobile Platform SD...
Technology Blogs by SAP
Learn how to extend and personalize SAP applications. Follow the SAP technology blog for insights into SAP BTP, ABAP, SAP Analytics Cloud, SAP HANA, and more.
Turn on suggestions
Auto-suggest helps you quickly narrow down your search results by suggesting possible matches as you type.
Showing results for
Product and Topic Expert
Options
- Subscribe to RSS Feed
- Mark as New
- Mark as Read
- Bookmark
- Subscribe
- Printer Friendly Page
- Report Inappropriate Content
04-30-2015
11:53 PM
Note: The code for the sample application is now published.
In this blog, I will be talking about how you can enable push notification on Windows Store applications built using the SAP Mobile Platform SDK (hereinafter referred to as “SMP SDK” or “SDK”). Push notifications are ubiquitous in the mobile world. Users are accustomed to getting the latest information immediately on their mobile device. The SAP Mobile Platform runtime (hereinafter referred to as “SMP Server”) uses Windows Push Notification Services (hereinafter referred to as “WNS”) to send toast, tile, badge and raw updates to the mobile application in a dependable manner.
How it works?
There are basically 4 players in the push notification process.
- Windows Store application – This is the application that the end user interacts with
- Notification Client Platform (NCP) – Part of the Windows 8.1 OS. It interacts with WNS and passes notifications to the client application
- Windows Notification Service (WNS) – Responsible for sending notifications to devices
- Cloud Service – SAP Mobile Platform performs this role – responsible for creating the push notification
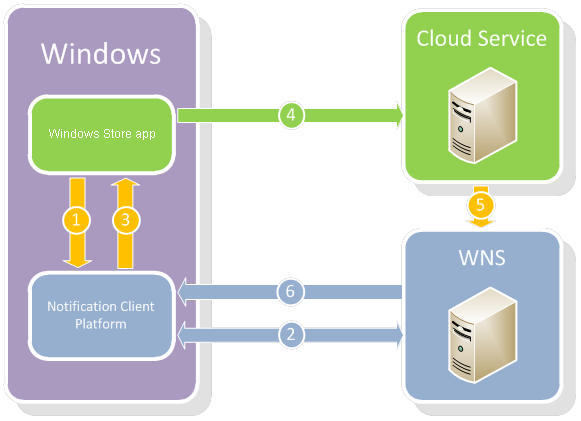
The workflow involves 6 steps.
- Client application requests Channel URI from the Notification Client Platform
- Notification Client Platform talks with WNS to obtain Channel URI
- Notification Client Platform returns Channel URI to client application
- Client application sends Channel URI to SAP Mobile Platform
- Something changes in the backend database. SAP Mobile Platform sends the notification to WNS and Channel URI to WNS
- WNS sends the notification to Notification Client Platform which handles tile or toast updates
Step by step instructions on Push Notification workflow
As mentioned earlier, the Push Notification workflow has 6 important steps. Let’s look at each step one by one.
Step 1
Client application requests Channel URI from Notification Client Platform
The Channel URI can be requested asynchronously from the Notification Client Platform by calling the CreatePushNotificationChannelForApplicationAsync method. This can be done immediately after the on-boarding process. It is recommended to make this call in the LogonCompleted event handler method.
// Request a push notification channel. var CurrentChannel = await PushNotificationChannelManager.CreatePushNotificationChannelForApplicationAsync(); |
Note: The Channel URI can expire in 30 days. So periodically renew the Channel URI as push notifications to expired Channel URI’s will be dropped. In the sample application, we request the Channel URI every time user logs in successfully and persist it in local storage. If the newly requested Channel URI is different from the Channel URI in local storage, then we know that the Channel URI has changed. We then send this changed Channel URI to the SMP Server.
Step 2
Notification Client Platform talks with WNS to obtain Channel URI
The Windows 8.1 operating system must be able to reach the WNS. In the Package.appxmanifest file, make sure that the application has Internet capabilities. This is enabled by default.

Step 3
Notification Client Platform returns Channel URI to client application
No further action required from the developer.
Step 4
Client application sends Channel URI to SAP Mobile Platform
The client application must submit an HTTP POST request to the SAP Mobile Platform and send the newly acquired Channel URI as part of the message body.
URL: http://{SMPHost:Port}/odata/applications/{latest|v1/}{appid}/Connections('{appcid}') Method : PUT HTTP Headers : "Content-Type" = "application/atom+xml" "X-HTTP-METHOD" = "MERGE" Body : <entry xmlns="http://www.w3.org/2005/Atom" xmlns:m="http://schemas.microsoft.com/ado/2007/08/dataservices/metadata" xmlns:d="http://schemas.microsoft.com/ado/2007/08/dataservices"> <content type="application/xml"> <m:properties> <d:WnsChannelURI>{WNS Channel URI}</d:WnsChannelURI> </m:properties> </content> </entry> |
This can be accomplished asynchronously by
var writableSettings = logonCore.ApplicationSettings.GetWritableSettings(); writableSettings["WnsChannelURI"].Value = "YOUR_CHANNEL_URI_HERE_AS_A_STRING"; await logonCore.ApplicationSettings.UpdateSettingsAsync(writableSettings); |
Step 5
SAP Mobile Platform sends notification and Channel URI to WNS
SAP Mobile Platform takes care of sending the notification and Channel URI to WNS behind the scenes as long as it’s properly configured. However, the developer can trigger this action by sending an HTTP POST message. This is typically done when some value changes in the backend database and the end user needs to be notified of the change.
URL: http://{SMPHost:Port}/restnotification/registration/{applicationRegistrationId} Method : POST Body : {"alert":"New Approval Request has been submitted"} |
See appendix on how to configure the SAP Mobile Platform for Windows Push Notification.

Step 6
WNS sends notification to Notification Client Platform which handles toast and tile updates
The client application must be configured to receive toast notifications. Also, for tile updates the client application must be pinned to the Start screen using the Medium tile size.

See you all in the next blog where I will be talking about batch processing.
Appendix
Configuring SAP Mobile Platform for push notification
- Browse to http://dev.windows.com
- Log in with your Windows developer account
- Click on ‘Submit apps’ icon

- Choose Windows Store

- From the dashboard menu in the left pane, click on the option ‘Submit an app’

- Give the app an unique name


- Click on Services to enable push notification

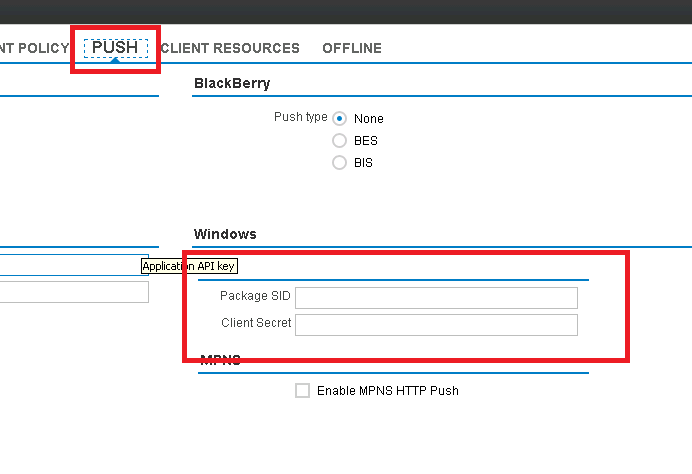
- Click on the link 'Live Services Site'

- Make note of Package SID and client secret. You will enter these values in the SAP Mobile Platform application configuration.

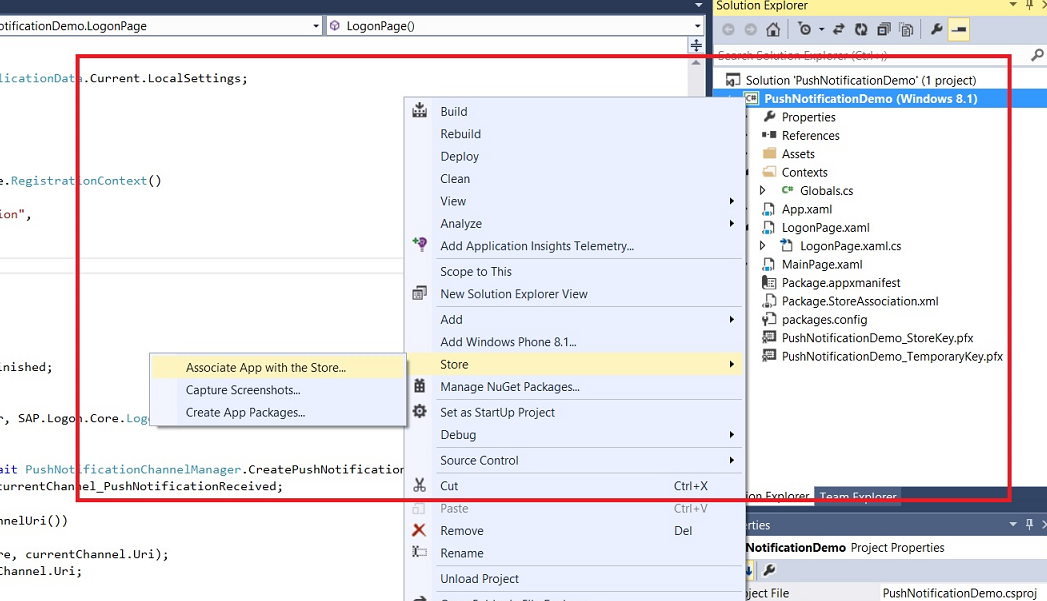
Associating app with the Store
- From within Visual Studio, right click on the project and select Store -> Associate App with the Store
- Login to your Windows developer account if prompted
- Select your app name and click Next

- Click Associate to associate your app with the Store

- SAP Managed Tags:
- SAP Mobile Platform
You must be a registered user to add a comment. If you've already registered, sign in. Otherwise, register and sign in.
Labels in this area
-
ABAP CDS Views - CDC (Change Data Capture)
2 -
AI
1 -
Analyze Workload Data
1 -
BTP
1 -
Business and IT Integration
2 -
Business application stu
1 -
Business Technology Platform
1 -
Business Trends
1,661 -
Business Trends
88 -
CAP
1 -
cf
1 -
Cloud Foundry
1 -
Confluent
1 -
Customer COE Basics and Fundamentals
1 -
Customer COE Latest and Greatest
3 -
Customer Data Browser app
1 -
Data Analysis Tool
1 -
data migration
1 -
data transfer
1 -
Datasphere
2 -
Event Information
1,400 -
Event Information
65 -
Expert
1 -
Expert Insights
178 -
Expert Insights
280 -
General
1 -
Google cloud
1 -
Google Next'24
1 -
Kafka
1 -
Life at SAP
784 -
Life at SAP
11 -
Migrate your Data App
1 -
MTA
1 -
Network Performance Analysis
1 -
NodeJS
1 -
PDF
1 -
POC
1 -
Product Updates
4,577 -
Product Updates
330 -
Replication Flow
1 -
RisewithSAP
1 -
SAP BTP
1 -
SAP BTP Cloud Foundry
1 -
SAP Cloud ALM
1 -
SAP Cloud Application Programming Model
1 -
SAP Datasphere
2 -
SAP S4HANA Cloud
1 -
SAP S4HANA Migration Cockpit
1 -
Technology Updates
6,886 -
Technology Updates
408 -
Workload Fluctuations
1
Related Content
- ABAP Cloud Developer Trial 2022 Available Now in Technology Blogs by SAP
- SAP HANA Cloud Vector Engine: Quick FAQ Reference in Technology Blogs by SAP
- 10+ ways to reshape your SAP landscape with SAP Business Technology Platform – Blog 4 in Technology Blogs by SAP
- Top Picks: Innovations Highlights from SAP Business Technology Platform (Q1/2024) in Technology Blogs by SAP
- Consuming SAP with SAP Build Apps - Connectivity options for low-code development - part 2 in Technology Blogs by SAP
Top kudoed authors
| User | Count |
|---|---|
| 13 | |
| 10 | |
| 10 | |
| 7 | |
| 6 | |
| 5 | |
| 5 | |
| 5 | |
| 4 | |
| 4 |