
- SAP Community
- Products and Technology
- Technology
- Technology Blogs by SAP
- How To Install SAP Web IDE Locally for Trial in Wi...
Technology Blogs by SAP
Learn how to extend and personalize SAP applications. Follow the SAP technology blog for insights into SAP BTP, ABAP, SAP Analytics Cloud, SAP HANA, and more.
Turn on suggestions
Auto-suggest helps you quickly narrow down your search results by suggesting possible matches as you type.
Showing results for
former_member19
Explorer
Options
- Subscribe to RSS Feed
- Mark as New
- Mark as Read
- Bookmark
- Subscribe
- Printer Friendly Page
- Report Inappropriate Content
04-21-2015
11:02 AM
- 1. Introduction
- 2. Prerequisites
- 3. SAP Web IDE Installation Process
- 4. Configuring and Starting SAP Web IDE
- 5. Testing Installation by Connecting to Remote System
- 6. Connecting to an External Git Repository
Please note - SAP Web IDE Local Installation is no longer available.
Following a strong demand from customers, We would like to announce the release of SAP HANA Cloud Platform, Web IDE personal edition (SAP Web IDE Personal Edition) for trial and productive usage. SAP Web IDE personal edition is intended as a complementary IDE. It is to be installed by a single developer on a personal workstation for off-line development.
1. Introduction
This blog details out step-by-step procedure to local trial installation of SAP Web IDE 1.8 for test and evaluation purposes. You can experience the SAP Web IDE capabilities and see how simple it is to create and extend SAP Fiori/SAPUI5 applications with SAP Web IDE. Additionally, If you want to experience the trial version of SAP Web IDE on HANA Cloud Platform then please follow, Getting Started with SAP Web IDE on HANA Cloud.
Please note: This is a trial version for non-productive usage only and is not updated with the latest features as often as the SAP HANA Cloud version is. It contains a subset of SAP Web IDE functionality, leaving out cloud-specific features such as plugin/template development, consumption of optional plugins and collaboration support.
2. Prerequisites
- JVM (Java Virtual Machine) should be 7.0 or higher. JVM can be downloaded from here (only JRE is required).
3. SAP Web IDE Installation Process
3.1 Download the SAP Web IDE Local Installation package here by filling a simple form and following the instructions thereby.
3.2 Download Eclipse Orion package for Windows Platform from here.

3.3 Download Eclipse Director package from here:
http://www.eclipse.org/downloads/download.php?file=/tools/buckminster/products/director_latest.z...
3.4 After successful download of the files mentioned in above steps you would now have the the following:
a. Local Web IDE Installer : SAP_Web_IDE_Local_Inst.zip
b. Eclipse Orion : eclipse-orion-5.0-win32.win32.x86_xx.zip
c. Eclipse Director : director_latest.zip
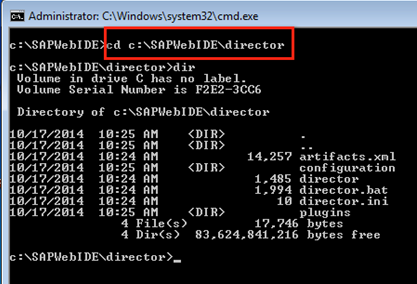
3.5 Create a new folder on the C drive named “SAPWebIDE”

3.6 Extract the Eclipse Orion package into C:\SAPWebIDE

3.7 Extract the Eclipse Director into C:\SAPWebIDE

3.8 Your C:\SAPWebIDE should now have the following folder structure

3.9 Extract "SAP_Web_IDE_Local_Inst.zip”. Once extracted, you will find two zip files named "SAP_HAT_local.zip" and “updatesite.zip”.

3.10 Open Command Promt and go to the C:\SAPWebIDE\director folder
3.11 Run this command in order to install the SAP Web IDE package into Eclipse Orion:
director -repository jar:file:/<location of the downloaded zip file>!/ -installIU com.sap.webide.orionplugin.feature.feature.group -destination c:\SAPWebIDE\eclipse
In our example, the complete command is
director -repository jar:file:C:\X XX XX X\Downloads\updatesite.zip!/ -installIU com.sap.webide.orionplugin.feature.feature.group -destination c:\SAPWebIDE\eclipse
NOTE: If the path to the downloaded zip file contains spaces, you need to wrap the entire path with double quotes (i.e. jar:file:”C:\Users\path with some spaces\Downloads\updatesite.zip”).

You have successfully installed your local copy of SAP Web IDE.
4. Configuring and Starting SAP Web IDE
Before starting Eclipse Orion you should modify the port of the Orion server from the standard 8080 to 9090. This is an optional step, but since there could be other software running on that port, it’s a best practice to change it. Navigate to Eclipse Orion folder using Windows Explorer and double click on the file orion.ini.

4.1 Locate the line “-Dorg.eclipse.equinox.http.jetty.http.port=8080”, change the port number to 9090 and save the file

4.2 Double click on the Eclipse Orion executable to start it

4.3 If you get this message, Click on Run

4.4 You will get a new command prompt window like this: don’t close it!

4.5 Open your Internet browser and type http://localhost:9090/webide/index.html

4.6 The Eclipse Orion home page will be loaded. Click on Create a new account

4.7 Enter the required information and click on Sign up

4.8 You have successfully started your local SAP Web IDE.

Note : Should you need to close SAP Web IDE and Eclipse Orion, close first the browser page containing SAP Web IDE and then select the console that Eclipse Orion opened when you started it up. Type the command “close” and then hit ENTER. Confirm to close it by pressing “y”.
5. Testing Installation by Connecting to Remote System
Now that we have configured our SAP Web IDE, we might also want to connect it to a remote system to get some data. There are basically 4 ways to do it and for a couple of them you need to create a special destination file, which gives to SAP Web IDE all the needed connection information. In particular, we might want to connect to a generic OData source or to an ABAP system.
Let’s take a look to how we can create the destination files for connecting to the public sample gateway system “sapes1.sapdevcenter.com”. You can get more information and register to it by going to the page Getting started with the SAP Netweaver Gateway Service Consumption System
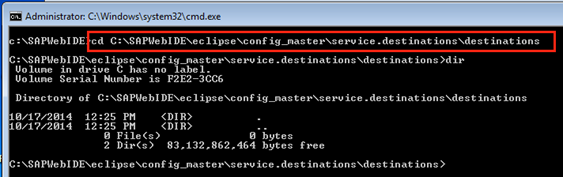
5.1 Open Command Prompt and type
cd C:\SAPWebIDE\eclipse\config_master\service.destinations\destinations
5.2 Type
echo #ServiceDestination > ES1

5.3 Type
notepad es1

5.4 Append the following lines to the file:
Description=es1 Type=HTTP TrustAll=true Authentication=NoAuthentication WebIDEUsage=odata_gen Name=es1 WebIDEEnabled=true URL=https\://sapes1.sapdevcenter.com ProxyType=Internet WebIDESystem=es1 |
5.5 The ES1 file in notepad should now look like

5.6 Close SAP Web IDE, if it was already open, and restart it. You will probably need to sign again in Eclipse Orion.
5.7 Create a new project using File > New > Project from Template and choose 'SAP Fiori Master Detail Application'.
5.8 At the step “3 - Data Connection” you can do the following:
- Click on Service URL.
- Select the es1 destination.
- Enter the path to the resource (it will be concatenated with the URL specified in the destination). In this example we can use “/sap/opu/odata/IWFND/RMTSAMPLEFLIGHT/”.
- Click on Select.
- After entering the credentials for accessing the gateway system, you will get the list of the available OData entities.

5.9 You have successfully tested the connection to an OData source, you can click on Next and continue with the project creation.
6. Connecting to an External Git Repository
Since you need to pass through a proxy you cannot access your Git repositories. For this you need to do some configuration. First of all you need to configure the orion.ini file to allow the SAP Web IDE to pass through the proxy.
6.1 Close SAP Web IDE and exit from Eclipse Orion by first closing the browser page containing SAP Web IDE and then selecting the console that Eclipse Orion is opened when you started it. Type the command “close” and then hit ENTER. Confirm to close it by pressing “y”.
![]()
6.2 Go in the C:\SAPWebIDE\eclipse folder with Windows Explorer
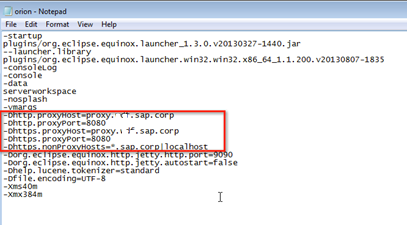
6.3 Double click on the orion.ini file to open it in the editor
6.4 Add the following lines to the file, just after the -vmargs line.
-Dhttp.proxyHost=<proxy> -Dhttp.proxyPort=<port> -Dhttps.proxyHost=<proxy> -Dhttps.proxyPort=<port> -Dhttps.nonProxyHosts=<hosts to be excluded from proxy> |
In our example it’s
-Dhttp.proxyHost=proxy.x xx x.sap.corp -Dhttp.proxyPort=8080 -Dhttps.proxyHost=proxy.x xx x.sap.corp -Dhttps.proxyPort=8080 -Dhttps.nonProxyHosts=*.sap.corp|localhost |
6.5 After the changes to orion.ini save the file.
6.6 Restart Eclipse Orion and reopen SAP Web IDE.
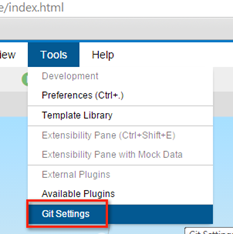
6.7 You need now to configure the account settings for the SAP Web IDE Git Client. Click on Tools > Git Settings
6.8 Provide your account information and click on Update

6.9 You have successfully configured your Git client with a proxy. You can test it by simply going to File > Git > Clone Repository.

6.10 Enter the name of a repository you want to clone in your environment, provide your credentials and click on OK

6.11 The project has been cloned successfully and connection to external git repository has been established successfully.

| Brought to you by the SAP Technology RIG |
|---|
- SAP Managed Tags:
- SAPUI5,
- SAP Enterprise Portal
Labels:
59 Comments
- « Previous
-
- 1
- 2
- Next »
You must be a registered user to add a comment. If you've already registered, sign in. Otherwise, register and sign in.
Labels in this area
-
ABAP CDS Views - CDC (Change Data Capture)
2 -
AI
1 -
Analyze Workload Data
1 -
BTP
1 -
Business and IT Integration
2 -
Business application stu
1 -
Business Technology Platform
1 -
Business Trends
1,658 -
Business Trends
91 -
CAP
1 -
cf
1 -
Cloud Foundry
1 -
Confluent
1 -
Customer COE Basics and Fundamentals
1 -
Customer COE Latest and Greatest
3 -
Customer Data Browser app
1 -
Data Analysis Tool
1 -
data migration
1 -
data transfer
1 -
Datasphere
2 -
Event Information
1,400 -
Event Information
66 -
Expert
1 -
Expert Insights
177 -
Expert Insights
296 -
General
1 -
Google cloud
1 -
Google Next'24
1 -
Kafka
1 -
Life at SAP
780 -
Life at SAP
13 -
Migrate your Data App
1 -
MTA
1 -
Network Performance Analysis
1 -
NodeJS
1 -
PDF
1 -
POC
1 -
Product Updates
4,577 -
Product Updates
342 -
Replication Flow
1 -
RisewithSAP
1 -
SAP BTP
1 -
SAP BTP Cloud Foundry
1 -
SAP Cloud ALM
1 -
SAP Cloud Application Programming Model
1 -
SAP Datasphere
2 -
SAP S4HANA Cloud
1 -
SAP S4HANA Migration Cockpit
1 -
Technology Updates
6,873 -
Technology Updates
420 -
Workload Fluctuations
1
Related Content
- ABAP Cloud Developer Trial 2022 Available Now in Technology Blogs by SAP
- SAP SABRIX UPGRADE in Technology Blogs by Members
- Special characters not displayed correctly in SAP BO 4.3 in Technology Q&A
- Exciting updates from TTA Cloud in Technology Blogs by Members
- How to install SAPHANA Studio in Windows in Technology Q&A
Top kudoed authors
| User | Count |
|---|---|
| 36 | |
| 25 | |
| 17 | |
| 13 | |
| 8 | |
| 7 | |
| 7 | |
| 6 | |
| 6 | |
| 6 |