
- SAP Community
- Products and Technology
- Technology
- Technology Blogs by SAP
- Near-Zero Downtime Maintenance for High Availabili...
Technology Blogs by SAP
Learn how to extend and personalize SAP applications. Follow the SAP technology blog for insights into SAP BTP, ABAP, SAP Analytics Cloud, SAP HANA, and more.
Turn on suggestions
Auto-suggest helps you quickly narrow down your search results by suggesting possible matches as you type.
Showing results for
Former Member
Options
- Subscribe to RSS Feed
- Mark as New
- Mark as Read
- Bookmark
- Subscribe
- Printer Friendly Page
- Report Inappropriate Content
04-07-2015
4:54 PM
Please note that this post is outdated. For the latest information, please see https://blogs.sap.com/2023/04/03/near-zero-downtime-maintenance-for-high-availability-disaster-recov...
Overview
Being up-to-date with the latest technologies and aiming the production stability and consistency are the top priorities for most businesses. However, that often requires business critical downtime for production systems. SAP offers a solution to this problem by providing its clients with the near-Zero Downtime Maintenance (nZDM) for SAP Java procedure for its SAP Java systems.
This blog gives an overview of the nZDM Java solution and the specifics of performing it on High Availability (HA) SAP Java systems.
What is the nZDM Java procedure?
The near-Zero Downtime Maintenance for SAP Java is a procedure that enables you to perform maintenance activities with greatly reduced business downtime on SAP Portal, SAP Process Orchestration (PO) and SAP systems that have only some of the usage types part of SAP Process Orchestration. nZDM Java deliveries are part of SAP SL Toolset program.
The nZDM Java procedure allows SAP customers to perform all maintenance activities on a copy or clone of the system (also called ‘target system’ in the context of nZDM) while the production system (called ‘source system’) is still in use.
More information about the nZDM solution can be found here:
Approaches for performing nZDM Java
Depending on the client’s system landscape and complexity, there are two main approaches for performing nZDM Java. Both rely on the copy or clone of the production system and include some basic common steps but the finalization steps differ.
Below the different approaches are explained via diagrams. The following legend describes the meaning of the different colors:

- System switch
This approach is suitable for virtualized systems as well as HA systems. The system’s clone will become the new production system. Before replacing the production system with the target system, testing the updated clone is possible without downtime. This happens in a special ‘nZDM test mode’.
The technical downtime is approximately the time needed to restart the system. It varies depending on the type and load of the system.
These are the generic steps of performing a ‘System Switch’ on a standard Process Orchestration system:
0. Initial State
The system on which we perform the ‘System Switch’ is a SAP Process Orchestration (PO) system consisting of several components: one or more Java Application Servers (AS), SAP Web Dispatcher (WD), SAP Central Services (SCS), SAP Enqueue Replication Service (ERS) and a database.

1. Preparation
Prepare the production system for nZDM Java: configure database settings, deactivate background jobs, set the landscape directory (SLD) to read-only mode, download and run the nZDM Java GUI on a separate host.
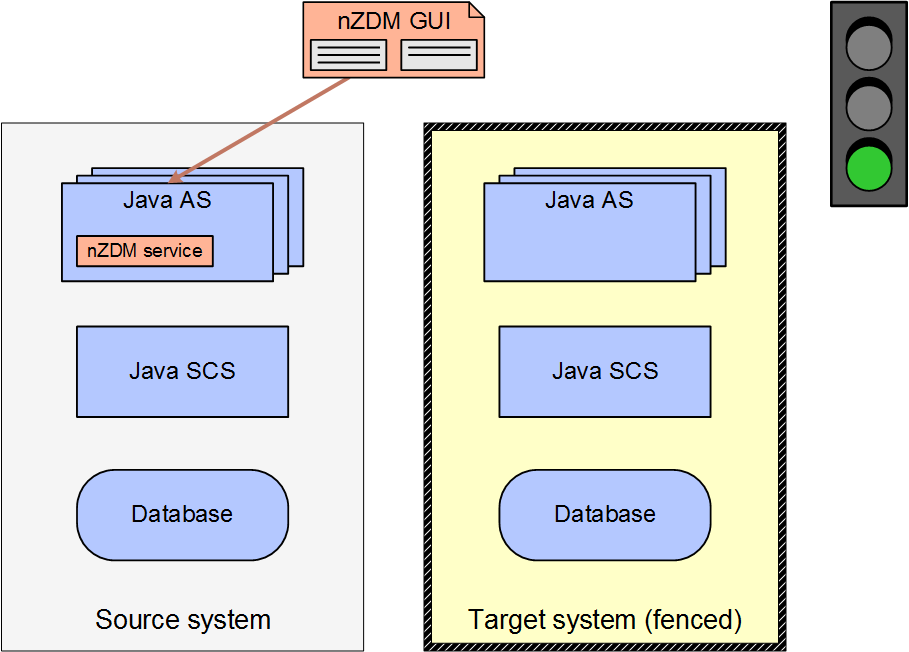
2. Connect the nZDM Java GUI to the source (production) system
Connect the nZDM Java GUI to one of the application servers of the source system.

3. Start recording
Initialize recording of the database changes on the production system.
4. Clone the source (production) system
Clone the source (production) system to create a target system.

5. Isolate the cloned system
Configure the isolation (network fencing) of the target system to avoid conflict with the source (production) system.
6. Start the target system
When the isolated clone is started, it starts as a target system.

7. Update the target system
Perform the desired maintenance activities on the target system.
8. (optional) Test the updated system
The updated target system can be tested before replacing the production system. No production system downtime is required for while testing on the target system. However, before performing tests it is important to do a backup of the target system. After the tests, the target system is restored to that backup.
9. Connect nZDM Java GUI to the target system
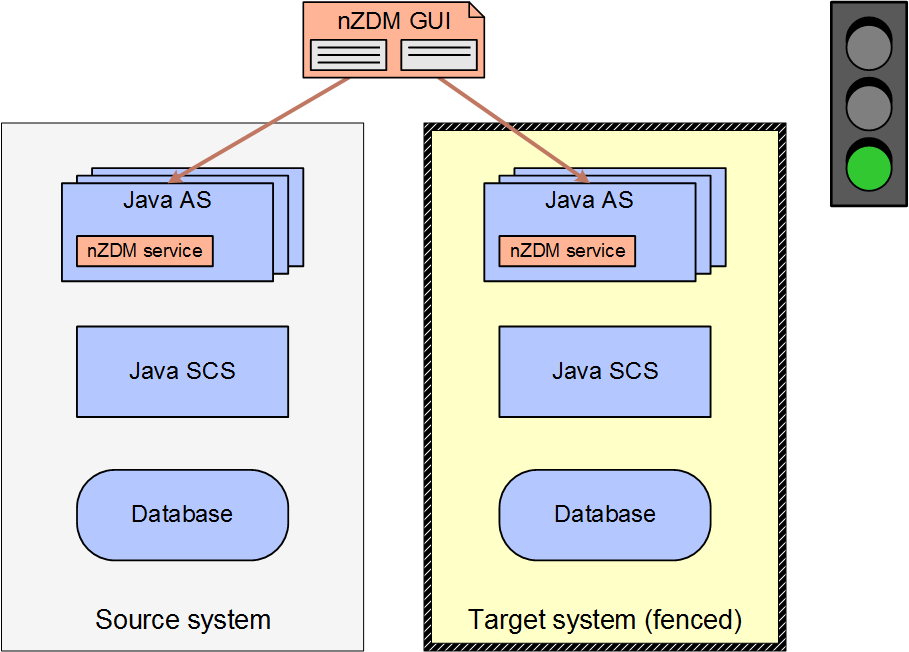
10. Start DB data replication from the source system to the target system
Replicate all available data changes from the source’s DB to the target system.
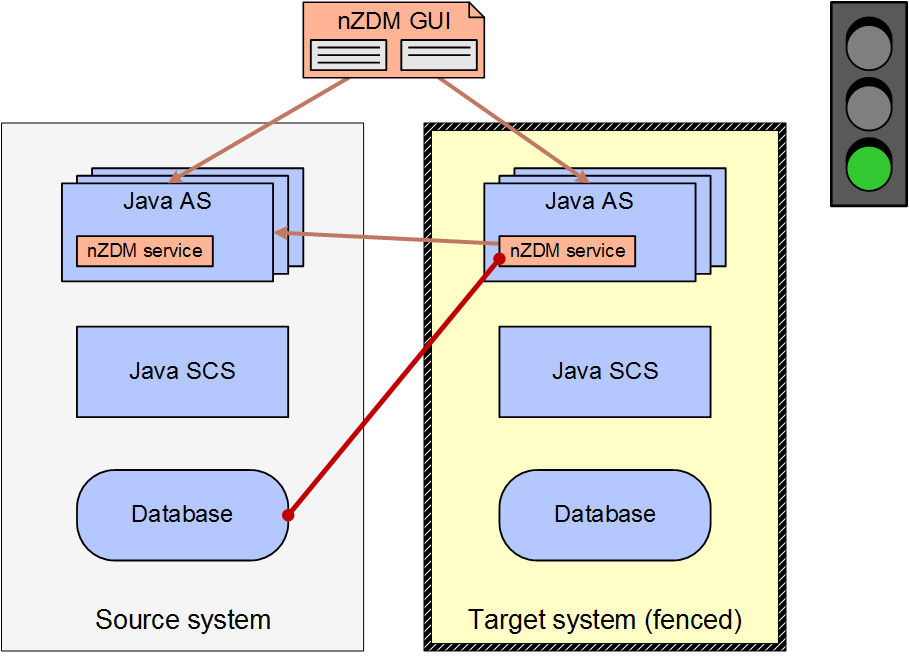
11. Stop source system / enter downtime phase
To replicate the last data changes the source system is stopped, starting the downtime phase. Only the DB of the source system remains active so that the replication can be finished.
This phase is activated via the nZDM GUI.

12. Stop and unfence target system
After finishing the replication, the updated target system is stopped and unfenced. Once unfenced, it can be started.
13. Start updated system / end of downtime phase
After starting the updated system, it replaces the original and becomes the new production system.

- Database switch
Recommended when there is no virtualization of the system and not suitable for High Availability systems. It uses the newly created database on the existing source system DB host. The data is cloned on the existing database server or on a shared storage. This approach is useful when the existing productive environment has a large scale and complex configurations. Therefore it might be the least costly way to use the already existing environment.
nZDM Java on High Availability System
Depending on the scenario and the suitable approach for it, the steps of the nZDM Java procedure may differ.
This section contains step-by-step descriptions, of two successfully performed scenarios of nZDM Java on HA systems. The first scenario demonstrates the above-mentioned ‘Cluster Clone’ and for the second a split of the cluster is performed.
nZDM Java on High Availability System: Cluster Clone
This approach for nZDM Java on HA system is more suitable for virtualized systems or other environments where making a clone or a copy of the system can be easily performed. With the HA ‘Cluster Clone’ the update is performed on a clone / copy of the production system. During the maintenance performed on of the clone (target system), the production system (source system) is active. The downtime is required for completion of the replication of data changes from source to target and takes about one system restart time.
These are the generic steps of performing a ‘Cluster Clone’ on a two-node HA system setup:
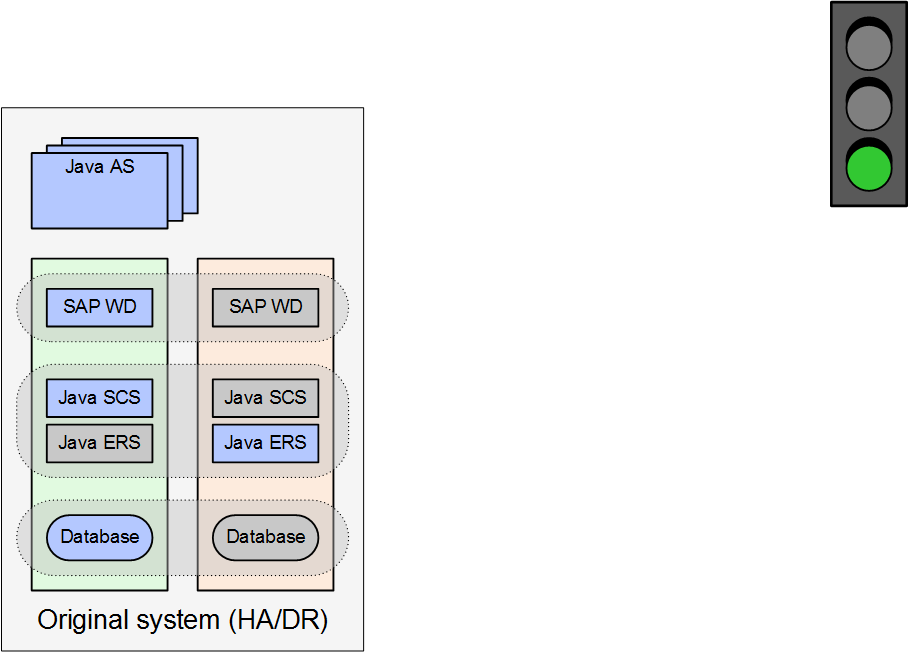
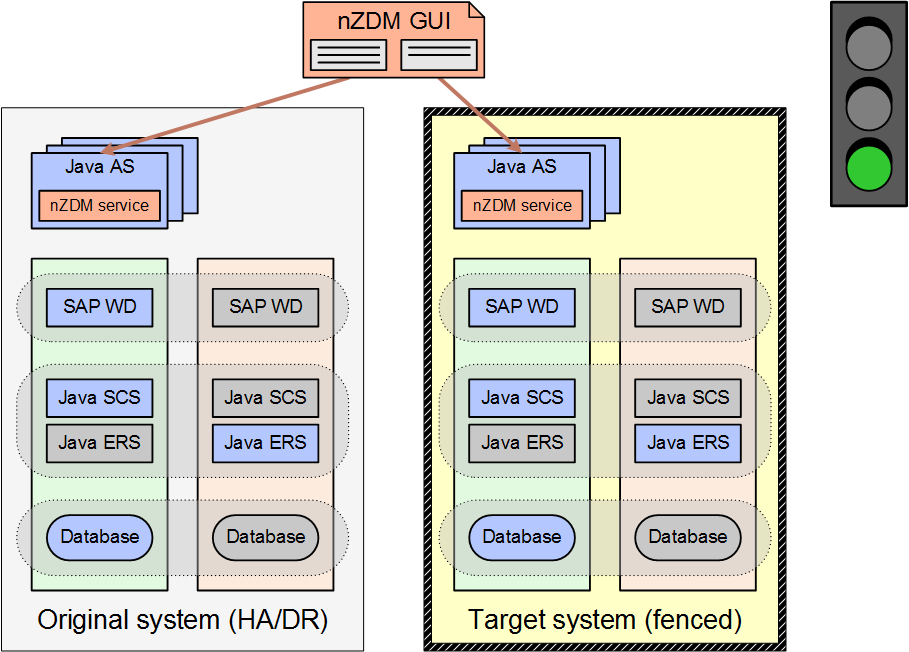
0. Initial State
The system on which we perform the ‘Cluster Clone’ is a High Availability / Disaster Recovery SAP Java system with two nodes and multiple application servers. Each node may have SAP Web Dispatcher (WD), SAP Central Services (SCS), SAP Enqueue Replication Service (ERS) and a database. The nodes are bound together in a HA cluster via HA software.
There is only one active WD, SCS, ERS and DB instance in the cluster of nodes at any given moment. If an active instance fails, the inactive activates and replaces it.
1. Preparation
Prepare the production system for nZDM Java: configure database settings, deactivate background jobs, set the landscape directory (SLD) to read-only mode, download and run the nZDM Java GUI on a separate host.
2. Connect nZDM Java GUI to the source (production) system
Connect the nZDM Java GUI to one of the application servers of the source system.

3. Start recording
Initialize recording of the database changes on the production system.
4. Clone the source (production) system
Clone the whole cluster of nodes to create a target system.

5. Isolate the cloned system
Configure the isolation (network fencing) of the target system to avoid conflict with the source (production) system.
6. Start the target system
When the isolated clone is started, it becomes our target system.

7. Update the target system
Perform the desired maintenance activities on the target system.

8. (optional) Test the updated system
The updated target system can be tested before replacing the production system. No production system downtime is required for while testing on the target system. However, before performing tests it is important to do a backup of the target system. After the tests, the target system is restored to that backup.
9. Connect nZDM Java GUI to the target system
10. Start DB data replication from the source system to the target system
Begin replication of data changes from the source’s DB to the target system.

11. Stop source system / enter downtime phase
To replicate the last data changes the source system is stopped, starting the downtime phase. Only the DB of the source system remains active so that the replication can be finished.
This phase is activated via the nZDM GUI.

12. Stop and unfence target system
After finishing the replication, the updated target system is stopped and unfenced. Once unfenced, it can be started.
13. Start updated system / end of downtime phase
After starting the updated system, it replaces the original and becomes the new production system.

nZDM Java on HA System: Cluster Split
This is an alternative approach for nZDM Java on HA systems having limited hardware resources at their disposal. It is suitable for non-virtualized systems. With the ‘Cluster Split’ instead of making a clone of the system including all of its nodes (like we do with ‘System switch’), we split the cluster of nodes and use one of the already available cluster nodes as a target system. The other node serves as a source system and remains active until the finalization phase of the nZDM Java procedure. The downtime takes about one system restart time but recreation of the HA setup may need additional planning, time and efforts.
The following describes the generic steps of a ‘Cluster Split’ nZDM Java approach on a two-node HA system:
0. Initial State
The system on which we perform the ‘Cluster Split’ is a High Availability / Disaster Recovery SAP Java system with two nodes and multiple application servers. Each node may have SAP Web Dispatcher (WD), SAP Central Services (SCS), SAP Enqueue Replication Service (ERS) and a database. The nodes are bound together in a HA cluster via HA software.
There is only one active WD, SCS, ERS and DB instance in the cluster of nodes at any given moment. If an active instance fails, the inactive activates and replaces it.

1. Preparation
Prepare the production system for nZDM Java: configure database settings, deactivate background jobs, set the landscape directory (SLD) to read-only mode, download and run nZDM Java GUI.
2. Connect nZDM Java GUI to the source (production) system
Connect the nZDM Java GUI to one of the application servers of the source system.

3. Start recording
Initialize recording of the database changes on the production system.
4. Split the cluster / break HA
Remove from the cluster the node that will be used as a target system.

5. Isolate the removed node
Configure the isolation (network fencing) of the removed node to avoid conflict with the source (production) system.
6. Add one Java Application Server (AS) to the removed node
Add an application server to the node that was removed from the cluster and create new Java system (target). That application server will be used for the connection between the target system and the nZDM Java GUI.
7. Start the target system
When the removed node is started it starts as a target system.

8. Update the target system
Perform the desired maintenance activities on the target system.

9. (optional) Test the updated system
The updated target system can be tested before replacing the production system. No production system downtime is required for while testing on the target system. However, Before performing tests it is important to do a backup of the target system. After the tests, the target system is restored to that backup.
10. Create cluster from the target system
Configure a HA cluster from the target system.
11. Connect nZDM Java GUI to the target system
Connect the nZDM Java GUI to the application server, added to the target system.

12. Start DB data replication from the source system to the target system
Replicate all available data changes from the source’s DB to the target system.

13. Stop source system / enter downtime phase
To replicate the last data changes the source system is stopped, starting the downtime phase. Only the DB of the source system remains active so that the replication can be finished. This phase is activated via the nZDM GUI.

14. Stop and unfence target system
After finishing the replication, the updated target system is stopped and unfenced.
15. Reconfigure application servers
Reconnect the application servers to the updated system.

16. Recreate the high availability system
To complete the process we must recreate the high availability setup of the production system. This is done by adding the former source system to the cluster we created with the updated system. Once the nodes are synced (via the HA software) the HA setup is restored and the system is successfully updated.

* The steps described above are highly dependent on the system’s specific setup. Therefore on a different system than the one used in this scenario there will be differences in the steps.
Conclusion
The nZDM Java procedure offers a flexible and effective solution for updating SAP Java systems. It also supports various High Availability landscapes of SAP Java systems. The main benefits of the procedure are the significantly reduced downtime and the ability to test the updated system before making it a production system, minimizing the risk of possible problems.
Further Information
nZDM Java user guides and the nZDM Java GUI are available at http://service.sap.com/sltoolset
Minimizing planned downtime during maintenance
What is High Availability system?
- SAP Managed Tags:
- SAP Process Integration,
- Software Logistics
Labels:
1 Comment
You must be a registered user to add a comment. If you've already registered, sign in. Otherwise, register and sign in.
Labels in this area
-
ABAP CDS Views - CDC (Change Data Capture)
2 -
AI
1 -
Analyze Workload Data
1 -
BTP
1 -
Business and IT Integration
2 -
Business application stu
1 -
Business Technology Platform
1 -
Business Trends
1,658 -
Business Trends
109 -
CAP
1 -
cf
1 -
Cloud Foundry
1 -
Confluent
1 -
Customer COE Basics and Fundamentals
1 -
Customer COE Latest and Greatest
3 -
Customer Data Browser app
1 -
Data Analysis Tool
1 -
data migration
1 -
data transfer
1 -
Datasphere
2 -
Event Information
1,400 -
Event Information
74 -
Expert
1 -
Expert Insights
177 -
Expert Insights
346 -
General
1 -
Google cloud
1 -
Google Next'24
1 -
GraphQL
1 -
Kafka
1 -
Life at SAP
780 -
Life at SAP
14 -
Migrate your Data App
1 -
MTA
1 -
Network Performance Analysis
1 -
NodeJS
1 -
PDF
1 -
POC
1 -
Product Updates
4,575 -
Product Updates
388 -
Replication Flow
1 -
REST API
1 -
RisewithSAP
1 -
SAP BTP
1 -
SAP BTP Cloud Foundry
1 -
SAP Cloud ALM
1 -
SAP Cloud Application Programming Model
1 -
SAP Datasphere
2 -
SAP S4HANA Cloud
1 -
SAP S4HANA Migration Cockpit
1 -
Technology Updates
6,871 -
Technology Updates
479 -
Workload Fluctuations
1
Related Content
- SAP BTP FAQs - Part 2 (Application Development, Programming Models and Multitenancy) in Technology Blogs by SAP
- Experience the new Product Maintenance reporting in SAP for Me / Customer Insights dashboard in Technology Blogs by SAP
- SAP BW/4 - revamp and true to the line 2024 in Technology Blogs by Members
- IoT - Ultimate Data Cyber Security - with Enterprise Blockchain and SAP BTP 🚀 in Technology Blogs by Members
- SAP GUI for Java 8.10 on the Horizon in Technology Blogs by SAP
Top kudoed authors
| User | Count |
|---|---|
| 17 | |
| 15 | |
| 11 | |
| 11 | |
| 9 | |
| 8 | |
| 8 | |
| 7 | |
| 7 | |
| 7 |