
- SAP Community
- Products and Technology
- Additional Blogs by SAP
- Debugging and Developing Android applications in e...
Additional Blogs by SAP
Turn on suggestions
Auto-suggest helps you quickly narrow down your search results by suggesting possible matches as you type.
Showing results for
marvin_hoffmann
Active Participant
Options
- Subscribe to RSS Feed
- Mark as New
- Mark as Read
- Bookmark
- Subscribe
- Printer Friendly Page
- Report Inappropriate Content
11-02-2014
2:23 PM
Update (November 2015):
In this article I was describing how to connect an Android device to the local reverse proxy tool Membrane Monitor. I am still using the steps how to connect the Android device when I am debugging client/server applications, but as a reverse proxy tool I prefer now Fiddler.
So I suggest following the described steps here but instead of using Membrane Monitor use Fiddler, as described here: Using Fiddler as Reverse Proxy to debug Client Server Communication .
----------------------
Recently I am involved in many mobile application development projects. Target is mainly the development of hybrid (Kapsel/Cordova) and/or native (Android) apps that are communicating with SAP Mobile Platform 3 (or alternatively HCPms). In this post I want to describe how I setup my development environment and how I debug especially the communication between device and SMP3.
In an ideal development environment you could do it the following way:
- Connect your Android phone or a fast emulator to your computer
- Start the Android IDE (e.g. eclipse or Android Studio) and execute your project
- Connect to your SMP over WiFi or internet
- (Optional) For communication debugging use an HTTP connection to your SMP and setup Wireshark or another Network Monitoring Tool on the server.
Like said, this would be the ideal case, but most customer or partner environments are setup in a different (maybe more secure) way. Often the development SMP is not reachable via Internet or the Android test devices used by the developers are not allowed to access the company's internal WLAN (maybe because the device is not managed or it is rooted). Using the Android emulator is often very painful. You might reply here that there are also fast emulators available, e.g. Genymotion, which is based on OracleBox. But actually these fast emulators have one big disadvantage in common, they are based on X86 cpu architecture. Most real devices are (still) using ARM processors and some libraries (e.g. SMP3 SDK SP05 OData Offline libs) your project might use are only compiled for ARM devices and thus the reason why you cannot use these emulators. When coming to communication debugging it is often not allowed by customer's security guidelines to install tools like Wireshark or other Network Sniffer tools on internal servers.
So how to come around these restrictions?
- Connect your Android device to your computer
- Activate port forwarding (using Google Chrome Inspect) to forward requests from your device over the USB cable to your computer
- Setup a small Proxy (e.g. Membrane Monitor, NetTool, TCPMon, ...) on your computer which routes the requests coming from the Android device to the SMP server
Using this way has several advantages.
- You can use a real device (no need for emulator)
- You are using the network connection of your computer to connect to the SMP server. This is even working when the computer is connected to a VPN
- You can trace all requests which are sent between the device and the SMP, because these requests are routed over your small Proxy utility
Let me explain this way with some screenshots
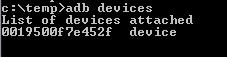
Connect your Android device to your computer and make sure that the developer options are activated and that the ADB drivers are installed. You can verify this by calling "adb devices" in a command prompt (adb tool is stored inside the AndroidSDK, e.g. C:\Development\Android\android-sdk\platform-tools)
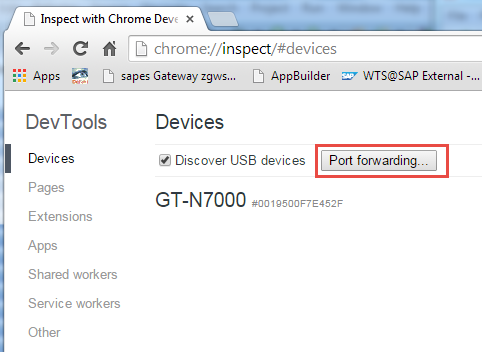
Open your Google Chrome (make sure you are on the latest available version) and go to address "chrome://inspect". You should see here now your device (in my case a Galaxy Note, GT-N7000). Now click on button "Port forwarding..."
Specify the port which should get forwarded from your Android device (in my case I chose 8088) and the target address localhost:8088 (my computer). Make sure to check also the check mark at the bottom "Enable port forwarding" before clicking on "Done".

After that start the Chromium/Web browser on your Android phone (make sure that you are using a new Android Version, I am preferring 4.4). You can see now that a new application (Chrome) appears followed by the tap which is open here. If you would click here on "inspect" you can open the Chrome Developer Tools and debug your websites or hybrid apps running on the Android device, which is e.g. also described here already Getting Started with Kapsel - Appendix B -- Debugging . For us the appearing green dot and the port number beside our Android device is more interesting. Only if you see this green dot the port forwarding is active.

Note: Do not exit the Chromium/Browser app on your Android app, it should continue running in background.
Next, let's setup the local Proxy on our computer to forward the request to SMP3. I tried here several utilities, which were mainly all working fine, e-.g. TCPMon, NetTools, Burp Suite Free Edition but finally I ended up in using Membrane Monitor. It is based on Java, open source (under ASF 2.0 license), is easy to use and requires no installation. You can get it from here Membrane SOAP/HTTP Monitor and Proxy .
Extract the zip package and start the tool by simply clicking on membrane-monitor.exe.
Add a new "Simple Service Proxy"

Specify that it should listen on port 8088

And that the requests should get forwarded to our SMP3 server

That's it. So let's start an Android app and have a look if it is working.
Inside your Android app you now have to connect to 127.0.0.1:8088

After the requests got sent you can see these requests and their responses inside the Membrane Monitor

Tip
You can save your proxy configuration in Membrane Monitor by choosing "File > Save Configuration". If you are saving the configuration here inside Membranes program directory and call it ".membrane.xml", then this config will be automatically loaded when you start the application. Quite convenient...
Extension for HTTPS communication
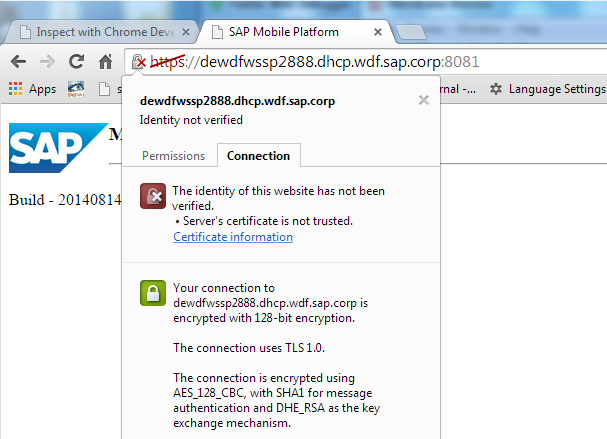
So if you can reach your SMP or HCPms server only by using HTTPS you can simply extend the setup. For this you have to get the certificate used by the SMP server, so e.g. open the page https://<yourSMP3server>:8081/ and extract the certificate. (In Chrome click on the "lock" symbol inside the address bar and choose "Certificate Information".
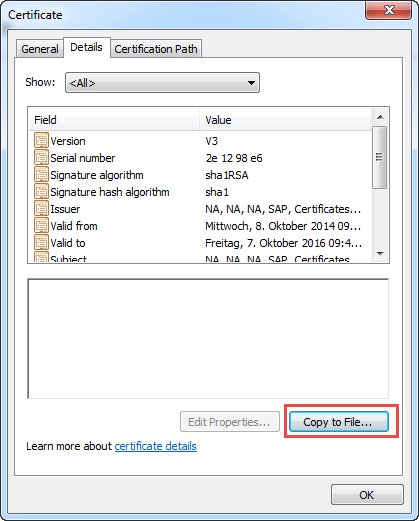
Then click on "Details" tab and choose "Copy to File").
Next step is to import this certificate into Membrane's truststore. For that you can choose the already existing client.jks keystore which is located inside the Membranes configuration directory (Password is "secret"). Open this Java keystore e.g. with Keystore Explorer (usually my preferred tool for keystore handling, KeyStore Explorer - Home) and import the SMP3 certificate as trusted certificate and save the keystore.

Exit the KeyStore Explorer, open the preferences inside Membrane Monitor and choose "Security SSL/TLS" option. Under "Truststore" choose our changed client.jks keystore.

After that I needed to restart Membrane Monitor. Then you can setup a new Simple Service Proxy, but this time enable the option "SecureConnection (SSL/TLS)" when you are specifying the target host of your SMP3 server. After that requests get send from your computer SSL encrypted to the SMP3 server.

Advantage when using this way is also that you do not have to think about importing certificates into your Android device (if the SMP server is using self signed certificates), because the Android device is still connecting to your proxy using normal HTTP.
Related Content
- ABAP Cloud Developer Trial 2022 Available Now in Technology Blogs by SAP
- Simplifying Employee and Manager Experiences with Employee Central Quick Actions in Human Capital Management Blogs by SAP
- New Machine Learning features in SAP HANA Cloud in Technology Blogs by SAP
- Building Low Code Extensions with Key User Extensibility in SAP S/4HANA and SAP Build in Enterprise Resource Planning Blogs by SAP
- SAP PaPM Cloud Universal Model: Deploy your environment via Manage Containers in Financial Management Blogs by SAP