
- SAP Community
- Products and Technology
- CRM and Customer Experience
- CRM and CX Blogs by Members
- Giving the new External Pricing feature a test dri...
CRM and CX Blogs by Members
Find insights on SAP customer relationship management and customer experience products in blog posts from community members. Post your own perspective today!
Turn on suggestions
Auto-suggest helps you quickly narrow down your search results by suggesting possible matches as you type.
Showing results for
Former Member
Options
- Subscribe to RSS Feed
- Mark as New
- Mark as Read
- Bookmark
- Subscribe
- Printer Friendly Page
- Report Inappropriate Content
07-02-2014
10:00 AM
Hi folks,
As you probably know, 1405 came out with an interesting feature for Sales Quotes: it now allows you to directly request the pricing in your integrated on prem SAP system (ECC or CRM) and the configuration is really effortless.
We played with it recently and I thought I would share our configuration steps as the documentation about this is spread in different locations.
Our system landscape: SAP CRM on premise, integrated with C4C via HCI.
We also implemented the SAP Web Dispatcher instead of using a good old reverse proxy, but I will not cover this part as the existing documentation is already very good on this topic. In general, any C4C Integration related documentation is covered in ginger.gatling/content like this one: SAP Cloud for Customer Integration with ERP and CRM: How-to Guides and E-Learning
Preparing your on premise system
First of all, make sure you update the add-on that makes integration with HCI or PI much easier, especially in the latest versions: CRMPCD01 SP08 currently.
It's a fairly easy installation, your hosting/BASIS team should be able to help you out easily.
Once this component is updated/installed, you will need to implement the Note 1994712 which will ask you to do the CRMPCD01 component update and to implement the Note 2014007.
Then as described in the documentation on the SAP CRM and HCI Integration (paragraph 4.7 "Configuration for receiving pricing information from SAP CRM"), you will need to activate the web service in your SOAP MANAGER. If you are not sure how to connect to this admin interface, just open your SAP CRM GUI and use SOAMANAGER as a Transaction Code.
The link will probably be something like: https://<URL>:<PORT>/sap/bc/webdynpro/sap/appl_soap_management?sap-client=100&sap-language=EN

Once in there, head to the Web Service Configuration and just directly search for the Service "EXTERNALSALESDOCUMENTDATAQUERY" (without quotes) which should now exist after implementing the Note 2014007.
Select the line result and click on "Apply selection" as shown below.

After clicking on "Apply selection", a new area will be displayed below with some Overview information. Head straight to the "Configuration" tab and we wil lcreate the Binding from there.

You can set the name, the binding etc. as you want. You can just use "EXTERNALSALESDOCUMENTDATAQUERY" if you want to, but you might want to check with your BASIS Team if they have any naming convention for your web services already.

Once done, just click on "Apply Settings", you will be able to update advanced settings like Security for instance.

This part is really more specific to your configuration and your security policies.
In the "Provider Security" you will configure the communication security (HTTP or HTTPS basically), if the service is authenticated by a user name and password or by a certificate.
In the "Messaging" tab, you can leave the message protocol to "WS-RM 2005/02". We had some issues with "SAP RM", the iflow was not working properly but it is working perfectly just set as "WS-RM 2005/02".
The rest can be left with the default options. Again, depending on your system configuration and your landscape you might need to tweak some of the options but for most of the cases it should work as it is.
Once done, just Save and come back in the "Overview" tab of your service just above.
You will now be able to select a Binding and click on "Show / hide selected Binding's or Service's WSDL URL". It will display the internal link of the web service you just activated.
Save that link for the HCI Configuration.

As far as your on premise system is concerned, you're done! Let's now do the quick configuration on HCI.
Preparing your HCI system
I would suggest you to read some of the HCI documentation as posted as an introduction if you are not very familiar with HCI yet. Some elements of the configuration can be sometimes difficult to understand the first time, but overall it is a simple system to use.
To properly configure the iflow you will need to have your Outbound Certificate from C4C and make sure you know which authentication method you need to use for your on premise system. We are going to configure a C4C > HCI > CRM iflow, you will have 2 authentication methods to configure in it. One between C4C and HCI which should be straightforward as you are just going to use the Certificate you already use in any C4C > CRM iflow. And one between HCI and your On Premise system, in our case we are using Basic Auth.
At this stage, some persons prefer to create the Communication Arrangement in C4C right now. If you want to do that, just quickly go to the next part below and perform the first few tasks until the CA is created. You can download the Certificate from the CA once it's created.
You will also need to have installed Eclipse and the HCI Tools, please follow the instructions here if you don't know how to proceed yet: SAP Development Tools for Eclipse (disregard the part below about the Data Service Agent, it is not necessary for this case).
I am going to explain how to deploy the iflow first using the Web Interface, and then finishing part of the configuration using the Eclipse plugin as some options are not yet available in the Web Interface. If you are already knowledgeable with HCI and Eclipse, you can do everything in Eclipse (you will just need to download the base package in the Web Interface first).
Simply connect to your HCI Tenant Web Interface. You should have received the URL in your welcome e-mail.
Go in "Discover" and click on the "SAP CRM Packages" (or SAP ECC if you are following this guide and adapting it for ECC).
Look for the "External Pricing for Quote" iflow and let's start the Configuration.

The first piece is easy, you will most probably only to have to upload your C4C Outbound Communication Certificate as explained above. If you are using Basic Auth instead, just change the Auth Type and fill in the settings.

Then head to the Receiver part, and the URL field will need to be updated with the Binding URL we saved above. However if you are using SAP Web Dispatcher or a Reverse Proxy as you are most probably are, the URL will slightly differ. Your hostname and probably port will be different. Your On Premise system will give you the Internal Hostname for your Company Network by default in the Binding URL as shown in the SOAP Manager.
Again, a good exercise if it is the first time for you is to check with the existing iflow configured. You will most probably use the same hostname and port.

Once you have updated the "Address", you can Deploy and Save.
Now, remember that we have to update the Auth Method between HCI and your On Premise system. Unfortunately we cannot edit the iflow in the Web Interface to perform this task, maybe if you know a way to do it in the Web Interface please let me know and I will gladly update this part.
To do so we will have to open Eclipse and connect to our Tenant. We will then import the freshly deployed iflow and update the communication part with the proper auth settings, and re-deploy it.
You will want to put yourself in the "Integration Designer" as we are going to update an iflow.
We want to import the iflow we just deployed, just go in the "File" menu and click on "Import". We will import and "Integration Content Archive".

Click on "Next" and then select the Import location as "Tenant Management Node". In the "Integration Content" list, select "com.sap.scenarios.cod2crm.querysalesquotepricing.request". Then hit "Finish".

Now you should see the package on your Project Explorer, expand it and go in "src.main.resources.scenarioflows.integrationflow" and double click on the iflow below.

The iflow will be displayed on the main area, you can double click on the SOAP connection as highlighted below to update the auth method between HCI and your On Premise system.

Go to the "Adapter Specific" tab, and if you are using a Basic Auth method as we are, just check the box as shown below and in the Credential Name put the user you have configured in HCI. It should be the same as other iflows and the one already configured on your HCI Tenant. Please check the general documentation as listed at the beginning for more information on how to configure basic auth users in HCI.

Once you are done, save the iflow and click on "Deploy" (shortcut displayed below). Check the iflow package and just hit "Finish".

The Console will let you know if everything is ok and if the iflow is deployed. You can double check in the Monitoring section of the Web Interface for instance to make sure the iflow is started.
That's it for the HCI part. Now basically HCI knows what to do when it gets a request from C4C on this iflow and can normally reach your On Premise system to call the Web Service we configured.
One of the trickiest part of this configuration is the auth method. Please make sure that you have a good understanding by following the documentation, asking SAP Support and comparing with existing iflows. This helped us a lot.
Configuring C4C
The final part of this guide. Please keep in mind that we are doing this configuration in our Test system. We are not yet going live with this feature for various internal reasons, so you might need to do a bit more before doing this in Production.
I will consider that your Sales Orgs, Customers and Materials are also integrated between your systems. If it is not the case, just make sure that you have External ID configured manually for your test scenarios (this is what we did).
I also consider that you already activated the External Pricing for Sales Quotes in your Scoping options.
Let's start by creating the Communication Arrangement for this new web service. Head to your Administration WorkCenter, and open the "Communication Arrangements" configuration.
Create a new "Communication Arrangement" and select "Sales Quote with Pricing in an external system".
In "Business Data", select your "Communication System" already configured, and the Code List Mapping associated with it (relevant for Pricing Procedure configuration, Sales Quote document type etc.).
Your "Technical Data" are probably fine by default. Just make sure that the Outbound Communication Auth method matches with what we configured earlier in HCI.
Review, Save, and voilà!
One final configuration step, we have to create the Sales Quote Document Type that will allow External Pricing.
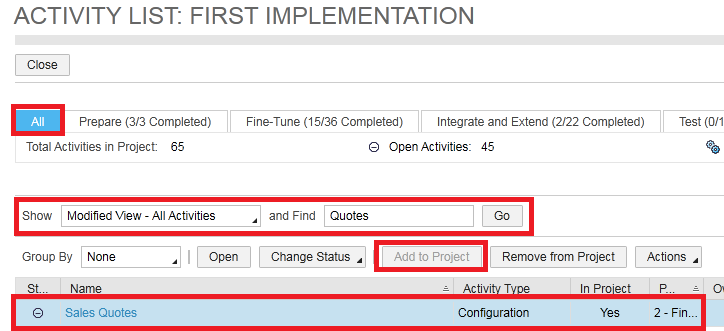
For this, head to your "Business Configuration > Implementation Projects" work center and click on "Open Activity List".
Go in the "All" tab and make sure you display all Activities and not just the ones in your Project to make sure you can update Sales Quotes. Add it to your project as displayed below if it's not the case already.
Open the "Document Type" configuration piece, and create a new Document Type to activate the "External Pricing Procedure".

Save and Close.
From now on it's a matter of making sure the data required when creating a Sales Quote as a proper External ID in your configuration.
This means, Materials, Sales Org/Unit/Channel/Division, Pricing steps (not required for test, it will just throw an error that you can disregard, the pricing will still work), Accounts of course, the newly created Document Type as well etc.
As I wrote above, this is not a Production implementation so I am not going to cover this part. Furthermore this is very specific to your case and the necessary data in your On Premise system to get accurate pricing.
If you need some guidance, don't hesitate to post in the Community and I will gladly help if I can.
Giving it a go
Go ahead and create a Sales Quotes with some Test Data (sorry for blacking out everything, real Customer names etc. even in a Test system). Save it and Open it.

If your data is mapped correctly, you should be able to head straight to Action > Request Pricing. After a few seconds, your full pricing procedure will be loaded and can be checked in the Products tab.

You will get errors, but they are usually clear enough for you to be able to understand what is wrong.
Troubleshoot first by checking that the iflow is OK in HCI, check the status of the message if it has been processed and sent in HCI. Then check on your On Premise system if you see it in your monitoring as well (use the Transaction Code SRTUTIL and start a Trace while running a test).
The Error Monitor of SRTUTIL will be helpful at the beginning as well to understand if there are missing data in the Web Service or if the call is not done properly.
I hope this guide helped!
Thanks,
JB.
- SAP Managed Tags:
- SAP Cloud for Customer add-ins
11 Comments
You must be a registered user to add a comment. If you've already registered, sign in. Otherwise, register and sign in.
Labels in this area
-
ABAP
1 -
API Rules
1 -
c4c
1 -
CRM
1 -
Custom Key Metrics
1 -
Customer Data
1 -
Determination
1 -
Determinations
1 -
Introduction
1 -
KYMA
1 -
Kyma Functions
1 -
open SAP
1 -
Sales and Service Cloud Version 2
1 -
Sales Cloud
1 -
Sales Cloud v2
1 -
SAP
1 -
SAP Community
1 -
SAP CPQ
1 -
SAP CRM Web UI
1 -
SAP Customer Data Cloud
1 -
SAP Customer Experience
1 -
SAP Integration Suite
1 -
SAP Sales Cloud v2
1 -
SAP Service Cloud v2
1 -
SAP Service Cloud Version 2
1 -
Service Cloud v2
1 -
Validation
1 -
Validations
1
Related Content
- Working with SAFe Epics in the SAP Activate Discover phase in CRM and CX Blogs by SAP
- Power of E-commerce Subscription Models in Increasing Conversions and Boosting Average Order Value in CRM and CX Blogs by SAP
- SAP Customer Data Cloud Integration with Commerce Cloud and Composable Storefront in CRM and CX Blogs by SAP
- SAP Customer Checkout 2.0 Feature Pack 19 (Released on 26-MARCH-2024) in CRM and CX Blogs by SAP
- What is planned for the 2405 release of SAP Variant Configuration and Pricing? in CRM and CX Blogs by SAP
Top kudoed authors
| User | Count |
|---|---|
| 1 | |
| 1 | |
| 1 | |
| 1 | |
| 1 |