
- SAP Community
- Products and Technology
- Technology
- Technology Blogs by SAP
- Get started on HANA Cloud Platform (HCP) XS develo...
Technology Blogs by SAP
Learn how to extend and personalize SAP applications. Follow the SAP technology blog for insights into SAP BTP, ABAP, SAP Analytics Cloud, SAP HANA, and more.
Turn on suggestions
Auto-suggest helps you quickly narrow down your search results by suggesting possible matches as you type.
Showing results for
Product and Topic Expert
Options
- Subscribe to RSS Feed
- Mark as New
- Mark as Read
- Bookmark
- Subscribe
- Printer Friendly Page
- Report Inappropriate Content
02-13-2014
3:49 PM
Lately I’ve started building a POC of a mobile app for tourism. Given the low entry barrier of HANA Cloud Platform (HCP) as opposed to all the plumbing and IT set up required to operate and expose a REST app on the Internet, I thought HCP would be the way to go. I come from the world of Java Servlet development and I wanted to see whether I could apply my Java expertise as is in the HCP XS environment. While laying the ground to the POC, I thought I would share my experience as a tutorial. So here is the SAP Guided Tour Tutorial, or SGT for short.
Scenario:
The SGT POC requires a service to create new touristic sites and a service to retrieve all the existing touristic sites.
At the time of writing this tutorial, I am using the HANA studio version:1.0.7000 and the HANA Cloud DB version: 1.00.70.00.386119
Prerequisites:
Sorry, I hate starting with prerequisites but we can’t escape it if we don’t want to waste too much time figuring out why things break.
- Get your account (it’s a free small account and no credit card info is requested )
https://help.hana.ondemand.com/help/frameset.htm?868d804efd0b4eb788bdebd7b36a57a4.html
- Download and install the HANA studio (a development environment based on Eclipse)
https://help.hana.ondemand.com/help/frameset.htm?b0e351ada628458cb8906f55bcac4755.html
Create a HANA XS app:
Follow the steps described here: https://help.hana.ondemand.com/help/frameset.htm?3762b229a4074fc59ac6a9ee7404f8c9.html
Important notice: make sure you don’t skip Step 3 (3. Create a Subpackage). Otherwise you may receive an “insufficient privilege” error message. It seems that this is a security measure as the trial accounts run on a shared HANA server.
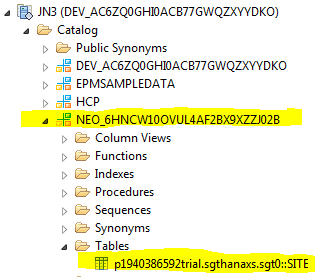
For the SGT POC, I created a package with the name “sgthanaxs” and subpackage with the name “sgt0”. P1940386592 is my user Id and p1940386592trial my account number. Note that the subpackage doesn’t show under the cockpit.

On the SAHA studio you should see:

The Repositories tab of the SAP HANA development perspective looks like this:

Under your Project Explorer tab, make sure the package structure shows as highlighted.

Create a table:
To persist our sites we need a HANA table. Although one can go with the Hana studio SQL console, I chose to go with the descriptive way. This way the HANA XS server will create automatically the table upon activation of the project. Here is the SITE table declaration:
//Touristic site table
table.schemaName = "NEO_6HNCW10OVUL4AF2BX9XZZJ02B";
table.tableType = COLUMNSTORE;
table.columns = [
{name = "site_id"; sqlType = INTEGER; nullable = false;},
{name = "site_name"; sqlType = VARCHAR; nullable = false; length = 72;},
{name = "site_type"; sqlType = VARCHAR; nullable = false; length = 16;}
];
table.primaryKey.pkcolumns = ["site_id"];
The hdbrole file looks like this:
role p1940386592trial.sgthanaxs.sgt0::model_access {
application privilege: p1940386592trial.sgthanaxs.sgt0::Basic;
sql object p1940386592trial.sgthanaxs.sgt0::SITE: SELECT,INSERT;
}
The project explorer looks now as follow:

The orange barrel indicates that a file is activated and that I should see the SITE table created under the SGT schema. Don’t worry about the red cross.
Create the REST services:
Let’s create the “site” REST service. Create a file with name site.xsjs and paste the following code:
$.response.contentType = "text/json";
var output = "";
try {
//connect to default schema
var conn = $.db.getConnection();
var pstmtSelect = conn.prepareStatement("SELECT * FROM \"p1940386592trial.sgthanaxs.sgt0::SITE\"");
var rs = pstmtSelect.executeQuery();
//build an Array of site JSON objects out of the result set
var sites = [];
while (rs.next()) {
var site = {};
site.siteId = rs.getString(1);
site.siteName = rs.getString(2);
site.siteType = rs.getString(3);
sites.push(site);
}
output = output + JSON.stringify(sites);
//close everything
rs.close();
pstmtSelect.close();
conn.close();
//return the HTTP response. OK is used by default
$.response.setBody(output);
} catch (e) {
//log the error
$.trace.fatal(e.message);
//return 501
$.response.status = $.net.http.INTERNAL_SERVER_ERROR;
}
Activate the file and go to the HCP Trial cockpit. For my trial account I see:

Note that on an HCP trial account SAML is the default sign-in protocol. So if your browser asks you if it should use your company’s sign-in certificate, you should select NO.
Click on the application URL and you would get and empty JSON array “[]” since the SGT’s SITES table is empty.
To try if the SQL Select really works, you can go to the developer Studio and insert some records to the p1940386592trial.sgthanaxs.sgt0::SITE table using the SQL insert on the SQL console or using the HANA studio’s data import wizard located under File>Import>SAP HANA Content>Data from Local File.
Here is an example of such an Insert statement:
insert into "NEO_6HNCW10OVUL4AF2BX9XZZJ02B"."p1940386592trial.sgthanaxs.sgt0::SITE" values(1,'my site','monument')
The second requirement is the ability to create new touristic sites. Let’s enhance the previous site.xsjs script and add to it a RESTy flavor so to use HTTP GET verb for retrieving the sites and the POST verb for creating sites. Overwrite the previous site.xsjs with the following:
/**
* get query parameters in as JSON object
* @returns JSON object
*/
function getRequestParameters() {
var paramsObject = {};
var i;
//$.request.getParameter(paramerterName) is not supported
for (i = 0; i < $.request.parameters.length; ++i) {
var name = $.request.parameters[i].name;
var value = $.request.parameters[i].value;
paramsObject[name] = value;
}
return paramsObject;
}
/**
* handle site GET request
*/
function doGet() {
$.response.contentType = "text/json";
var output = "";
try {
//connect to default schema
var conn = $.db.getConnection();
var pstmtSelect = conn.prepareStatement("SELECT * FROM \"p1940386592trial.sgthanaxs.sgt0::SITE\"");
var rs = pstmtSelect.executeQuery();
//build an Array of site JSON objects out of the result set
var sites = [];
while (rs.next()) {
var site = {};
site.siteId = rs.getString(1);
site.siteName = rs.getString(2);
site.siteType = rs.getString(3);
sites.push(site);
}
output = output + JSON.stringify(sites);
//close everything
rs.close();
pstmtSelect.close();
conn.close();
//return the HTTP response. OK is used by default
$.response.setBody(output);
} catch (e) {
//log the error
$.trace.fatal(e.message);
//return 501
$.response.status = $.net.http.INTERNAL_SERVER_ERROR;
}
}
/**
* handle site POST request
*/
function doPost() {
$.response.contentType = "text/json";
var output = "";
try {
//connect to default schema
var conn = $.db.getConnection();
//get the parameters of the POST body
var paramsObject = getRequestParameters();
//validate received parameters
if (paramsObject.siteId === null
|| paramsObject.siteName === null
|| paramsObject.siteType === null
|| paramsObject.siteId.length <= 0
|| paramsObject.siteName <= 0
|| paramsObject.siteType <= 0) {
$.trace.debug("Wrong parameters");
//return 412
$.response.status = $.net.http.PRECONDITION_FAILED;
} else {
var pstmtInsert = conn.prepareStatement("INSERT INTO \"p1940386592trial.sgthanaxs.sgt0::SITE\" values(?,?,?)");
pstmtInsert.setInteger(1, parseInt(paramsObject.siteId));
pstmtInsert.setString(2, paramsObject.siteName);
pstmtInsert.setString(3, paramsObject.siteType);
var numberRows = pstmtInsert.executeUpdate();
if(numberRows!==1){
$.trace.fatal("something bad went wrong with the insert of a SITE");
//return 501
$.response.status = $.net.http.INTERNAL_SERVER_ERROR;
return;
}
conn.commit();
pstmtInsert.close();
$.trace.info("site created: " + paramsObject.siteId);
doGet();
}
} catch (e) {
$.trace.fatal(e.message);
//return 403
$.response.status = $.net.http.NOT_MODIFIED;
}
}
// only GET and POST are supported for the site service
if ($.request.method === $.net.http.GET) {
doGet();
} else if($.request.method === $.net.http.POST){
doPost();
} else{
$.response.status = $.net.http.METHOD_NOT_ALLOWED;
}
Given that the sign-in protocol is SAML, it is not easy to test an HTTP POST using popular REST Clients. So let’s design an HTML form to calls the site.xsjs POST service to insert some data.
Create an HTML file with the name site.html and activate it.
<!DOCTYPE html>
<html>
<body>
<form name="input" action="https://s1hanaxs.hanatrial.ondemand.com/p1940386592trial/sgthanaxs/sgt0/site.xsjs" method="post">
siteId: <input type="text" name="siteId"><br>
siteName: <input type="text" name="siteName"><br>
siteType: <input type="text" name="siteType"><br>
<input type="submit" value="Create site">
</form>
</body>
</html>
Fill the fields and submit.
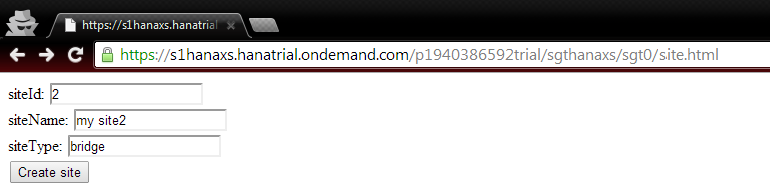
You should happily see the newly created site added to the response.
[{"siteId":"1","siteName":"my site","siteType":"monument"},{"siteId":"2","siteName":"my site2","siteType":"bridge"}]
At the end, the HANA Studio perspectives for the project should look like this:


Note that in order to show all the artifacts under the subpackage “sgt0”, you should enable “Show all objects” under Window>Preferences>SAP HANA>Modeler>Content Presentation.
Conclusion:
I hope this can help some of you guys J and please let me know if you have problems.
Having the Database and the source control view and the project structure under the same development environment is great. Besides coding in JavaScript, I felt that the HANA SX development experience is very comparable to the Servlet development.
As a developer, you can now build your mobile app or web site with the little tooling provided in this tutorial. For more support in building your enterprise apps, you should better go with standard tools such as OData, SAP UI5, SAP Fiori, etc.
Some references:
http://help.sap.com/hana/SAP_HANA_XS_JavaScript_Reference_en/index.html
- SAP Managed Tags:
- SAP HANA
6 Comments
You must be a registered user to add a comment. If you've already registered, sign in. Otherwise, register and sign in.
Labels in this area
-
ABAP CDS Views - CDC (Change Data Capture)
2 -
AI
1 -
Analyze Workload Data
1 -
BTP
1 -
Business and IT Integration
2 -
Business application stu
1 -
Business Technology Platform
1 -
Business Trends
1,658 -
Business Trends
105 -
CAP
1 -
cf
1 -
Cloud Foundry
1 -
Confluent
1 -
Customer COE Basics and Fundamentals
1 -
Customer COE Latest and Greatest
3 -
Customer Data Browser app
1 -
Data Analysis Tool
1 -
data migration
1 -
data transfer
1 -
Datasphere
2 -
Event Information
1,400 -
Event Information
69 -
Expert
1 -
Expert Insights
177 -
Expert Insights
330 -
General
1 -
Google cloud
1 -
Google Next'24
1 -
GraphQL
1 -
Kafka
1 -
Life at SAP
780 -
Life at SAP
13 -
Migrate your Data App
1 -
MTA
1 -
Network Performance Analysis
1 -
NodeJS
1 -
PDF
1 -
POC
1 -
Product Updates
4,575 -
Product Updates
375 -
Replication Flow
1 -
REST API
1 -
RisewithSAP
1 -
SAP BTP
1 -
SAP BTP Cloud Foundry
1 -
SAP Cloud ALM
1 -
SAP Cloud Application Programming Model
1 -
SAP Datasphere
2 -
SAP S4HANA Cloud
1 -
SAP S4HANA Migration Cockpit
1 -
Technology Updates
6,872 -
Technology Updates
461 -
Workload Fluctuations
1
Related Content
- Digital Twins of an Organization: why worth it and why now in Technology Blogs by SAP
- Replication Flow Blog Part 6 – Confluent as Replication Target in Technology Blogs by SAP
- Embedding Business Context with the SAP HANA Cloud, Vector Engine in Technology Blogs by SAP
- SAP BTP FAQs - Part 2 (Application Development, Programming Models and Multitenancy) in Technology Blogs by SAP
- SAP BTP FAQs - Part 1 (General Topics in SAP BTP) in Technology Blogs by SAP
Top kudoed authors
| User | Count |
|---|---|
| 16 | |
| 12 | |
| 9 | |
| 7 | |
| 7 | |
| 6 | |
| 6 | |
| 6 | |
| 5 | |
| 4 |