

- SAP Community
- Products and Technology
- Enterprise Resource Planning
- ERP Blogs by SAP
- Unlock the Full Potential of Short-Term Cash Posit...
Enterprise Resource Planning Blogs by SAP
Get insights and updates about cloud ERP and RISE with SAP, SAP S/4HANA and SAP S/4HANA Cloud, and more enterprise management capabilities with SAP blog posts.
Turn on suggestions
Auto-suggest helps you quickly narrow down your search results by suggesting possible matches as you type.
Showing results for
Advisor
Options
- Subscribe to RSS Feed
- Mark as New
- Mark as Read
- Bookmark
- Subscribe
- Printer Friendly Page
- Report Inappropriate Content
10-31-2023
2:42 AM
You have learned about mandatory settings in Define Cash Position Profiles from my previous blog Unlock the Full Potential of Short-Term Cash Positioning – Part 1. Now let's continue to explore some other important settings that you can use to tailor your Short-Term Cash Positioning report.
Cash flows that have a value date earlier than the reporting period are considered as overdue cash flows. For overdue cash flows, you can decide whether to show them in the Short-Term Cash Positioning app, whether they should be calculated into the closing balances, and restrict the planning levels of the overdue cash flows to be considered.
To show the overdue cash flows, you have to set the Show Overview option as Yes.
This enables the Overdue Amount column tol be displayed in the Short-Term Cash Positioning app. Cash flows that have a value date earlier than the reporting period are then aggregated and displayed in this column. The opening balance comes from the closing balance of the last day of the reporting period.
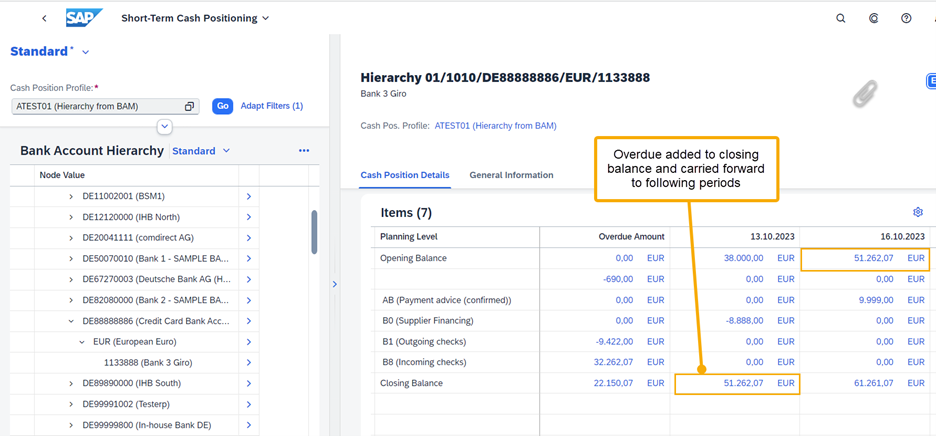
If you set the Include Overdue option, the sum of the overdue amount will be included in the calculation of the first period closing balance when displaying cash position. If the option is not set, the overdue cash flows will not be carried forward and the balance numbers will be different. Compare the differences below:
Moreover, you can restrict the planning levels for overdue cash flows through a filter. We’ll come to that in the section for filters.
Cash flows that have a value date later than the reporting period are regarded as future cash flows.
Just like overdue cash flows, you can control whether you want to see future cash flows using the Include Future option. If you set the option as Yes, the Future Amount column will be displayed. The opening balance comes from the closing balance of the last day of the reporting period.
The following settings are relevant to the smart currency determination function.
With each cash position profile, you can define a display currency for your report. Before you enable the smart currency function, the display currency will be used to aggregate balances and cash flows for higher level nodes, for example, when you are viewing your cash positions for a company code that owns multiple bank accounts with different bank account currencies. However, this setting is not mandatory, when the smart currency function is not enabled and you didn’t define a display currency, the aggregation can’t work and you can only view aggregated amounts for bank accounts that are grouped by the same bank account currency. You can see the differences below:
Smart currency not enabled, and display currency is not maintained:
Smart currency is not enabled, but display currency is maintained:
With the Enable Smart Currency function, you can switch between different currency types to get an aggregated balance. There are three currency types:
Depending on the hierarchy source you have defined, the smart currency determination works differently:
Here are some more examples for you to better understand the smart determination logic:
Example:
Example:
By default, the Cash Position Details view is available only for bank account level and cash pool header account level.
The two screenshots below show when the embedded view Cash Position Details is on and off:
You can refer to the following table to get the information displayed for different node types with or without the Display Cash Position Details function:
The Highlight in Red field determines whether negative balances will be highlighted in red in Cash Position Overview and Cash Pool Structure in the Short-Term Cash Positioning app.
This field consists of the following two dropdown lists:
To create a filter, proceed as follows:
Here you can restrict the planning levels for forecasted cash flows and for overdue cash flows respectively.
Please note that both planning levels selected for forecasted cash flows and overdue cash flows will show up in your report. For example, you have selected planning level AA for forecasted cash flows and planning level BB for overdue cash flows. In the Short-Term Cash Positioning app, a row for planning level AA and a row for planning level BB are displayed under the Planning Level column.
The screenshots below illustrate how it works. Note the following planning levels:
When there is no restriction on planning levels, all planning levels are shown as below.
When you set filters to only to see forecasted flows for B2 but no restriction on overdue flows:
When you set filters to see forecasted flows only for B2 and overdue flows only for B1. The following changes are displayed in the report:
You may want to scale the numbers displayed in your reports by thousands or millions. To do so, in your profile on the top right corner, choose User Setting. You can then enable the custom scaling function and define how you would like to see the numbers in your reports.
In the Scaling Factor field, you can specify the number of places you want to scale down. In this field, only numbers between 0 and 9 can be entered.
For example, the value “3” means showing the values in thousands. The value “6” means showing the values in millions.
In the Number of Decimal Places field, you can specify the number of places you want to show after the decimal point of the amount in the app. For example, the value “1” means showing one digit after the decimal point.
For example, if you enter 3 for the scaling factor and 2 for the decimal places as shown below, JPY 5568800 will then be displayed as JPY 5568.80.
Now that you’ve learned the ins and outs of using Define Cash Position Profiles to customize and fine tune your Short-Term Cash Positioning report, give it a try and let us know if you have any questions or feedback!
Overdue Cash Flows
Cash flows that have a value date earlier than the reporting period are considered as overdue cash flows. For overdue cash flows, you can decide whether to show them in the Short-Term Cash Positioning app, whether they should be calculated into the closing balances, and restrict the planning levels of the overdue cash flows to be considered.
To show the overdue cash flows, you have to set the Show Overview option as Yes.
This enables the Overdue Amount column tol be displayed in the Short-Term Cash Positioning app. Cash flows that have a value date earlier than the reporting period are then aggregated and displayed in this column. The opening balance comes from the closing balance of the last day of the reporting period.

If you set the Include Overdue option, the sum of the overdue amount will be included in the calculation of the first period closing balance when displaying cash position. If the option is not set, the overdue cash flows will not be carried forward and the balance numbers will be different. Compare the differences below:

Moreover, you can restrict the planning levels for overdue cash flows through a filter. We’ll come to that in the section for filters.
Future Cash Flows
Cash flows that have a value date later than the reporting period are regarded as future cash flows.
Just like overdue cash flows, you can control whether you want to see future cash flows using the Include Future option. If you set the option as Yes, the Future Amount column will be displayed. The opening balance comes from the closing balance of the last day of the reporting period.
Smart Currency Determination
The following settings are relevant to the smart currency determination function.

How Things Work Without Smart Currency Determination
With each cash position profile, you can define a display currency for your report. Before you enable the smart currency function, the display currency will be used to aggregate balances and cash flows for higher level nodes, for example, when you are viewing your cash positions for a company code that owns multiple bank accounts with different bank account currencies. However, this setting is not mandatory, when the smart currency function is not enabled and you didn’t define a display currency, the aggregation can’t work and you can only view aggregated amounts for bank accounts that are grouped by the same bank account currency. You can see the differences below:
Smart currency not enabled, and display currency is not maintained:

Smart currency is not enabled, but display currency is maintained:

With the Enable Smart Currency function, you can switch between different currency types to get an aggregated balance. There are three currency types:
- Company code currency
- Bank account currency
- Display currency
Depending on the hierarchy source you have defined, the smart currency determination works differently:
- For the hierarchy source Bank Account Master Data, if you have enabled smart currency, you must specify a display currency in the cash position profile. The smart currency function works as below:
- If the selection rule of the node is bank accounts with the same account currency, the bank account currency will be used for displaying cash positions.
- If the selection rule of the node is bank accounts with the same company code, the company code currency will be used for displaying cash position.
- In other cases, the display currency defined in the cash position profile will be used for displaying cash position.
The screenshot below shows how smart currency works with the hierarchy source Derived from Bank Account Master Data:
Here are some more examples for you to better understand the smart determination logic:
- Example 1
Hierarchy Level | Node | Currency Source |
| Root Node | Root Node | Display Currency Defined in Profile |
| Level 1 | Currency | Bank Account Currency |
| Level 2 | Company Code | Bank Account Currency |
| Sub Node | Bank Account | Bank Account Currency |
- Example 2
| Hierarchy Level | Node | Currency Source |
| Root Node | Root Node | Display Currency Defined in Profile |
| Level 1 | Bank Key | Display Currency Defined in Profile |
| Level 2 | Company Code | Company Code Currency |
| Leaf Node | Bank Account | Bank Account Currency |
- Example 3
| Hierarchy Level | Node | Currency Source |
| Root Node | Root Node | Display Currency Defined in Profile |
| Level 1 | Bank Key | Display Currency Defined in Profile |
| Level 2 | Bank Account Currency | Bank Account Currency |
| Leaf Node | Bank Account | Bank Account Currency |
- For the hierarchy source Bank Account Hierarchy, if you have enabled smart currency, you must specify a display currency in the cash position profile. The smart currency function works as below:
- For bank accounts, the bank account currency will be used.
- For all other nodes, the display currency will be used.

Example:
| Hierarchy Level | Node | Currency Source |
| Root Node | Root Node Defined in Bank Account Hierarchy | Display Currency |
| Sub Nodes | Sub Nodes Defined in Bank Account Hierarchy | Display Currency |
| Leaf Node | Bank Account | Bank Account Currency |
- For the hierarchy source Cash Pool and Bank Account Master Data, the hierarchy levels are fixed. The first level is company code, and the second level is bank account currency. The following rules are applied:
- For the company code node, the company code currency will be used.
- For the bank account currency node, the bank account currency will be used.
- For bank accounts, the bank account currency will be used.
Example:
| Hierarchy Level | Node | Currency Source |
| Level 1 | Company Code | Company Code Currency |
| Level 2 | Currency | Bank Account Currency |
| Leaf Node | Bank Account | Bank Account Currency |

Display Embedded Cash Position Detail View
By default, the Cash Position Details view is available only for bank account level and cash pool header account level.
The two screenshots below show when the embedded view Cash Position Details is on and off:
If you want to enable the view for other hierarchy levels as well, here’s what you need to do:
- Make sure that you have either entered a display currency or enabled the smart currency function.
- Set the Display Cash Position Details option as Yes.
You can refer to the following table to get the information displayed for different node types with or without the Display Cash Position Details function:
| Node Type | Information with Function Switched On | Information with Function Switched Off |
| Cash Pool Header | Cash Pool Structure, Cash Position Details | Cash Pool Structure, Cash Position Details |
| Bank Account | Cash Position Details, General Information | Cash Position Details, General Information |
| Other Nodes | Cash Position Details, Cash Position Overview | Cash Position Overview |
Highlight in Red
The Highlight in Red field determines whether negative balances will be highlighted in red in Cash Position Overview and Cash Pool Structure in the Short-Term Cash Positioning app.
This field consists of the following two dropdown lists:
- Highlight Negative Balances
If you choose this option, the item containing negative balances will be displayed in red with a highlight indicator in front of the row in Cash Position Overview and Cash Pool Structure of the Short-Term Cash Positioning app.
- No Highlight
If you choose this option, the item containing negative balances will not be highlighted in Cash Position Overview and Cash Pool Structure of the Short-Term Cash Positioning app.
Filters for Cash Position Profile
To create a filter, proceed as follows:
- Go to Define Filters -> New Entries.
- Add a filter ID and description.
- In Define Cash Position Profiles, select a profile and then choose Assign Filter to Cash Position Profile.
- Choose New Entries to assign the filter to the cash position profile.
- In Define Filters, select the filter and then choose the Define Filter Conditions

- On the Maintain Filter Conditions page, you can set filters for:
- Bank Accounts: You can restrict the bank accounts to be displayed in your report by using attributes such as company code, bank country/region key, currency, and so on.
- Cash Flows: You can restrict the cash flows to be displayed in your report by specifying the planning levels.
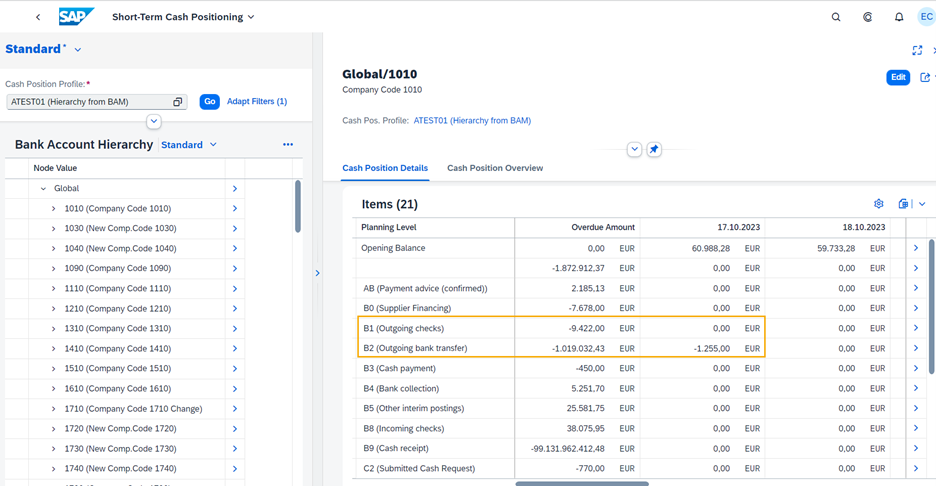
Here you can restrict the planning levels for forecasted cash flows and for overdue cash flows respectively.

Please note that both planning levels selected for forecasted cash flows and overdue cash flows will show up in your report. For example, you have selected planning level AA for forecasted cash flows and planning level BB for overdue cash flows. In the Short-Term Cash Positioning app, a row for planning level AA and a row for planning level BB are displayed under the Planning Level column.
- In the Overdue Amount column, only data for planning level BB is displayed. The cells for planning level AA display 0.
- For columns that show the forecasted cash flows, only data for planning level AA is displayed. The cells for planning level BB display 0.
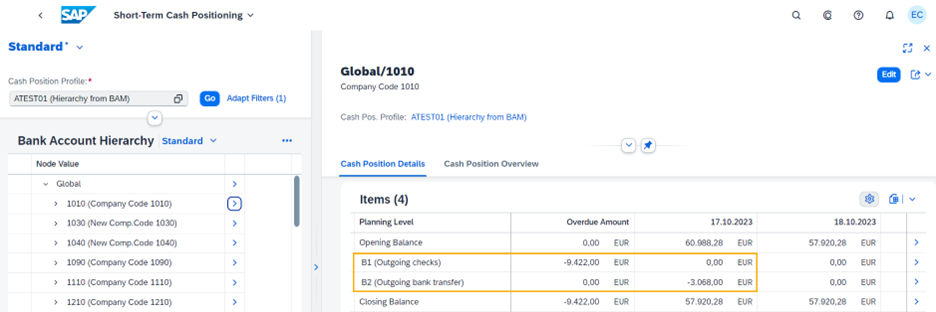
The screenshots below illustrate how it works. Note the following planning levels:
- AU: No overdue data; has forecasted data
- B1: Has overdue data; no forecasted data
- B2: Has both overdue and forecasted data
When there is no restriction on planning levels, all planning levels are shown as below.

When you set filters to only to see forecasted flows for B2 but no restriction on overdue flows:
- No change on the row B2
- AU disappears from the report because it was overruled for forecasted flows, and it has no overdue flows
- No change on row B1, as there is no restriction on overdue flows, and it contains overdue data

When you set filters to see forecasted flows only for B2 and overdue flows only for B1. The following changes are displayed in the report:
- Now only the two specified planning levels are displayed
- B2 has overdue data but due to the restriction in the filter, it has been set to display only forecasted data. As a result, the overdue amount for B2 shows 0 and the forecast data is displayed as usual.

Currency Scaling
You may want to scale the numbers displayed in your reports by thousands or millions. To do so, in your profile on the top right corner, choose User Setting. You can then enable the custom scaling function and define how you would like to see the numbers in your reports.


In the Scaling Factor field, you can specify the number of places you want to scale down. In this field, only numbers between 0 and 9 can be entered.
For example, the value “3” means showing the values in thousands. The value “6” means showing the values in millions.
In the Number of Decimal Places field, you can specify the number of places you want to show after the decimal point of the amount in the app. For example, the value “1” means showing one digit after the decimal point.
For example, if you enter 3 for the scaling factor and 2 for the decimal places as shown below, JPY 5568800 will then be displayed as JPY 5568.80.
Conclusion
Now that you’ve learned the ins and outs of using Define Cash Position Profiles to customize and fine tune your Short-Term Cash Positioning report, give it a try and let us know if you have any questions or feedback!
Related Info
- Unlock the Full Potential of Short-Term Cash Positioning – Part 1
- Cash and Liquidity Management (SAP S/4HANA Cloud): https://help.sap.com/s4_ce_clm
- Cash and Liquidity Management (SAP S/4HANA): https://help.sap.com/s4_op_clm
- SAP Managed Tags:
- SAP S/4HANA Cloud for Finance,
- SAP S/4HANA,
- FIN (Finance),
- FIN Cash Management,
- SAP S/4HANA Public Cloud
Labels:
2 Comments
You must be a registered user to add a comment. If you've already registered, sign in. Otherwise, register and sign in.
Labels in this area
-
Artificial Intelligence (AI)
1 -
Business Trends
363 -
Business Trends
29 -
Customer COE Basics and Fundamentals
1 -
Digital Transformation with Cloud ERP (DT)
1 -
Event Information
461 -
Event Information
27 -
Expert Insights
114 -
Expert Insights
177 -
General
1 -
Governance and Organization
1 -
Introduction
1 -
Life at SAP
415 -
Life at SAP
2 -
Product Updates
4,682 -
Product Updates
261 -
Roadmap and Strategy
1 -
Technology Updates
1,500 -
Technology Updates
96
Related Content
- The Role of SAP Business AI in the Chemical Industry. Overview in Enterprise Resource Planning Blogs by SAP
- SAP S/4HANA Cloud Private Edition | 2023 FPS01 Release – Part 2 in Enterprise Resource Planning Blogs by SAP
- Sustainability with SAP S/4HANA Cloud Public Edition 2402 in Enterprise Resource Planning Blogs by SAP
- Unlock the Full Potential of Short-Term Cash Positioning - Part 1 in Enterprise Resource Planning Blogs by SAP
Top kudoed authors
| User | Count |
|---|---|
| 14 | |
| 6 | |
| 6 | |
| 4 | |
| 4 | |
| 4 | |
| 3 | |
| 3 | |
| 3 | |
| 3 |