
- SAP Community
- Products and Technology
- Enterprise Resource Planning
- ERP Blogs by SAP
- SAP S/4HANA Cloud, public edition, ABAP Environmen...
Enterprise Resource Planning Blogs by SAP
Get insights and updates about cloud ERP and RISE with SAP, SAP S/4HANA and SAP S/4HANA Cloud, and more enterprise management capabilities with SAP blog posts.
Turn on suggestions
Auto-suggest helps you quickly narrow down your search results by suggesting possible matches as you type.
Showing results for
Product and Topic Expert
Options
- Subscribe to RSS Feed
- Mark as New
- Mark as Read
- Bookmark
- Subscribe
- Printer Friendly Page
- Report Inappropriate Content
06-05-2023
11:01 AM
Here we come to the 4th blog of our series. First of all, I’d like to suggest that you can read other blogs in our series.
Case Introduction
Case 1 - Enhanced Goods Receipt Process
Case 2 - Customizing Sales Order App
Case 3 - Custom CDS View Using ADT
After these, let’s start our journey again!
Our customer raised a requirement that they'd like to do mass update in work center, but now there is no such an APP can meet their requirement in SAP S/4HANA Cloud System. We'd like to develop an APP with our 3SL to achieve this target.
First create a Package, right-click ZLOCAL > New > ABAP Package.
Fill in Name and Description of the Package and check Add to favorite packages for easy follow-up. Click Next > Next > Finish to complete the package creation.
Right click on the created Package and choose Other ABAP Repository Object. Search for Database Table and click Next.
Enter the Name and Description of the Database Table and click Next > Finish to finish the creation.
To define the data table using the following code, click the button 🕯 in the menu bar to activate it after saving.
Right click on the created Package and choose Other ABAP Repository Object. Search for Data Definition and click Next.
Enter Name and Description for Database Definition and click Next > Next.
Choose Define Root View Entity and click Finish to finish the creation.
Define the CDS view using the following code, and after saving, click the button 🕯 in the menu bar to activate it.
Right click on the created Package and choose Other ABAP Repository Object. Search for Data Definition and click Next.
Enter Name and Description for Database Definition and click Next > Next. Choose Define Projection View and click Finish to finish the creation.
Define the Projection View using the following code, and after saving, click the button 🕯 in the menu bar to activate it.
Create a Behavior Definition for CDS View first. Right-click the CDS Data Model and select New Behavior Definition.
Click Next > Finish to finish the creation. Using the following code definition, click the button 🕯 in the menu bar to activate it after saving.
Create a Behavior Definition for Projection View in the same step. Click the button 🕯 in the menu bar to activate after saving.
In Behavior Definition, place the cursor on the implementation class, press CTRL + 1, and double-click Create behavior implementation class to create an implementation class.
Click Next > Finish to finish creating the Implementation Class.
Define the implementing class using the following code and activate it by clicking the button 🕯 in the menu bar after saving.
Right-click Projection View and choose New Service Definition.
Enter Name and Description for Service Definition and click Next > Finish to finish creation. Click the button 🕯 in the menu bar to activate after saving.
Right-click the Service Definition created and choose New Service Binding.
Enter Name and Description for Service Binding, Binding Type, select OData V2 - UI, and click Next > Finish to finish the creation.
Click the button 🕯 in the menu bar to activate after saving. Click Publish to publish the Service Binding. When the publication is complete, select the service you created and click Preview to view the published service.
Preview with Fiori App.
Configure Destination on BTP platform to connect to SAP S/4HANA Cloud system.
In tab Instance and Subscriptions, open SAP Business Application Studio.
Create a Project. Enter npm run deploy after Business Application Studio has finished developing the application interface.
Wait until the Business Application Studio deployment is completed.
Back to Eclipse when the deployment is completed, the following additional files are available in the directory.
Right-click Cloud Identify and Access Management and select New > IAM App. Fill in the Name and Description. Note that Application Type is EXT - External App.
After the creation, enter the Launchpad App Descriptor Items file name as Fiori Launchpad App Descr Item ID.
When your entries are complete, click Publish Locally in the top right corner.
Right click on the Package created, choose Other ABAP Repository Object. Search for Business Catalog and click Next. Fill in the Name and Description. Click Next > Finish to create the Business Catalog.
Select the Apps submenu below and click Add to create a Business Catalog App Assignment. Fill in the name of the IAM App you just created. Click Next > Finish to finish the creation. Click Publish Locally in the top right corner.
Open SAP S/4HANA Cloud System and enter APP - Maintain Business Roles. Click on New to create a new Business Role. Fill in the Business Role ID and Business Role Description and click Create.
Select Tab Assigned Business Catalogs. Click Add, search for the Business Catalog name you created, and then click OK. Click Save to complete the creation of the Business Role.
Enter APP - Maintain Business Users and add the Business Role you just created for your business user.
Search in your system and you can find the APP which you have previously deployed.
Follow us via @SAP and #S4HANA or follow summer23
Case Introduction
Case 1 - Enhanced Goods Receipt Process
Case 2 - Customizing Sales Order App
Case 3 - Custom CDS View Using ADT
After these, let’s start our journey again!
1. Scenario Requirements
Our customer raised a requirement that they'd like to do mass update in work center, but now there is no such an APP can meet their requirement in SAP S/4HANA Cloud System. We'd like to develop an APP with our 3SL to achieve this target.
2. Back-end Service Development
2.1 Create a Package to Store All Development Content
First create a Package, right-click ZLOCAL > New > ABAP Package.
Fill in Name and Description of the Package and check Add to favorite packages for easy follow-up. Click Next > Next > Finish to complete the package creation.

New ABAP Package
2.2 Create a Database Table
Right click on the created Package and choose Other ABAP Repository Object. Search for Database Table and click Next.
Enter the Name and Description of the Database Table and click Next > Finish to finish the creation.

New Database Table
To define the data table using the following code, click the button 🕯 in the menu bar to activate it after saving.
define table zrap_wkc_x {


  key workcenterinternalid     : abap.numc(8) not null;

  key workcentertypecode       : abap.char(2) not null;

  workcenter                   : abap.char(8);

  plant                        : abap.char(4);

  supplyarea                   : z_supplyarea;

  workcenterusage              : z_workcenterusage;

  matlcompismarkedforbackflush : z_boole_d;


}
2.3 Creating a CDS Data Model
Right click on the created Package and choose Other ABAP Repository Object. Search for Data Definition and click Next.
Enter Name and Description for Database Definition and click Next > Next.

New CDS Data Model
Choose Define Root View Entity and click Finish to finish the creation.
Define the CDS view using the following code, and after saving, click the button 🕯 in the menu bar to activate it.
define root view entity ZRAP_I_WKCTP_X as select from zrap_wkc_x

{

  key workcenterinternalid         as Workcenterinternalid,

  key workcentertypecode           as Workcentertypecode,

      workcenter                   as Workcenter,

      plant                        as Plant,

      supplyarea                   as Supplyarea,

      workcenterusage              as Workcenterusage,

      matlcompismarkedforbackflush as Matlcompismarkedforbackflush

}
2.4 Creating a Projection View
Right click on the created Package and choose Other ABAP Repository Object. Search for Data Definition and click Next.
Enter Name and Description for Database Definition and click Next > Next. Choose Define Projection View and click Finish to finish the creation.

New Projection View
Define the Projection View using the following code, and after saving, click the button 🕯 in the menu bar to activate it.
define root view entity ZRAP_C_WKCTP_X as projection on zrap_i_wkcenterTP

{

  key Workcenterinternalid,

  @Search.defaultSearchElement: true

  key Workcentertypecode,

  @Search.defaultSearchElement: true

  @Consumption.valueHelpDefinition: [ { entity: { name: 'I_WrkCtrBySemanticKeyStdVH', element: 'WorkCenter' } } ]

  @Search.fuzzinessThreshold: 0.9

  Workcenter,

  @Search.defaultSearchElement: true

  @Consumption.valueHelpDefinition: [ { entity: { name: 'I_PlantStdVH', element: 'Plant' } } ]

  Plant,

  @Search.defaultSearchElement: true

  @Consumption.valueHelpDefinition: [ { entity: { name: 'I_ProductionSupplyAreaStdVH', element: 'Supplyarea' } } ]

  Supplyarea,

  @Search.defaultSearchElement: true

  @Consumption.valueHelpDefinition: [ { entity: { name: 'I_ProductionResourceUsage', element: 'ProductionResourceUsage' } } ]

  Workcenterusage,

  @Search.defaultSearchElement: true

  Matlcompismarkedforbackflush

}
2.5 Create Behavior Definitions
Create a Behavior Definition for CDS View first. Right-click the CDS Data Model and select New Behavior Definition.
Click Next > Finish to finish the creation. Using the following code definition, click the button 🕯 in the menu bar to activate it after saving.
managed implementation in class zbp_rap_i_wkctp_x unique;

strict ( 2 );


define behavior for ZRAP_I_WKCTP_X alias Work_Center_X

persistent table zrap_wkc_x

lock master

authorization master ( instance )

//etag master <field_name>

{

  //create;

  update;

  //delete;

  internal action sync_WorkCenter;

  action set_Supplyarea;

  action set_Usage;

  action set_backflush;

}
Create a Behavior Definition for Projection View in the same step. Click the button 🕯 in the menu bar to activate after saving.
projection;

strict ( 2 );


define behavior for ZRAP_C_WKCTP_X //alias <alias_name>

{

  use update;


  use action set_Supplyarea;

  use action set_Usage;

  use action set_backflush;

}
2.6 Create a Behavior Implementation
In Behavior Definition, place the cursor on the implementation class, press CTRL + 1, and double-click Create behavior implementation class to create an implementation class.

Create Behavior Implementation Class
Click Next > Finish to finish creating the Implementation Class.

New Behavior Class
Define the implementing class using the following code and activate it by clicking the button 🕯 in the menu bar after saving.
CLASS lhc_Work_Center_X DEFINITION INHERITING FROM cl_abap_behavior_handler.

  PRIVATE SECTION.


    METHODS get_instance_authorizations FOR INSTANCE AUTHORIZATION

      IMPORTING keys REQUEST requested_authorizations FOR Work_Center_X RESULT result.


    METHODS set_backflush FOR MODIFY

      IMPORTING keys FOR ACTION Work_Center_X~set_backflush.


    METHODS set_Supplyarea FOR MODIFY

      IMPORTING keys FOR ACTION Work_Center_X~set_Supplyarea.


    METHODS set_Usage FOR MODIFY

      IMPORTING keys FOR ACTION Work_Center_X~set_Usage.


    METHODS sync_WorkCenter FOR MODIFY

      IMPORTING keys FOR ACTION Work_Center_X~sync_WorkCenter.


ENDCLASS.


CLASS lhc_Work_Center_X IMPLEMENTATION.


  METHOD get_instance_authorizations.

  ENDMETHOD.


  METHOD set_backflush.

  ENDMETHOD.


  METHOD set_Supplyarea.

  ENDMETHOD.


  METHOD set_Usage.


*   Local definition

    DATA:

      lt_update TYPE TABLE FOR UPDATE   i_workcentertp,

      ls_update TYPE STRUCTURE FOR UPDATE   i_workcentertp.


*   Read EML from update BO

    READ ENTITIES OF zrap_i_wkctp_x IN LOCAL MODE

    ENTITY Work_Center_X

      FIELDS (  workcenterinternalid workcentertypecode supplyarea workcenterusage matlcompismarkedforbackflush )

      WITH CORRESPONDING #( keys )

    RESULT DATA(lt_work_centers)

    FAILED DATA(ls_failed)

    REPORTED DATA(ls_reported).


*   Form update table for Work Center BO

    LOOP AT lt_work_centers ASSIGNING FIELD-SYMBOL(<work_centers>).


      ls_update-%key-WorkCenterInternalID = <work_centers>-WorkCenterInternalID.

      ls_update-%key-WorkCenterTypeCode   = <work_centers>-WorkCenterTypeCode.

      ls_update-SupplyArea                = <work_centers>-SupplyArea.

      ls_update-WorkCenterUsage           = <work_centers>-WorkCenterUsage.

      ls_update-MatlCompIsMarkedForBackflush = <work_centers>-MatlCompIsMarkedForBackflush.

      ls_update-%control-SupplyArea       = if_abap_behv=>mk-on.

      ls_update-%control-WorkCenterUsage  = if_abap_behv=>mk-on.

      ls_update-%control-MatlCompIsMarkedForBackflush = if_abap_behv=>mk-on.


      APPEND ls_update TO lt_update.


    ENDLOOP.


*   Make modifications to Work Center

    MODIFY ENTITIES OF i_workcentertp

     ENTITY WorkCenter UPDATE FIELDS ( supplyarea workcenterusage matlcompismarkedforbackflush )

     WITH lt_update

    MAPPED DATA(ls_update_mapped)

    FAILED DATA(ls_update_failed)

    REPORTED DATA(ls_update_reported).


  ENDMETHOD.


  METHOD sync_WorkCenter.


*   Initial Work Center

    SELECT Workcenterinternalid,

           Workcentertypecode,

           Workcenter,

           Plant,

           Supplyarea,

           Workcenterusage,

           Matlcompismarkedforbackflush

      FROM I_WorkCenterTP

      INTO TABLE @DATA(lt_workcenter).


    IF sy-subrc = 0.


      MODIFY zrap_wkc_x FROM TABLE @lt_workcenter.


    ENDIF.


  ENDMETHOD.


ENDCLASS.
2.7 Create a Service Definition and Service Binding
Right-click Projection View and choose New Service Definition.
Enter Name and Description for Service Definition and click Next > Finish to finish creation. Click the button 🕯 in the menu bar to activate after saving.

New Service Definition
Right-click the Service Definition created and choose New Service Binding.
Enter Name and Description for Service Binding, Binding Type, select OData V2 - UI, and click Next > Finish to finish the creation.

New Service Binding
Click the button 🕯 in the menu bar to activate after saving. Click Publish to publish the Service Binding. When the publication is complete, select the service you created and click Preview to view the published service.

Preview Published Service
Preview with Fiori App.

Preview in Fiori
3. Front-end APP Development
3.1 Create Destination on BTP Platform
Configure Destination on BTP platform to connect to SAP S/4HANA Cloud system.

Create Destination
3.2 Open the subscribed SAP Business Application Studio Service
In tab Instance and Subscriptions, open SAP Business Application Studio.
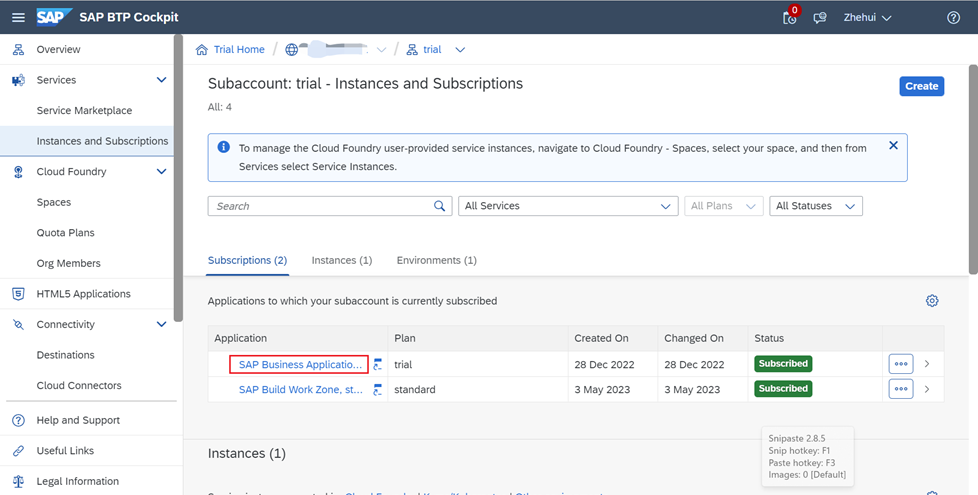
Open SAP Business Application Studio
3.3 Finalize Front-end Fiori App Interface Development and Deployment
Create a Project. Enter npm run deploy after Business Application Studio has finished developing the application interface.
Wait until the Business Application Studio deployment is completed.

Deploy Your APP
3.4 Create and Assign Business Catalog in Eclipse
Back to Eclipse when the deployment is completed, the following additional files are available in the directory.

New Files in Eclipse
Right-click Cloud Identify and Access Management and select New > IAM App. Fill in the Name and Description. Note that Application Type is EXT - External App.

New IAM App
After the creation, enter the Launchpad App Descriptor Items file name as Fiori Launchpad App Descr Item ID.
When your entries are complete, click Publish Locally in the top right corner.

Publish IAM App
Right click on the Package created, choose Other ABAP Repository Object. Search for Business Catalog and click Next. Fill in the Name and Description. Click Next > Finish to create the Business Catalog.

New Business Catalog
Select the Apps submenu below and click Add to create a Business Catalog App Assignment. Fill in the name of the IAM App you just created. Click Next > Finish to finish the creation. Click Publish Locally in the top right corner.

New Business Catalog Assignment
3.5 View APP in System
Open SAP S/4HANA Cloud System and enter APP - Maintain Business Roles. Click on New to create a new Business Role. Fill in the Business Role ID and Business Role Description and click Create.

New Business Role
Select Tab Assigned Business Catalogs. Click Add, search for the Business Catalog name you created, and then click OK. Click Save to complete the creation of the Business Role.

Add Business Catalogs
Enter APP - Maintain Business Users and add the Business Role you just created for your business user.

Add Business Roles
Search in your system and you can find the APP which you have previously deployed.

Find Your APP in System
4. More Information on SAP S/4HANA Cloud, Public Edition
- SAP S/4HANA Cloud, public edition, release info here
- Latest SAP S/4HANA Cloud, public edition, release blog posts here and previous release highlights here
- Product videos on our SAP S/4HANA Cloud, public edition and SAP S/4HANA YouTube playlist
- SAP S/4HANA PSCC Digital Enablement Wheel here
- Early Release Webinar Series here
- Inside SAP S/4HANA Podcast here
- openSAP Microlearnings for SAP S/4HANA here
- Best practices for SAP S/4HANA Cloud, public edition, here
- SAP S/4HANA Cloud, public edition, Community: here
- Feature Scope Description here
- What’s New here
- Help Portal Product Page here
- SAP S/4HANA Cloud ABAP Environment Community here
Follow us via @SAP and #S4HANA or follow summer23
Labels:
2 Comments
You must be a registered user to add a comment. If you've already registered, sign in. Otherwise, register and sign in.
Labels in this area
-
Artificial Intelligence (AI)
1 -
Business Trends
363 -
Business Trends
23 -
Customer COE Basics and Fundamentals
1 -
Digital Transformation with Cloud ERP (DT)
1 -
Event Information
461 -
Event Information
24 -
Expert Insights
114 -
Expert Insights
158 -
General
1 -
Governance and Organization
1 -
Introduction
1 -
Life at SAP
415 -
Life at SAP
2 -
Product Updates
4,684 -
Product Updates
218 -
Roadmap and Strategy
1 -
Technology Updates
1,502 -
Technology Updates
89
Related Content
- SAP S4HANA Cloud Public Edition Logistics FAQ in Enterprise Resource Planning Blogs by SAP
- SAP S/4HANA Cloud, public edition, ABAP Environment Case 8: Material Shelf Life Management in Enterprise Resource Planning Blogs by SAP
- Manage Supply Shortage and Excess Supply with MRP Material Coverage Apps in Enterprise Resource Planning Blogs by SAP
- Quick Start guide for PLM system integration 3.0 Implementation/Installation in Enterprise Resource Planning Blogs by SAP
- Business Rule Framework Plus(BRF+) in Enterprise Resource Planning Blogs by Members
Top kudoed authors
| User | Count |
|---|---|
| 13 | |
| 11 | |
| 10 | |
| 7 | |
| 7 | |
| 6 | |
| 6 | |
| 4 | |
| 4 | |
| 4 |