
- SAP Community
- Products and Technology
- Enterprise Resource Planning
- ERP Blogs by SAP
- From A to Z: Setup a Starter System of the SAP S/4...
Enterprise Resource Planning Blogs by SAP
Get insights and updates about cloud ERP and RISE with SAP, SAP S/4HANA and SAP S/4HANA Cloud, and more enterprise management capabilities with SAP blog posts.
Turn on suggestions
Auto-suggest helps you quickly narrow down your search results by suggesting possible matches as you type.
Showing results for
Product and Topic Expert
Options
- Subscribe to RSS Feed
- Mark as New
- Mark as Read
- Bookmark
- Subscribe
- Printer Friendly Page
- Report Inappropriate Content
05-31-2023
6:19 PM
Introduction
As a new customer to the SAP S/4HANA Cloud, public edition solution, the very first system you are going to get, and use is called the Starter System. This system has a set of master data and a set of 225+ SAP Best Practice scopes loaded to help you explore its capabilities and conduct the Fit-to-Standard Workshop.
In this blog, I am going to introduce all the concepts/terminology and steps to set up your Starter System from A to Z, with a focus on SAP Central Business Configuration (CBC) tenant. My explanation is divided into three sections:
- Starter System Landscape
- CBC Tenant Technical Configuration for Starter System
- CBC Project Configurations for Starter System
You should be able to get the Starter System running in 2-3 days.
Starter System Landscape
To help the first-time users of the SAP S/4HANA Cloud, public cloud, I am going to explain the system landscape and its many relevant concepts.
Starter System Landscape
The Starter System Landscape is composed of these systems:
- Central Business Configuration (CBC) tenant
- Extensibility Tenant – Tenant 080 of the Starter System
- Customizing Tenant – Tenant 100 of the Starter System
- Identity Authentication Service (IAS) tenant
- Identity Provisioning Service (IPS) tenant
- Identity Directory
- SAP Cloud Identity Service, which is composed of IAS, Identity Directory and IPS
- Identity Provider (IdP) – optional for customers to adopt a corporation IdP.

Starter System Landscape
From a glimpse, there are a lot of systems. To many existing SAP on-premise customers, customizing tenant and extensibility tenant are easy to understand. The challenge ones are those new kids on the block, the CBC, IAS and IPS tenants; especially how they work together. In fact, these are the ones could easily go wrong and need support.
Initial Admin User and System Users
In the commercial contract of subscribing the SAP S/4HANA Cloud, public edition, it includes the name and the email address of an IT Contact person. When a system is provisioned, all systems related emails are sent to this IT Contact, not these people who sign the contract or pay the bill! If there is a change of this IT Contact, such as taking a new job role within the company, a new IT Contact is named, etc., a customer should contact SAP immediately to name a new IT Contact by creating a ticket in the component XX-S4C-OPR-SRV.
During the first phase of an implementation project, a CBC tenant is provisioned first. At that time, the IT Contact will receive an email like the below figure to activate the IAS (part of SAP Cloud Identity Service) as an Initial Admin User.

SAP Cloud Identity Service Admin User Activation Email
This Initial Admin User is the first user in many systems for this customer. For example, the IT Contact can logon to Tenant 100 using his/her email address. In the Tenant 100, this IT Contact’s user ID is CB000000000, representing the very first user in the system. The Initial Admin User can use this user account to create more users in the system (Tenant 100).

Initial Admin Users in Different Starter System Tenants
Above figure illustrates the Initial Admin Users in all relevant systems. We can list them as the following:
- User P000000 (six zeros) in the IAS, IPS and CBC tenants
- User CB000000000 (nine zeros) in Tenants 080 and 100
- SAP User S0012345678 (ten numbers) in SAP Support System, like SAP4Me or SAP Support Launchpad (to be replaced by SAP4Me very soon)
SAP User, or Super User, is not new to the SAP S/4HANA Cloud, public edition. It is there in the on-premise world. Super User can create other S users for his/her colleagues. If a customer is not new to SAP, there might already be some S users in the company. Please check the authorizations of these S users to make sure they have the proper access to the cloud systems, not just the on-premise systems.
Roles Played by SAP Cloud Identity Services
SAP Cloud Identity Services have three key components: Identity Authentication Service (IAS), Identity Provision Service (IPS) and Identity Directory. The Identity Directory is coupled with the IAS. Therefore, from a system administration point of view, you only work with IAS and IPS directly.

Roles IAS and IPS Play in the User Management
For an IT Contact, you use the same credential to access IAS and IPS, jointly called SAP Cloud Identity Service.
The IAS Plays following roles:
- Authenticate users
- Assign CBC user roles to CBC users
- Act as a proxy system when a corporate IdP is used
Let me explain what “Assign CBC user roles to CBC users” means: Different from Tenants 080 and 100, CBC tenant does not have capabilities to assign user roles by itself. This functionality is dedicated to the IAS. After users in Tenant 100 tenant are created, if these users need to access to CBC, the IAS assigns 1 out of 5 CBC roles to these users, so that they can play their roles when accessing the CBC tenant.
From the IAS User Management (see below), besides user’s First Name, Last Name and E-Mail, there is a Login Name. It is george.yu in this case. In addition, there is a User ID (P000000).
The Login Name is critical to the CBC. It is called Subject Name Identifier, an attribute pushed over from the IAS to identify a user who logons to the CBC Tenants.

User Management in IAS
When a business user is created in the Starter System tenants (080 and 100), the following information is mandatory:
- Username: george.yu or D123456 for a corporate ID
- Email address: george.yu@sap.com
- User ID: CB9980000050
- Business roles: BR_BPC_EXPERT and SAP_BR_ADMINISTRATOR
The username is the most critical here. It is exported to the IAS and stored as Login Name for authentication purposes. In other words, Username in Tenant 100 and Login Name in the IAS link one unique business user together.
Most times, we use email address as the login name. That is a setting in IAS. We can also change that to use Login Name to logon to a system.
Both User ID and Business Roles only stay within the Tenant 100; they are never exported to the IAS tenant. It is easy to understand: IAS is for authentication, and business roles are for authorizations within the customizing/extensibility tenant.
The IPS Plays following roles:
- Replicate five CBC user roles from CBC to IAS. This only performs once when the system is set up for the first time.
- Read CBC users from the IAS tenant and provision them to the CBC tenant. This needs to be done each time when new CBC users are added/created.
With the user provisioning role by IPS tenant, CBC tenant has a user’s following information:
- Login Name: george.yu
- User ID: P00000
- Business Role: SAP_CBC_CONSUMPTION_ACTIVITY_ALL
Under the user icon of the CBC tenant, the Login Name: GEORGE.YU is used to identify the user.

User Login Name is Used as the Identifier in CBC Tenant
In contrast, when logon to Customizing Tenant 100, the user’s full name is used as shown below.

User Full Name is Used as the Identifier in Dev-100 Tenant
CBC Tenant Technical Configurations for Starter System
After a Starter System is provisioned by SAP, you usually have no difficulty in customizing and extensibility tenants. But you still need to follow the below steps to get the CBC Tenant ready for the first-time use.
Step 1 - Activate the Initial Admin User in SAP Cloud Identity Services (email)
In the Initial Admin User discussion, I introduced an email from SAP Cloud Identity Services which provides an administrator account (your email address) to you. You need to activate this account and create a password for it. With this account, you can act as an administrator in the IAS and the IPS tenants. Since Tenants 080 and 100 use the same IAS for authentication, this account is used to access Tenants 080 and 100 as well.
If for any reason, your administrator account activation period is over, when you try to activate the account with the original notification email, a new activation email will be sent to you right away, so that you can activate the account promptly.
The following email provides the URLs of three important tenants: IAS, IPS (in the middle section) and CBC (at the bottom).

System Access Information for the CBC Tenant
Note: Although in the SAP Cloud Identity Service email, the IAS and IPS tenants are listed separately with a different URL, in fact, they are now all using the same URL. When you access the IAS Tenant, the tab Identity Provisioning serves the IPS function.
Following Steps 2 – 7 might be optional for you as a customer, because they are all done by SAP’s operations team for you as part of the system provisioning process. However, to give you further technical details in case you need to do troubleshooting, I explain them in detail. You can follow through to ensure everything is set up correctly.
SAP Help Portal has a discussion on this subject: CBC User Setup and Access.
Step 2 - Configure the Trust Relationship in the IAS Tenant to the SAP CBC Sub-account
By clicking on the URL for the IAS, we launch the IAS Tenant.

User Interface of the IAS Tenant
Under Tab Applications & Resources, select Applications. Here we need to have at least three applications in the Bundled Applications section (name could vary):
- CBC Tenant
- Starter Customizing Tenant
- Starter Development Tenant
If the CBC Tenant is not listed, we can create it as a new application by clicking on the Create button. In the Type dropdown list, select “SAP Central Business Configuration solution”.

Create a CBC Tenant in IAS
After the CBC Tenant application is created, you need to build a Trust in three areas by clicking on the CBC Tenant application, then clicking on the Trust tab on the right-hand panel:
- SAML 2.0 Configuration
- Subject name Identifier
- Assertion Attributes

Configure the CBC Tenant Application
First, we do a SAML 2.0 Configuration by fetching a metadata file and uploading it to the interface, so that you don’t need to manually type the information. For example, if there is a metadata URL provided, https://cbc.yourdomain.authentication.aws.hana.ondemand.com/saml/metadata, click it. While nothing shows up on the web browser, in fact, a file saml-cbc-ap-rel-xyz-sp.xml has been downloaded. You can confirm this by checking the lower left corner of the web browser. When you click on the Browse button, select this xml file.
Note: The SAML 2.0 Configuration is only valid for SAP Internal systems; not for customers.
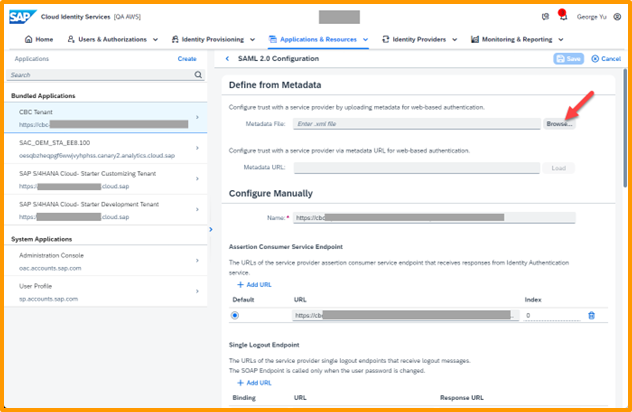
Define SAML 2.0 Configuration Metadata
Second, we need to verify the configuration in Subject Name Identifier, i.e., making sure Login Name is a basic attribute.
The Subject Name Identifier is a profile attribute that the IAS sends to the SAP Central Business Configuration application (see detailed explanation and example in my blog User Management in a Nutshell for the SAP S/4HANA Cloud, public edition). The CBC Tenant then uses this attribute to identify the user.

Configure the Subject Name Identifier
Finally, we need to maintain Assertion Attributes. The CBC tenant uses groups to authorize users. Before a user is pushed over from the IAS tenant to the CBC Tenant, the user is assigned a CBC group. This step is to insert a new attribute to be part of the user identifications, along with the Login Name and others.
Select Assertion Attributes, add a new field called Field for Groups by clicking on the +Add button. Then we maintain “Groups” (G should be in the capital letter) in the field and hit the Save button.

Configure the SAML Assertion Attributes
With the above three steps in place, the trust relationship from the customer´s IAS tenant to the SAP CBC Sub-account is successfully established.
Step 3 – Create A “System as a Technical User Administrator” in the IAS tenant
Previously I discussed how the CBC users are created in the IAS tenant. After assigning group(s), these users are pushed over to the CBC tenant by running a job. To make this step possible, we need to create a system as a technical user administrator, which is used by the IPS tenant to authenticate in the IAS tenant and create Groups.
In the main interface of the IAS tenant, under tab Users & Administrators, select Administrators. Check those entries with a database cylinder icon; they represent systems.
When you click on these listed systems (SAP IPS- Central Business Configuration, for example), its property is displayed on the right-hand side. In the Configure Authorizations section, make sure Manage Users and Manage Groups are turned on.

A System as a Technical User Administrator
To create a system as a technical user administrator if it does not exist, you click on Add → System. You give a name to the system, such as TechAdmin. After the System has been created, it is listed together with the other systems.
Click on the newly created System TechAdmin. Click on the Secrets to generate a password.

Set the Secrets (password) for TechAdmin System
Copy the Client ID and Secrets and save it in a safe place. Also make sure Manage Users and Manage Groups are turned on.
Step 4 - Create Source and Target Systems in IPS
I explained the roles of IPS previously. It is basically a broker of doing two job executions: first pushing roles from CBC to the IAS tenant; this is only executed once. Second, provisioning users from the IAS to the CBC. To make this easy to understand, we adopt source system and target system concept:
- For User Provisioning from the customer´s IAS tenant to CBC tenant, the customer´s IAS tenant should be maintained as a Source and the CBC tenant as a Target in the IPS.
- For pushing roles as groups from CBC to the customer IAS tenant, the CBC tenant should be maintained as a Source and the customer´s IAS tenant should be maintained as a target in the IPS.
These source systems and target systems have been set up by SAP’s operations team already. You can verify them by clicking on the tab Identity Provisioning → Source Systems or Identity Provisioning → Target Systems.

Check the Source Systems

Check the Target Systems
Step 5 - Push Roles from the CBC into IAS as Groups
Although the CBC Tenant does not do user management by itself, it does user access authorization by groups. During the initial setup, we need to push these CBC related roles from CBC into IAS as groups, so that when users are created in the IAS tenant, proper CBC role(s) can be assigned to the users.
Before executing this step, double check if the user roles are already available in the IAS tenant (could be done by the SAP operations team). Click on Users and Administrators --> User Groups, if all CBC related groups are available, you can find them (see below figure). In this case, there is no need to push roles from the CBC into IAS as groups.

Five CBC User Groups Are Available in the IAS Tenant
If the User Group shows empty, then there is a need to push roles from the CBC into IAS as groups. Click on tab Identity Provisioning → Source Systems. Select the CBC Tenant as a source, click on Jobs tab, click on Run Now button in the Read Job row.

Run a Job to Push CBC User Groups into the IAS Tenant
Step 6 - Provision the Initial Admin User to the CBC Tenant
Most likely, the Initial Admin User (P000000) has already been pushed to the CBC Tenant by the SAP operations team. You can verify that by following Step 7 to logon to the CBC tenant. If not, you can do the following:
- Add User P000000 to the CBC group: Click on the tab Users & Administrators → User Group (refer to the 2nd figure from above). In my case, the user P000000 is already part of the group SAP_CBC_CONSUMPTION_ACTIVITY_ALL. If not, click on the Add button to add the user.
- Provision User P000000 to the CBC tenant: Click on the Identity Provisioning → Source System. Select IAS for CBC entry. Click on the Jobs tab. Click on the Run Now button in the row of Read Job.

Run a Job to Push Users from the IAS Tenant into the CBC Tenant
After running the job, from the tab Identity Provisioning → Job Logs, we can check if a user is created or updated. In this case, since the CBC user was created by the SAP Ops Team, the user is updated only.
The job log tells us the following:
- From the IAS Tenant, 5 CBC user groups are read; 1 user is read. No user or group is created.
- Within the CBC Tenant, 5 user groups are updated; 1 user is updated. No user or group is created.

Job Log of Provisioning Users from the IAS Tenant to the CBC Tenant
Step 7 - Login to CBC as the Initial Admin User
To verify if the CBC system has been set up correctly, login as the Initial Admin User. If running into any error, go back to fix it until you can login successfully.
When you login to the CBC tenant for the first time, you will get a pop-up window to create a CBC project. That is our CBC Configuration activities to be discussed in next section.

A Pop-Up Window when Accessing a New CBC Tenant
Common CBC User Logon Errors
Many times we encounter CBC user logon errors. I am listing several common errors here
Error 1: Unauthorized
Symptom: When you log on to a CBC tenant for the first time, you get an “Unauthorized” error.
Cause: CBC Tenant does not have the user information. It is not pushed over from the IAS Tenant. This happens a lot when you create a group of users. Some users activate their accounts right away. If you run above Step 8 after user activation, these users have no problem to logon to CBC. However, some users only activate their account days(!) later, and the administrator is not aware and doesn’t run above Step 8 afterwards. These users will see this error.
This usually happens to some users but not all, because it requires one more step in user setup procedure.
Solution: Rerun the above Step 6.
Error 2: Unauthorized
Symptom: When you log on to a CBC tenant for the first time, you get an “Unauthorized” error.
Cause: As I explained before, when you create a new user in Dev tenants and export it to the IAS, the User Name in the Dev tenants becomes Login Name in the IAS tenant. This Login Name is used as the so-called Subject Name Identifier (SNI). That means the CBC uses this SNI to identify the user. If the SNI uses a different basic attribute, such as an email address or a User ID, the Login Name passed over from the IAS Tenant becomes useless.
This usually happens to all users, because it is a system setting.
Solution: Follow the steps listed in SAP Note 3103503 to fix the error, and rerun the above Step 6.
Error 3: Response has invalid status code urn:oasis:names:tc:SAML:2.0:status:UnknownAttrProfile, status message is User attribute configured for name-id format unspecified is not supported.
Symptom: After authentication is passed at the IAS Tenant, this message pops up.
Cause: This only happened to myself as the Initial Admin User. When the systems were provisioned, my user account was already created in the IAS (P000000) and the Dev Tenants (CB000000000). So I usually don’t need to create a new user account for myself. As I explained before, when you create a new user in Dev tenants and export it to the IAS, the User Name in the Dev tenants becomes Login Name in the IAS tenant. And that Login Name is passed on to the CBC Tenant when running above Step 6. In my case, the Login Name was blank in my user details. This causes above error message.
Solution: Fill the blank Login Name in the IAS Tenant with the User Name from the Dev -100, and rerun above Step 6.
Step 8 - Create Business Users in the Starter System
With the current Starter System landscape, we can create CBC users independent of customizing and extensibility tenants. In other words, the same user can have two separate accounts for CBC and customizing and extensibility tenants. My personal opinion is don't do that. From workflow of system configuration, the same person will start the system configuration in the CBC, and continue on product-specific activities in the customizing tenant. You hardly have two people doing that separately.
My approach is to create business users for both the Tenants 080 and 100 first, then export to the IAS, and then push to the CBC Tenant. This way we have the same user for all three tenants.
Please refer to my blog User Management in a Nutshell for the SAP S/4HANA Cloud, public edition for business user creation.
After the CBC Tenant is set up correctly and users can logon to it, we are moving on to configure CBC projects in next section.
CBC Project Configurations for Starter System
As I discussed in the Starter System Landscape section, we have two Starter System tenants: customizing tenant 100 and development extensibility tenant 080. For each tenant, we need to create a corresponding project in the CBC tenant. SAP Help Portal has good information on this at Phases, Project Activities, and Milestones in an Evaluation Project.
Note: For a Starter System project, it is categorized as the Evaluation Project, not the Implementation Project.
Create a Starter System Customizing Project
When we click on the Create New button shown in above figure, a New Project window pops up. Enter info for a new project; choosing Evaluation as the project type.

Create a New Project in the CBC Tenant
Note: There are two types of Project Type, Implementation and Evaluation. For a Starter System, you need to select Evaluation. With that selection, organization structure and master data will be created for you. For regular implementation, you select Implementation. No master data or organization structure will be created for you.
Define Scope Activity
After a project is created, the first activity is Define Scope.

A New Project Created Successfully
When you first work with the Evaluation Project, we recommend choosing only one country/region first. The reason is that the more countries you choose, the more scopes you will activate. This will make the activation process running much longer. If you want to do multi-countries together, the upper limit is five countries. Don't add more than five countries. You can add more countries/regions later via Initiate Change.
In my case, I select one country, USA; and the Private Sector. Some scopes are different for the Private Sector from the Public Sector.

Select Country and Sector for Define Scope Activity
The evaluation project only offers a limited scope selection. It already contains the Enterprise Management bundle. After hitting the Save button, all 225 scopes are selected automatically as part of the Enterprise Management Layer.
Two scenarios are available for parallel ledger accounting. You can choose either the group ledger scenario Accounting and Financial Close - Group Ledger US GAAP or Accounting and Financial Close - Group Ledger IFRS. Depending on your country/region selection, additional scenarios may also be available.
You can find the scope Accounting and Financial Close - Group Ledger US GAAP by scrolling down a little bit.

Add Scope Accounting and Financial Close - Group Ledger US GAAP
After reviewing all selected scopes, click on the Complete Activity button to complete the Define Scope Activity.

Complete Define Scope Activity
Assign Deployment Target Activity
In each evaluation project you must assign a deployment target, either the starter customizing tenant or the starter development tenant. That’s what the Assign Deployment Target Activity is for.

Assign Deployment Target Activity
After clicking the Open button of the Assign Deployment Target Activity, choose the Starter Customizing tenant to assign.

Assign Customizing Tenant as the Target System
After the target tenant is assigned, click on the Tab Activities. Now the task Assign Deployment Target falls in the In Progress Lane. Click on Manage to change it to be Completed.

Manage Assign Customizing Tenant Activity
Confirm Scoping is Completed Activity
Now we confirm scoping is completed by clicking on the Manage button in the task Confirm Scoping is Completed Activity. In the pop-up window, click on the button Confirm Milestone.

Confirm Milestone in Confirm Scoping is Completed Activity
Before confirmation proceeds, there is a warning message to ask you to be patient 😊.

A Warning Message before the Confirmation
During the confirmation, a progress bar displays the percentage of the work. This step usually completes in 30 minutes.

Confirmation Progress Bar
After the milestone is set, three new activities are listed under the Open Lane:
- Specify Primary Finance Settings
- Setup Organizational Structure
- Confirm Scope and Organizational Structure Phase is Completed.
Specify Primary Finance Settings Activity
The preconfigured evaluation project only allows you to confirm K4 - Cal. Year, 4 Special Periods as fiscal year variant and USD (US Dollar) as group currency. All additional fiscal year variants or group currencies are presented for your information only.

Specify Primary Finance Settings
When you hit the Save button, a confirmation window pops up. Check the two check places and Confirm it.

Confirm Primary Finance Settings
After a successful confirmation, the setting check area grays out. Hit the Complete Activity button.

Complete Specify Primary Finance Settings Activity
Set Up Organizational Structure Activity
The evaluation project contains an existing organizational structure, with all organizational units confirmed already. You can choose to enhance the preconfigured organizational structure by creating your own organizational units. If you want to deploy the organizational units you created to the target system, you need to confirm them.
By scrolling down, we can see the predefined organization structure graphically, or in a grid format.

Predefined Organization Structure
If no new organization structure needs to be added, hit the Complete Activity button.
Confirm Scope and Organizational Structure Phase is Completed Activity
Click the Manage button in the Confirm Scope and Organizational Structure Phase is Completed activity. In the popup window, hit the Confirm Milestone button.

Confirm Milestone of the Confirm Scope and Organizational Structure Phase is Completed Activity
The progress is displayed with a progress bar. After about one to two hours, it reaches 60%. From that time on, it takes a long time to complete. In my own experience, the entire confirmation process takes more than six hours. I usually start it before leaving work and come back the next morning to see the result.

Confirmation Progress Bar
After the milestone is completed, go to the Product-Specific Configuration phase to carry out configuration activities that cover detailed settings of the solution process.

Product-Specific Configuration
Check the Master Data
Different from regular customer systems, the Starter System provides the master data for a user to quickly get a demo scenario running. These master data are created when we set the milestone in the CBC project. To check it out, we run the Product List app. One prerequisite is to create a user role by copying from SAP delivered user role SAP_BR_PRODMASTER_SPECIALIST and assign yourself to this user role.
The below figure shows 225 products in the Customizing tenant 100.

SAP Delivered Product List in the Starter System, Customizing Tenant – 100
Create Starter System Development Project
If you plan to test out the capabilities of the Development Extensibility Tenant, we need to create a new project in the CBC Tenant; otherwise, you can stop here.

Create Starter System Development Project
If the screen does not show the new project Starter System Development, you can manually click on the Switch Project button; otherwise, the newly created project is displayed.
Similarly, as the Starter System Customizing project, several activities are listed in the Open Lane, such as Define Scope Activity, and others for the Starter System Development project.

Activities in the Starter System Development Project
From this step and on, you basically repeat all the steps we did for the Create a Starter System Customizing Project, but for the Starter System Development Project.
Conclusion
In this blog, with the system landscape for the Starter System of the SAP S/4HANA Cloud, public edition as the foundation, I explained all the steps, from A to Z, to setup the Starter System after its provisioning, including CBC Technical Setups and CBC configurations for the Customizing and the Development Extensibility tenants, respectively. From this point on, you can use the system to explore its standard functionalities and conduct the fit-to-standard workshop with your business users.
Labels:
29 Comments
You must be a registered user to add a comment. If you've already registered, sign in. Otherwise, register and sign in.
Labels in this area
-
Artificial Intelligence (AI)
1 -
Business Trends
363 -
Business Trends
29 -
Customer COE Basics and Fundamentals
1 -
Digital Transformation with Cloud ERP (DT)
1 -
Event Information
461 -
Event Information
28 -
Expert Insights
114 -
Expert Insights
185 -
General
1 -
Governance and Organization
1 -
Introduction
1 -
Life at SAP
415 -
Life at SAP
2 -
Product Updates
4,679 -
Product Updates
265 -
Roadmap and Strategy
1 -
Technology Updates
1,499 -
Technology Updates
97
Related Content
- Subscription Billing with Convergent Invoicing and Contract-Based Revenue Recognition in Enterprise Resource Planning Blogs by SAP
- Mass upload utility via API to SAP S/4HANA Cloud Public Edition with SAP Build Process Automation in Enterprise Resource Planning Blogs by SAP
- Logo SAP S/4HANA Cloud Public Edition in Enterprise Resource Planning Q&A
- Why YCOA? The value of the standard Chart of Accounts in S/4HANA Cloud Public Edition. in Enterprise Resource Planning Blogs by SAP
- Understand Upgrading and Patching Processes of SAP S/4HANA Cloud Public Edition in Enterprise Resource Planning Blogs by SAP
Top kudoed authors
| User | Count |
|---|---|
| 6 | |
| 4 | |
| 4 | |
| 3 | |
| 3 | |
| 3 | |
| 3 | |
| 2 | |
| 2 | |
| 2 |