
- SAP Community
- Products and Technology
- Technology
- Technology Blogs by SAP
- Cloud Integration: Call iFlow from Node app [1] wi...
Technology Blogs by SAP
Learn how to extend and personalize SAP applications. Follow the SAP technology blog for insights into SAP BTP, ABAP, SAP Analytics Cloud, SAP HANA, and more.
Turn on suggestions
Auto-suggest helps you quickly narrow down your search results by suggesting possible matches as you type.
Showing results for
Product and Topic Expert
Options
- Subscribe to RSS Feed
- Mark as New
- Mark as Read
- Bookmark
- Subscribe
- Printer Friendly Page
- Report Inappropriate Content
05-26-2023
3:38 PM
SAP Cloud Integration (aka CPI) allows to call an integration flow via HTTP request from an external system (HTTP Sender adapter).
This tutorial describes how to write a Node.js application which calls an iFlow, from SAP BTP.
The app uses a custom client certificate for authentication.
For security reasons, the certificate has to be rotated.
A shell script is created for credentials rotation.
Used Technologies:
SAP Business Technology Platform (BTP), Cloud Foundry
CF Command Line Client
OpenSSL
Node.js
Linux scripting
0.1. Prerequisites
0.2. Preparation
0.3. Introduction:
1. Create Certificate Chain
2. Create Node.js App
3. Create iFlow
4. Run
5. Credentials Rotation
6. Shell Script for Credentials Rotation
7. Security Considerations
Appendix 1: Sample Application Code
Appendix 2: Linux Script
1. OpenSSL
OpenSSL is the most commonly used tool (and library) for security-related operations, dealing with certificates, keys, converting, etc etc
Basically, it consists of libraries (for “c”) and a command line tool.
If you have GIT installed, you can just open the git bash which contains openssl.
Otherwise, follow these instructions to install OpenSSL under Windows:
Download openssl starting from here.
Afterwards it might be required to add the openssl.exe to the PATH.
If you get this error:
Unable to load config info from /usr/local/ssl/openssl.cnf
You need to set an environment variable pointing to the config file
e.g. on command line:
set OPENSSL_CONF=c:/tools/openssl/openssl.cfg
Note:
For windows, the config-file extension .cnf has to be adjusted to .cfg
A template .cnf file can be found in GIT installation folder.
2. Certificate Chain
Before we start with the tutorial, we need the certificate chain with private key.
Unfortunately, we cannot create use a self-signed certificate chain for this tutorial, as it is not accepted in CPI.
As such, to follow this tutorial, you need an existing client certificate chain, signed by a CA that is trusted by SAP.
Workaround:
You could generate a SAP-managed client certificate.
As described by the blogs mentioned above, the required steps are the following:
Create service instance of Process Integration Runtime (it-rt) with plan integration-flow
Create service key with key type “certificate”.
View the service key content and copy the certificate chain and key to 2 separate files.
Probably you also need to format them, such that they have newlines and look like normal certificate, like those used in this tutorial.
As a customer, I have my own PKI (public key infrastructure), or I have my process to use own certificates, issued by a public trusted CA.
I want to use my own infrastructure to generate certificates - and renew when expired.
For security reasons, certificates should be rotated frequently and with nearly zero downtime.
There is a good coverage of documentation about HTTP Inbound communication with client certificates, as mentioned in the prerequisites.
Why we still need one more blog on that topic?
🔹 Today we cover service binding instead of service key.
🔹 We use external certificate instead of SAP-managed certificate.
🔹 We use it in an application, deployed to SAP BTP.
🔹 We go through a credential rotation scenario.
🔹 We create a shell script for automatic rotation..
Little recap.
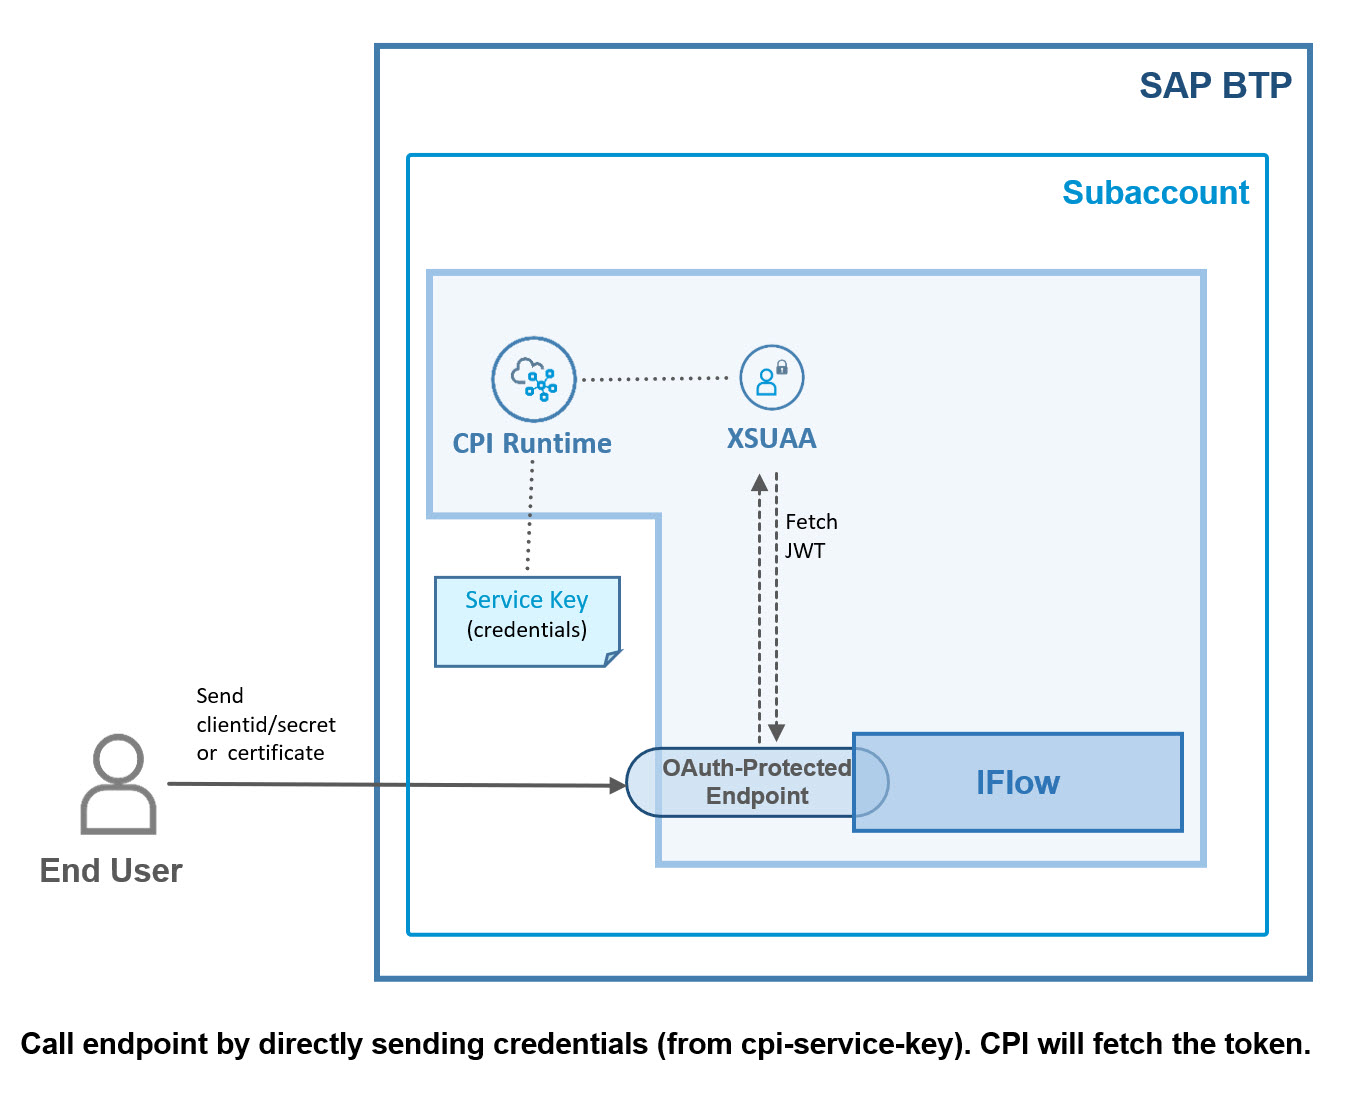
When calling an OAuth-protected endpoint, we need to fetch a JWT token by following OAuth flow (e.g. client credentials).
To fetch a JWT token, we need credentials.
These can be:
- user/password, i.e. clientid/clientsecret
- client certificate
Such credentials are provided to us when we create a service binding, by binding an app to a service instance.
Alternatively, for external calls without app-binding, we can create a service key, which will contain the same credentials.
OK.
We can decide, if we want to get the credentials as clientid/secret or as client certificate.
We do so by providing config params when creating a service key or binding.
OK.
Bottom line: fetch a JWT token by sending clientsecret or certificate.
In case of CPI….
If we call an endpoint which is exposed by a iFlow, we have one more convenient option:
We can skip the OAuth flow and send the credentials directly to the iFlow.
We can send either clientid/secret or the certificate.
CPI will then take care of fetching the JWT token.
Nice.
OK.
Now let's briefly talk about client certificates.
As mentioned, we can use a client certificate for fetching a token or to call the endpoint.
That certificate (including private key) is provided to us in a service key or binding.
In the binding parameters or service key parameters, we can somewhat control the credentials which we get:
Alternatively, we can bring our own certificate (called “external certificate”).
In that case, the certificate has to made known to CPI (more precisely, to XSUAA).
This is done by specifying it in parameter when creating service key or binding.
During binding, the service broker will do some validation and generate the credentials section which will contain a generated clientid and the provided certificate.
Afterwards, we can use this external client certificate for fetching a token or calling the iFlow.
Below diagram illustrates the 3 types of configuration options and config files:
Create service instance, service binding (in manifest.yml or in bind.json) and create service key.
Summarizing:
We have 6 options for calling iFlow:
- Bearer Token, fetched via basic auth (clientid/secret)
- Bearer Token, fetched via client certificate
- Basic Auth, sending clientid/secret to iFlow
- Client Certificate (SAP-managed) sent directly to iFlow
- Bearer Token, fetched via external certificate
- External Certificate sent to iFlow
From these 6 scenarios we choose one for today’s tutorial:
💠💠💠 External certificate for direct call 💠💠💠
Disclaimer:
Below code and design is not an official recommendation.
It is just my personal learning which I like to share with the community.
BTW, the second scenario is covered in the this blog post.
To create a custom certificate chain, we would proceed as follows:
🔹Create Private Key.
🔹Create Certificate Signing Request (CSR).
🔹Send the request to a Certification Authority (CA), and pay for it.
🔹Receive the certificate chain, signed by CA, as response.
Unfortunately, we cannot accompany this creation process in our tutorial, but at least we can have a look at the required OpenSSL commands:
🔷 Create Private Key
🔷 Create Certificate Signing Request (CSR).
🔷 Convert pkcs7 response to certificate chain
If the response contains the chain in PKCS #7 format, we need to convert it:
➡️ The result and the foundation for the following steps are 2 files:
privkey.pem
chain.pem
And they look like normal pem files:
The original format with newlines after 64 characters is not suitable for programmatic processing.
We need to adapt the files.
Furthermore, we need to extract the client certificate from the chain.
To distinguish the role of the certificates in a chain, the client cert is typically called "leaf certificate".
In the steps below, we're doing the required modifications manually.
The corresponding commands are used in shell script chapter
🔷 Extract leaf certificate from chain
The chain is ordered and the first cert is the leaf, the last is the root.
As pem files are normal text files, we can just copy the first cert from the file and paste into a new file with name leafCert.crt.
But we can also use the x509 command:
View content:
Note:
The name for a cert file with pem format is not important.
We're using file extension .crt because this is required by iFlow Designer.
🔷 Adapt leaf cert for yaml
For pasting the cert into a yaml file, the format must be one single line without any \n character.
We're adapting manually.
Create new file: leafCertOneLine.txt
In Visual Studio Code editor, we use search box with reg ex enabled, search for \n and replace with nothing:
🔷 Adapt Chain for ENV
To send the certificate chain and the private key in a JSON file, we need them as one single line, but we need the \n .
Create new file: chainOneLine.txt
If the chain contains bag attributes, we should remove them.
Then we convert the chain to one single line, where every newline is represented by a \n
In VS Code, as before, we enable regex button, replace all \n with \\n
Note: in regular expression, two backslashes are used to indicate that we want real \n character.
🔷 Adapt Private Key for ENV
Create new file: privkeyOneLine.txt
Repeat same as above:
Replace newlines with real \n character such that we get one single line which contains \n.
We want to create an application that is bound to an instance of process integration and reads some required information from the binding.
However, we don’t want to use a client certificate that is generated by SAP and handed over in the binding.
We want to use our own custom client certificate chain, to follow our company processes (or whatever reason).
However, if we just send our client certificate to CPI, it won’t work, because nobody knows it.
Even if we configure the client certificate in the iFlow, it won’t be enough, because to validate it, the whole chain is required.
The CPI runtime will use it to fetch a jwt token from XSUAA.
As such, we have to make XSUAA familiar with our certificate.
For this step, only the leaf is used.
To make our certificate known to XSUAA, we enter it in the binding parameters, when binding our app to an instance of cpi runtime.
Binding parameters are read by the service broker of cpi runtime.
Usually, binding parameters are not required for most services.
They are required for CPI in case that
1. we want to use SAP managed certificate instead of clientid/clientsecret
In this case, we can use the binding parameters to specify that we want e.g. short-lived certificate with big key size.
2. we want to use our own certificate.
In this case, we specify the certificate itself in the parameters, to make it known to XSUAA.
OK.
So we’re going to specify our own client certificate in the manifest.yml file.
Before we do so, there are 2 things to note:
Note 1:
We cannot specify the whole chain here, it is not accepted by the service broker.
Note 2:
In a yaml file, we need PEM format in one single line.
No newlines, no \n contained in the text, even the hyphens are not separated from the payload with \n
Fortunately, we're already well prepared.
🔷 manifest.yml
Our manifest should contain:
1. binding to cpi runtime service instance
2. binding param to tell that we use own certificate
3. binding param to send own certificate
The full file content can be found in appendix 1.
Note:
We must specify the client certificate in the binding, even though we don’t use it at runtime (because at runtime we need the chain, see below).
Reason is that XSUAA must be aware of the client cert.
At runtime, CPI will then use the cert to fetch a JWT token, and it must validate the chain up to the CA.
So if we don’t specify the client certificate here, the call to CPI will fail, even if we configure the HTTP adapter properly.
Note:
It is not possible to specify the whole chain here, as the service broker would throw an error
🔷 server.js
In the application code we need to send the whole chain, otherwise the request to CPI would fail.
Reason:
The client certificate (leaf) has to be validated.
To do so, the issuer of the leaf (intermediate cert) has to be validated.
And afterwards the issuer of the issuer.
And so on, until the root is reached.
And the root must be a CA that is trusted by SAP.
See SAP note.
This means, the root cert is present in CPI and would not need to be sent.
As such, in fact, we could cut off the last certificate in the chain, when sending the request.
Note:
It doesn’t help to upload intermediate certificates to CPI Keystore.
Only the supported Root CAs are contained in the Truststore and the chain must be sent during request.
OK.
In case of custom certificate, we don’t get the full chain and private key from binding (we can only specify the client certificate in binding parameters of manifest).
As such, we have to think about how to access that data from the code.
I see 2 possibilities:
- pack both files into the application and read the files at runtime
- set the data as environment variable and read it at runtime
The second option might sound less safe, but is more suitable for credentials rotation, so let’s go for this option.
Below diagram shows the whole runtime scenario.
We can see the app binding.
We can see that the app sends the certificate and that the certificate is used by CPI runtime to fetch a JWT token.
We can see the app env configured with chain and key.
Note:
Alternatively, below code snippet can be used to read the files.
These files can contain bag attributes and newlines, axios can handle
The last diagram adds the admin task to the whole picture.
We can see that the admin requests a client certificate at a Certification Authority and sends the CSR and the private key.
Afterwards, the admin configures the app binding and en
The sample application code is kept as short and simple as possible.
Note that it is not productive code.
First of all, we read the certificate and private key from the environment variables (we’ll set it later, after pushing the app):
Their format of the cert and key is pem in single line with newlines (see below), so it can be directly used for the call:
Note:
The target endpoint which is called here (/ntifext), has to match the endpoint which we’ll specify in the iFlow below.
For the sake of curiosity, we can read the certificate and print the expiration date to the console
When creating an instance of X509Certificate, the chain is ignored, only the first certificate is taken into account. This is the leaf certificate, which is what we want.
The full sample project code can be found in appendix 1.
🔷 Create Service Instance
We create an instance of service "Process Integration" with service plan "integration flow".
No params required, as we don’t use user roles today:
cf create-service it-rt integration-flow iflowext
🔷 Deploy
After deploying the app with cf push, we can go ahead and set the environment variables, which we access from the application code.
🔷 Set Environment
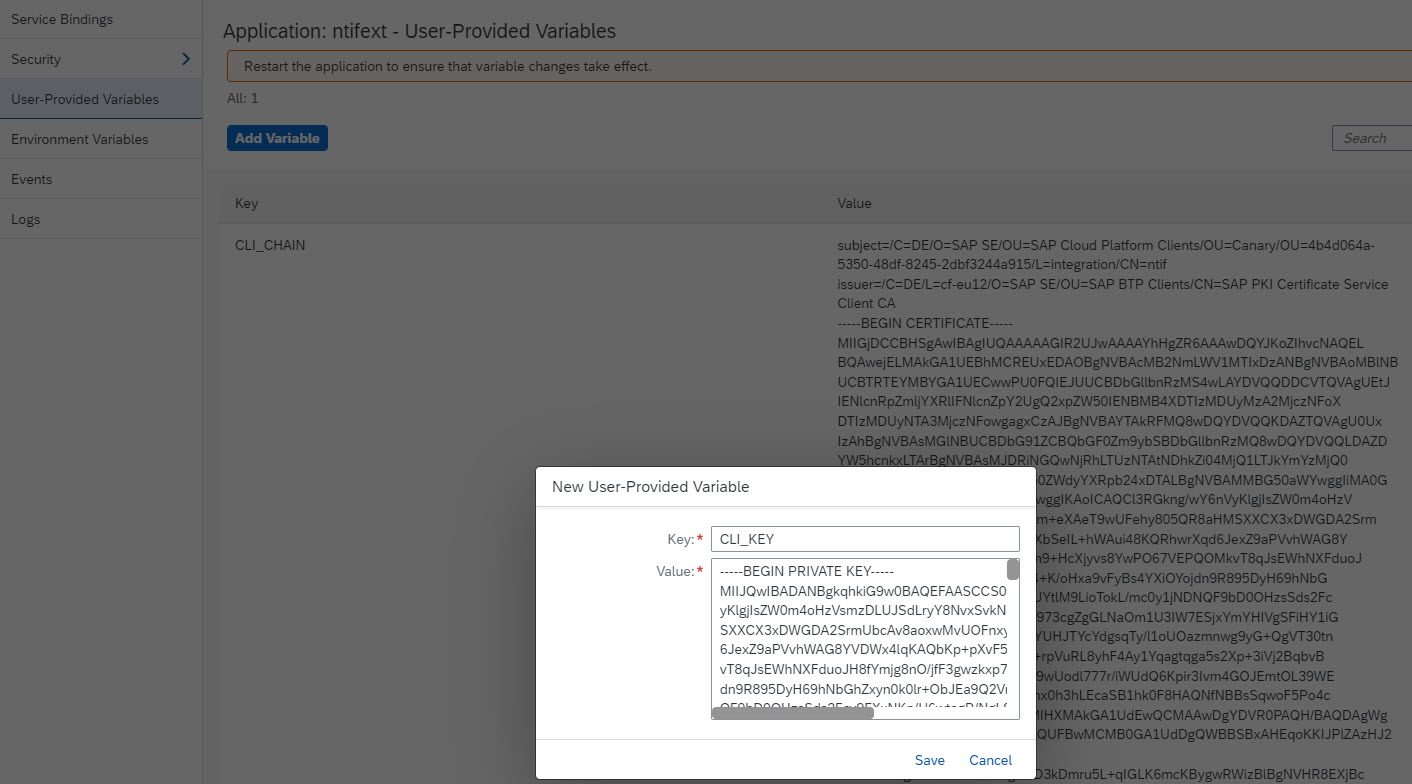
We use the BTP Cockpit for easily creating 2 variables.
(we'll use the respective command later, in shell script)
In BTP Cockpit, we navigate to our app -> "User-Provided-Variables"
Press “Add Variable” and enter the following:
Key: "CLI_CHAIN"
Value: copy the content of the file chain.pem
Key: CLI_KEY
Value: content of privkey.pem
Note:
We don’t need to remove the ugly bag attributes, as node.js can deal with it.
We can see that the popup and the dashboard can deal with the certificate format having newlines.
We don’t need to replace newlines with \n here
Note:
We copy and paste the whole chain file, to make life easier.
Actually, we could remove the root certificate, because it is already available in SAP trust store.
When validating the chain, it will be found.
So the call would be still successful, if we remove the root certificate from the environment variable.
Afterwards, restart or restage the app with
cf restage ntifext
Our integration flow is very simple:
We only need to create an HTTPS sender adapter.
No more steps are required.
When we call the endpoint from our app, we’ll receive a response from CPI anyways.
The configuration of the HTTP adapter:
🔸 Address
set to /ntifext
Note that this endpoint name must match the endpoint used in our node app
🔸 Authorization
Set to "Client Certificate"
🔸 Subject and Isser DN
We press the “Select” button and choose our leafCert.crt file
Note that file extension .pem is not supported here
🔸 CSRF
Checkbox disabled.
Note:
Alternatively, we can copy and paste the Subject and Issuer DN from the app environment in Cloud Foundry:
cf env ntifext
The values can be found in the section
it-rt-> credentials->oauth->“certificate details”
After configuring the HTTPS adapter, we can save and deploy the iFlow.
To run our scenario, we invoke our app which will then trigger the iFlow and print the response of the iFlow in the browser window.
In my example, the app has the following url:
https://ntifext.cfapps.eu.hana.ondemand.com/callcpi
As a result, we see the iFlow response, which is the same text that we’re sending in our node app.
The log shows the expiration date of the current client certificate:
Conclusion:
Our own custom certificate chain has successfully been used to authenticate at the iFlow.
Up to now, the tutorial has been designed to make life easy and simple.
Now welcome to hard life:
We want to find a reproducible way to rotate the certificate on a frequent regular basis.
Ideally with a script that can be executed via pipeline.
This procedure requires some changes to above description.
The following steps need to be done:
Let’s go through these steps.
1. Obtain new client certificate / key
Hopefully, our company PKI allows for automated certificate renewal.
So we can do the required steps in a script:
The commands are the same as in chapter 1.
2. Configure iFlow
In the HTTPS adapter we configure the new client certificate in addition to the already existing one.
this allows for smooth transition, as both will be accepted.
Note:
This is only required if the subject and issuer have changed.
I guess in most cases, issuer will be the same and also our subject does not need to change.
This means that we can skip step 2
3. Rebind the app to same service instance with new binding param
In above tutorial, we added the binding param to the manifest file.
In that case, the binding is created during deploy.
Now, for credentials rotation, we don't want to re-deploy the application.
As such, the procedure is little different:
OK, so let's adapt leaf cert, to be used in JSON file..
We create a file with name leafCertOneLine.crt as copy from leafCert.crt file.
BTW, we're now talking about the new cert file.
We convert the content such that every newline is replaced by \n
We create a bind.json file with the following content:
This would be kind of template file.
The value of X.509 has to be filled.
We copy and paste the content of leafCertOneLine.crt into bind.json as value of X.509
Now that we have created the binding param file, including the new leaf cert, we can use it for rebinding our app.
First unbind:
cf us ntifext iflowext
Then rebind with new certificate
cf bs ntifext iflowext -c bind.json
Afterwards restage the app
cf restage ntifext
Note:
Above commands are using the short alias names.
I think it makes the commands more readable.
The full names:
unbind-service
bind-service
4. Update the environment variables
Now update the chain (and key) which our app reads from the env variables.
In cockpit, we go to user provided variables and edit our 2 variables.
Replace the content of env var with the content of the new chain.pem and privkey.pem
Afterwards restage the app
cf restage ntifext
5. remove the old certificate from iFlow
As mentioned in step 2, we need to do this only if we’ve changed the subject DN and if we have different issuer DN.
Otherwise, we don’t need to reconfigure the iFlow, which is a manual step.
OK.
After going through these steps, we can test our app.
The call should be successful and in the log we should see the prove that the certificate has been exchanged indeed:
We can see a new expiration date.
Optional: check the expiration date on console
There’s a simple OpenSSL command to print the expiration date of a certificate.
Just point to a certificate and add the -enddate option.
In our example:
openssl x509 -in leafCert.crt -enddate
As a result, we get the same date as seen above:
The command can be enhanced to suppress the useless output via -noout:
In our example:
openssl x509 -in leafCert.crt -noout -enddate
I've heard you complaining about the manual steps to replace newlines and to configure environment, etc 😤
Honestly, for a dummy like me it is really helpful for understanding, when doing things manually, at least once.
So I’ve put together the steps and commands to form an executable script.
What the script does:
Automatically replace newlines with \n using the awk command which is totally unreadable, hence powerful:
Use comments, to make awk more readable
Assign result of awk to a variable (unreadable)
Create bind.json file on the fly and fill the property with the (readable result of awk 😞
Execute the cf commands, like:
Note:
Before using cf commands, the CLI must be installed on the linux machine.
See docu, e.g. for ubuntu.
Note:
You might wish to also delete the chain and private key.
Like that, you don't need to think about how to securely store the key
What the script doesn’t do
As such, prior to execution, you need to enhance the script or prepare the 3 above steps manually.
The (somewhat) full script can be found in appendix 2.
Note:
My apologies, I'm not familiar with shell scripts.
The script is not ready for productive use, as it doesn’t contain error handling, etc
Of course it is not safe to set the private key as environment variable.
However, it is not less safe than the SAP-managed private key, which is handed over to us in the app environment.
Also, if we pack the private key in the application and deploy it, it is not more safe, as anybody can download a the droplet from Cloud Foundry (see command below).
Note that in the course of credentials rotation, we can generate a new private key on each rotation and easily set it in the env, without the need of redeploying the app.
The key can be deleted during script execution, so it doesn't need to be stored on any safe location.
A new deployment of a source code means that potentially an untested version might be deployed.
Another advantage: as long as no deployment is required, the task of credentials rotation can be done by admin or operations team, or as part of automated pipeline.
It could be considered to encrypt the private key before setting as environment variable.
The whole tutorial has been dealing with an unencrypted private key.
The command for creating encrypted private key with password:
The command for downloading droplet:
cf download-droplet ntifext
The result is a zip file which looks like this
In this blog post we’ve learned about using custom certificates when calling an iFlow via HTTPS adapter.
We've learned about certificate chain and when to use client cert (binding params) and when to use the chain (http request to iFlow endpoint).
We've spend lot of time with converting formats, removing and replacing newlines, which is a bit confusing:
Manifest.yml requires leaf cert in one single line with no \n
Binding param JSON file requires leaf cert in one single line with \n for every newline
Environment variable requires the original file content.
Our focus was on calling the iFlow from a node app, deployed to Cloud Foundry.
No service keys nor postman in this tutorial.
We've learned that an iFlow endpoint can be called with JWT token or directly with credentials, while in the latter case the CPI runtime takes care of fetching the JWT token
We've learned how to specify binding parameters (for cpi service) in manifest file.
We've learned about credential rotation: To ensure better security, the credentials used to call a protected endpoint, should be rotated (=changed, invalidated) on regular basis.
We've learned a possible way to rotate the custom client certificate with a selfmade shell script.
See next blog post for a description using SAP-managed certificate to fetch JWT token, CSRF token, user roles.
PEM
Specification RFC about PEM and representation format in single lines.
Node.js
Official documentation of crypto package
Security Glossary Blog
Next blog post covering SAP-managed certificate, JWT, CSRF, user roles.
Specification for X.509 v3 with extensions: rfc5280
Certificate Authority in wikipedia.
Blog about user roles and attributes and accessing JWT in script
Cloud Foundry CLI
Installation guide, e.g. for ubuntu
OpenSSL
Official list of unofficial binaries download page
Docu home
Manual: https://www.openssl.org/docs/manmaster/man1/
Generate Private Key: genpkey
Certificate Request: req command
Certificate Operations: x509 command
Project Structure:
Note:
In my sample project, I have included the folder for dealing with certificates (called cert).
To avoid deploying this folder, we can create a .cfignore file, to ask the CF CLI to exclude this folder from deployment.
Alternatively, run the certificate related commands in a different directory.
Note:
the bind.json file is not required when using the shell script.
Note:
You might need to adapt the app names in manifest and the domain of the routes.
Also, if you changed the name of the target endpoint, make sure to adapt.
manifest.yml
package.json
server.js
.cfignore
bind.json
credentialRotation.sh
This tutorial describes how to write a Node.js application which calls an iFlow, from SAP BTP.
The app uses a custom client certificate for authentication.
For security reasons, the certificate has to be rotated.
A shell script is created for credentials rotation.
Used Technologies:
SAP Business Technology Platform (BTP), Cloud Foundry
CF Command Line Client
OpenSSL
Node.js
Linux scripting
Quicklinks:
Quick Guide
Sample Code
Content
0.1. Prerequisites
0.2. Preparation
0.3. Introduction:
1. Create Certificate Chain
2. Create Node.js App
3. Create iFlow
4. Run
5. Credentials Rotation
6. Shell Script for Credentials Rotation
7. Security Considerations
Appendix 1: Sample Application Code
Appendix 2: Linux Script
0.1. Prerequisites
- There are already great blog posts in the Community that introduce into the Inbound HTTP scenario using client certificate: Mandys and Danils Blogs
- For remaining open questions I recommend the Security Glossary.
- To follow this tutorial, access to a Cloud Integration tenant is required, as well as basic knowledge about creating iFlows.
- You should be familiar with Node.js, even though the tutorial can be followed without local Node.js installation.
- The command line tool OpenSSL is used in this tutorial, so don't be afraid of using it
0.2. Preparation
1. OpenSSL
OpenSSL is the most commonly used tool (and library) for security-related operations, dealing with certificates, keys, converting, etc etc
Basically, it consists of libraries (for “c”) and a command line tool.
If you have GIT installed, you can just open the git bash which contains openssl.
Otherwise, follow these instructions to install OpenSSL under Windows:
Download openssl starting from here.
Afterwards it might be required to add the openssl.exe to the PATH.
If you get this error:
Unable to load config info from /usr/local/ssl/openssl.cnf
You need to set an environment variable pointing to the config file
e.g. on command line:
set OPENSSL_CONF=c:/tools/openssl/openssl.cfg
Note:
For windows, the config-file extension .cnf has to be adjusted to .cfg
A template .cnf file can be found in GIT installation folder.
2. Certificate Chain
Before we start with the tutorial, we need the certificate chain with private key.
Unfortunately, we cannot create use a self-signed certificate chain for this tutorial, as it is not accepted in CPI.
As such, to follow this tutorial, you need an existing client certificate chain, signed by a CA that is trusted by SAP.
Workaround:
You could generate a SAP-managed client certificate.
As described by the blogs mentioned above, the required steps are the following:
Create service instance of Process Integration Runtime (it-rt) with plan integration-flow
Create service key with key type “certificate”.
View the service key content and copy the certificate chain and key to 2 separate files.
Probably you also need to format them, such that they have newlines and look like normal certificate, like those used in this tutorial.
0.3. Introduction
As a customer, I have my own PKI (public key infrastructure), or I have my process to use own certificates, issued by a public trusted CA.
I want to use my own infrastructure to generate certificates - and renew when expired.
For security reasons, certificates should be rotated frequently and with nearly zero downtime.
There is a good coverage of documentation about HTTP Inbound communication with client certificates, as mentioned in the prerequisites.
Why we still need one more blog on that topic?
🔹 Today we cover service binding instead of service key.
🔹 We use external certificate instead of SAP-managed certificate.
🔹 We use it in an application, deployed to SAP BTP.
🔹 We go through a credential rotation scenario.
🔹 We create a shell script for automatic rotation..
Little recap.
When calling an OAuth-protected endpoint, we need to fetch a JWT token by following OAuth flow (e.g. client credentials).
To fetch a JWT token, we need credentials.
These can be:
- user/password, i.e. clientid/clientsecret
- client certificate
Such credentials are provided to us when we create a service binding, by binding an app to a service instance.
Alternatively, for external calls without app-binding, we can create a service key, which will contain the same credentials.
OK.
We can decide, if we want to get the credentials as clientid/secret or as client certificate.
We do so by providing config params when creating a service key or binding.
OK.
Bottom line: fetch a JWT token by sending clientsecret or certificate.

In case of CPI….
If we call an endpoint which is exposed by a iFlow, we have one more convenient option:
We can skip the OAuth flow and send the credentials directly to the iFlow.
We can send either clientid/secret or the certificate.
CPI will then take care of fetching the JWT token.
Nice.
OK.
Now let's briefly talk about client certificates.
As mentioned, we can use a client certificate for fetching a token or to call the endpoint.
That certificate (including private key) is provided to us in a service key or binding.
In the binding parameters or service key parameters, we can somewhat control the credentials which we get:

This is what we call SAP-managed.
SAP generates the certificate for us, if we desire and according to our params.
Alternatively, we can bring our own certificate (called “external certificate”).
In that case, the certificate has to made known to CPI (more precisely, to XSUAA).
This is done by specifying it in parameter when creating service key or binding.

During binding, the service broker will do some validation and generate the credentials section which will contain a generated clientid and the provided certificate.
Afterwards, we can use this external client certificate for fetching a token or calling the iFlow.
Below diagram illustrates the 3 types of configuration options and config files:
Create service instance, service binding (in manifest.yml or in bind.json) and create service key.

Summarizing:
We have 6 options for calling iFlow:
- Bearer Token, fetched via basic auth (clientid/secret)
- Bearer Token, fetched via client certificate
- Basic Auth, sending clientid/secret to iFlow
- Client Certificate (SAP-managed) sent directly to iFlow
- Bearer Token, fetched via external certificate
- External Certificate sent to iFlow
From these 6 scenarios we choose one for today’s tutorial:
💠💠💠 External certificate for direct call 💠💠💠
Disclaimer:
Below code and design is not an official recommendation.
It is just my personal learning which I like to share with the community.
BTW, the second scenario is covered in the this blog post.
1. Create Custom Certificate Chain 🔗
To create a custom certificate chain, we would proceed as follows:
🔹Create Private Key.
🔹Create Certificate Signing Request (CSR).
🔹Send the request to a Certification Authority (CA), and pay for it.
🔹Receive the certificate chain, signed by CA, as response.
1.1. Request Client Certificate
Unfortunately, we cannot accompany this creation process in our tutorial, but at least we can have a look at the required OpenSSL commands:
🔷 Create Private Key
openssl genpkey -algorithm RSA -pkeyopt rsa_keygen_bits:4096 -out privkey.pem🔷 Create Certificate Signing Request (CSR).
openssl req -new -key privkey.pem -out csr.pem -subj "/C=DE/O=myorg/OU=myunit1/OU=myunit2/OU=myunit3/L=myLocation/CN=ntif"🔷 Convert pkcs7 response to certificate chain
If the response contains the chain in PKCS #7 format, we need to convert it:
openssl pkcs7 -print_certs -in chain_pkcs7.pem -out chain.pem➡️ The result and the foundation for the following steps are 2 files:
privkey.pem
chain.pem
And they look like normal pem files:

1.2. Adapt the Chain and Key
The original format with newlines after 64 characters is not suitable for programmatic processing.
We need to adapt the files.
Furthermore, we need to extract the client certificate from the chain.
To distinguish the role of the certificates in a chain, the client cert is typically called "leaf certificate".
In the steps below, we're doing the required modifications manually.
The corresponding commands are used in shell script chapter
🔷 Extract leaf certificate from chain
The chain is ordered and the first cert is the leaf, the last is the root.
As pem files are normal text files, we can just copy the first cert from the file and paste into a new file with name leafCert.crt.
But we can also use the x509 command:
openssl x509 -in chain.pem -out leafCert.crtView content:
openssl x509 -text -noout -in leafCert.crt Note:
The name for a cert file with pem format is not important.
We're using file extension .crt because this is required by iFlow Designer.
🔷 Adapt leaf cert for yaml
For pasting the cert into a yaml file, the format must be one single line without any \n character.
We're adapting manually.
Create new file: leafCertOneLine.txt
In Visual Studio Code editor, we use search box with reg ex enabled, search for \n and replace with nothing:

🔷 Adapt Chain for ENV
To send the certificate chain and the private key in a JSON file, we need them as one single line, but we need the \n .
Create new file: chainOneLine.txt
If the chain contains bag attributes, we should remove them.
Then we convert the chain to one single line, where every newline is represented by a \n
In VS Code, as before, we enable regex button, replace all \n with \\n
Note: in regular expression, two backslashes are used to indicate that we want real \n character.

🔷 Adapt Private Key for ENV
Create new file: privkeyOneLine.txt
Repeat same as above:
Replace newlines with real \n character such that we get one single line which contains \n.
2. Create Node.js Application
We want to create an application that is bound to an instance of process integration and reads some required information from the binding.
However, we don’t want to use a client certificate that is generated by SAP and handed over in the binding.
We want to use our own custom client certificate chain, to follow our company processes (or whatever reason).
However, if we just send our client certificate to CPI, it won’t work, because nobody knows it.
Even if we configure the client certificate in the iFlow, it won’t be enough, because to validate it, the whole chain is required.
The CPI runtime will use it to fetch a jwt token from XSUAA.
As such, we have to make XSUAA familiar with our certificate.
For this step, only the leaf is used.
To make our certificate known to XSUAA, we enter it in the binding parameters, when binding our app to an instance of cpi runtime.
Binding parameters are read by the service broker of cpi runtime.
Usually, binding parameters are not required for most services.
They are required for CPI in case that
1. we want to use SAP managed certificate instead of clientid/clientsecret
In this case, we can use the binding parameters to specify that we want e.g. short-lived certificate with big key size.
2. we want to use our own certificate.
In this case, we specify the certificate itself in the parameters, to make it known to XSUAA.
OK.
So we’re going to specify our own client certificate in the manifest.yml file.
Before we do so, there are 2 things to note:
Note 1:
We cannot specify the whole chain here, it is not accepted by the service broker.
Note 2:
In a yaml file, we need PEM format in one single line.
No newlines, no \n contained in the text, even the hyphens are not separated from the payload with \n
Fortunately, we're already well prepared.
🔷 manifest.yml
Our manifest should contain:
1. binding to cpi runtime service instance
2. binding param to tell that we use own certificate
3. binding param to send own certificate
applications:

  - name: ntifext

    services:

      - name: iflowext

        parameters:

          key-type: certificate_external

          X.509: -----BEGIN CERTIFICATE-----MIIGjDCCBHSgAwIB...uh+4YZ3peK9-----END CERTIFICATE-----
The full file content can be found in appendix 1.
Note:
We must specify the client certificate in the binding, even though we don’t use it at runtime (because at runtime we need the chain, see below).
Reason is that XSUAA must be aware of the client cert.
At runtime, CPI will then use the cert to fetch a JWT token, and it must validate the chain up to the CA.
So if we don’t specify the client certificate here, the call to CPI will fail, even if we configure the HTTP adapter properly.
Note:
It is not possible to specify the whole chain here, as the service broker would throw an error
🔷 server.js
In the application code we need to send the whole chain, otherwise the request to CPI would fail.
Reason:
The client certificate (leaf) has to be validated.
To do so, the issuer of the leaf (intermediate cert) has to be validated.
And afterwards the issuer of the issuer.
And so on, until the root is reached.
And the root must be a CA that is trusted by SAP.
See SAP note.
This means, the root cert is present in CPI and would not need to be sent.
As such, in fact, we could cut off the last certificate in the chain, when sending the request.
Note:
It doesn’t help to upload intermediate certificates to CPI Keystore.
Only the supported Root CAs are contained in the Truststore and the chain must be sent during request.
OK.
In case of custom certificate, we don’t get the full chain and private key from binding (we can only specify the client certificate in binding parameters of manifest).
As such, we have to think about how to access that data from the code.
I see 2 possibilities:
- pack both files into the application and read the files at runtime
- set the data as environment variable and read it at runtime
The second option might sound less safe, but is more suitable for credentials rotation, so let’s go for this option.
Below diagram shows the whole runtime scenario.

We can see the app binding.
We can see that the app sends the certificate and that the certificate is used by CPI runtime to fetch a JWT token.
We can see the app env configured with chain and key.
Note:
Alternatively, below code snippet can be used to read the files.
These files can contain bag attributes and newlines, axios can handle
const certChain = fs.readFileSync('./cert/chain.pem', 'utf-8')

const privateKey = fs.readFileSync('./cert/privkey.pem', 'utf-8')
The last diagram adds the admin task to the whole picture.

We can see that the admin requests a client certificate at a Certification Authority and sends the CSR and the private key.
Afterwards, the admin configures the app binding and en
The sample application code is kept as short and simple as possible.
Note that it is not productive code.
First of all, we read the certificate and private key from the environment variables (we’ll set it later, after pushing the app):
const certChain = process.env.CLI_CHAIN

const privateKey = process.env.CLI_KEY
Their format of the cert and key is pem in single line with newlines (see below), so it can be directly used for the call:
const options = {

    url: `${CREDENTIALS.url}/http/ntifext`,

    headers: {

        'Content-Type': 'application/text'

    },

    method: 'POST',

    data : "Some Data sent from app with custom certificate chain and private key, updatable via credentials rotation script.",

    httpsAgent : new https.Agent({

        cert: certChain,

        key: privateKey

    })

}

const response = await axios(options)
Note:
The target endpoint which is called here (/ntifext), has to match the endpoint which we’ll specify in the iFlow below.
For the sake of curiosity, we can read the certificate and print the expiration date to the console
const certificate = new crypto.X509Certificate(certChain)

console.log("===> Client Certificate valid to: " + certificate.validTo)
When creating an instance of X509Certificate, the chain is ignored, only the first certificate is taken into account. This is the leaf certificate, which is what we want.
The full sample project code can be found in appendix 1.
🔷 Create Service Instance
We create an instance of service "Process Integration" with service plan "integration flow".
No params required, as we don’t use user roles today:
cf create-service it-rt integration-flow iflowext
🔷 Deploy
After deploying the app with cf push, we can go ahead and set the environment variables, which we access from the application code.
🔷 Set Environment
We use the BTP Cockpit for easily creating 2 variables.
(we'll use the respective command later, in shell script)
In BTP Cockpit, we navigate to our app -> "User-Provided-Variables"
Press “Add Variable” and enter the following:
Key: "CLI_CHAIN"
Value: copy the content of the file chain.pem
Key: CLI_KEY
Value: content of privkey.pem
Note:
We don’t need to remove the ugly bag attributes, as node.js can deal with it.
We can see that the popup and the dashboard can deal with the certificate format having newlines.
We don’t need to replace newlines with \n here
Note:
We copy and paste the whole chain file, to make life easier.
Actually, we could remove the root certificate, because it is already available in SAP trust store.
When validating the chain, it will be found.
So the call would be still successful, if we remove the root certificate from the environment variable.
Afterwards, restart or restage the app with
cf restage ntifext
3. Create iFlow
Our integration flow is very simple:
We only need to create an HTTPS sender adapter.
No more steps are required.
When we call the endpoint from our app, we’ll receive a response from CPI anyways.

The configuration of the HTTP adapter:
🔸 Address
set to /ntifext
Note that this endpoint name must match the endpoint used in our node app
🔸 Authorization
Set to "Client Certificate"
🔸 Subject and Isser DN
We press the “Select” button and choose our leafCert.crt file
Note that file extension .pem is not supported here
🔸 CSRF
Checkbox disabled.

Note:
Alternatively, we can copy and paste the Subject and Issuer DN from the app environment in Cloud Foundry:
cf env ntifext
The values can be found in the section
it-rt-> credentials->oauth->“certificate details”

After configuring the HTTPS adapter, we can save and deploy the iFlow.
4. Run Scenario
To run our scenario, we invoke our app which will then trigger the iFlow and print the response of the iFlow in the browser window.
In my example, the app has the following url:
https://ntifext.cfapps.eu.hana.ondemand.com/callcpi
As a result, we see the iFlow response, which is the same text that we’re sending in our node app.
The log shows the expiration date of the current client certificate:

Conclusion:
Our own custom certificate chain has successfully been used to authenticate at the iFlow.
5. Credentials Rotation
Up to now, the tutorial has been designed to make life easy and simple.
Now welcome to hard life:
We want to find a reproducible way to rotate the certificate on a frequent regular basis.
Ideally with a script that can be executed via pipeline.
This procedure requires some changes to above description.
The following steps need to be done:
- obtain new client certificate (and private key)
- configure it in iFlow (if required)
- rebind the app to same service instance with new binding param
- update the environment variables with new chain and key
- restage the app
- remove the old certificate from iFlow (if required)
Let’s go through these steps.
1. Obtain new client certificate / key
Hopefully, our company PKI allows for automated certificate renewal.
So we can do the required steps in a script:
- Create private key
- Create CSR
- Send request to get new client certificate chain
- If required, run command to extract p7b or p12/pfx file
The commands are the same as in chapter 1.
openssl genpkey -algorithm RSA -pkeyopt rsa_keygen_bits:4096 -out privkey.pem

openssl req -new -key privkey.pem -out csr.pem -subj "/C=DE/O=myOrg/OU=myUnit1/OU=myUnit2/OU=myUnit3/L=myLocation/CN=ntif"

openssl pkcs7 -print_certs -in chain_pkcs7.pem -out chain.pem

openssl x509 -in chain.pem -out leafCert.crt
2. Configure iFlow
In the HTTPS adapter we configure the new client certificate in addition to the already existing one.
this allows for smooth transition, as both will be accepted.
Note:
This is only required if the subject and issuer have changed.
I guess in most cases, issuer will be the same and also our subject does not need to change.
This means that we can skip step 2
3. Rebind the app to same service instance with new binding param
In above tutorial, we added the binding param to the manifest file.
In that case, the binding is created during deploy.
Now, for credentials rotation, we don't want to re-deploy the application.
As such, the procedure is little different:
- We manually delete the existing binding
- We manually create new binding and pass the binding parameters in this step.
The binding params are the same like in the manifest:
key-type and X.509 certificate.
However, the bind-command requires the params as JSON.
This means that we need to
- create a JSON file
- paste the certificate as one single line with \n
Note that this is different to the yaml file, where \n were not allowed
OK, so let's adapt leaf cert, to be used in JSON file..
We create a file with name leafCertOneLine.crt as copy from leafCert.crt file.
BTW, we're now talking about the new cert file.
We convert the content such that every newline is replaced by \n
![]()
We create a bind.json file with the following content:
{

    "key-type": "certificate_external",

    "X.509": ""

}
This would be kind of template file.
The value of X.509 has to be filled.
We copy and paste the content of leafCertOneLine.crt into bind.json as value of X.509

Now that we have created the binding param file, including the new leaf cert, we can use it for rebinding our app.
First unbind:
cf us ntifext iflowext
Then rebind with new certificate
cf bs ntifext iflowext -c bind.json
Afterwards restage the app
cf restage ntifext
Note:
Above commands are using the short alias names.
I think it makes the commands more readable.
The full names:
unbind-service
bind-service
4. Update the environment variables
Now update the chain (and key) which our app reads from the env variables.
In cockpit, we go to user provided variables and edit our 2 variables.
Replace the content of env var with the content of the new chain.pem and privkey.pem
Afterwards restage the app
cf restage ntifext
5. remove the old certificate from iFlow
As mentioned in step 2, we need to do this only if we’ve changed the subject DN and if we have different issuer DN.
Otherwise, we don’t need to reconfigure the iFlow, which is a manual step.
OK.
After going through these steps, we can test our app.
The call should be successful and in the log we should see the prove that the certificate has been exchanged indeed:

We can see a new expiration date.
Optional: check the expiration date on console
There’s a simple OpenSSL command to print the expiration date of a certificate.
Just point to a certificate and add the -enddate option.
In our example:
openssl x509 -in leafCert.crt -enddate
As a result, we get the same date as seen above:
![]()
The command can be enhanced to suppress the useless output via -noout:
In our example:
openssl x509 -in leafCert.crt -noout -enddate
6. Shell Script for Credentials Rotation 🔄
I've heard you complaining about the manual steps to replace newlines and to configure environment, etc 😤
Honestly, for a dummy like me it is really helpful for understanding, when doing things manually, at least once.
So I’ve put together the steps and commands to form an executable script.
What the script does:
Automatically replace newlines with \n using the awk command which is totally unreadable, hence powerful:
awk 'NF {sub(/\r/, ""); printf "%s\\n",$0;}' leafCert.crt
Use comments, to make awk more readable
# adapt leaf certificate: convert to one single line, newlines to be replaced by \n, write result into a variable, for inserting into bind.json
Assign result of awk to a variable (unreadable)
leafCertOneLine=$(awk 'NF {sub(/\r/, ""); printf "%s\\n",$0;}' leafCert.crt)Create bind.json file on the fly and fill the property with the (readable result of awk 😞
ext="certificate_external"

json='{"key-type": "'$ext'", "X.509":"'$leafCertOneLine'"}'

echo $json > bind.json
Execute the cf commands, like:
cf bs ntifext iflowext -c bind.json


env_chain=$(cat chain.pem)

cf set-env ntifext CLI_CHAIN "$env_chain"
Note:
Before using cf commands, the CLI must be installed on the linux machine.
See docu, e.g. for ubuntu.
Finally, delete the files created during script execution:
rm leafCert.crt

rm bind.json
Note:
You might wish to also delete the chain and private key.
Like that, you don't need to think about how to securely store the key
What the script doesn’t do
- The script doesn't create the certificate chain, as this depends on customer setup.
However, it wouldn't be much effort, to copy the req command from above into the script, and - if possible - execute curl commands to request the chain. - For same reason, the script doesn't create a private key.
However, the command can just be copied from above. - The script doesn't login to Cloud Foundry, as this would mean to hard-code my password 😉
As such, prior to execution, you need to enhance the script or prepare the 3 above steps manually.
The (somewhat) full script can be found in appendix 2.
Note:
My apologies, I'm not familiar with shell scripts.
The script is not ready for productive use, as it doesn’t contain error handling, etc
7. Security Considerations
Of course it is not safe to set the private key as environment variable.
However, it is not less safe than the SAP-managed private key, which is handed over to us in the app environment.
Also, if we pack the private key in the application and deploy it, it is not more safe, as anybody can download a the droplet from Cloud Foundry (see command below).
Note that in the course of credentials rotation, we can generate a new private key on each rotation and easily set it in the env, without the need of redeploying the app.
The key can be deleted during script execution, so it doesn't need to be stored on any safe location.
A new deployment of a source code means that potentially an untested version might be deployed.
Another advantage: as long as no deployment is required, the task of credentials rotation can be done by admin or operations team, or as part of automated pipeline.
It could be considered to encrypt the private key before setting as environment variable.
The whole tutorial has been dealing with an unencrypted private key.
The command for creating encrypted private key with password:
openssl genpkey -aes-256-cbc -algorithm RSA -pkeyopt rsa_keygen_bits:2048 -out privkey.pem -pass pass:abc123The command for downloading droplet:
cf download-droplet ntifext
The result is a zip file which looks like this

Summary
In this blog post we’ve learned about using custom certificates when calling an iFlow via HTTPS adapter.
We've learned about certificate chain and when to use client cert (binding params) and when to use the chain (http request to iFlow endpoint).
We've spend lot of time with converting formats, removing and replacing newlines, which is a bit confusing:
Manifest.yml requires leaf cert in one single line with no \n
Binding param JSON file requires leaf cert in one single line with \n for every newline
Environment variable requires the original file content.
Our focus was on calling the iFlow from a node app, deployed to Cloud Foundry.
No service keys nor postman in this tutorial.
We've learned that an iFlow endpoint can be called with JWT token or directly with credentials, while in the latter case the CPI runtime takes care of fetching the JWT token
We've learned how to specify binding parameters (for cpi service) in manifest file.
We've learned about credential rotation: To ensure better security, the credentials used to call a protected endpoint, should be rotated (=changed, invalidated) on regular basis.
We've learned a possible way to rotate the custom client certificate with a selfmade shell script.
See next blog post for a description using SAP-managed certificate to fetch JWT token, CSRF token, user roles.
Links
PEM
Specification RFC about PEM and representation format in single lines.
Node.js
Official documentation of crypto package
Security Glossary Blog
Next blog post covering SAP-managed certificate, JWT, CSRF, user roles.
Specification for X.509 v3 with extensions: rfc5280
Certificate Authority in wikipedia.
Blog about user roles and attributes and accessing JWT in script
Cloud Foundry CLI
Installation guide, e.g. for ubuntu
OpenSSL
Official list of unofficial binaries download page
Docu home
Manual: https://www.openssl.org/docs/manmaster/man1/
Generate Private Key: genpkey
Certificate Request: req command
Certificate Operations: x509 command
Appendix 1: Sample Application Code
Project Structure:

Note:
In my sample project, I have included the folder for dealing with certificates (called cert).
To avoid deploying this folder, we can create a .cfignore file, to ask the CF CLI to exclude this folder from deployment.
Alternatively, run the certificate related commands in a different directory.
Note:
the bind.json file is not required when using the shell script.
Note:
You might need to adapt the app names in manifest and the domain of the routes.
Also, if you changed the name of the target endpoint, make sure to adapt.
manifest.yml
---

applications:

  - name: ntifext

    memory: 64M

    path: .

    buildpacks:

      - nodejs_buildpack

    routes:

    - route: ntifext.cfapps.eu12.hana.ondemand.com

    services:

      - name: iflowext

        parameters:

          key-type: certificate_external

          X.509: -----BEGIN CERTIFICATE-----MIIGjDCCBHSgAwIBAgIUQA...BAcMB2NmLWPyUUYZ3peK9-----END CERTIFICATE-----
package.json
{

  "dependencies": {

    "axios": "0.24.0",

    "@sap/xsenv": "latest",

    "@sap/xssec": "^3.2.13",

    "express": "^4.17.1"

  }

}
server.js
const https = require('https')

const crypto = require('crypto')

const xsenv = require('@sap/xsenv')

const axios = require('axios');

const express = require('express')


const app = express()


var CREDENTIALS = xsenv.serviceCredentials({ name: 'iflowext' }).oauth


app.listen(process.env.PORT)


app.get('/callcpi', async (req, res) => {


    const certChain = process.env.CLI_CHAIN

    const privateKey = process.env.CLI_KEY


    // check validity of client cert

    const certificate = new crypto.X509Certificate(certChain)

    console.log("===> Client Certificate valid to: " + certificate.validTo) // TODO: calculate remaining days


    // call CPI

    const options = {

        url: `${CREDENTIALS.url}/http/ntifext`,

        headers: {

            'Content-Type': 'application/text'

        },

        method: 'POST',

        data : "Some Data sent from app with custom certificate chain and private key, updatable via credentials rotation script.",

        httpsAgent : new https.Agent({

            cert: certChain,

            key: privateKey

        })

    }


    const response = await axios(options)

    res.send(`Response from iFlow: ${JSON.stringify(response.data)}`)

})
.cfignore
cert
bind.json
{

    "key-type": "certificate_external",

    "X.509": "-----BEGIN CERTIFICATE-----\nMIIGjDCCBHSgAwIBAgIUQAQAAAGISQjmIA...ZIhvcNAQEL\nBQAwejELMAkGABgNVBAcMB2IknQWBJp\n-----END CERTIFICATE-----\n"

}
Appendix 2: Shell Script
credentialRotation.sh
echo "Running script for credentials rotation."


# extract leaf certificate from chain

openssl x509 -in chain.pem -out leafCert.crt

validity=$(openssl x509 -in leafCert.crt -noout -enddate)


# adapt leaf certificate: convert to one single line, newlines to be replaced by \n, write result into a variable, for inserting into bind.json

leafCertOneLine=$(awk 'NF {sub(/\r/, ""); printf "%s\\n",$0;}' leafCert.crt)


# Compose JSON file for binding: bind.json containing the user certificate in one line with \n

ext="certificate_external"

json='{"key-type": "'$ext'", "X.509":"'$leafCertOneLine'"}'

echo $json > bind.json


# update binding with new leaf cert

echo "Run CF commands to update binding with new leaf certificate"

cf us ntifext iflowext

cf bs ntifext iflowext -c bind.json


echo "Run CF commands to update app env with new chain and private key"


env_chain=$(cat chain.pem)

env_key=$(cat privkey.pem)

cf set-env ntifext CLI_CHAIN "$env_chain"

cf set-env ntifext CLI_KEY "$env_key"


# finally

cf restage ntifext


# cleanup: delete created files

rm leafCert.crt

rm bind.json

# rm privkey.pem

# rm chain.pem


echo "Done with credentials rotation."

echo "Validity of new client certificate:" $validity
Labels:
4 Comments
You must be a registered user to add a comment. If you've already registered, sign in. Otherwise, register and sign in.
Labels in this area
-
ABAP CDS Views - CDC (Change Data Capture)
2 -
AI
1 -
Analyze Workload Data
1 -
BTP
1 -
Business and IT Integration
2 -
Business application stu
1 -
Business Technology Platform
1 -
Business Trends
1,661 -
Business Trends
88 -
CAP
1 -
cf
1 -
Cloud Foundry
1 -
Confluent
1 -
Customer COE Basics and Fundamentals
1 -
Customer COE Latest and Greatest
3 -
Customer Data Browser app
1 -
Data Analysis Tool
1 -
data migration
1 -
data transfer
1 -
Datasphere
2 -
Event Information
1,400 -
Event Information
65 -
Expert
1 -
Expert Insights
178 -
Expert Insights
280 -
General
1 -
Google cloud
1 -
Google Next'24
1 -
Kafka
1 -
Life at SAP
784 -
Life at SAP
11 -
Migrate your Data App
1 -
MTA
1 -
Network Performance Analysis
1 -
NodeJS
1 -
PDF
1 -
POC
1 -
Product Updates
4,577 -
Product Updates
330 -
Replication Flow
1 -
RisewithSAP
1 -
SAP BTP
1 -
SAP BTP Cloud Foundry
1 -
SAP Cloud ALM
1 -
SAP Cloud Application Programming Model
1 -
SAP Datasphere
2 -
SAP S4HANA Cloud
1 -
SAP S4HANA Migration Cockpit
1 -
Technology Updates
6,886 -
Technology Updates
408 -
Workload Fluctuations
1
Related Content
- Top Picks: Innovations Highlights from SAP Business Technology Platform (Q1/2024) in Technology Blogs by SAP
- SAP GUI for Java 8.10 on the Horizon in Technology Blogs by SAP
- It has never been easier to print from SAP with Microsoft Universal Print in Technology Blogs by Members
- Unlocking Full-Stack Potential using SAP build code - Part 1 in Technology Blogs by Members
- Consuming CAPM Application's OData service into SAP Fiori Application in Business Application Studio in Technology Blogs by Members
Top kudoed authors
| User | Count |
|---|---|
| 13 | |
| 10 | |
| 10 | |
| 7 | |
| 6 | |
| 5 | |
| 5 | |
| 5 | |
| 5 | |
| 4 |