
- SAP Community
- Products and Technology
- Enterprise Resource Planning
- ERP Blogs by SAP
- Material Planning Strategies – Part 2 - PIRs ...an...
Enterprise Resource Planning Blogs by SAP
Get insights and updates about cloud ERP and RISE with SAP, SAP S/4HANA and SAP S/4HANA Cloud, and more enterprise management capabilities with SAP blog posts.
Turn on suggestions
Auto-suggest helps you quickly narrow down your search results by suggesting possible matches as you type.
Showing results for
Product and Topic Expert
Options
- Subscribe to RSS Feed
- Mark as New
- Mark as Read
- Bookmark
- Subscribe
- Printer Friendly Page
- Report Inappropriate Content
05-19-2023
12:30 PM
Thanks to renewed interest in my previous blog on Material Planning Strategies – Part 1, here I am, almost a year later, picking up my digital pen to continue the series with Part 2, this blog.
I am sure that you are all eager to get into the thick of it and want to hear about the various planning strategies that exist in S/4HANA Cloud, how you set them up, how you use them, for what use case, but that will need to wait a little longer until Part 4.
In this blog, I want to start getting into the system, but provide the basics of how to get started, point out how to solve some issues you might face along the way, and hopefully provide you with some tips that you were not aware of and we will even see how some of the AI tools like GPT or Bard that are the current talk of the town could be used in this process (or not). So let’s get started.
All the applications you will need to be able to manage the entire lifecycle of Planned Independent Requirements (PIRs) are highlighted below:
They are:
There are also two application jobs that are relevant if you intend to use the forecasting capabilities of the system. In this case, these two jobs are:
Part 2 (this blog) will focus on the App Maintain PIRs, and Part 3 will focus on the other Html GUI apps. Both have something to offer you.
You have maintained your product masters, and in particular in the MRP data section maintained a strategy(ies) group, as this will drive the requirement type of your PIRs here, but also your customer requirements later on.
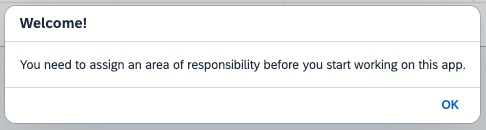
Once you launch the Maintain PIRs app, it is very likely that the first time you run this app, you will see nothing. This is normal, as you first have to set the area for which you are responsible (i.e this defines the materials for which you are responsible – from a PIRs/Demand Management point of view - and thus can see), and subsequently we will see that the filters also play role in what you see.
Normally, upon entering the app for the first time or if no area of responsibility is assigned to you a prompt like this one should be presented to you.
Another popup will be presented, click on the highlighted line to gain access to the areas of responsibility.
The Area Of Responsibility (AOR) definition screen will be presented.
Each Area of Responsibility corresponds to a combination of Plant and MRP Controller.
You can assign one or more AORs to your user. Multiple users can be assigned to the same AOR. Each AOR assigned to you is evidenced by the green check mark as shown below.
Once you have assigned one or more AOR to yourself, you can go back to the main app screen.
Note that if you made an assignment mistake, or if in the course of your work, these AORs change, you can simply access the AOR screen by selecting the ‘App Settings’ option from the ME menu.
You are now back in the Main app screen, you’ve hit the Go button to start the search for materials you want to plan, but the result is an empty list! The results list here is based on your selection filters, so if you are not seeing anything, they are likely the culprits (assuming you do have materials assigned to the plant and MRP controller from your AOR in your system!).
As you can see above, the filter for this field is set to No, meaning that the selection will look for materials for which I have already planned PIRs, but in an Inactive version (active = no). This is different from a material for which I have not entered any PIRs yet (typically the case right after you have just created a material or have never planned it before). To search for those, you would use the N/A selection value. If you are looking for materials, for which PIRs have been entered and are Active, then you would select Yes to search for those. You can search for PIRs by selecting one or multiple values.
This version indicator is an important setting because it defines whether the requirement is ‘Active’, i.e passed on to MRP. If a PIR, is not active, MRP will not see it and hence will not plan it.
You could for example plan PIRs, and whilst you refine these numbers or seek consensus from other departments, save these PIRs in an inactive version. This allows you to enter the data in the system, without it influencing your operational MRP or triggering replenishments. Once you are ready to have these PIRs seen by MRP, you could then simply flip the indicator to Active.
This is also an important indicator, in both the selection of PIRs in this screen as well as from an operational point of view.
Selection. This indicator has to match what has been entered in the Forecast section of the product master. Meaning that if in the Product Master, you entered a Forecast period of (W)Weekly, but here in the selection screen have entered (M)Monthly, the product will not be selected/found.
Operational. This indicator will define how the PIRs will be planned by default (Monthly, Weekly buckets) and how the sales volumes and material consumption data will be stored. Note that you will still be able as we will see later on, to split a monthly PIR quantity into weekly buckets.
Now that we have adjusted our search filters, let’s click Go again. We now have a list of materials!
To avoid getting overwhelmed with too many materials to plan at once, maybe consider refining the search criteria or manually selecting a few materials, and as you become comfortable with the use of this app, increase the number of materials to plan in one session.
Here, to get started, we will select one material and click ‘Create’ to enter some PIRs.
A popup will be presented proposing settings that you can amend. Of importance is the Active setting which as said previously determines whether the PIRs will be passed to MRP directly after saving or not. The requirements type will be proposed based on the strategy indicate in the product master, but other types are available for selection. You could also at any point have several versions ‘on the go’ if you for example wanted to work on a very optimistic plan and maybe another one less so optimistic.
This will take you to the planning table, where you will have one line per material. You will have a 12 months horizon in which to enter your PIRs, and if you need to enter PIRs at a point in time that is greater than 12 months, then you can simply pick the date you want to go to from the date picker, situated at the top of the table (tip: save your entries before navigating to a new period).
One way to enter PIRs is to enter the quantities directly in the material/time period bucket where you want to enter them. This works fine if you have a small combination of materials and time periods to maintain or want to quickly correct an erroneous entry.
For example here, we enter 100 in the period June 2023.
With this method, you have three options available to you:
For this option, click the Mass Maintenance button and a popup will be presented. Use this popup to select the periods (in this case we will select 3 contiguous periods), then choose the option <Enter Quantity> and enter the quantity you wish to mass allocate.
The planning line of the material is updated accordingly.
For this option, we again use the Mass maintenance button, but this time we choose <Forecast Quantity>, and there is no possibility to enter a quantity as this will be determined by the system.
The planning line of the material is updated accordingly.
As before for this option, we again use the Mass maintenance button, but this time we choose <Copy From Reference Material>, and there is no possibility to enter a quantity as this will be determined by the system, but a selection box will allow you to choose the reference material.
The data from the reference material, for the chosen periods is copied.
This option could work very well if for example, you needed to massage your PIR quantities outside the system by marrying data from other sources, or if you wanted to provide your sales force the ability to enter the data for their sector and then consolidate it or even ask your customers to enter their forecast requirements.
Let’s consider the current planning of our material is as below. Click on the Spreadsheet icon as shown, to download the data template file to your computer. This will be a CSV file.
Then, open your downloaded file with your favorite spreadsheet software and amend the values as per your requirements. In our case, we are showing in red the values we have changed.
Once you are happy with your changes, save them. Back in the Maintain PIRs app, choose the option to upload and edit PIRs.
Select your file and continue to upload your data.
You then see your amended PIRs in SAP.
Now that you have finalized your PIRs and are happy to pass them on to MRP for planning, you need to change the state of your version from Inactive to Active. To do so flip the switch in the planning line of the material.
Your PIRs will now be planned, and trigger replenishments, the next time your run MRP.
Whilst this has nothing to do with the actual process of creating PIRs, I want to highlight a UI tip that might provide some usability comfort as you use this app, namely the possibility to ‘freeze’ columns, much like you can in MS Excel for example. You might want to use it so as to keep in focus as a reference some of your planning periods, or maybe they could represent a horizon you do not want to make changes to. In any case, if you want to use this feature, click on a column header and select the ‘Freeze’ option.
You can now see, that your scroll area is to the right of the column you froze.
Use the same process to ‘unfreeze’.
I had not planned on broaching this topic, but based on the buzz that we see at the moment for AI tools such as GPT, or Bard to name a couple, and based on the fact, that after a pandemic, forecasting future demand based solely on the basis of past sales volumes seems to have become non-sensical. Also, if you are just starting out your journey with S/4, you will not have a history of sales and hence require to create a forecast outside the system, if you rely at least partly on your past history. Personally, I believe that a forecast can not in any case rely on only looking back in the mirror, it needs to incorporate future demand and predictions as well.
I should also mention that this use of AI is merely a personal test, not a recommendation. As you will see different AI tools generated wildly different results, so if you are going to go down this route in some shape or form, then make sure you touch this data with a pair of thermonuclear tweezers!
For this example, I used openAI Chat-GPT as well as Google Bard. I gave them both the same prompt and historical data, asking them to take into account % increases advised by my customers in various quarters and also to take into account economic factors such as inflation that might affect demand. I also asked it to test for patterns such as trends or seasonality. Lastly, I also asked it to output the data in a CSV format, so that I could without too much manipulation upload the data back into the system as-is. My prompt was:
I want you to forecast my future sales for some of my products on the basis of their past sales volumes.
The data for my past sales is as below in comma separated format.
The first line is a header line where the first field represents the product to be forecasted and the subsequent fields represent the past 13 months of sales history in units sold for that product going from April 2022 through to April 2023.
Each line after that holds the actual past sales volumes in units sold for the products I want you to do a forecast for. Each line corresponds to one product.
Product,April 2022,May 2022,June 2022,July 2022,August 2022,September 2022,October 2022,November 2022,December 2022,January 2023,February 2023,March 2023,April 2023
PR-INV-001,100,100,100,100,450,450,450,60,60,90,110,110,120
PR-INV-002,272,392,305,188,189,329,245,382,344,349,183,157,317
PR-INV-003,95,20,40,90,150,240,180,80,30,50,100,160,250
PR-INV-004,329,356,261,342,164,323,395,186,175,290,380,295,347
PR-INV-005,242,308,396,325,299,132,140,211,399,348,258,297,324
PR-INV-006,308,222,166,153,260,173,231,222,253,159,310,128,298
On the basis of that information, and knowing that my customers are telling me that they expect an increase in demand for these products of 14% for Q3 of 2023 and an increase of 17% in Q4 of 2023 in demand, I want you to forecast my expected future sales for each product for which I have given you past sales volume information. I want you to test for trend and seasonality for each product and if you cannot determine any pattern, then use a simple exponential smoothing method with an alpha of 0.2 to perform the forecast. I also want you to take into account any information regarding inflation, interest rates and demand for fast consumer goods as it applies in the USA. The forecast should be rounded to the nearest whole number.
I want you to forecast my sales in pieces for the next 12 months starting from June 2023.
For each product if you are able to detect a seasonality or trend for any product then call it out.
Output the data in the form of comma separated values, with one line per product and do not forget to add a header line that tells me what the fields you have output correspond to.
GPT provided me this output:
Bard provided me this output:
I then laid the data out in Excel to perform a high-level comparison of the two results.
In order to compare apples to apples, I removed the April 2024 forecast from GPT, that Bard omitted to provide.
So what is the takeaway?
That I would be reticent to blindly accept the values provided to me by either one of those AI. Of course, my prompting skills probably need to be improved to better word what I want (e.g. tell GPT how to output trend/seasonality test) and target a better response, I could also have drilled down and asked additional questions such as the inflation rates it took into account.
Maybe this has prompted an idea for you to develop an extensibility scenario leveraging the SAP BTP (Business Technology Platform)?
I hope this blog has provided you with helpful information regarding the use of the Maintain PIRs application and how you can use it in your workflow.
Hopefully, I have not lost you yet and you will be interested to continue reading our series with Part 3 of this series where we look at the other apps available to you in this PIR creation process, before moving on to Part 4 which is when the rubber hits the road and we look at how the planning strategies are used!
We will be covering a number but not all strategies, so if you have any specific use case you'd like to see covered, don't hesitate to drop them in the comments.
I am sure that you are all eager to get into the thick of it and want to hear about the various planning strategies that exist in S/4HANA Cloud, how you set them up, how you use them, for what use case, but that will need to wait a little longer until Part 4.
In this blog, I want to start getting into the system, but provide the basics of how to get started, point out how to solve some issues you might face along the way, and hopefully provide you with some tips that you were not aware of and we will even see how some of the AI tools like GPT or Bard that are the current talk of the town could be used in this process (or not). So let’s get started.
Where to Start
All the applications you will need to be able to manage the entire lifecycle of Planned Independent Requirements (PIRs) are highlighted below:

PIRs Planning Applications
They are:
- Maintain PIRs – With this app you can manage PIRs (create, change, display, forecast, upload and mass maintain) your PIRs. This app is a FIORI app.
- Create PIRs, Change PIRs, Display PIRs. The names of these apps are self-explanatory. These applications are SAP GUI for Html transactions. With these applications you can access PIRs for products, requirements plans, or MRP areas, you can execute forecasts or copy existing forecasts, and split requirements into different periods.
- Schedule PIR Reorganizing runs. This is an application that should be used to clean up your unneeded or unwanted PIRs. For example, say sales were less than expected and you have PIRs that now lie outside the consumption period – do you still want them to remain active and generate MRP requirements? Probably not, and that is when this application becomes handy, to delete or adjust outdated requirements.
There are also two application jobs that are relevant if you intend to use the forecasting capabilities of the system. In this case, these two jobs are:
- Schedule Material Demand Forecast Runs. As the name indicates, this job allows you to forecast future material demand based on past consumption figures.
- Schedule Copying Total Forecast runs. This job is used to simulate or perform the copy of the forecast requirements from the previous job, into PIRs that could be in an active or inactive version. The horizon of forecast requirements to copy is selective – meaning that even if you forecasted for 12 months, you may choose to only copy the first 6 months, or 6 months after the next 3 months for example.
Part 2 (this blog) will focus on the App Maintain PIRs, and Part 3 will focus on the other Html GUI apps. Both have something to offer you.
Maintaining PIRs
You have maintained your product masters, and in particular in the MRP data section maintained a strategy(ies) group, as this will drive the requirement type of your PIRs here, but also your customer requirements later on.
Once you launch the Maintain PIRs app, it is very likely that the first time you run this app, you will see nothing. This is normal, as you first have to set the area for which you are responsible (i.e this defines the materials for which you are responsible – from a PIRs/Demand Management point of view - and thus can see), and subsequently we will see that the filters also play role in what you see.
Normally, upon entering the app for the first time or if no area of responsibility is assigned to you a prompt like this one should be presented to you.
Assign Area of Responsibility
Another popup will be presented, click on the highlighted line to gain access to the areas of responsibility.
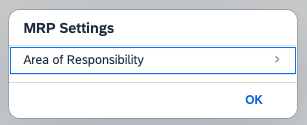
MRP Settings - Area Of Responsibility
The Area Of Responsibility (AOR) definition screen will be presented.
Each Area of Responsibility corresponds to a combination of Plant and MRP Controller.
You can assign one or more AORs to your user. Multiple users can be assigned to the same AOR. Each AOR assigned to you is evidenced by the green check mark as shown below.

Assign/Unassign Area of Responsibility to your user
Once you have assigned one or more AOR to yourself, you can go back to the main app screen.
Note that if you made an assignment mistake, or if in the course of your work, these AORs change, you can simply access the AOR screen by selecting the ‘App Settings’ option from the ME menu.

ME menu to access app settings
You are now back in the Main app screen, you’ve hit the Go button to start the search for materials you want to plan, but the result is an empty list! The results list here is based on your selection filters, so if you are not seeing anything, they are likely the culprits (assuming you do have materials assigned to the plant and MRP controller from your AOR in your system!).
![]()
Empty list of Materials to plan PIRs
Version Active
As you can see above, the filter for this field is set to No, meaning that the selection will look for materials for which I have already planned PIRs, but in an Inactive version (active = no). This is different from a material for which I have not entered any PIRs yet (typically the case right after you have just created a material or have never planned it before). To search for those, you would use the N/A selection value. If you are looking for materials, for which PIRs have been entered and are Active, then you would select Yes to search for those. You can search for PIRs by selecting one or multiple values.

Active/Inactive Version selector
This version indicator is an important setting because it defines whether the requirement is ‘Active’, i.e passed on to MRP. If a PIR, is not active, MRP will not see it and hence will not plan it.
You could for example plan PIRs, and whilst you refine these numbers or seek consensus from other departments, save these PIRs in an inactive version. This allows you to enter the data in the system, without it influencing your operational MRP or triggering replenishments. Once you are ready to have these PIRs seen by MRP, you could then simply flip the indicator to Active.
Period Indicator
This is also an important indicator, in both the selection of PIRs in this screen as well as from an operational point of view.
Selection. This indicator has to match what has been entered in the Forecast section of the product master. Meaning that if in the Product Master, you entered a Forecast period of (W)Weekly, but here in the selection screen have entered (M)Monthly, the product will not be selected/found.

Period selector in the Product Master
Operational. This indicator will define how the PIRs will be planned by default (Monthly, Weekly buckets) and how the sales volumes and material consumption data will be stored. Note that you will still be able as we will see later on, to split a monthly PIR quantity into weekly buckets.
Now that we have adjusted our search filters, let’s click Go again. We now have a list of materials!

Materials Available for PIR planning
To avoid getting overwhelmed with too many materials to plan at once, maybe consider refining the search criteria or manually selecting a few materials, and as you become comfortable with the use of this app, increase the number of materials to plan in one session.
Here, to get started, we will select one material and click ‘Create’ to enter some PIRs.

Select Material(s) to plan
A popup will be presented proposing settings that you can amend. Of importance is the Active setting which as said previously determines whether the PIRs will be passed to MRP directly after saving or not. The requirements type will be proposed based on the strategy indicate in the product master, but other types are available for selection. You could also at any point have several versions ‘on the go’ if you for example wanted to work on a very optimistic plan and maybe another one less so optimistic.

Plan Settings
This will take you to the planning table, where you will have one line per material. You will have a 12 months horizon in which to enter your PIRs, and if you need to enter PIRs at a point in time that is greater than 12 months, then you can simply pick the date you want to go to from the date picker, situated at the top of the table (tip: save your entries before navigating to a new period).

Enter PIRs
Entering PIRs by direct manual entry
One way to enter PIRs is to enter the quantities directly in the material/time period bucket where you want to enter them. This works fine if you have a small combination of materials and time periods to maintain or want to quickly correct an erroneous entry.
For example here, we enter 100 in the period June 2023.

Manual PIR Entry
Entering PIRs by Mass Maintenance
With this method, you have three options available to you:
- You can enter the same quantity for one or more periods. This works well if you have for example a constant PIR requirement over several periods/material(s).
Or - You can perform a forecast based on the 12 months' historical sales volume. As per the SAP Help, the system will use the twelve months moving average method to calculate the forecast.
Or - You can copy the quantities from a reference material. This is handy if you have an existing material that has a PIR plan that is identical to the one you want to apply to target material(s) or is similar but requiring some minor adjustments.
Enter Quantity
For this option, click the Mass Maintenance button and a popup will be presented. Use this popup to select the periods (in this case we will select 3 contiguous periods), then choose the option <Enter Quantity> and enter the quantity you wish to mass allocate.

Manual entry of quantity - mass maintenance
The planning line of the material is updated accordingly.

Mass Update of PIR quantities
Enter Forecast
For this option, we again use the Mass maintenance button, but this time we choose <Forecast Quantity>, and there is no possibility to enter a quantity as this will be determined by the system.

Mass Maintenance - Forecast Quantity
The planning line of the material is updated accordingly.

Mass maintenance - forecast quantity
Copy Reference Material
As before for this option, we again use the Mass maintenance button, but this time we choose <Copy From Reference Material>, and there is no possibility to enter a quantity as this will be determined by the system, but a selection box will allow you to choose the reference material.

Copy from reference Material
The data from the reference material, for the chosen periods is copied.

Data copied from reference material
Entering PIRs by Upload
This option could work very well if for example, you needed to massage your PIR quantities outside the system by marrying data from other sources, or if you wanted to provide your sales force the ability to enter the data for their sector and then consolidate it or even ask your customers to enter their forecast requirements.
Let’s consider the current planning of our material is as below. Click on the Spreadsheet icon as shown, to download the data template file to your computer. This will be a CSV file.

Download Template
Then, open your downloaded file with your favorite spreadsheet software and amend the values as per your requirements. In our case, we are showing in red the values we have changed.

Maintain data in a spreadsheet
Once you are happy with your changes, save them. Back in the Maintain PIRs app, choose the option to upload and edit PIRs.

Upload Planning Data
Select your file and continue to upload your data.

Select file
You then see your amended PIRs in SAP.

Updated data after upload
Now that you have finalized your PIRs and are happy to pass them on to MRP for planning, you need to change the state of your version from Inactive to Active. To do so flip the switch in the planning line of the material.

Active version switch
Your PIRs will now be planned, and trigger replenishments, the next time your run MRP.
UI Tip
Whilst this has nothing to do with the actual process of creating PIRs, I want to highlight a UI tip that might provide some usability comfort as you use this app, namely the possibility to ‘freeze’ columns, much like you can in MS Excel for example. You might want to use it so as to keep in focus as a reference some of your planning periods, or maybe they could represent a horizon you do not want to make changes to. In any case, if you want to use this feature, click on a column header and select the ‘Freeze’ option.

Freeze column
You can now see, that your scroll area is to the right of the column you froze.

Frozen scroll area
Use the same process to ‘unfreeze’.
Using AI to generate a PIR forecast
I had not planned on broaching this topic, but based on the buzz that we see at the moment for AI tools such as GPT, or Bard to name a couple, and based on the fact, that after a pandemic, forecasting future demand based solely on the basis of past sales volumes seems to have become non-sensical. Also, if you are just starting out your journey with S/4, you will not have a history of sales and hence require to create a forecast outside the system, if you rely at least partly on your past history. Personally, I believe that a forecast can not in any case rely on only looking back in the mirror, it needs to incorporate future demand and predictions as well.
I should also mention that this use of AI is merely a personal test, not a recommendation. As you will see different AI tools generated wildly different results, so if you are going to go down this route in some shape or form, then make sure you touch this data with a pair of thermonuclear tweezers!
For this example, I used openAI Chat-GPT as well as Google Bard. I gave them both the same prompt and historical data, asking them to take into account % increases advised by my customers in various quarters and also to take into account economic factors such as inflation that might affect demand. I also asked it to test for patterns such as trends or seasonality. Lastly, I also asked it to output the data in a CSV format, so that I could without too much manipulation upload the data back into the system as-is. My prompt was:
I want you to forecast my future sales for some of my products on the basis of their past sales volumes.
The data for my past sales is as below in comma separated format.
The first line is a header line where the first field represents the product to be forecasted and the subsequent fields represent the past 13 months of sales history in units sold for that product going from April 2022 through to April 2023.
Each line after that holds the actual past sales volumes in units sold for the products I want you to do a forecast for. Each line corresponds to one product.
Product,April 2022,May 2022,June 2022,July 2022,August 2022,September 2022,October 2022,November 2022,December 2022,January 2023,February 2023,March 2023,April 2023
PR-INV-001,100,100,100,100,450,450,450,60,60,90,110,110,120
PR-INV-002,272,392,305,188,189,329,245,382,344,349,183,157,317
PR-INV-003,95,20,40,90,150,240,180,80,30,50,100,160,250
PR-INV-004,329,356,261,342,164,323,395,186,175,290,380,295,347
PR-INV-005,242,308,396,325,299,132,140,211,399,348,258,297,324
PR-INV-006,308,222,166,153,260,173,231,222,253,159,310,128,298
On the basis of that information, and knowing that my customers are telling me that they expect an increase in demand for these products of 14% for Q3 of 2023 and an increase of 17% in Q4 of 2023 in demand, I want you to forecast my expected future sales for each product for which I have given you past sales volume information. I want you to test for trend and seasonality for each product and if you cannot determine any pattern, then use a simple exponential smoothing method with an alpha of 0.2 to perform the forecast. I also want you to take into account any information regarding inflation, interest rates and demand for fast consumer goods as it applies in the USA. The forecast should be rounded to the nearest whole number.
I want you to forecast my sales in pieces for the next 12 months starting from June 2023.
For each product if you are able to detect a seasonality or trend for any product then call it out.
Output the data in the form of comma separated values, with one line per product and do not forget to add a header line that tells me what the fields you have output correspond to.
GPT provided me this output:

GPT Response
Bard provided me this output:

Bard Response
- Both have given me an output as I asked for it, in CSV format.
- GPT said that if seasonality or trend did exist, I did not tell it where to output the data and thus did not output the information!
- Bard provided me with more detailed information pertaining to seasonality or trends
- Based on the dates, I see that Bard only forecasted the next 11 periods as opposed to the 12 I asked for (which GPT did).
I then laid the data out in Excel to perform a high-level comparison of the two results.
In order to compare apples to apples, I removed the April 2024 forecast from GPT, that Bard omitted to provide.
- Overall, Bard forecasted 29% more units than GPT
- For all products except one, Bard forecasted a larger number of units than GPT
- One product PR-INV-003 was forecasted by Bard by 61% more units than GPT

Comparison
So what is the takeaway?
That I would be reticent to blindly accept the values provided to me by either one of those AI. Of course, my prompting skills probably need to be improved to better word what I want (e.g. tell GPT how to output trend/seasonality test) and target a better response, I could also have drilled down and asked additional questions such as the inflation rates it took into account.
Maybe this has prompted an idea for you to develop an extensibility scenario leveraging the SAP BTP (Business Technology Platform)?
I hope this blog has provided you with helpful information regarding the use of the Maintain PIRs application and how you can use it in your workflow.
Hopefully, I have not lost you yet and you will be interested to continue reading our series with Part 3 of this series where we look at the other apps available to you in this PIR creation process, before moving on to Part 4 which is when the rubber hits the road and we look at how the planning strategies are used!
We will be covering a number but not all strategies, so if you have any specific use case you'd like to see covered, don't hesitate to drop them in the comments.
- SAP Managed Tags:
- SAP S/4HANA Public Cloud
Labels:
You must be a registered user to add a comment. If you've already registered, sign in. Otherwise, register and sign in.
Labels in this area
-
Artificial Intelligence (AI)
1 -
Business Trends
363 -
Business Trends
21 -
Customer COE Basics and Fundamentals
1 -
Digital Transformation with Cloud ERP (DT)
1 -
Event Information
461 -
Event Information
24 -
Expert Insights
114 -
Expert Insights
155 -
General
1 -
Governance and Organization
1 -
Introduction
1 -
Life at SAP
415 -
Life at SAP
2 -
Product Updates
4,685 -
Product Updates
217 -
Roadmap and Strategy
1 -
Technology Updates
1,502 -
Technology Updates
89
Related Content
- Limit: Block Purchasing on WBS for stock materials in Enterprise Resource Planning Blogs by SAP
- Dynamizing Material Specifications and Inspection Plans in SAP in Enterprise Resource Planning Q&A
- Discrepecy in MRP area in Subcontracting process in Enterprise Resource Planning Q&A
- Manage Supply Shortage and Excess Supply with MRP Material Coverage Apps in Enterprise Resource Planning Blogs by SAP
- Enterprise Portfolio and Project Management in SAP S/4HANA Cloud, Private Edition 2023 FPS1 in Enterprise Resource Planning Blogs by SAP
Top kudoed authors
| User | Count |
|---|---|
| 12 | |
| 11 | |
| 8 | |
| 6 | |
| 6 | |
| 6 | |
| 4 | |
| 4 | |
| 4 | |
| 4 |