- SAP Community
- Products and Technology
- Technology
- Technology Blogs by SAP
- Configure SAML SSO with SAP Ariba Business Network...
Technology Blogs by SAP
Learn how to extend and personalize SAP applications. Follow the SAP technology blog for insights into SAP BTP, ABAP, SAP Analytics Cloud, SAP HANA, and more.
Turn on suggestions
Auto-suggest helps you quickly narrow down your search results by suggesting possible matches as you type.
Showing results for
Product and Topic Expert
Options
- Subscribe to RSS Feed
- Mark as New
- Mark as Read
- Bookmark
- Subscribe
- Printer Friendly Page
- Report Inappropriate Content
05-19-2023
4:02 PM
In this blog I will discuss SAML trust setup between SAP Ariba Business Network and SAP Cloud Identity Authentication Service(IAS). Before we go through the setup process I wanted to highlight couple points that are important.
For the purpose of this blog, I am also going to assume that you are following SAP best practices and have other SAP applications setup to trust IAS. Furthermore, your IAS tenant is already configured to proxy to your corporate Identity Provider such as Microsoft Azure or others. In such scenario you may have a requirement to have corporate users authenticate to SAP Ariba using your corporate IDP and non-corporate user authenticate through SAP Cloud Identity Authentication Service. Let's see how we can setup such a scenario.
Setup trust with SAP Cloud Identity Authentication in SAP Ariba Business Network
In order to set up SAML trust on the Ariba side, you will need to work SAP Ariba support team. The SAP Ariba support team will need the SAML metadata from your SAP Cloud Identity Authentication Service. To download the metadata follow these steps:
Setup SAP Ariba Business Network application in SAP Cloud Identity Authentication Service
As mentioned earlier, SAP Ariba Business Network supports IDP initiated SSO only. Once the trust between Ariba and IAS is setup, access the IDP initiated URL to confirm successful login to Ariba. The URL would take the following format:
https://<IASTenantID>.accounts.ondemand.com/saml2/idp/sso?sp=<Entity ID of Ariba application>
If the test is successful you can proceed with the next steps to further configure the application to support both corporate and non-corporate users. The process to configure a corporate identity provider with IAS is beyond the scope of this blog and already well documented and covered in other blogs. I've listed just a few resources you can use to setup your corporate identity provider with IAS:
Configure the setup to support corporate and non-corporate users
What IDP initiated URL do I use to authenticate corporate and non-corporate users?
Authenticate with SAP Cloud Identity (non-corporate users)
https://<IASTenantID>.accounts.ondemand.com/saml2/idp/sso?sp=<Entity ID of Ariba application>&idp=<IASTenantID>.accounts.ondemand.com
User will see the IAS login screen and must specify an IAS username and password to authenticate.
Authenticate with Corporate IDP (corporate users)
https://<IASTenantID>.accounts.ondemand.com/saml2/idp/sso?sp=<Entity ID of Ariba application>
User will be redirected to the login screen of the corporate identity provider and must specify the corporate IDP credentials to authenticate.
Happy reading!
- SAP Ariba Business Network supports Identity Provider(IDP) initiated single sign-on only. Service Provider(SP) initiated SSO is not possible.
- SAML response must be signed.
For the purpose of this blog, I am also going to assume that you are following SAP best practices and have other SAP applications setup to trust IAS. Furthermore, your IAS tenant is already configured to proxy to your corporate Identity Provider such as Microsoft Azure or others. In such scenario you may have a requirement to have corporate users authenticate to SAP Ariba using your corporate IDP and non-corporate user authenticate through SAP Cloud Identity Authentication Service. Let's see how we can setup such a scenario.
Setup trust with SAP Cloud Identity Authentication in SAP Ariba Business Network
In order to set up SAML trust on the Ariba side, you will need to work SAP Ariba support team. The SAP Ariba support team will need the SAML metadata from your SAP Cloud Identity Authentication Service. To download the metadata follow these steps:
- Access your SAP Cloud Identity Authentication(IAS) Admin console. The URL of the admin console for IAS is in the format: https://<tenantid>.accounts.ondemand.com/admin.
- Click Applications & Resources >> Tenant Settings.

- Scroll down on the page and click SAML 2.0 Configuration.
- Click the Download Metadata File from the top right corner of the page.

- Send the downloaded xml file to your SAP Ariba team.
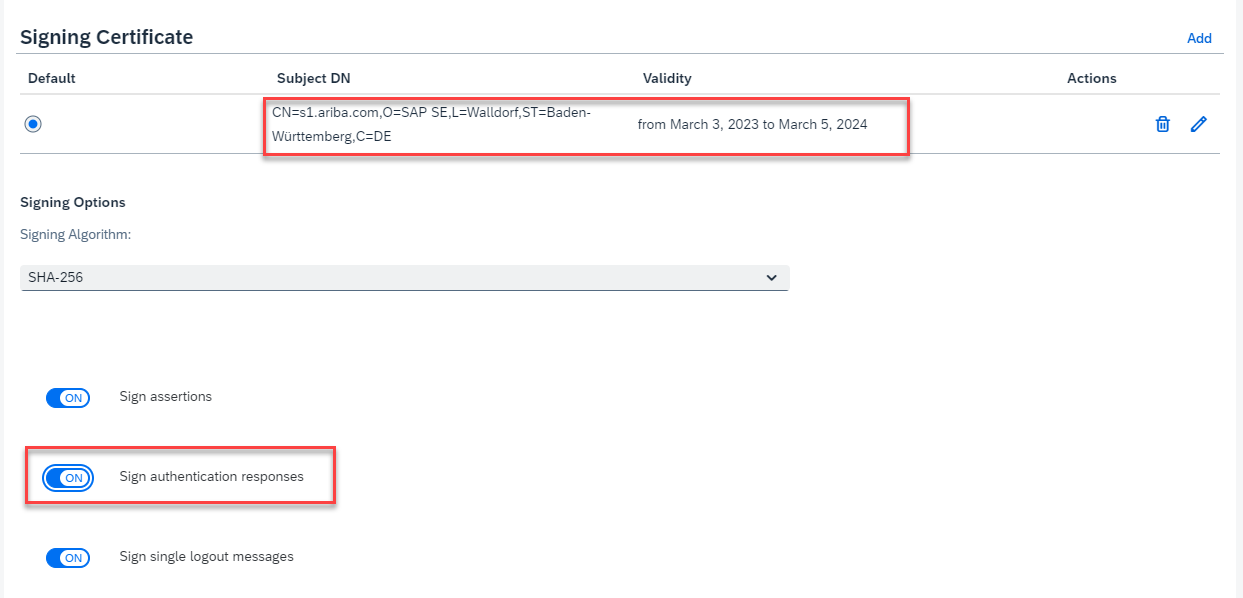
- The SAP Ariba team will configure your SAP Ariba Business Network using the provided metadata. The screenshot below is for reference only as the config shown in the screenshot will be done by SAP.

Setup SAP Ariba Business Network application in SAP Cloud Identity Authentication Service
- Access your SAP Cloud Identity Authentication(IAS) Admin console. The URL of the admin console for IAS is in the format: https://<IASTenantId>.accounts.ondemand.com/admin.
- Click Applications & Resources >> Applications.

- Specify a Display Name for your app and set the Type to SAP Ariba Solution.

- Click SAML 2.0 Configuration.

- Browse for the SAML metadata file provided by Ariba admin.

- Make note of the Name value (aka Entity ID) as this will be required to construct the URL needed to access SAP Ariba Buyer portal.

- Verify the signing certificate is valid and ensure that the Sign authentication responses toggle is enabled.
- Save your application.
- Click Subject Name Identifier and change it from User ID to E-Mail.

As mentioned earlier, SAP Ariba Business Network supports IDP initiated SSO only. Once the trust between Ariba and IAS is setup, access the IDP initiated URL to confirm successful login to Ariba. The URL would take the following format:
https://<IASTenantID>.accounts.ondemand.com/saml2/idp/sso?sp=<Entity ID of Ariba application>

If the test is successful you can proceed with the next steps to further configure the application to support both corporate and non-corporate users. The process to configure a corporate identity provider with IAS is beyond the scope of this blog and already well documented and covered in other blogs. I've listed just a few resources you can use to setup your corporate identity provider with IAS:
- https://help.sap.com/docs/identity-authentication/identity-authentication/corp-idp-configure-trust-w...
- https://blogs.sap.com/2020/07/10/connect-okta-to-sap-cloud-platform-identity-authentication-service/
- https://learn.microsoft.com/en-us/azure/active-directory/saas-apps/sap-hana-cloud-platform-identity-...
Configure the setup to support corporate and non-corporate users
- In the admin console of IAS, click Applications & Resources >> Applications.
- Select your Ariba application entry created earlier, and click Conditional Authentication.

- Change the Default Identity Provider to your corporate identity provider
- Enable Allow users stored in Identity Authentication service to log on and save your configuration.

- Navigate to Identity Providers >> Corporate Identity Providers.

- Select your corporate identity provider and click on Identity Federation.

- Confirm "Use Identity Authentication user store" toggle is enabled.

What IDP initiated URL do I use to authenticate corporate and non-corporate users?
Authenticate with SAP Cloud Identity (non-corporate users)
https://<IASTenantID>.accounts.ondemand.com/saml2/idp/sso?sp=<Entity ID of Ariba application>&idp=<IASTenantID>.accounts.ondemand.com

User will see the IAS login screen and must specify an IAS username and password to authenticate.
Authenticate with Corporate IDP (corporate users)
https://<IASTenantID>.accounts.ondemand.com/saml2/idp/sso?sp=<Entity ID of Ariba application>

User will be redirected to the login screen of the corporate identity provider and must specify the corporate IDP credentials to authenticate.
Happy reading!
- SAP Managed Tags:
- SAP Cloud Identity Services,
- SAP Ariba Buying and Invoicing
Labels:
2 Comments
You must be a registered user to add a comment. If you've already registered, sign in. Otherwise, register and sign in.
Labels in this area
-
ABAP CDS Views - CDC (Change Data Capture)
2 -
AI
1 -
Analyze Workload Data
1 -
BTP
1 -
Business and IT Integration
2 -
Business application stu
1 -
Business Technology Platform
1 -
Business Trends
1,658 -
Business Trends
92 -
CAP
1 -
cf
1 -
Cloud Foundry
1 -
Confluent
1 -
Customer COE Basics and Fundamentals
1 -
Customer COE Latest and Greatest
3 -
Customer Data Browser app
1 -
Data Analysis Tool
1 -
data migration
1 -
data transfer
1 -
Datasphere
2 -
Event Information
1,400 -
Event Information
66 -
Expert
1 -
Expert Insights
177 -
Expert Insights
295 -
General
1 -
Google cloud
1 -
Google Next'24
1 -
Kafka
1 -
Life at SAP
780 -
Life at SAP
13 -
Migrate your Data App
1 -
MTA
1 -
Network Performance Analysis
1 -
NodeJS
1 -
PDF
1 -
POC
1 -
Product Updates
4,577 -
Product Updates
341 -
Replication Flow
1 -
RisewithSAP
1 -
SAP BTP
1 -
SAP BTP Cloud Foundry
1 -
SAP Cloud ALM
1 -
SAP Cloud Application Programming Model
1 -
SAP Datasphere
2 -
SAP S4HANA Cloud
1 -
SAP S4HANA Migration Cockpit
1 -
Technology Updates
6,873 -
Technology Updates
419 -
Workload Fluctuations
1
Related Content
- SAP Cloud Identity Services - Identity Authentication with sap ecc in Technology Q&A
- Consuming SAP with SAP Build Apps - Mobile Apps for iOS and Android in Technology Blogs by SAP
- Demystifying the Common Super Domain for SAP Mobile Start in Technology Blogs by SAP
- Onboarding Users in SAP Quality Issue Resolution in Technology Blogs by SAP
- How to use AI services to translate Picklists in SAP SuccessFactors - An example in Technology Blogs by SAP
Popular Blog Posts
| Subject | Kudos |
|---|---|
|
|
|
|
|
|
|
|
|
|
|
|
|
|
|
|
|
|
|
Top kudoed authors
| User | Count |
|---|---|
| 36 | |
| 25 | |
| 17 | |
| 13 | |
| 8 | |
| 7 | |
| 6 | |
| 6 | |
| 6 | |
| 6 |