
- SAP Community
- Products and Technology
- Technology
- Technology Blogs by SAP
- Exploring Capturing Business Events in SAP Datasph...
Technology Blogs by SAP
Learn how to extend and personalize SAP applications. Follow the SAP technology blog for insights into SAP BTP, ABAP, SAP Analytics Cloud, SAP HANA, and more.
Turn on suggestions
Auto-suggest helps you quickly narrow down your search results by suggesting possible matches as you type.
Showing results for
Product and Topic Expert
Options
- Subscribe to RSS Feed
- Mark as New
- Mark as Read
- Bookmark
- Subscribe
- Printer Friendly Page
- Report Inappropriate Content
05-18-2023
9:36 PM
Hikers will see a flock of birds flying up from the trees when hunters in the distance shoot their prey, even before they would hear the gunshot. Sleepy-head spiders will feel vibrations through their bodies when insects hit their web, even before they would know what happened... Nature around us is full of events that trigger the curiosity of a closer look: "What's going on?"
The same can be said about business events flowing around in an IT landscape. Traditional approaches to data management and data analysis can often lead to lengthy preparation, consolidation, aggregation, and finally presentation processes, which inherently create a delay between a transaction happening in the source system, and the corresponding reports showing it in a visually appealing manner. Business events generated at the same time as a transaction could bypass this data wrangling to raise real-time alerts and notifications. Not to replace proper data management practices, but to extend them, or to be used in scenarios where source system access is not available such as external/B2B communication. Business events are very powerful yet often underestimated in what they can mean for your business: "This just happened!"
In this blog I'm taking a closer look at a scenario where business events, routed via an event broker, are stored in a data warehouse, so they can be used to enrich existing data sets and be presented immediately.
For this scenario, I will be using three solutions from the SAP BTP portfolio:
A trio of great solutions that make life easier in their own right, and even better together. There are of course viable alternatives to each, which I listed at the end of this blog.
(See also, as a next step: Enabling an Event Processing Flow for Bulk Database Operations)
On the right-hand side we see various areas of a potential system landscape, be it cloud or on-premise systems, backend or shop floor solutions. Events they emit can be captured by locally deployed or nearby cloud-hosted event brokers. These event brokers will make the events available to SAP Integration Suite, Advanced Event Mesh, which will put them on a queue for consumption. Cloud Integration will read the events from the queue, process them, and write them to a dedicated database schema residing on SAP Datasphere. From here, the event can be combined with other data sets and presented to the end users.
For our scenario, we will be using custom, CloudEvents-compliant events that represent created customer orders, as well as new customer complaints that are sent in:
Let's build up the solution in 3 parts:
Requirements: you have access to a tenant of SAP Integration Suite, Advanced Event Mesh, and already have (or can) create an event broker. If not, you can follow the steps here to create a tenant.
Create a cloud broker and open the Advanced Connection Options, and make sure the Secured AMQP Host is enabled.
Navigate to the Connect page and open the AMQP section. Note down the Username, Password and Secured AMQP Host. We will need these in the next step.
Optional: in case you want to create multiple event brokers in different geographies, you can create a mesh to link the different brokers together. For more information about creating a mesh can be found here.
Requirements: you have access to a tenant of SAP Datasphere, and already have (or can) create a space. If not, you can follow the steps here to create a tenant.
Create a dedicated schema in your Datasphere Space which will be used to write our events to. To do so, navigate to Database Access, and click on Create in the Database Users section.
Provide a Database User Name Suffix for your schema, and enable both read and write access.
Once created, we need to obtain the credentials to access it. Click the little information icon next to your user to open its details.
Take note of the Database User Name, Host Name, Port and Password. To see the password you have to request one by clicking the button. Make sure to note this password down as you won't be able to retrieve it again afterwards.
Finally, we can open the Database Explorer and log in with the credentials we just noted down.
In the explorer, open a new SQL window (use the little SQL icon on the left) and verify that you are connected to the correct schema. In order to store the events we will receive we need to create a new table.
For our first event (sap.demo.stores.ce.sales.orders.created.v1) we will create a table to store customer orders, which will have an ID, Customer, and Value field, as well as a timestamp of when the entry was created.
This is the SQL code I used to create the "E_ORDERS_CREATED" table:
Optional: repeat this last step for any additional tables you want to create for other events you wish to add later on.
SAP Datasphere uses an IP allowlist concept where external systems have to be registered with their IP address before they can connect. The external system in our case will be SAP Integration Suite.
First you need to find out where your tenant of cloud integration is hosted. You can see that in the URL, which for me shows "eu10-003":
Now look up the range of potential egress IP addresses this tenant can use via the documentation on the SAP Help portal: Regions and API Endpoints Available for the Cloud Foundry Environment.
This is the list of IP addresses you have to register in SAP Datasphere.
In the SAP Datasphere menu, click on System and Configuration. Open the IP Allowlist menu and select Trusted IPs. Now click on Add for each of the addresses to add them to your allowlist.
SAP Datasphere is now ready to receive and store our event!
Requirements: you have access to a tenant of SAP Integration Suite, which has the Cloud Integration capability enabled. If not, you can follow the steps here to create a tenant.
The event broker credentials we captured in part A and the Datasphere credentials from part B have to be uploaded into the credential store before we can use them.
Log in to SAP Integration Suite, open the Integrations Monitor and click on Security Material.
Use the Create menu on the right to create a new User Credential. Make sure to provide a unique Name and enter the User and Password from the event broker's AMQP credentials. Finally, click on Deploy to save this new credential.
Navigate back to the Monitor, which you can do by clicking on Overview in the breadcrumbs on top. Then navigate to JDBC Material.
Click Add to create a new data source, and provide the SAP Datasphere schema credentials noted down earlier. Make sure to change the Database Type to "SAP HANA Cloud", and use the correct format for the JDBC URL field: "jdbc:sap://{hostname}:{port}". Click on Deploy to store this credential.
Now we are coming to the interesting part: subscribing to the AMQP endpoint, and providing the events to SAP Datasphere. There are many ways to model this integration flow, from the most basic to the most complex. I chose a middle ground which is not too complex but does cater for flexibility in adding multiple event types over time (each with their own data model). To achieve this flexibility we will create some artifacts that will be referenced via dynamic attributes rather than code the integration flow for a specific event only.
The integration flow we will be building consists of 2 main integration processes and 1 local integration process. The diagram below highlights the different areas.
I advise to start with C, then B, and only add A when your tests are successful.
C1: a JSON To XML Converter which converts the incoming event from JSON to XML. It also adds the root element cloudevent. JSON payload is typically sent without root tag, and XML requires one, so that's why we need to add it here.
C2: an XML Validator which validates the event (now in XML) against an XSD schema. This XSD schema is a file we have to upload, you can find it below. This validation is an optional step, but highly recommended and you can verify that the event is properly structured before trying to process it.
This is the sample XSD schema file I came up with. It is a generic schema which should validate any CloudEvents-compliant event, as it contains the various (mandatory and optional) metadata elements, as well as a data element which is kept flexible as it will be different for every type of event.
C3: a Content Modifier which creates the "EventType" property that holds the type of event, as deducted from the event XML. This information is important for the next step.
C4: a Groovy Script step where we will reference a Script Collection. To make sure our approach remains dynamic, we will not create a local script file but use a referenced Script Collection that we can maintain outside of this integration flow.
I used the following Groovy script "Determine_MappingFile" to deduct which message mapping to use for which event type. For more information on how to achieve dynamic message mapping, see the links mentioned in the code.
C5: a Router that verifies if the Groovy script was successful in selecting a mapping file. If not (and the MappingFile property still has the default "ref:NOT-MAPPED" value) we will generate an error. If the script was successful (selected as the default behavior) then we will continue with step C6.
C6: a Message Mapping step which will re-arrange the event XML payload to the HANA data model that corresponds to the received event type. Also this step has a Dynamic Reference to an external artifact (which we haven't created yet), so for now you can just provide the expression containing the name of the file as generated by the Groovy script.
We will now create the message mapping, so Save your integration flow and navigate back to your package by clicking on the package name in the breadcrumbs on top. In your package, add a Message Mapping.
The ID you provide for this artifact is important, because it will have to match the MappingFile property we set in the Groovy script (in my case: "Mapping_ORDERS"). Click on OK to create the item and click on the name to open it.
Open the Edit mode and click on Upload. Here we will upload an XSD file which contains both the data model of the event, as well as the data model of the HANA table. You can find a sample XSD file below.
Below is my sample XSD file "Mapping_ORDERS.xsd" which contains 4 elements:
This structure makes it easy later on when you want to add more event types: just duplicate this file and change the 2 bottom elements with the new data structure.
After uploading the XSD file, click on Add source message and select the file we just uploaded, and the cloudevent element. Do the same for the target message, where you will choose hana as the element.
Afterwards, your screen will contain the event structure on the left and the hana structure on the right. You see 2 red alerts in the target which we will resolve first. The outcome of this mapping will be a database insert transaction on our table, so we have to provide an action (which is "INSERT") and the name of our table (which is "E_ORDERS_CREATED"). We can do this by assigning a constant value to these items. Click the little arrow icon next to @action, choose Assign Constant and change the value to INSERT. Do the same for the table element with the value E_ORDERS_CREATED.
Then we can scroll down in both the source and the target structure and start mapping the actual data elements. Drag the items from the source to the target to create a link (line). If you want to play with some mapping functions you can create a calculation where the value column in HANA will be the product of quantity and amount from the event. You can create this calculation by searching for the multiply function in the Functions list and connecting it to the various input and output fields.
Now we can Save and Deploy this message mapping to make it available to the integration flow.
This concludes the local integration process.
This flow is rather straight-forward, and consists of 2 adapters and a single process step. Your integration flow will contain an empty integration process with a Sender and Receiver. You can use this to build this flow.
B1: an HTTPS Adapter which exposes this integration process via a public endpoint, without CSRF Protection (to make testing easier).
B2: a Process Call step which refers to the local integration process we just developed (flow C).
B3: a JDBC Adapter which connects to our database using the credentials we created earlier.
This would be a good time to test if everything works fine, before connecting to the event broker. Refer to the Deployment and Testing section below for guidance.
This flow is very similar to flow B, with the only difference that the starting point is now an event coming from the event broker.
A1: an AMQP Adapter which will connect to the event broker and receive the events from the queue. Use the AMQP connection details noted down earlier and enable Connect with TLS. On the Processing tab, provide the Queue Name of the queue you want to create in the event broker. Queue creation will happen automatically when this integration flow is deployed.
A2 and A3 are identical to B2 and B3.
To test the flow via the HTTP endpoint, you can use any client of your choice. I will be using Postman.
At this stage I assume you are familiar with the 2 prerequisite steps in obtaining credentials to test an integration flow outlined below. If not, please consult the documentation here.
Open your HTTP client (e.g. Postman) and create a new request with the following configuration:
The JSON body you can use to test is the following:
Execute the call and see if you received a positive response in the Message Processing Monitor: the successful processing, as well as the Custom Headers which display the EventType and MappingFile the integration flow used.
Now that our first test event has been created in the database, we can open SAP Datasphere again to see it there.
Open the Data Builder and make sure you are still in your correct Space. Click on New Graphical View.
In the menu with data sources, choose Sources, and expand your schema to see the table we created earlier. Now drag this table, drop it in the canvas next to "View 1" and confirm the Import Table pop-up.
When the table is successfully imported, click on View 1 and select the Data Viewer icon. This will open the panel at the bottom which will show the available records. We see indeed our event in the table, with the calculated VALUE column!
From here, you can take the SAP Datasphere journey further, and explore the variety of options it offers to consume this information in other data models and dashboards.
All what is left now is to test our scenario via the event broker as well.
For this we need to head back to the SAP Integration Suite, Advanced Event Mesh solution. You will see that the deployment of the integration flow triggered the creation of a queue. By default this queue is created with a configuration to retry messages forever. It is best to change that to make sure failed messages are discarded after a few attempts. If you're interested in reading more about retry options, have a look at a blog on the topic here.
For a productive scenario, it would be best to look into the usage of the Dead Message Queue (DMQ), which is described here.
We can now subscribe to the topics we are interested in. Subscriptions tell the event broker which events to assign to our queue, so without a subscription our queue will remain empty and no events will reach the integration flow.
Open the Subscriptions tab, click on +Subscription, specify our event type "sap.demo.stores.ce.sales.orders.created.v1" and click Create.
Now we can send a test event, so head back to your event broker in the Cluster Manager and click on Try Me!.
In the Publisher section, click on Connect to connect to the event broker, specify our event type as the Topic and paste the sample payload we used for the HTTP request in the Message field. I changed the id and the quantity of the payload to have a different value in the database.
Click on Publish to send the event.
Verifying that also this worked well, we can open SAP Datasphere again and click on the Refresh icon to see the latest data.
This confirms that the event was successfully processed!
As shown above, the integration is successful for a single event type, however the integration flow is designed to handle more than 1 event type.
To add more event types (e.g. customer complaints), you will have to do the following:
Did you notice we didn't have to change anything to the actual integration flow itself? That remains deployed as-is to keep stability in the environment.
I challenge you to extend our scenario with the additional "customer complaints" event!
This type of implementation can work if the volume of events is manageable. Once the volume grows it would be worthwhile to consider an approach in the integration flow which is more scalable, to step away from the 1 event = 1 database call constraint. There would be multiple possible approaches to achieve this (e.g. staging buffer, batch-mode, bulk fetch, ...) which can all be implemented via SAP Integration Suite, depending on your business scenario.
Alternative solution components:
Thinking about higher-volume throughput? See Enabling an Event Processing Flow for Bulk Database Operations
Were you able to build the scenario yourself? Great! Do you want to download my version so you can upload it to your own integration tenant? Also great! You can find the material here.
Feel free to leave a comment below or reach out to me for any questions or advice.
(edited in August 2023 to make the steps more concise)
Pro Tip: Are you a developer or integration designer who already know his way around SAP BTP? Then find out how to build integrations from and to cloud applications with SAP’s free learning content on SAP Integration Suite. Check out even more role-based learning resources and opportunities to get certified in one place on SAP Learning site.
The same can be said about business events flowing around in an IT landscape. Traditional approaches to data management and data analysis can often lead to lengthy preparation, consolidation, aggregation, and finally presentation processes, which inherently create a delay between a transaction happening in the source system, and the corresponding reports showing it in a visually appealing manner. Business events generated at the same time as a transaction could bypass this data wrangling to raise real-time alerts and notifications. Not to replace proper data management practices, but to extend them, or to be used in scenarios where source system access is not available such as external/B2B communication. Business events are very powerful yet often underestimated in what they can mean for your business: "This just happened!"
In this blog I'm taking a closer look at a scenario where business events, routed via an event broker, are stored in a data warehouse, so they can be used to enrich existing data sets and be presented immediately.
For this scenario, I will be using three solutions from the SAP BTP portfolio:
- SAP Integration Suite, Advanced Event Mesh: SAP's flagship event broker capable of high-volume, real-time, and complex geographically distributed eventing, based on Solace PubSub+ (service info).
- Cloud Integration capability of SAP Integration Suite: SAP's flagship enterprise middleware for SAP/non-SAP, internal/external and cloud/on-premise integration adopting a visual approach to integration modelling (service info).
- SAP Datasphere: SAP's flagship data management and data warehousing solution, providing data federation, data analysis and data presentation at scale (service info).
A trio of great solutions that make life easier in their own right, and even better together. There are of course viable alternatives to each, which I listed at the end of this blog.
(See also, as a next step: Enabling an Event Processing Flow for Bulk Database Operations)
High-level Architecture

On the right-hand side we see various areas of a potential system landscape, be it cloud or on-premise systems, backend or shop floor solutions. Events they emit can be captured by locally deployed or nearby cloud-hosted event brokers. These event brokers will make the events available to SAP Integration Suite, Advanced Event Mesh, which will put them on a queue for consumption. Cloud Integration will read the events from the queue, process them, and write them to a dedicated database schema residing on SAP Datasphere. From here, the event can be combined with other data sets and presented to the end users.
For our scenario, we will be using custom, CloudEvents-compliant events that represent created customer orders, as well as new customer complaints that are sent in:
- sap.demo.stores.ce.sales.orders.created.v1 (containing order information)
- sap.demo.stores.ce.support.complaint.new.v1 (containing complaint information)
Let's build up the solution in 3 parts:
A. The event broker(s)
B. The target database schema and table(s)
C. The integration flow (also available for download at the bottom)
A. Enabling AMQP on your event broker(s)
Requirements: you have access to a tenant of SAP Integration Suite, Advanced Event Mesh, and already have (or can) create an event broker. If not, you can follow the steps here to create a tenant.
Create a cloud broker and open the Advanced Connection Options, and make sure the Secured AMQP Host is enabled.

Navigate to the Connect page and open the AMQP section. Note down the Username, Password and Secured AMQP Host. We will need these in the next step.

Optional: in case you want to create multiple event brokers in different geographies, you can create a mesh to link the different brokers together. For more information about creating a mesh can be found here.
B. Setting up the target database schema and table(s)
Requirements: you have access to a tenant of SAP Datasphere, and already have (or can) create a space. If not, you can follow the steps here to create a tenant.
1. Create a schema
Create a dedicated schema in your Datasphere Space which will be used to write our events to. To do so, navigate to Database Access, and click on Create in the Database Users section.

Provide a Database User Name Suffix for your schema, and enable both read and write access.
Once created, we need to obtain the credentials to access it. Click the little information icon next to your user to open its details.

Take note of the Database User Name, Host Name, Port and Password. To see the password you have to request one by clicking the button. Make sure to note this password down as you won't be able to retrieve it again afterwards.
Finally, we can open the Database Explorer and log in with the credentials we just noted down.

In the explorer, open a new SQL window (use the little SQL icon on the left) and verify that you are connected to the correct schema. In order to store the events we will receive we need to create a new table.
For our first event (sap.demo.stores.ce.sales.orders.created.v1) we will create a table to store customer orders, which will have an ID, Customer, and Value field, as well as a timestamp of when the entry was created.
This is the SQL code I used to create the "E_ORDERS_CREATED" table:
CREATE TABLE "E_ORDERS_CREATED"(

    "CREATED" LONGDATE DEFAULT CURRENT_TIMESTAMP,

    "ID" NVARCHAR(50),

    "CUSTOMER" NVARCHAR(100),

    "VALUE" DOUBLE

);Optional: repeat this last step for any additional tables you want to create for other events you wish to add later on.
2. Grant access to the Cloud Integration IP address range
SAP Datasphere uses an IP allowlist concept where external systems have to be registered with their IP address before they can connect. The external system in our case will be SAP Integration Suite.
First you need to find out where your tenant of cloud integration is hosted. You can see that in the URL, which for me shows "eu10-003":

Now look up the range of potential egress IP addresses this tenant can use via the documentation on the SAP Help portal: Regions and API Endpoints Available for the Cloud Foundry Environment.

This is the list of IP addresses you have to register in SAP Datasphere.
In the SAP Datasphere menu, click on System and Configuration. Open the IP Allowlist menu and select Trusted IPs. Now click on Add for each of the addresses to add them to your allowlist.

SAP Datasphere is now ready to receive and store our event!
C. Creating the integration flow
Requirements: you have access to a tenant of SAP Integration Suite, which has the Cloud Integration capability enabled. If not, you can follow the steps here to create a tenant.
1. Store the event broker and Datasphere credentials
The event broker credentials we captured in part A and the Datasphere credentials from part B have to be uploaded into the credential store before we can use them.
Log in to SAP Integration Suite, open the Integrations Monitor and click on Security Material.
Use the Create menu on the right to create a new User Credential. Make sure to provide a unique Name and enter the User and Password from the event broker's AMQP credentials. Finally, click on Deploy to save this new credential.

Navigate back to the Monitor, which you can do by clicking on Overview in the breadcrumbs on top. Then navigate to JDBC Material.
Click Add to create a new data source, and provide the SAP Datasphere schema credentials noted down earlier. Make sure to change the Database Type to "SAP HANA Cloud", and use the correct format for the JDBC URL field: "jdbc:sap://{hostname}:{port}". Click on Deploy to store this credential.

2. Build the integration flow
Now we are coming to the interesting part: subscribing to the AMQP endpoint, and providing the events to SAP Datasphere. There are many ways to model this integration flow, from the most basic to the most complex. I chose a middle ground which is not too complex but does cater for flexibility in adding multiple event types over time (each with their own data model). To achieve this flexibility we will create some artifacts that will be referenced via dynamic attributes rather than code the integration flow for a specific event only.
The integration flow we will be building consists of 2 main integration processes and 1 local integration process. The diagram below highlights the different areas.
- A (AMQP to JDBC): this flow will listen to events and provide them to the local integration process for processing, and finally write them into our schema.
- B (HTTPS to JDBC): this flow is mainly used for testing purposes. It executes the same logic as flow A but it exposes an HTTP-endpoint which can be called via Postman to test.
- C (Local integration process): which will receive the event, validate it, transform it to the HANA data model and generate the SQL insert statement.

I advise to start with C, then B, and only add A when your tests are successful.
Building flow C (Local integration process)
C1: a JSON To XML Converter which converts the incoming event from JSON to XML. It also adds the root element cloudevent. JSON payload is typically sent without root tag, and XML requires one, so that's why we need to add it here.
C2: an XML Validator which validates the event (now in XML) against an XSD schema. This XSD schema is a file we have to upload, you can find it below. This validation is an optional step, but highly recommended and you can verify that the event is properly structured before trying to process it.
This is the sample XSD schema file I came up with. It is a generic schema which should validate any CloudEvents-compliant event, as it contains the various (mandatory and optional) metadata elements, as well as a data element which is kept flexible as it will be different for every type of event.
<xs:schema xmlns:xs="http://www.w3.org/2001/XMLSchema" attributeFormDefault="qualified" elementFormDefault="qualified">

    <xs:element name="cloudevent">

        <xs:complexType>

            <xs:all>

                <xs:element type="xs:string" name="id"/>

                <xs:element type="xs:string" name="source"/>

                <xs:element type="xs:string" name="type"/>

                <xs:element type="xs:string" name="specversion"/>

                <xs:element type="xs:string" name="eventtypeversion" minOccurs="0"/>

                <xs:element type="xs:string" name="datacontenttype" minOccurs="0"/>

                <xs:element name="data">

                    <xs:complexType>

                        <xs:sequence>

                            <xs:any minOccurs="0" maxOccurs="unbounded" processContents="skip"/>

                        </xs:sequence>

                    </xs:complexType>

                </xs:element>

            </xs:all>

        </xs:complexType>

    </xs:element>

</xs:schema>C3: a Content Modifier which creates the "EventType" property that holds the type of event, as deducted from the event XML. This information is important for the next step.
C4: a Groovy Script step where we will reference a Script Collection. To make sure our approach remains dynamic, we will not create a local script file but use a referenced Script Collection that we can maintain outside of this integration flow.
I used the following Groovy script "Determine_MappingFile" to deduct which message mapping to use for which event type. For more information on how to achieve dynamic message mapping, see the links mentioned in the code.
// More information on dynamic message mapping:

// SAP Blog: https://blogs.sap.com/2022/09/15/sap-integration-suite-dynamically-assign-and-execute-message-mappin...

// SAP Help: https://help.sap.com/docs/cloud-integration/sap-cloud-integration/creating-message-mapping-as-flow-s...

import com.sap.gateway.ip.core.customdev.util.Message;

def Message processData(Message message) {

    // Get the event type property from the previous step

    def EventType = message.getProperties().get("EventType");

    // Set default value for the mapping file

    def MappingFile = "NOT-MAPPED";


    // Use regular expressions to see if the event type contains a given string. This uses the find() method via the =~ operator. The resulting MappingFile has to be the id of the deployed Message Mapping artifact (see 'View Metadata' -> id)

         if(EventType =~ /orders\.created/)     MappingFile = "Mapping_ORDERS";

    else if(EventType =~ /orders\.changed/)     MappingFile = "Mapping_ORDERS";

    else if(EventType =~ /complaint\.new/)      MappingFile = "Mapping_COMPLAINTS";


    // Store the mapping file in a property for the next step, using the 'ref:' reference

    message.setProperty("MappingFile", "ref:${MappingFile}");


    // OPTIONAL:

    // Get the MPL to add custom headers so we can see it in the monitor

    def messageLog = messageLogFactory.getMessageLog(message);

    // Store the Event Type in the headers

    messageLog.addCustomHeaderProperty("EventType", EventType);

    // Store the Mapping File in the headers

    messageLog.addCustomHeaderProperty("MappingFile", MappingFile);


    return message;

}C5: a Router that verifies if the Groovy script was successful in selecting a mapping file. If not (and the MappingFile property still has the default "ref:NOT-MAPPED" value) we will generate an error. If the script was successful (selected as the default behavior) then we will continue with step C6.
C6: a Message Mapping step which will re-arrange the event XML payload to the HANA data model that corresponds to the received event type. Also this step has a Dynamic Reference to an external artifact (which we haven't created yet), so for now you can just provide the expression containing the name of the file as generated by the Groovy script.

We will now create the message mapping, so Save your integration flow and navigate back to your package by clicking on the package name in the breadcrumbs on top. In your package, add a Message Mapping.

The ID you provide for this artifact is important, because it will have to match the MappingFile property we set in the Groovy script (in my case: "Mapping_ORDERS"). Click on OK to create the item and click on the name to open it.
Open the Edit mode and click on Upload. Here we will upload an XSD file which contains both the data model of the event, as well as the data model of the HANA table. You can find a sample XSD file below.

Below is my sample XSD file "Mapping_ORDERS.xsd" which contains 4 elements:
- cloudevent: the structure of our event. You can see that the data element is using a reference, so this section is still generic and will remain the same for any event type.
- hana: the structure of the HANA SQL statement. More information on how to construct this SQL command can be found here. Also here you can see that the access element (which contains the data) is using a reference, so this section is still generic and will remain the same for any event type.
- EventDataStructure: the structure of the data element of our event. This part is specific to our "orders.created" event, and lists out the different data fields the event contains. Note that they are set to be optional fields, so that events that don't contain all fields can still be processed.
- HANADataStructure: the structure of the access element of the SQL statement. This part is specific to our "E_ORDERS_CREATED" table, and lists out the different columns it contains.
This structure makes it easy later on when you want to add more event types: just duplicate this file and change the 2 bottom elements with the new data structure.
<xs:schema attributeFormDefault="qualified" elementFormDefault="qualified"

    xmlns:xs="http://www.w3.org/2001/XMLSchema">

    <xs:element name="cloudevent">

        <xs:complexType>

            <xs:all>

                <xs:element type="xs:string" name="id"/>

                <xs:element type="xs:string" name="source"/>

                <xs:element type="xs:string" name="type"/>

                <xs:element type="xs:string" name="specversion"/>

                <xs:element type="xs:string" name="eventtypeversion" minOccurs="0"/>

                <xs:element type="xs:string" name="datacontenttype" minOccurs="0"/>

                <xs:element type="EventDataStructure" name="data" />

            </xs:all>

        </xs:complexType>

    </xs:element>

    <xs:element name="hana">

        <xs:complexType>

            <xs:sequence>

                <xs:element name="StoreEvent">

                    <xs:complexType>

                        <xs:sequence>

                            <xs:element name="dbTableName">

                                <xs:complexType>

                                    <xs:sequence>

                                        <xs:element type="xs:string" name="table" />

                                        <xs:element type="HANADataStructure" name="access" />

                                    </xs:sequence>

                                    <xs:attribute type="xs:string" name="action" use="required"/>

                                </xs:complexType>

                            </xs:element>

                        </xs:sequence>

                    </xs:complexType>

                </xs:element>

            </xs:sequence>

        </xs:complexType>

    </xs:element>

    <xs:complexType name="EventDataStructure">

        <xs:all>

            <xs:element type="xs:string" name="id" minOccurs="0"/>

            <xs:element type="xs:string" name="customer" minOccurs="0"/>

            <xs:element type="xs:string" name="product" minOccurs="0"/>

            <xs:element type="xs:integer" name="quantity" minOccurs="0"/>

            <xs:element type="xs:float" name="amount" minOccurs="0"/>

        </xs:all>

    </xs:complexType>

    <xs:complexType name="HANADataStructure">

        <xs:all>

            <xs:element type="xs:string" name="id" minOccurs="0"/>

            <xs:element type="xs:string" name="customer" minOccurs="0"/>

            <xs:element type="xs:float" name="value" minOccurs="0"/>

        </xs:all>

    </xs:complexType>

</xs:schema>
After uploading the XSD file, click on Add source message and select the file we just uploaded, and the cloudevent element. Do the same for the target message, where you will choose hana as the element.
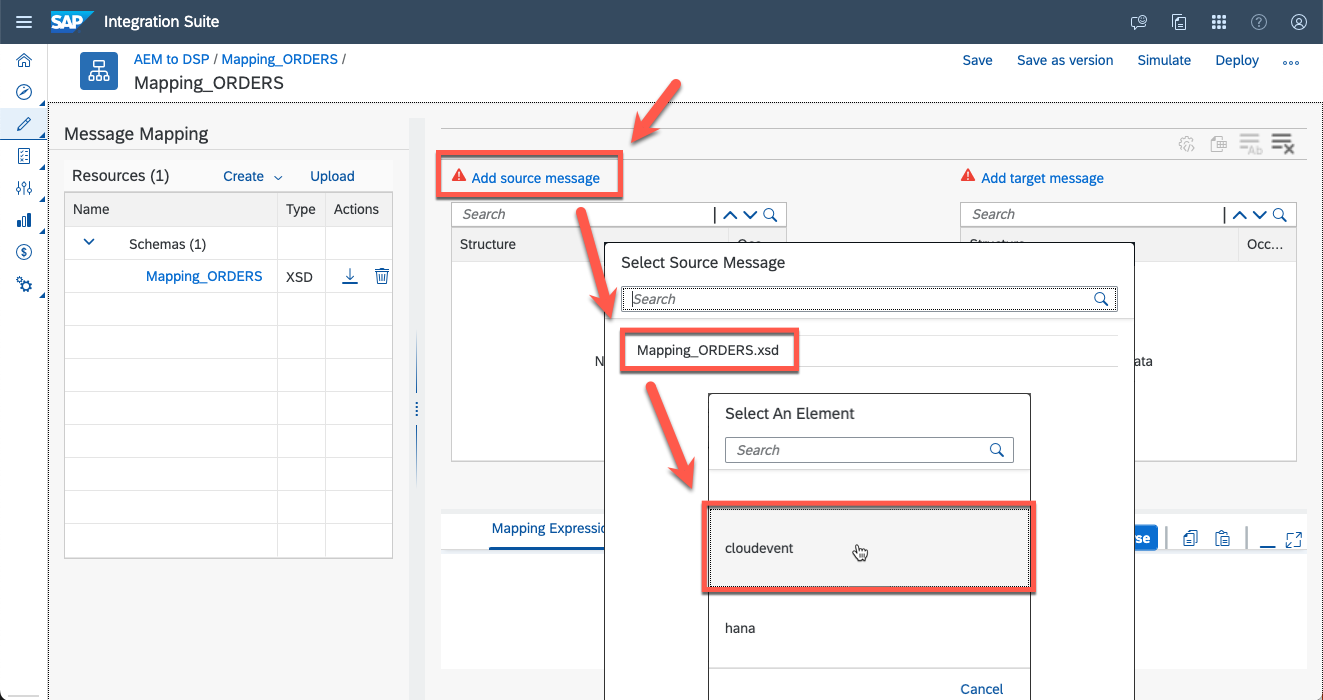
Afterwards, your screen will contain the event structure on the left and the hana structure on the right. You see 2 red alerts in the target which we will resolve first. The outcome of this mapping will be a database insert transaction on our table, so we have to provide an action (which is "INSERT") and the name of our table (which is "E_ORDERS_CREATED"). We can do this by assigning a constant value to these items. Click the little arrow icon next to @action, choose Assign Constant and change the value to INSERT. Do the same for the table element with the value E_ORDERS_CREATED.

Then we can scroll down in both the source and the target structure and start mapping the actual data elements. Drag the items from the source to the target to create a link (line). If you want to play with some mapping functions you can create a calculation where the value column in HANA will be the product of quantity and amount from the event. You can create this calculation by searching for the multiply function in the Functions list and connecting it to the various input and output fields.
Now we can Save and Deploy this message mapping to make it available to the integration flow.

This concludes the local integration process.
Building flow B (HTTPS to JDBC)
This flow is rather straight-forward, and consists of 2 adapters and a single process step. Your integration flow will contain an empty integration process with a Sender and Receiver. You can use this to build this flow.
B1: an HTTPS Adapter which exposes this integration process via a public endpoint, without CSRF Protection (to make testing easier).
B2: a Process Call step which refers to the local integration process we just developed (flow C).
B3: a JDBC Adapter which connects to our database using the credentials we created earlier.
This would be a good time to test if everything works fine, before connecting to the event broker. Refer to the Deployment and Testing section below for guidance.
Building flow A (AMQP to JDBC)
This flow is very similar to flow B, with the only difference that the starting point is now an event coming from the event broker.
A1: an AMQP Adapter which will connect to the event broker and receive the events from the queue. Use the AMQP connection details noted down earlier and enable Connect with TLS. On the Processing tab, provide the Queue Name of the queue you want to create in the event broker. Queue creation will happen automatically when this integration flow is deployed.

A2 and A3 are identical to B2 and B3.
Does it work?
Test via the HTTP endpoint
To test the flow via the HTTP endpoint, you can use any client of your choice. I will be using Postman.
At this stage I assume you are familiar with the 2 prerequisite steps in obtaining credentials to test an integration flow outlined below. If not, please consult the documentation here.
- create an instance of the Process Integration Runtime service, using the integration-flow plan
- create a service key which will provide you with a clientid and clientsecret
Open your HTTP client (e.g. Postman) and create a new request with the following configuration:
- Method: POST
- URL: the HTTP Endpoint you copied earlier
- Authorization: Basic Authentication using the clientid and clientsecret
- Body: raw input in the form of JSON
The JSON body you can use to test is the following:
{

    "type": "sap.demo.stores.ce.sales.orders.created.v1",

    "source": "sap/demo/stores",

    "eventtypeversion": "v1",

    "specversion": "1.0",

    "id": "26ac236a-6551-414f-9a9e-94fb150f78eb",

    "data": {

        "id": "ORD-15-223",

        "customer": "Best Run inc.",

        "product": "H100.E9 Compressor Valve",

        "quantity": 2,

        "amount": 285.99

    },

    "datacontenttype": "application/json"

}
Execute the call and see if you received a positive response in the Message Processing Monitor: the successful processing, as well as the Custom Headers which display the EventType and MappingFile the integration flow used.

Verify test message in SAP Datasphere
Now that our first test event has been created in the database, we can open SAP Datasphere again to see it there.
Open the Data Builder and make sure you are still in your correct Space. Click on New Graphical View.

In the menu with data sources, choose Sources, and expand your schema to see the table we created earlier. Now drag this table, drop it in the canvas next to "View 1" and confirm the Import Table pop-up.

When the table is successfully imported, click on View 1 and select the Data Viewer icon. This will open the panel at the bottom which will show the available records. We see indeed our event in the table, with the calculated VALUE column!

From here, you can take the SAP Datasphere journey further, and explore the variety of options it offers to consume this information in other data models and dashboards.
Test via the event broker
All what is left now is to test our scenario via the event broker as well.
For this we need to head back to the SAP Integration Suite, Advanced Event Mesh solution. You will see that the deployment of the integration flow triggered the creation of a queue. By default this queue is created with a configuration to retry messages forever. It is best to change that to make sure failed messages are discarded after a few attempts. If you're interested in reading more about retry options, have a look at a blog on the topic here.
For a productive scenario, it would be best to look into the usage of the Dead Message Queue (DMQ), which is described here.
We can now subscribe to the topics we are interested in. Subscriptions tell the event broker which events to assign to our queue, so without a subscription our queue will remain empty and no events will reach the integration flow.
Open the Subscriptions tab, click on +Subscription, specify our event type "sap.demo.stores.ce.sales.orders.created.v1" and click Create.


Now we can send a test event, so head back to your event broker in the Cluster Manager and click on Try Me!.
In the Publisher section, click on Connect to connect to the event broker, specify our event type as the Topic and paste the sample payload we used for the HTTP request in the Message field. I changed the id and the quantity of the payload to have a different value in the database.
Click on Publish to send the event.

Verify event message in SAP Datasphere
Verifying that also this worked well, we can open SAP Datasphere again and click on the Refresh icon to see the latest data.

This confirms that the event was successfully processed!
Extending the scenario
As shown above, the integration is successful for a single event type, however the integration flow is designed to handle more than 1 event type.
To add more event types (e.g. customer complaints), you will have to do the following:
- Add a subscription to your queue for the new event type (re-use the same queue).
- Add a table in the database schema if the new event type needs its own table.
- Create an XSD schema with the correct EventDataStructure and HANADataStructure, and use this to create and deploy a new message mapping artifact.
- Change and deploy the Groovy script to pick up this new message mapping artifact based on the event type.
Did you notice we didn't have to change anything to the actual integration flow itself? That remains deployed as-is to keep stability in the environment.
I challenge you to extend our scenario with the additional "customer complaints" event!

Final thoughts
This type of implementation can work if the volume of events is manageable. Once the volume grows it would be worthwhile to consider an approach in the integration flow which is more scalable, to step away from the 1 event = 1 database call constraint. There would be multiple possible approaches to achieve this (e.g. staging buffer, batch-mode, bulk fetch, ...) which can all be implemented via SAP Integration Suite, depending on your business scenario.
Alternative solution components:
- SAP Integration Suite, Advanced Event Mesh: you can also use SAP Event Mesh as broker.
- Cloud Integration capability of SAP Integration Suite: transforming the message between AMQP and JDBC can be done in various ways, e.g. SAP Data Intelligence or a SAP CAP application, but SAP Integration Suite has the advantage of easy message mapping.
- SAP Datasphere: you can also use SAP HANA Cloud directly with or without SAP Analytics Cloud.
Thinking about higher-volume throughput? See Enabling an Event Processing Flow for Bulk Database Operations
Material download
Were you able to build the scenario yourself? Great! Do you want to download my version so you can upload it to your own integration tenant? Also great! You can find the material here.
Feel free to leave a comment below or reach out to me for any questions or advice.
(edited in August 2023 to make the steps more concise)
Pro Tip: Are you a developer or integration designer who already know his way around SAP BTP? Then find out how to build integrations from and to cloud applications with SAP’s free learning content on SAP Integration Suite. Check out even more role-based learning resources and opportunities to get certified in one place on SAP Learning site.
- SAP Managed Tags:
- SAP Datasphere,
- SAP Integration Suite
Labels:
6 Comments
You must be a registered user to add a comment. If you've already registered, sign in. Otherwise, register and sign in.
Labels in this area
-
ABAP CDS Views - CDC (Change Data Capture)
2 -
AI
1 -
Analyze Workload Data
1 -
BTP
1 -
Business and IT Integration
2 -
Business application stu
1 -
Business Technology Platform
1 -
Business Trends
1,658 -
Business Trends
93 -
CAP
1 -
cf
1 -
Cloud Foundry
1 -
Confluent
1 -
Customer COE Basics and Fundamentals
1 -
Customer COE Latest and Greatest
3 -
Customer Data Browser app
1 -
Data Analysis Tool
1 -
data migration
1 -
data transfer
1 -
Datasphere
2 -
Event Information
1,400 -
Event Information
66 -
Expert
1 -
Expert Insights
177 -
Expert Insights
299 -
General
1 -
Google cloud
1 -
Google Next'24
1 -
Kafka
1 -
Life at SAP
780 -
Life at SAP
13 -
Migrate your Data App
1 -
MTA
1 -
Network Performance Analysis
1 -
NodeJS
1 -
PDF
1 -
POC
1 -
Product Updates
4,577 -
Product Updates
345 -
Replication Flow
1 -
RisewithSAP
1 -
SAP BTP
1 -
SAP BTP Cloud Foundry
1 -
SAP Cloud ALM
1 -
SAP Cloud Application Programming Model
1 -
SAP Datasphere
2 -
SAP S4HANA Cloud
1 -
SAP S4HANA Migration Cockpit
1 -
Technology Updates
6,873 -
Technology Updates
426 -
Workload Fluctuations
1
Related Content
- Not able to see run button on dataflow in Technology Q&A
- Exploring Integration Options in SAP Datasphere with the focus on using SAP extractors - Part II in Technology Blogs by SAP
- 10+ ways to reshape your SAP landscape with SAP Business Technology Platform – Blog 4 in Technology Blogs by SAP
- Top Picks: Innovations Highlights from SAP Business Technology Platform (Q1/2024) in Technology Blogs by SAP
- What’s New in SAP Datasphere Version 2024.8 — Apr 11, 2024 in Technology Blogs by Members
Top kudoed authors
| User | Count |
|---|---|
| 40 | |
| 25 | |
| 17 | |
| 14 | |
| 8 | |
| 7 | |
| 7 | |
| 7 | |
| 6 | |
| 6 |