- SAP Community
- Products and Technology
- Technology
- Technology Blogs by SAP
- Using Java Functionality from your ABAP Programs
Technology Blogs by SAP
Learn how to extend and personalize SAP applications. Follow the SAP technology blog for insights into SAP BTP, ABAP, SAP Analytics Cloud, SAP HANA, and more.
Turn on suggestions
Auto-suggest helps you quickly narrow down your search results by suggesting possible matches as you type.
Showing results for
Product and Topic Expert
Options
- Subscribe to RSS Feed
- Mark as New
- Mark as Read
- Bookmark
- Subscribe
- Printer Friendly Page
- Report Inappropriate Content
05-18-2023
10:56 PM
Introduction
In this blog, I will show you a simple way to leverage Java functionality, for example open-source components available as Jar files, from within your ABAP programs. For this sample, I picked the Apache POI library, which provides functionality for reading and writing files in Microsoft Office formats like Word and Excel. I will use this library for converting ABAP data contained in an internal table to an Excel file. But of course, there are no limits to your imagination here, as there is a wealth of available Java libraries for all kinds of tasks. You can use the techniques presented in this blog, for making any Jar file/Java API accessible to your ABAP projects.
As middleware, which bridges the gap between ABAP and Java, we use the SAP Business Connector.
Prerequisites
The reader should have some basic skills in Java programming as well as in ABAP programming. Some basic know-how about SAP Business Connector is helpful, but not required.
Preparation
Here is a summary of the necessary technical preparations that need to be performed, before this scenario can work. I won’t go into the details, but rather refer to the standard documentation.
First of all, an SAP Business Connector needs to be installed somewhere, unless your company is already using one for other tasks (like Elster tax reporting or communication with external business partners). For development or proof of concepts, it can easily be installed on your frontend PC or notebook, but for productive scenarios it should best be installed for example on one of the application servers of your ABAP system. If no SAP BC is yet installed in your environment, take a look at the Installation Guide for download and installation instructions:
https://support.sap.com/en/product/connectors/bc/details.html?anchorId=section_295234589
For this demo, I am using an SAP BC installed locally on my notebook (“localhost”).
Next, in the SAP BC UI, setup connection information for your backend system and start an RFC Listener as described in the SAP Adapter Guide, chapter 4, page 4-7ff.
And finally, you need to download the POI library from the Apache homepage. I used the archive poi-bin-5.2.3-20220909.zip from the Apache binary archive:
https://archive.apache.org/dist/poi/release/bin/
General information about the POI project can be found on its homepage:
https://poi.apache.org/
Setting up the Java Side
In the following, we are going to plug in the POI library into the SAP BC and make it callable from ABAP. For this, start the SAP BC Developer tool and log in to your SAP BC Server. (After a fresh installation, the SAP BC listens on port 5555 and accepts the credentials Administrator with password manage, which should of course be changed in a productive installation.) Create a new package, which we name ExcelProcessor:

Create New Package
Within this package, create a nested folder named demo/excel and within this a new Java Service named create. The end result should look like this:

Create New Java Service
Now the time has come to plug in the POI library into our new ExcelProcessor package. For this, switch to the file system where SAP BC Server is installed, unzip the poi-bin-5.2.3-20220909.zip file into a temporary directory and then copy the files
- commons-codec-1.15.jar
- commons-collections4-4.4.jar
- commons-io-2.11.0.jar
- commons-math3-3.6.1.jar
- log4j-api-2.18.0.jar
- poi-5.2.3.jar
into the directory sapbc481\Server\packages\ExcelProcessor\code\jars.
Afterwards, switch to the SAP BC admin UI, “Packages --> Management” and reload the ExcelProcessor package once. This is necessary to update the Java CLASSPATH and make our new jars available to the Java VM.
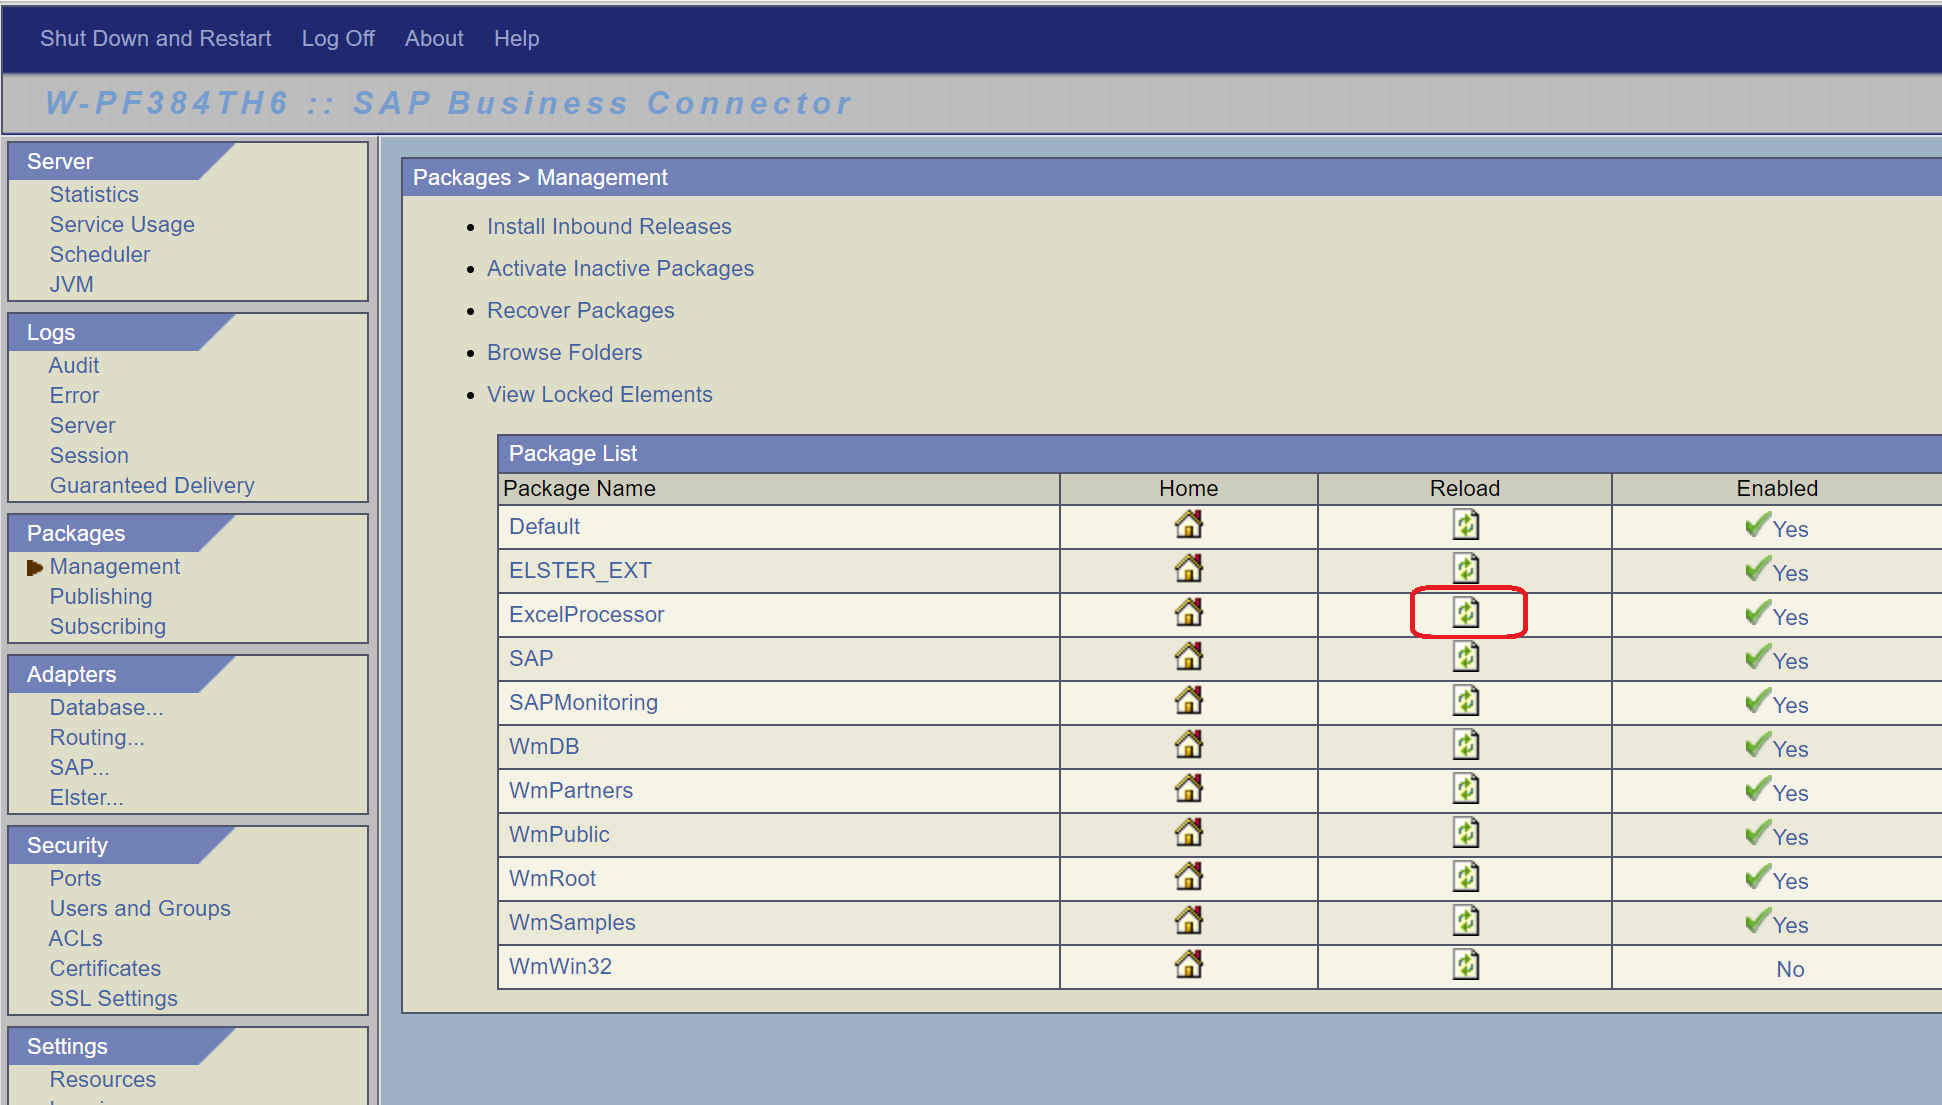
Reload Package
Now we are ready to use the Java classes contained in these jar files from our SAP BC Java Service demo.excel:create that we had created previously. To do this, switch back to the Developer, go to the Shared tab of that Java Service and add the following six imports. The first three are helper classes we need, and the rest pulls in the Apache classes used for creating the Excel sheet.

Java Imports for POI
Now we can fill the Source tab of the Service with the following Java code:
IDataCursor c = pipeline.getCursor();

if (!c.first("table")) throw new ServiceException("Missing input table");

Object input = c.getValue();


Table tab = null;

IData[] idata = null;

boolean isTab = true;

int numRows = 0, numCols = 0, i, j;


if (input instanceof Table){

	tab = (Table)input;

	numRows = tab.getRowCount();

}

else if (input instanceof IData[]){

	idata = (IData[])input;

	numRows = idata.length;

	isTab = false;

}

else{

	c.destroy();

	throw new ServiceException("Unsupported input type " + input.getClass().getName());

}


if (numRows == 0){

	c.destroy();

	throw new ServiceException("Input table is empty");

}


String[] colNames = null;

if (isTab) colNames = tab.getColumnNames();

else{

	IDataCursor temp = idata[0].getCursor();

	Vector<String> vec = new Vector<String>();

	while (temp.next()) vec.add(temp.getKey());

	temp.destroy();

	colNames = new String[vec.size()];

	for (i=0; i<colNames.length;++i) colNames[i] = vec.elementAt(i);

}

numCols = colNames.length;


if (numCols == 0){

	c.destroy();

	throw new ServiceException("Input table is empty");

}


Values line;

try{

	ByteArrayOutputStream out = new ByteArrayOutputStream();


	Workbook wbook = new HSSFWorkbook();

	Sheet sheet = wbook.createSheet();

	wbook.setSheetName(0, "data");


	for (i=0; i<numRows; ++i) sheet.createRow(i);

	sheet.createRow(i);


	Font font = wbook.createFont();

	font.setFontName(HSSFFont.FONT_ARIAL);

	font.setFontHeightInPoints((short)14);

	font.setBold(true);

	font.setColor(Font.COLOR_RED );

	CellStyle cstyle = wbook.createCellStyle();

	cstyle.setFont(font);

	cstyle.setFillForegroundColor(IndexedColors.LIGHT_YELLOW.index);

	cstyle.setFillPattern(FillPatternType.SOLID_FOREGROUND);


	Row r = sheet.getRow(0);

	Cell cell = null;

	for (j=0; j<numCols; ++j){

		cell = r.createCell(j);

		cell.setCellStyle(cstyle);

		cell.setCellValue(colNames[j]);

	}


	for (i=0; i<numRows; ++i){

		if (isTab) line = tab.getRow(i);

		else line = Values.use(idata[i]);

		r = sheet.getRow(i+1);

		for (j=0; j<numCols; ++j){

			cell = r.createCell(j);

			cell.setCellValue(line.getString(colNames[j]));

		}

	}


	for (j=0; j<numCols; ++j){

		sheet.autoSizeColumn(j);

	}


	wbook.write(out);

	out.flush();

	byte[] data = out.toByteArray();

	c.insertAfter("excelData", data);

}

catch (Exception e){

	throw new ServiceException(e);

}

finally{

	c.destroy();

}
A short explanation of what this code does: it takes an input object of type Table (which is the Business Connector’s Java representation of an ABAP internal table) and the fieldnames of that table. These fieldnames are then used as column names in the header line of the Excel sheet, bold red with a yellow background. Then it loops over the table, and for each table row, creates a row in the Excel sheet and fills the field values of the table row into the corresponding cells in the Excel row. At the end, the Excel data is converted to a byte[], which can then be used for further processing (for example returned to the ABAP system in an XSTRING exporting parameter, written to a local file, added to an Email as an attachment, or whatever).
Note that the above code creates only a very simple Excel sheet and uses only a small portion of the POI library’s functionality. But the purpose of this blog is to illustrate the general techniques used for making a Java library accessible to your SAP backend ABAP programs, and not to explain the finer details of the POI library. If you are interested in deeper know-how about this library, please take a look at the samples and tutorials on the POI homepage as well as at the JavaDoc contained in the poi-bin-5.2.3-20220909.zip archive.
For advanced SAP BC users, let me point out that our create Service accepts an alternative input in form of an IData array. This allows the Service to also process input data that was created for example by a Flow mapping or by the XML parser, in addition to input data received in an ABAP internal table.
In the end, switch to the Input/Output tab and create an input of type RecordList and an output of type Object as shown in the screenshot. Now our Service is ready to be used in various scenarios.

Input/Ouput of demo.excel:create
Creating an Excel Sheet from ABAP
The Business Connector Service, we created in the previous chapter, can now be used generically for converting any arbitrary ABAP internal table to an Excel file. We only need a function module with a tables parameter. Normally, you would create your own empty function module with the right signature for the task at hand, but to limit the amount of ABAP coding necessary for this example, I picked an existing function module with a simple table that is available in every SAP system: BAPI_USER_GETLIST. In order to receive and process calls for this function module on the SAP BC, we need to create an RFC Inbound Map and link it to the demo.excel:create Service from the previous chapter. This is done as follows:
In the SAP BC admin UI, go to “Adapters --> SAP” and click on the blue M icon in the “Maps” column. Enter the name BAPI_USER_GETLIST, choose direction “SAP --> SAP BC” and click “Add Map”. Fill the next screen as follows. Note that the field “Generate for Listener” is automatically prefilled with the name of your RFC Listener (see chapter “Preparation”), if you defined only one Listener for this SAP system.

Afterwards, switch back to the Developer and click the “Refresh” button. The RFC Inbound Map we just created, becomes visible. Select it, right-click on it and choose “Lock” to go into edit mode. Now we need to make two more modifications to that Inbound Map:
- We need to tell the demo.excel:create Service, which table to use as input. Go to the Flow tab, mark the first step “targetService” and then just map the USERLIST table parameter to the Service’s input:

- We need to do something with the resulting output excelData. For simplicity, we just save it into a local file. For this we can re-use a Service from the WmSamples package: pub.compress.demo:writeToFile. We only need to add it to the RFC Inbound Map as an additional step after the “targetService” step. Click the “Insert” button, open the WmSamples package and browse to the abovementioned Service:

Afterwards, map the excelData output of demo.excel:create to the bytes input of pub.compress.demo:writeToFile and fill filePath and fileName for example with “C:\temp” and “tabledata.xls”.

Now everything is in place to call our Excel Service from ABAP. For this, create a little sample report as follows:
REPORT Z_CALL_EXCEL_PROC.


DATA user_list type table of BAPIUSNAME.

DATA wa_user_list type BAPIUSNAME.

DATA error(120).


wa_user_list-username = '007'.

wa_user_list-firstname = 'James'.

wa_user_list-lastname = 'Bond'.

wa_user_list-fullname = 'Mr. James Bond'.

append wa_user_list to user_list.


wa_user_list-username = 'MOUSEMI'.

wa_user_list-firstname = 'Mickey'.

wa_user_list-lastname = 'Mouse'.

wa_user_list-fullname = 'Mr. Mickey Mouse'.

append wa_user_list to user_list.


wa_user_list-username = 'DUCKDO'.

wa_user_list-firstname = 'Donald'.

wa_user_list-lastname = 'Duck'.

wa_user_list-fullname = 'Mr. Donald Duck'.

append wa_user_list to user_list.


wa_user_list-username = 'DUCKDA'.

wa_user_list-firstname = 'Daisy'.

wa_user_list-lastname = 'Duck'.

wa_user_list-fullname = 'Ms. Daisy Duck'.

append wa_user_list to user_list.


CALL FUNCTION 'BAPI_USER_GETLIST' DESTINATION 'SBC_P34837'

  TABLES

    USERLIST = user_list

  EXCEPTIONS

    SYSTEM_FAILURE = 1 MESSAGE error

    COMMUNICATION_FAILURE = 2 MESSAGE error.


if sy-subrc ne 0.

  write at / error.

else.

  write at / 'Success'.

endif.
Note that when making a remote function call (DESTINATION ‘X’), one should always catch the two exceptions SYSTEM_FAILURE and COMMUNICATION_FAILURE, as it can always be, that the remote partner runs into a problem or that there are network problems. (You can test this for example by commenting out the code lines that fill the four rows into the user_list table and then executing the report. Instead of ‘Success’, the report will now write the error message from our Java code above: ‘Input table is empty’…!)
After executing the above program, the following Excel file will be written in C:\temp of your notebook (or wherever the SAP BC is running):

The Resulting Excel File
Summary
In the current blog, you have learned one possibility of how Java functionality can be used from backend ABAP programs with very little effort. Once an SAP BC is installed somewhere in the landscape, making a new Java library available to the ABAP side is as simple as
- downloading and copying the required Jar files into the correct directory
- performing a few customizing steps on the SAP BC
- writing a few lines of glue code (or Flow mappings) that map the input data from ABAP to the Java APIs and the output from the Java APIs back to the function module’s exporting/tables parameters
- creating an empty function module with the right signature (or “mis-using” an existing one…) and calling it from the ABAP code via CALL FUNCTION.
If you want to get deeper into some of the technologies used here, like how to use the Developer tool or how SAP BC Java and Flow Services work, I recommend some of the documentation available on https://support.sap.com/en/product/connectors/bc/details.html?anchorId=section_295234589 as follow-up reading, e.g. the Developer Tutorial, certain chapters in the Developer Guide (“Building Services using Java”) or the chapters about sending & receiving RFC calls in the SAP Adapter Guide.
- SAP Managed Tags:
- ABAP Connectivity,
- ABAP Extensibility,
- Java,
- SAP Business Connector
Labels:
You must be a registered user to add a comment. If you've already registered, sign in. Otherwise, register and sign in.
Labels in this area
-
ABAP CDS Views - CDC (Change Data Capture)
2 -
AI
1 -
Analyze Workload Data
1 -
BTP
1 -
Business and IT Integration
2 -
Business application stu
1 -
Business Technology Platform
1 -
Business Trends
1,658 -
Business Trends
93 -
CAP
1 -
cf
1 -
Cloud Foundry
1 -
Confluent
1 -
Customer COE Basics and Fundamentals
1 -
Customer COE Latest and Greatest
3 -
Customer Data Browser app
1 -
Data Analysis Tool
1 -
data migration
1 -
data transfer
1 -
Datasphere
2 -
Event Information
1,400 -
Event Information
66 -
Expert
1 -
Expert Insights
177 -
Expert Insights
299 -
General
1 -
Google cloud
1 -
Google Next'24
1 -
Kafka
1 -
Life at SAP
780 -
Life at SAP
13 -
Migrate your Data App
1 -
MTA
1 -
Network Performance Analysis
1 -
NodeJS
1 -
PDF
1 -
POC
1 -
Product Updates
4,577 -
Product Updates
345 -
Replication Flow
1 -
RisewithSAP
1 -
SAP BTP
1 -
SAP BTP Cloud Foundry
1 -
SAP Cloud ALM
1 -
SAP Cloud Application Programming Model
1 -
SAP Datasphere
2 -
SAP S4HANA Cloud
1 -
SAP S4HANA Migration Cockpit
1 -
Technology Updates
6,872 -
Technology Updates
427 -
Workload Fluctuations
1
Related Content
- Supporting Multiple API Gateways with SAP API Management – using Azure API Management as example in Technology Blogs by SAP
- Struggling with Filters on Select - Fiori App in Technology Q&A
- Extend Your Crystal Reports Solutions in the DHTML Viewer With a Free Function Library in Technology Blogs by Members
- I created a table function, but in amdp I am not able to create table using sqlscript to append data in Technology Q&A
- HANA DB usage of JSON embedded functions in Technology Q&A
Popular Blog Posts
| Subject | Kudos |
|---|---|
|
|
|
|
|
|
|
|
|
|
|
|
|
|
|
|
|
|
|
Top kudoed authors
| User | Count |
|---|---|
| 42 | |
| 25 | |
| 17 | |
| 14 | |
| 9 | |
| 7 | |
| 6 | |
| 6 | |
| 6 | |
| 6 |