
- SAP Community
- Products and Technology
- Technology
- Technology Blogs by SAP
- Data Integration in Forms of SAP Build Process Aut...
Technology Blogs by SAP
Learn how to extend and personalize SAP applications. Follow the SAP technology blog for insights into SAP BTP, ABAP, SAP Analytics Cloud, SAP HANA, and more.
Turn on suggestions
Auto-suggest helps you quickly narrow down your search results by suggesting possible matches as you type.
Showing results for
Product and Topic Expert
Options
- Subscribe to RSS Feed
- Mark as New
- Mark as Read
- Bookmark
- Subscribe
- Printer Friendly Page
- Report Inappropriate Content
05-18-2023
3:51 PM
Introduction
Application development and UX-Design is a very important aspect for orchestrating processes across the entire IT-landscape. If you give your users a bad experience, chances are high that they won’t use your processes and lack adoption.
The Forms-Designer in SAP Build Processes Automation is a very good approach to create lightweight application that can be used by your business people in order to trigger workflow-instances as a self-service. This tool can be used without having any advanced IT-knowledge or experience in SAPUI5 development. Obviously, you will aways experience a trade-off between the ease of use and the sophistication of the development environment. But thanks to the latest advancements of the Forms-Designer we can create more specific and sophisticated applications.
One of those advancements is the possibility to connect to a backend data-source to validate workflow-context, allowing process participants to select from information managed in external systems. This removes the need to manually add fields and information when creating a form. Because sometimes users must work with data like materiel identification-numbers, company codes or employee IDs, which not everybody has right at hand.
It certainly comes with a lot of advantages:
- Better access to data for business-people
- User-friendly workflow experience
- Mapping of dynamic data to validate input
- Consistent data for process execution
In this blog I want to show you how you can establish a connectivity to a data collection from a S/4 HANA System to a workflow form in SAP Build Process Automation.
Before we start make sure, that you have access to the SAP Build Lobby and create a project for workflow development. Also make sure that your Actions-Project is fulfilling following specifications:
- Only JSON files are supported and the file size is limited to 5 MB.
- Open API specification files with versions 2.x.x and 3.x.x of JSON type are supported.
- Must include a GETrequest with an array.
- Must not have mandatory input parameters defined.
- To make an action available as a data source, define it's output by setting the Main Output Array
- To use the search feature for a data source, the action must have the $searchparameter defined.
Establish the connectivity
The first thing that you need is a API connectivity to an backend-system. In this case I have used the published API’s on the SAP Business Accelerator Hub - Please check out this tutorial that gives you more background information on this topic.
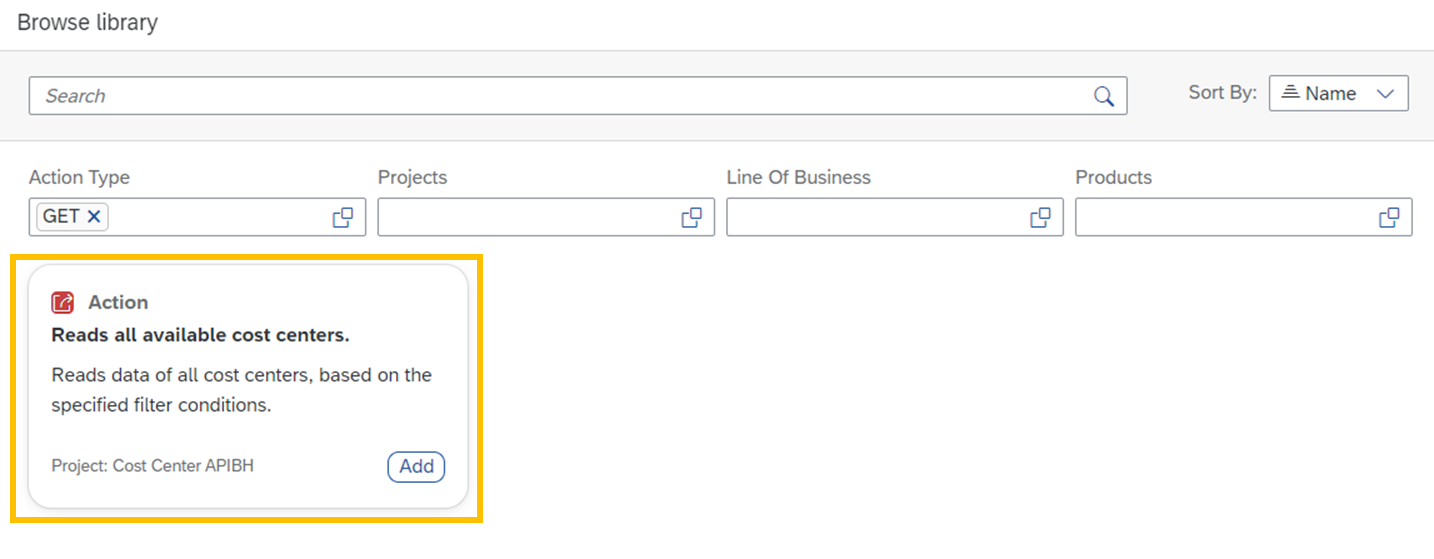
In my case I have selected the Cost Center API in my S/4 HANA Cloud system to retrieve essential financial data from my ERP. And we are going to use this API service to develop a workflow which allows users to change Cost Center related information.

As usual I created a Destination in my BTP Subaccount that points to my S/4 HANA OData service with the corresponding URL and authentication type. Make sure that the property sap.processautomation.enabled is set on true as you can see in the screenshot.

Once you have done that you can go ahead to your SAP Build Lobby and create a new project. Select Build an automated process and click on the Actions tile. Here you can give your project any name that you like and upload the JSON API specification. You can get the specification file from the SAP Business Accelerator Hub under the tab General for each API.

Once that is done you can start configuring your Actions project. In order to use the dropdown data-connectivity you need to select at least one Get-service. In my case I have used the Get-service to retrieve a list of cost centers from my S/4 system.

You can start adding header data if you need to. Since I am using the sandbox system from the Business Accelertor Hub, it is absolutely necessary for me to add the APIKey as the header. Select it as mandatory & static and enter the APIKey which you received from the Business Accelerator Hub.

The next step is very important and differentiates a dropdown Action from a regular Action. Under the tab Output you need to identify an array as the Main Output Array. Simply click on the desired array and select Tags. Here you need to select Main Output Array and identify the array as mandatory.

After this you can save and release your Actions project and publish it to the library. If you don’t do that it won’t appear in the development environment.
Build the process
Now you can start using this Actions inside your workflow project. Create a form (it doesn’t matter if it’s a form-trigger, regular form or approval step) and select the dropdown UI-Element and drag it into your user interface. I this scenario, a business user can use this workflow to change the owner of a cost center.

On the right hand side you can edit the specification of the dropdown UI. Click on From data set and search for the data source.

Select the action that we have created previously.
And now define which type of data needs to be displayed inside the dropdown menu for each individual cost center. After this you need to safe your project, release it and publish it so your business users can use it productively.
In my case I have selected:
- Cost Center
- Company Code
- Business Area
- Controlling Area

Et voilà! You have now successfully established a connection to a data source directly in the workflow formular. This will certainly grant a lot of benefits to your workflow userbase and makes your scenario more user-friendly with less data errors. Here are some examples how I incorporated this functionaliaty in my formulars.
This is the workflow formular to change cost center data:

And this is the formular to generate a Purchase Requisition. In this scenario it is also necessary to identify the right cost center where the PR needs to be assigned to:

To see LCNC in action, check out the SAP Low-Code/No-Code Learning Journey – designed to increase low-code/no-code skills and teach citizen developers the basic concepts of software development and learn how to build mobile apps for free. Check out LCNC and Discover BTP plus much more free learning at SAP Learning site.
Labels:
4 Comments
You must be a registered user to add a comment. If you've already registered, sign in. Otherwise, register and sign in.
Labels in this area
-
ABAP CDS Views - CDC (Change Data Capture)
2 -
AI
1 -
Analyze Workload Data
1 -
BTP
1 -
Business and IT Integration
2 -
Business application stu
1 -
Business Technology Platform
1 -
Business Trends
1,658 -
Business Trends
91 -
CAP
1 -
cf
1 -
Cloud Foundry
1 -
Confluent
1 -
Customer COE Basics and Fundamentals
1 -
Customer COE Latest and Greatest
3 -
Customer Data Browser app
1 -
Data Analysis Tool
1 -
data migration
1 -
data transfer
1 -
Datasphere
2 -
Event Information
1,400 -
Event Information
66 -
Expert
1 -
Expert Insights
177 -
Expert Insights
296 -
General
1 -
Google cloud
1 -
Google Next'24
1 -
Kafka
1 -
Life at SAP
780 -
Life at SAP
13 -
Migrate your Data App
1 -
MTA
1 -
Network Performance Analysis
1 -
NodeJS
1 -
PDF
1 -
POC
1 -
Product Updates
4,577 -
Product Updates
342 -
Replication Flow
1 -
RisewithSAP
1 -
SAP BTP
1 -
SAP BTP Cloud Foundry
1 -
SAP Cloud ALM
1 -
SAP Cloud Application Programming Model
1 -
SAP Datasphere
2 -
SAP S4HANA Cloud
1 -
SAP S4HANA Migration Cockpit
1 -
Technology Updates
6,873 -
Technology Updates
420 -
Workload Fluctuations
1
Related Content
- Start page of SAP Signavio Process Insights, discovery edition, the 4 pillars and documentation in Technology Blogs by SAP
- Consuming SAP with SAP Build Apps - Mobile Apps for iOS and Android in Technology Blogs by SAP
- Exploring Integration Options in SAP Datasphere with the focus on using SAP extractors - Part II in Technology Blogs by SAP
- SAP Build Process Automation -Unable to add Attended Trigger in Technology Q&A
- How to use AI services to translate Picklists in SAP SuccessFactors - An example in Technology Blogs by SAP
Top kudoed authors
| User | Count |
|---|---|
| 36 | |
| 25 | |
| 17 | |
| 13 | |
| 8 | |
| 7 | |
| 6 | |
| 6 | |
| 6 | |
| 6 |