
- SAP Community
- Products and Technology
- CRM and Customer Experience
- CRM and CX Blogs by Members
- SAP Service Cloud – Facebook Integration: Configur...
CRM and CX Blogs by Members
Find insights on SAP customer relationship management and customer experience products in blog posts from community members. Post your own perspective today!
Turn on suggestions
Auto-suggest helps you quickly narrow down your search results by suggesting possible matches as you type.
Showing results for
manson031
Explorer
Options
- Subscribe to RSS Feed
- Mark as New
- Mark as Read
- Bookmark
- Subscribe
- Printer Friendly Page
- Report Inappropriate Content
05-16-2023
9:10 AM
Dear All,
In this blog, I would like to share the updated configuration steps involved in integration of SAP Service Cloud with Facebook.
Scoping & Scoping Questions:
Creation of Facebook Social Media Channel:
Connect SAP Service Cloud with Facebook Channel:
Setup Channel by fetching the Account details from Facebook:
Create Social Media Import Runs (for Facebook):
With the above configuration steps,I hope the guide would be helpful for who would like to integrate their SAP Service Cloud system with Facebook, as this guide contains all the udpated steps for the integration.
I would be happy to share the working model with End-End Integration of SAP Service Cloud & Facebook with various scenarios. Please let me know in the COMMENTS section.
Last but not least,
If you liked reading my blog post, please LIKE the post.
If you have any queries/commensts, please COMMENT on the post.
Best Regards - Manson J
In this blog, I would like to share the updated configuration steps involved in integration of SAP Service Cloud with Facebook.
1. Pre-requisites for Integration:
- SAP C4C Administrator Access for configuration.
- Facebook access with Developer portal access (Please visit https://developers.facebook.com/ for registration and other details).
- Facebook page for integration & testing.
2. Configurations in Facebook:
Creation of Facebook App:
- Log in to Facebook App / website - https://www.facebook.com/
- If you already have Facebook account, log in to it.
- If new user, create a new Facebook account.
- Once you logged into Facebook, go to “Account (Profile Photo on top right) à Settings & Privacy à Settings”.

- Under “Privacy” tab, scroll down to bottom page and click on “Developers” to access Facebook’s Developer Portal.

- Clicking on “Developers” link take you to ‘Meta for Developers’ page with the same logged in user.
- Click on “My Apps” to App creation page.
- Click on “Create App” icon to start creating Facebook App for C4C Integration.

- On clicking “Create App”, a new page “Create an App” will be opened asking for selecting “Use Case”. Here select “Other” and click on ‘Next’.

- In next page, select App Type as “Business” and click on ‘Next’.
 Under “Details” tab, enter App Name, App Contact Email (automatically picked based on logged in user), Business Account (Optional). After entering all details, click on “Create App”.
- A new Facebook App is created, and you will see the below shown page.
 Go to “Settings à Basic”. This will open a dialog box asking for few details. Here, enter the needed details as shown.
- App ID & App Secret = Auto generated.
- Display Name = Auto picked the name that you entered during creation of App. If required, you can change the name.
- App Domains = crm.ondemand.com
- Contact Email = Auto picked from logged in user.
- Category = Select any suitable category from dropdown.Example: Business and Pages.

- Scroll to the bottom of the page and click on “+ Add platform” icon.
- A pop-up window will be opened asking for selecting the platform. Here, you can select in which platform, the app should be available.
- Example: In our case, platform should be C4C system. Hence, Select “Website” and click on ‘Next’.

- A website section will be added. Here, enter the URL of C4C tenant for which you wish to connect Facebook.
- After entering the ‘Website’ details, click on “Save Changes”.

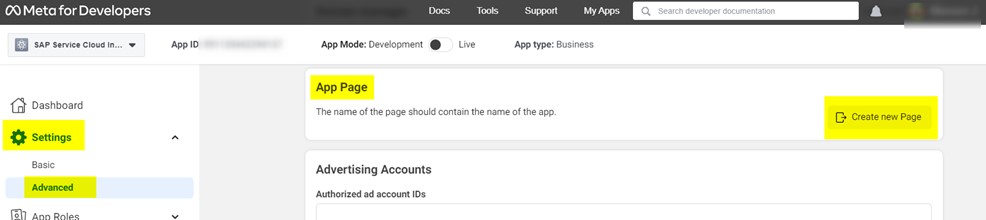
- Go to “Settings à Advanced”. This will open a dialog box asking for few details. Within this dialog box, go to “App Page” and click on “Create New Page” icon.
- On clicking “Create New Page” a new tab will be opened for creation of new Facebook page.
- Enter all needed details and click on “Create Page”
- Page Name = Please enter the page name same as Facebook App name. In our case, it will be “SAP Service Cloud Interface”.
- Category = Select one or more categories based on the nature of customer’s business Example: Internet Service Provider, telecommunication company, etc..
- Bio (Optional) = Enter a summary of the page.

- If needed, add all other details, and complete the Facebook page creation.
- Once the page is created, log in again to Facebook and go to “Settings à Advanced”.
- Go to “App Page” section and select the create Facebook page from the drop down. If you have more than one page, select all the needed pages for integration.
- After selecting the page, save the changes.

- Go to “Dashboard”, and select “Facebook Login for Business “ and click on ‘Set up’.

- Now a new page will be opened. Here, enter the Valid OAuth redirect URLs as https://myXXXXXX.crm.ondemand.com/sap/byd/oauth/facebook
- Here XXXXXX = denotes your C4C tenant ID. After entering, save the changes.

- Now all the Facebook settings needed for C4C Integration is now completed.
- If you go to “My Apps”, you will see your created App.

3. Configurations in SAP Service Cloud:
Scoping & Scoping Questions:
- As an Administrator, scope SAP C4C Service Cloud for Facebook integration and other related features. Business Configuration --> Implementation Projects --> Select your project --> Edit Project Scope --> Scoping & Questions.


Creation of Facebook Social Media Channel:
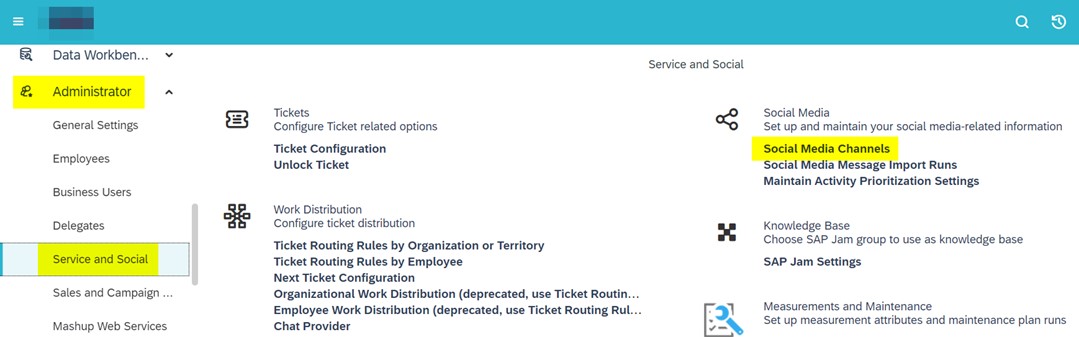
- As an Administrator, navigate to “Administrator --> Service and Social --> Social Media Channels”.

- Click on “New” button to create new Social Media Channel.
- On creation page, enter the following details.
- Social Media Channel Type à
- App ID = Enter the App ID from Facebook App that we have created (Settings -> Basics)
- App Secret = Enter App Secret from Facebook App that we have created. (Settings -> Basics)
- Run Initial Import From = Enter Date & Time from which you want to fetch the details from Facebook page.
- Log Level = Select any one based on your need.
- Direct Messages = Select any one based on your need.
- Remove Assigned Processor = Set to ‘Yes’ based on your need. (If set to Yes, then when a ticket is re-opened from this channel, then Processor (Assigned To) will be automatically removed.
- Create Ticket for Direct Message Only = Set to ‘Yes’ based on your need. When the switch is on, ticket is only created for direct message; when the switch is off, ticket is created for both direct message and public message.

Connect SAP Service Cloud with Facebook Channel:
- Click on “Connect with Channel” button to log on to Facebook channel website to complete the authentication.

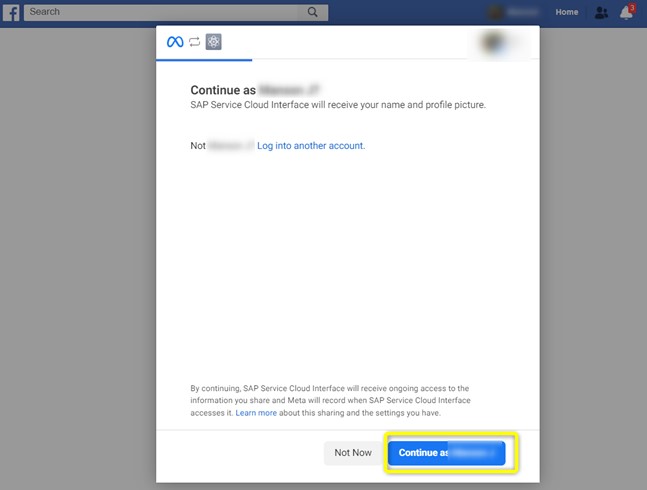
- Clicking on “Connect with Channel” will open a new tab asking you to logon to Facebook. Log on the same account you used to create the App.

- Once you successfully logged in, continue as the same admin user.
- In the next pop-up window, select the Opt In for future pages or only Existing pages. In existing pages, select our created page – SAP Service Cloud Interface.
- Click on “Continue”.

- Click on 'Save'.


- Now authentication is complete.

Setup Channel by fetching the Account details from Facebook:
- Click on “Get Account Details” button within social media channel creation page in C4C.

- On clicking on “Get Account Details” button, Facebook channel/page will be fetched and displayed.

- In the fetched channel, enter Channel ID, language, Select for Monitoring to ‘Yes’ and save the channel.

- Facebook social media channel is successfully created and configured.

Create Social Media Import Runs (for Facebook):
- As a administrator, go to “Administrator --> Service and social --> Social Media Message Import Runs”.

- Click on ‘New à Creation Run’ to create a new import run.

- In Import run creation page, enter Run Description and add the Channel ID that we have created in C4C.
- Activate the import run.

- New Import run is created.

- Select the created run and click on ‘Schedule’ button. Here you can schedule the create import run on timely basis as per your need.
- This run will then fetch the direct messages, comments, etc. from Facebook page.

- Once the configuration is done, all posts/broadcasts in facebook page, comments, likes, direct messages from Facebook will be transferred to SAP Service Cloud systems.
- Also, Service Employess can also reply,like,comment,direct message, etc from SAP Service Cloud to Facebook.
With the above configuration steps,I hope the guide would be helpful for who would like to integrate their SAP Service Cloud system with Facebook, as this guide contains all the udpated steps for the integration.
I would be happy to share the working model with End-End Integration of SAP Service Cloud & Facebook with various scenarios. Please let me know in the COMMENTS section.
Last but not least,
If you liked reading my blog post, please LIKE the post.
If you have any queries/commensts, please COMMENT on the post.
Best Regards - Manson J
- SAP Managed Tags:
- SAP Service Cloud,
- C4C Service
You must be a registered user to add a comment. If you've already registered, sign in. Otherwise, register and sign in.
Labels in this area
-
ABAP
1 -
API Rules
1 -
c4c
1 -
CRM
1 -
Custom Key Metrics
1 -
Customer Data
1 -
Determination
1 -
Determinations
1 -
Introduction
1 -
KYMA
1 -
Kyma Functions
1 -
open SAP
1 -
Sales and Service Cloud Version 2
1 -
Sales Cloud
1 -
Sales Cloud v2
1 -
SAP
1 -
SAP Community
1 -
SAP CPQ
1 -
SAP CRM Web UI
1 -
SAP Customer Data Cloud
1 -
SAP Customer Experience
1 -
SAP Integration Suite
1 -
SAP Sales Cloud v2
1 -
SAP Service Cloud v2
1 -
SAP Service Cloud Version 2
1 -
Service Cloud v2
1 -
Validation
1 -
Validations
1
Related Content
- When is the right time to compose? in CRM and CX Blogs by SAP
- Utility Product Integration Layer (UPIL) in S/4HANA Utilities for Customer Engagement – Part 1 in CRM and CX Blogs by Members
- How to Extend Order Integration from SAP Order Management Foundation to SAP S/4HANA in CRM and CX Blogs by SAP
- SAP Sales Cloud v2 - New Groupware Integration User- and Admin Interface in CRM and CX Blogs by SAP
- Delete & Rename Contract Account Name from SAP Cloud for Customer (C4C) in CRM and CX Blogs by Members
Top kudoed authors
| User | Count |
|---|---|
| 1 | |
| 1 | |
| 1 | |
| 1 | |
| 1 |