
- SAP Community
- Products and Technology
- Supply Chain Management
- SCM Blogs by SAP
- How to send Shipment document to from SAP ERP to B...
Supply Chain Management Blogs by SAP
Expand your SAP SCM knowledge and stay informed about supply chain management technology and solutions with blog posts by SAP. Follow and stay connected.
Turn on suggestions
Auto-suggest helps you quickly narrow down your search results by suggesting possible matches as you type.
Showing results for
Advisor
Options
- Subscribe to RSS Feed
- Mark as New
- Mark as Read
- Bookmark
- Subscribe
- Printer Friendly Page
- Report Inappropriate Content
05-16-2023
9:55 AM
Introduction
SAP Business Network for Logistics has introduced capability to send LE-TRA shipments to network and thus sharing this with carriers. On saving of Shipment in ECC, idoc SHPMNT05 will be triggered. Based on this idoc, LBN has provided out of the box mapping to LBN Freight order for confirmation APP. You will view the shipment document as a separate category.

In this document, we will share on how to setup shipment integration with LBN.
Limitations
- Only one delivery per shipment is supported.
1. Setup connection from S/4 to Business Network for Logistics
The required connection setup is like S/4 direct connection. You may refer to the blog on how to setup the connection
https://blogs.sap.com/2020/10/12/how-to-setup-direct-connection-from-your-on-prem-to-sap-logistics-b...
2. Create RFC destination
Transaction sm59

Host: https://l20398-iflmap.hcisbp.eu1.hana.ondemand.com
Port: 443
Path Prefix: /cxf/lbn/b2b/idoc/v1
In case you have a middleware ( SAP CI or SAP PI/PO ), you have to use the Host,Port and Path Prefix as per your middleware settings.

SSL value is based on the configuration you have during the setup of connection in the step1. If you have middleware, you may use basic authentication to your middleware system as well.
3. Output Control Settings:
Below set of configurations will trigger shipment IDOC outbound from ERP system
3.1 Creating Condition Tables:
- In the SAP ERP system, navigate to Customizing for Logistics Execution and choose Transportation Basic Transportation Functions-> Output Control ->Maintain Output Determination for Shipments-> Maintain Condition Tables .
- Choose Maintain Output Condition Table for Shipments.
- Create table between 900 and 999 and enter fields SHTYP and STTRG in the Selected fields screen area under Technical and Medium.
- Choose Condition ->Create .
- In the Table field enter a name (3-digit number) for the new condition table. Note that you can only choose names between 900 and 999.
- Choose Enter.
- Enter a description for the new condition table, for example, ShipmntTyp/OverallSta - Shipment Integration.
- Select the required fields for the condition table from the list of allowed fields for example, Shipment Type and Ov.transport status.
- Generate the new condition table.

3.2 Creating Access Sequences
1.In the SAP ERP system, navigate to Customizing for Logistics Execution and choose Transportation Basic Transportation Functions-> Output Control ->Maintain Output Determination for Shipments ->Maintain Access Sequence .
- Create an access sequence, for example, Z001
- Select Accesses in the dialog structure and enter the following data:
| No. | Table | Description | Requirement | Exclusive |
| <Next available Number> | Table you created in Creating condition Tables | <Description> | 0 | Not selected |
- Select your new entry and choose Fields in the dialog structure.
- In the Field Overview table, enter 0 in the Spec. Val. Source field for the entry with condition


3.3 Creating Output Types for Shipments
In the Customizing activity Maintain Output Types, you can define differnt condition types for the different situations in which SHPMNT IDocs are to be sent. Output types control how the SHPMNT IDoc is used to send a confirmation to Network:
- Output type ZLB1 generates an IDoc that sends a status notification to Network.
- Output type ZLB2 generates an IDoc that sends a confirmation to Network.
- Output type ZLB3 generates an IDoc that updates a freight document in Network based on changed delivery assignments to a SAP ERP shipment.
- Output type ZLB4 generates an IDoc that updates a freight order in Network based on changed item or handling unit assignments to a container handling unit of a SAP ERP shipment.
In the SAP ERP system, in Customizing for Logistics Execution, choose Transportation Basic Transportation Functions-> Output Control ->Maintain Output Determination for Shipments-> Maintain Output Types .

Enter the access sequence that you have created.
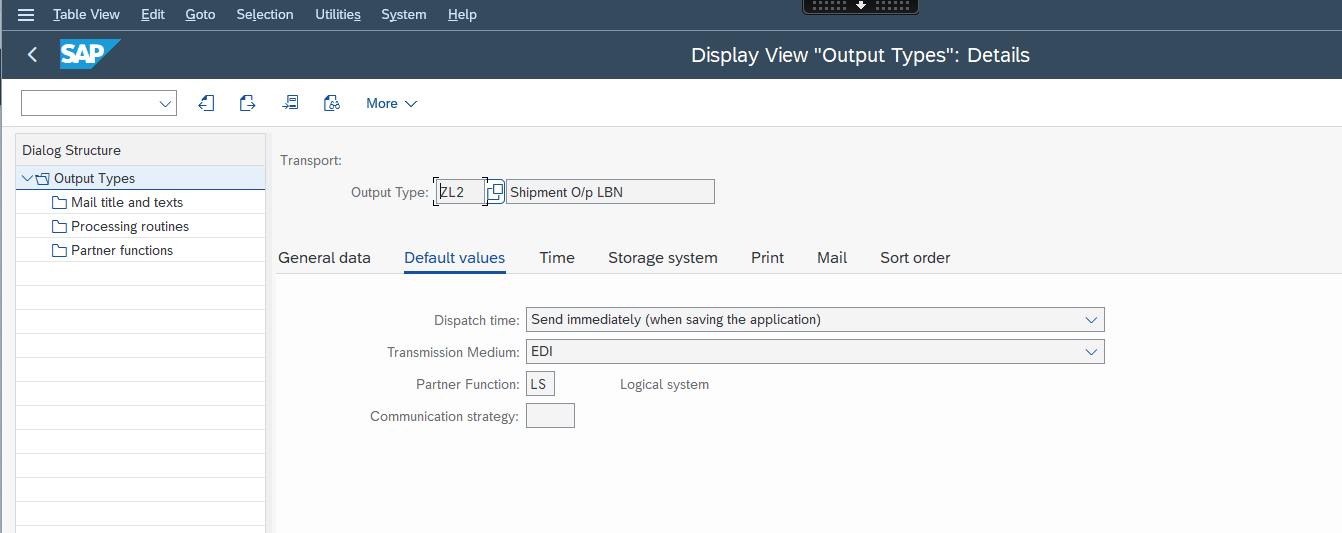


Repeat the above steps to create output types ZLB2, ZLB3, and ZLB4. Use the values as shown above
3.4 Defining Output Determination Procedures for Shipments
- In the SAP ERP system, navigate to Customizing for Logistics Execution and choose Transportation Basic Transportation Functions ->Output Control ->Maintain Output Determination for Shipments ->Maintain Output Determination Procedure .
- Create an output determination procedure such as ZSHIPO with the name Transport Output Ship. Outb.
- Select output determination procedure ZSHIPO and choose Control Data in the dialog structure.
- Assign output types to output determination procedure ZSHIPO by creating the following entries:

3.5 Assigning Output Determination Procedures to Shipment Types
- In the SAP ERP system, navigate to Customizing for Logistics Execution and choose Transportation Basic Transportation Functions-> Output Control-> Maintain Output Determination for Shipments-> Assign Output Determination Procedures .
- Create an entry for each relevant shipment type in the integration scenario and assign the output determination procedure and output type to the shipment type.

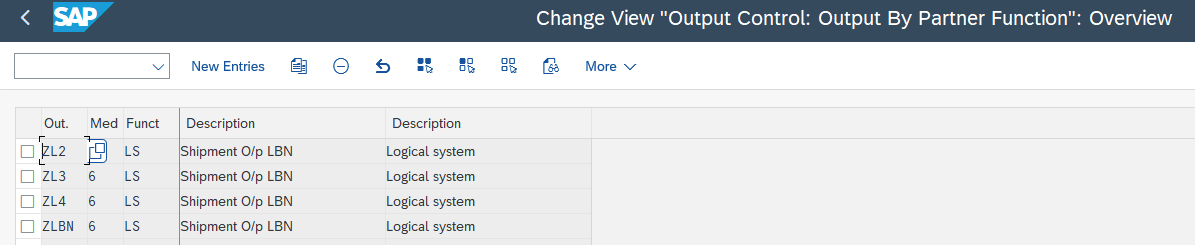
3.6 Assigning Output Types to Partner Functions
In the SAP ERP system, navigate to Customizing for Logistics Execution and choose Transportation Basic Transportation Functions-> Output Control-> Maintain Output Determination for Shipments-> Assign Output Types to Partner Functions
Assign medium 6 EDI and partner function LS (logical system) to each output type as follows:
3.7 Checking Output Control Settings
You can check the output control settings using test report RSNASTCK.
- Start report RSNASTCK. .
- Enter application V7 and choose Enter
- In the Select procedure to be checked dialog box, choose only active ones.
- Enter the shipment type and choose Enter
3.8 Creating Condition Records for Shipments
- On the SAP Easy Access screen of your SAP ERP system, choose Logistics Logistics Execution-> Master Data ->Output ->Shipment-> Create or call transaction VV71.
- Enter output type ZL1 as the context for the condition record.
- Create condition records for the condition table you created
- Create one entry for each shipment type and add value 0
- Repeat the above steps for remaining output types
4. Setting up of Partner Profile
Create Partner profile( Transaction we20)
For the Outbound create Separate Outbound entries for each of the output types.

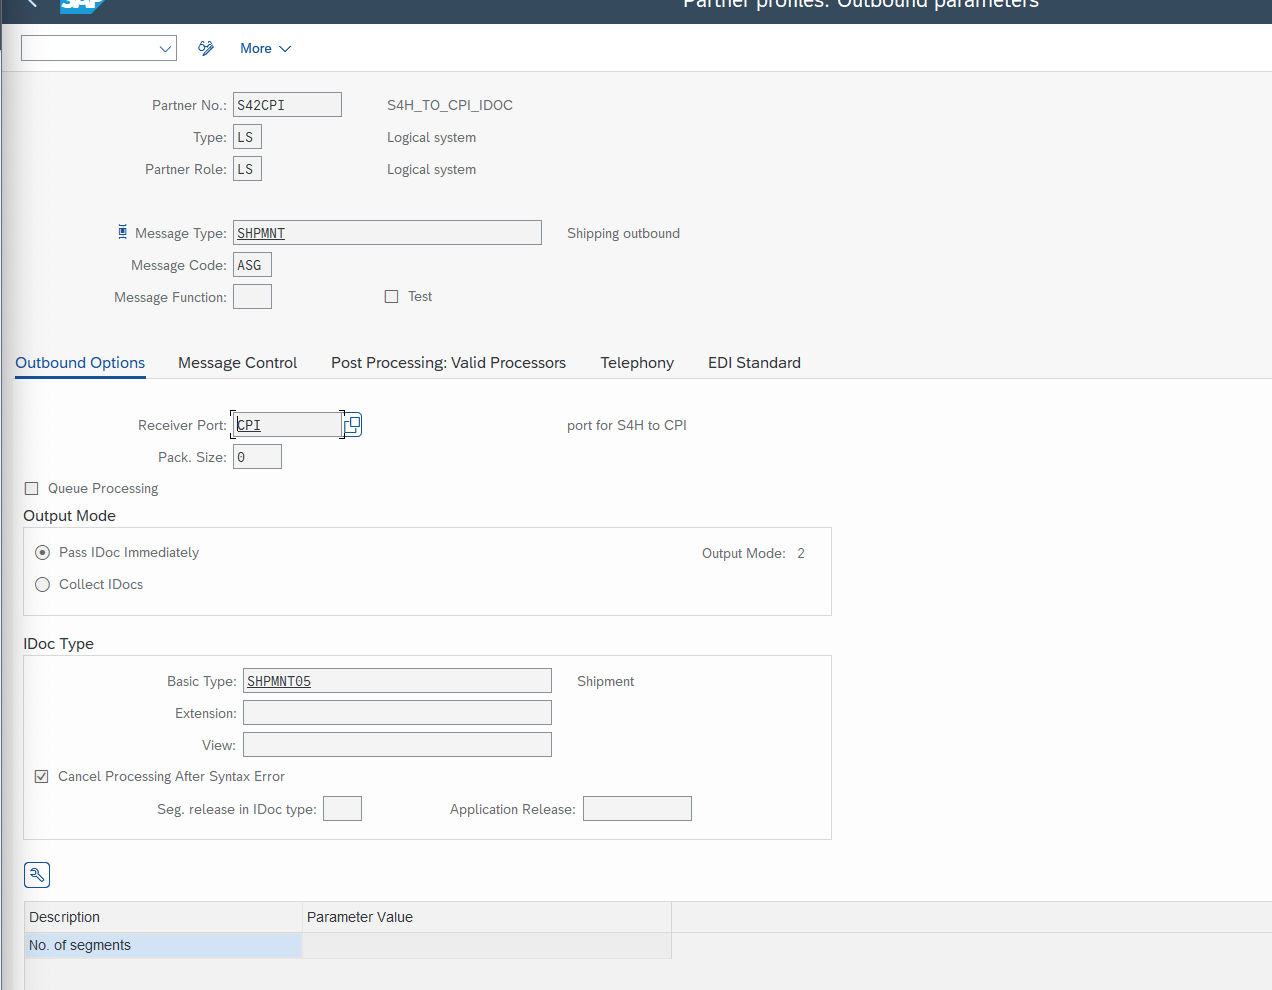
Create a receiver Port by double clicking on the entry

Come back to the Partner Profile UI and maintain Outbound Parameters, tab Message Control.

Repeat above steps for the remaining output types.
5. Map Vendor to Carrier LBN ID
BN for Logistics has to know the vendor to which this shipment has to be forwarded. This can be maintained in BN for logistics within Assign codes app.

5.1 Maintain Mapping in BN4L
Log in to BN for logistics fiori launchpad and click on Assign codes apps
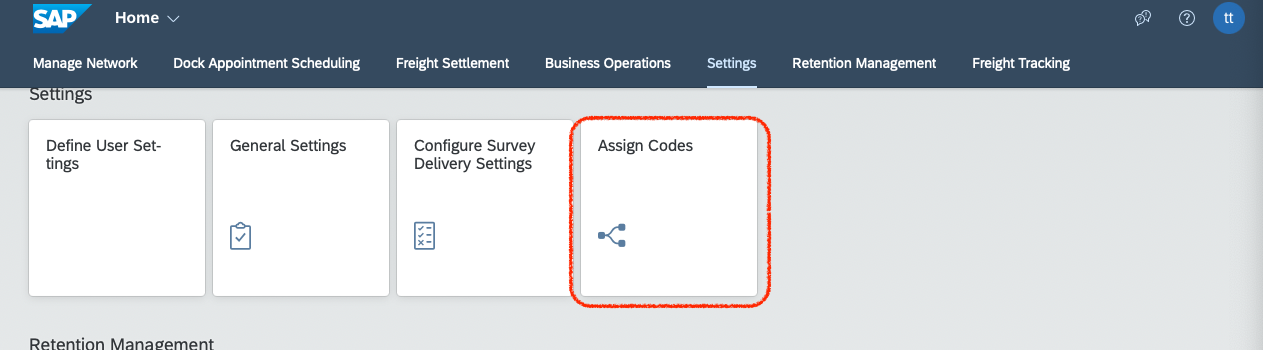
Maintain the mapping by entering System ID( this is the system ID that is sent in the IDOC ), Internal ID ( It is vendor ID as maintained in S4 shipment document ) and the Carrier LBN ID. To view your carrier LBN ID, you much have ensured that you have onboarded your forwarding agent as a carrier in LBN and have connected to the carrier LBNID.

Summary
By maintaining the above configuration, a shipment created based on the Shipment type created will be triggered from SAP ERP system to Business Network for Logistics. Note that there might be additional configurations needed to create the Shipment document.
Additional References
The setting up of Outbound is like ERP shipment outbound to SAP Transportatio Management configuration. You may refer much more details in the below document (Section 7.1 )
https://help.sap.com/doc/PRODUCTION/c00af7250c3342ad8a18af5286b514d0/9.6.2/en-US/00024264.pdf
Configuring SAP Cloud integration to receive IDOC :https://blogs.sap.com/2020/07/15/sap-s4h-idoc-to-sap-cpi-inbound-idoc-interface/
- SAP Managed Tags:
- SAP Business Network for Logistics,
- SAP Supply Chain Management
Labels:
You must be a registered user to add a comment. If you've already registered, sign in. Otherwise, register and sign in.
Labels in this area
-
Business Trends
169 -
Business Trends
23 -
Catalog Enablement
1 -
Event Information
47 -
Event Information
4 -
Expert Insights
12 -
Expert Insights
38 -
intelligent asset management
1 -
Life at SAP
63 -
Product Updates
500 -
Product Updates
64 -
Release Announcement
1 -
SAP Digital Manufacturing for execution
1 -
Super Bowl
1 -
Supply Chain
1 -
Sustainability
1 -
Swifties
1 -
Technology Updates
187 -
Technology Updates
17
Related Content
- Business Network for Logistics - Customer Onboarding Webinar Series in Supply Chain Management Blogs by SAP
- Adverse Media Monitoring: How to improve overall Supply Chain Management in Supply Chain Management Blogs by Members
- Announcement: New integration platform in SAP Business Network for Logistics in Supply Chain Management Blogs by SAP
- Premium Hub CoE – DSC Knowledge Bits Series in Supply Chain Management Blogs by SAP
- SAP Business Network For Logistics - Carrier Side ANSI-X12 EDI Setup and Testing for Road in Supply Chain Management Blogs by SAP
Top kudoed authors
| User | Count |
|---|---|
| 9 | |
| 8 | |
| 6 | |
| 4 | |
| 3 | |
| 3 | |
| 3 | |
| 2 | |
| 2 | |
| 2 |