
- SAP Community
- Groups
- Interest Groups
- DevOps and System Administration
- Blogs
- SAP on Azure: High Availability Setup of Content S...
DevOps and System Administration Blogs
Explore DevOps and system administration blog posts. Stay current with best practices, tools, and insights into efficient IT management strategies.
Turn on suggestions
Auto-suggest helps you quickly narrow down your search results by suggesting possible matches as you type.
Showing results for
Syed_Abbas607
Explorer
Options
- Subscribe to RSS Feed
- Mark as New
- Mark as Read
- Bookmark
- Subscribe
- Printer Friendly Page
- Report Inappropriate Content
05-15-2023
7:49 AM
Introduction
In this blog, we will provide steps to configure Highly available SAP Content Server 7.53 with MaxDB database version 7.9 on SUSE Linux in Microsoft Azure Cloud using Azure NetApp Files (ANF) as storage platform for database. It uses SUSE High Availability Extension tool set (Pacemaker) for the cluster solution.
Though we are using SUSE High Availability Extension tool set (pacemaker) for this blog, similar set up can also be achieved for Red Hat Enterprise Linux based systems. Also, MaxDB database can be replaced with File System as SAP content server repository which is not covered in this blog.
Purpose
To match the Availability SLA for the SAP Content Server with that of the OLTP systems on Microsoft Azure, we must understand the architecture of SAP Content Server. This includes identifying its single points of failure and building a resilient system spread across Availability Set or Availability Zones. The SAP Content Server consists of an application layer and a storage layer. The storage layer could either be a file system or MaxDB database. In this blog, we are using SAP MaxDB database as the storage layer. Application layer is managed by the SAP’s sapcontrol service. With SUSE High Availability Extension (HAE), we can manage MaxDB database resources and build an automated, highly available solution.
This blog can be used as reference for deployment of HA (High Availability) environment and not intended to cover other aspects of system design like infra, network, security, and performance.
System Architecture
Reference architecture for SAP Content Server & MaxDB database in Microsoft Azure is shown below. Its connected with ECC OR S/4HANA environment in Microsoft Azure.

Overall concept for this setup is that MaxDB database which is using Azure NetApp Files (ANF) as storage platform for data and log volumes is part of SUSE HA Cluster and it can failover between primary and secondary VM (virtual machines). Virtual IP for connecting MaxDB database is defined in Azure Internal Load Balancer (ILB) and it will be attached to the active node of the cluster resources.
SAP Content Server is running on both the VMs (Virtual Machines) in non-cluster drive and piggybacking on the MaxDB Virtual IP so that ECC or S/4HANA connects to the appropriate content server.
Refer to below table for the details of the reference setup:
| Hostname | IP Address | Role | OS Version | DB Version | SAP Version |
| AUEMAXDB00 | 10.116.96.6 | Content Server + MaxDB (Primary) | SLES 15 SP3 | MaxDB 7.9 | Content Sever 7.53 |
| AUEMAXDB01 | 10.116.96.7 | Content Server + MaxDB (Secondary) | |||
| AUEVMAXDB | 10.116.96.20 | Virtual Hostname (ILB) |
High-Availability setup for SAP solutions is technically complex activity and has several pre-requisites to be met before actual cluster configuration. This blog post will assume that you are familiar with general concepts of setting up the communication layer of SUSE HA pacemaker cluster solution. We recommend you refer to this blog to understand concepts and requirements in detail. We are using Azure Fencing Agent (which restarts a failed node via the Azure APIs) for setting up fencing in the pacemaker cluster.
High Level Overview of Installation Steps
For current blog, following are the summary of steps for installation of SAP Content Server with MaxDB with High availability.
- Prepatation for the HA Setup of SAP Content Server and MaxDB
- Read the required Installation Guide, SAP Notes, SAP on Azure docs and download the installation media.
- SAP Note 2786364 provides detailed steps to download, install and update SAP Content Server and SAP MaxDB database.
- Familiriaze yourself with Azure NetApp files.
- Create a Resource group, Virtual Network, Subnet (App & ANF), Availability set (if used).
- Provision the VMs and attach the Disks for following mount points: /sapmnt, /usr/sap and /sapdb.
- Setup the Azure Netapp Files to provision resource for MaxDB database DATA & LOG volumes.
- Deploy Azure Internal Loadbalancer and define virtual IP.
- Install the Content Server and MaxDB database on both the VMs. Choose the local mountpoint for content server (/sapmnt, /usr/sap), for MaxDB software installation (/sapdb). Use ANF resources for DATA and Log volumes.
- Setup the SUSE pacmaker cluster for the VMs using Azure Fence agent.
- Configure MaxDB database Cluster Resources in SUSE pacemaker.
- Configure Content Repositories in ECC OR S/4HANA for HA based Content Server.
Infrastructure Deployment
- Create a Resource group, Virtual Network, Subnet (App & ANF), Availability set(if used).
- Deploy the VMs with required VM SKUs and defined naming convention for hostnames/IP addresses (AUEMAXDB00 and AUEMAXDB01).
Deploy Azure NetApp Files resources:
The Azure NetApp Files resources and VMs, where the Azure NetApp Files resources would be mounted, must be deployed in the same Azure virtual network or in peered Azure virtual networks.
- Create a NetApp account in your selected Azure region by following the instructions in Create a NetApp account.

- Set up Azure NetApp Files capacity pool by following the instructions in Set up an Azure NetApp Files capacity pool.

- Delegate a subnet to Azure NetApp Files, as described in the instructions in Delegate a subnet to Azure NetApp Files.
- Deploy Azure NetApp Files volumes by following the instructions in Create an NFS volume for Azure NetApp Files.
- As you deploy the volumes, be sure to select the NFSv4.1 version. Deploy the volumes in the designated Azure NetApp Files subnet. The IP addresses of the Azure NetApp volumes are assigned automatically.

The MaxDB architecture presented in this blog uses a single Azure NetApp Files capacity pool at the Premium Service level. For MaxDB workloads on Azure, we recommend using Azure NetApp Files Ultra or Premium service Level.
Mount Azure Managed Disks and Azure NetApp Volumes:
The following items are prefixed with either [A] – applicable to all nodes, [1] – only applicable to node 1 or [2] – only applicable to node 2.
[A] Create Mount points:
- Ensure the managed disks attached to VM that would be used for following mount points /sapmnt/, /usr/sap, /sapdb are mounted permanently as shown below by adding required entries /etc/fstab.


- Create mountpoints using following command.
mkdir -p /sapdb/<<SID>> /sapdb/<<SID>>/sapdata /sapdb/<<SID>>/saplog
ex: mkdir -p /sapdb/SDB /sapdb/SDB/sapdata /sapdb/SDB/saplog
Above command would create directories inside the /sapdb mountpoint that comes from Azure managed disk.
- Verify the NFS domain setting. Make sure that the domain is configured as the default Azure NetApp Files domain, that is, defaultv4iddomain.com and the mapping is set to nobody.

- Verify nfs4_disable_idmapping. It should be set to Y. To create the directory structure where nfs4_disable_idmapping is located, execute the mount command. You will not be able to manually create the directory under /sys/modules, because access is reserved for the kernel / drivers.


[1] Temporarily mount ANF volumes:
- Now, temporarily mount the ANF volumes on primary node using following command:
mount -t nfs -o rw,hard,rsize=262144,wsize=262144,sec=sys,vers=4.1,tcp <<mount path from Azure NetApp Files Volumes>>
Example:
mount -t nfs -o rw,hard,rsize=262144,wsize=262144,sec=sys,vers=4.1,tcp 10.116.129.5:/sapdb-log /sapdb/SDB/saplog
mount -t nfs -o rw,hard,rsize=262144,wsize=262144,sec=sys,vers=4.1,tcp 10.116.129.4:/sapdb-data /sapdb/SDB/sapdata

- The disk layout on completion of above 2 steps would look as shown below in highlighted:
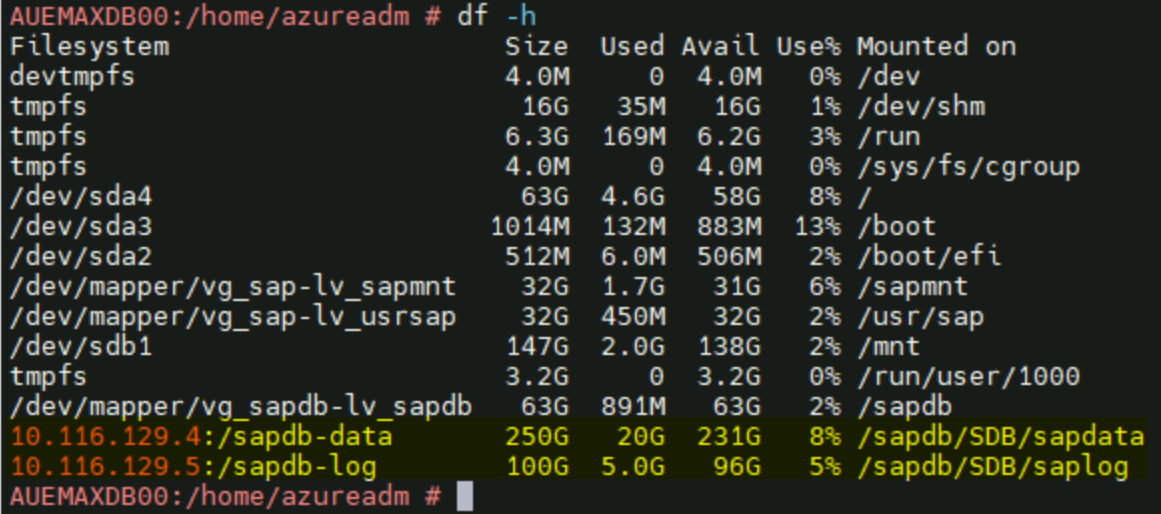
Note: Above highlighted mount points i.e., /sapdb/SDB/sapdata & /sapdb/SDB/saplog will be managed by cluster and hence do not need to be hardcoded via fstab.
Azure Internal Load Balancer:
- Create a load balancer (internal). We recommend standard load balancer. Select the virtual network created in step 1.

a. First, create a front-end IP pool:
- Open the load balancer, select frontend IP pool, and select Add.
- Enter the name of the new front-end IP pool (for example, AUEVMAXDB).
- Set the Assignment to Static and enter the IP address (for example, 10.116.96.20).
- Select OK.
- After the new front-end IP pool is created, note the pool IP address.


b. Create a single back-end pool:
- Open the load balancer, select Backend pools, and then select Add.
- Enter the name of the new back-end pool (for example, maxdb-backend).
- Select NIC for Backend Pool Configuration.
- Select Add a virtual machine.
- Select the virtual machines of the MaxDB database cluster.
- Select Add and save.

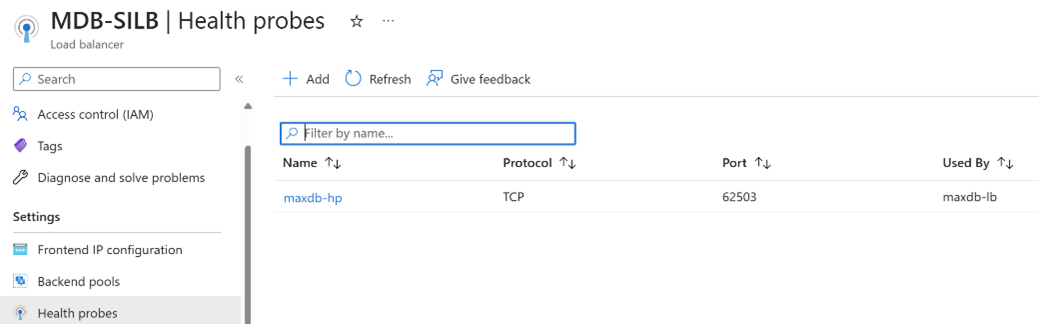
c. Next, create a health probe:
- Open the load balancer, select health probes, and select Add.
- Enter the name of the new health probe (for example, maxdb-hp).
- Select TCP as the protocol and port 62503 (or any unused port). Keep the Interval value set to 5.
- Select OK.
d. Next, create the load-balancing rules:
- Open the load balancer, select load balancing rules, and select Add.
- Enter the name of the new load balancer rule (for example, maxdb-lb).
- Select the front-end IP address, the back-end pool, and the health probe that you created earlier (for example, maxdb-frontend, maxdb-backend and maxdb-hp).
- Increase idle timeout to 30 minutes
- Select HA Ports.
- Make sure to enable Floating IP.
- Select OK.

2. Ensure the relevant entries for hosts are added to /etc/hosts file present in both the VMs that will be part of cluster to ensure Physical & Virtual hostname resolution works. In real time customer scenarios, DNS would be used to achieve the Hostname resolution.

Installation of SAP Content Server and MaxDB database
The following items are prefixed with either [A] – applicable to all nodes, [1] – only applicable to node 1 or [2] – only applicable to node 2.
[A] – Installation of Content Server
- Install SAP Content Server 7.53 by starting the latest version of SWPM (SoftWare Provisioning Manager).

- Choose the Content Server ID (CS9) and the SAP Mount directory (/sapmnt).

- Set the Master Password as per SAP recommendations.

- Click on next in below screen.

- Choose content Server as the option.

- Click ‘Yes’ to configure HTTP port if HTTP port needs to be used.

- Ensure SAP Content Server installation is completed successfully.

- Ensure the Content Server is running fine by executing SAPCONTROL command as SIDADM user mentioned below:
sapcontrol -nr 00 -function GetProcessList

- Define autostart parameter in Default profile so that content server is started automatically after VM restart.

[1] – Installation of SAP MaxDB Database Instances in Node 1
- Install SAP MaxDB 7.9 by starting the latest version of SWPM

- Choose the MaxDB SID (System ID) and the initial size of DB.

- Choose the default input and choose next.

- Provide the password for MaxDB Instance Software Owner and proceed to next screen.

- Choose the DB user password. Make sure password is no more than 9 characters (as per SAP note 2319006)

- Configure correct set of MaxDB instance parameters as per requirement and proceed.
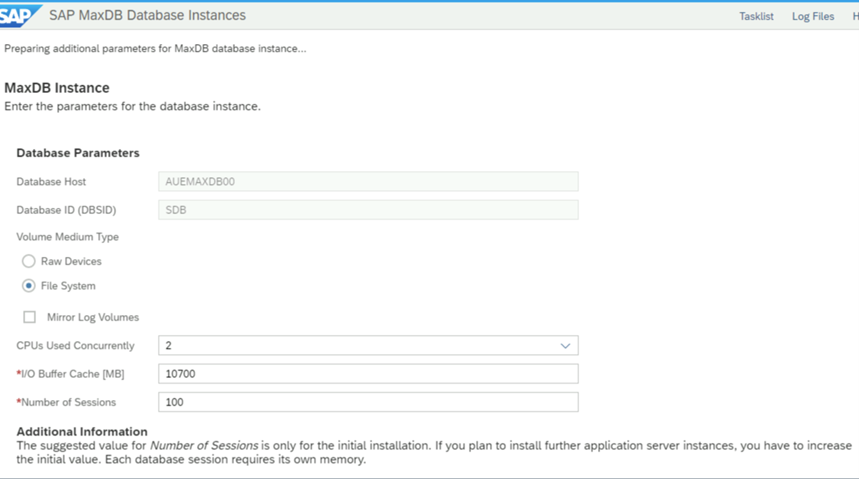
- Choose the MaxDB Log Volume location i.e., the Azure NetApp volume created for Log volume and the size of Log volume.

- Choose the MaxDB DATA Volume location i.e., the Azure NetApp volume created for DATA volume and the size of DATA volume.

- MaxDB installation has been completed successfully.

- Execute dbmcli command to check the version of MaxDB from the DB instance owner user sqdsdb (sqd<<SID>>).

- Now, stop the MaxDB database by using command db_offline.

- Ensure MaxDB instance is in offline state by executing command db_state.

- Now, unmount the ANF volumes mounted on Primary Node using below command:
umount /sapdb/SDB/sapdata /sapdb/SDB/saplog
[2] – MaxDB Software installation on Node 2
- Use the latest version of SWPM to create Operating system users relevant to MaxDB as shown below:

- Provide the SAPSID as the SID of Content Server (CS9 in this blog) and the DBSID of MaxDB (SDB as per the blog).

- Since the SIDADM user of Content Server is already created part of Content Server installation, provide the password of Content Server SIDADM user, and proceed.

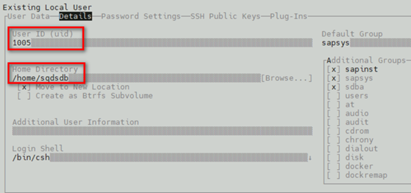
- Now confirm the User ID and group ID to be created as shown below and proceed to create users. Ensure the same password used in Primary Node (AUEMAXDB00) is used for sdb user in Node 2(AUEMAXDB01).

Note: Ensure the User ID and Group ID values are the same as that of Primary Node.
- Once the SWPM process for Operating system user creation is completed, follow the below steps for MaxDB instance specific owner user (sqd<<SID>>) creation.
- Launch Yast tool and navigate to users and group management as shown below.

- Create new user with name sqd<<SID>>(sqdsdb in this case) with same password used in Primary node and assign the user to be part of sapinst, sapsys and sdba groups.

- Ensure the UID for the user (sqd<<SID>>) is same as that of the UID for the user in Primary Node.
- Now, using the RDBMS media for MaxDB database, proceed with MaxDB database software installation on Node 2 (AUEMAXDB01).

Execute the below commands by logging into Primary Node (AUEMAXDB00)
[1] - copy User Profile, environment variable settings of sqdsdb user.
- Execute the below command to copy the contents of sqdsdb user from primary (AUEMAXDB00) to secondary node (AUEMAXDB01)
sudo rsync -av /home/sqdsdb AUEMAXDB01:/home/sqdbsdb

- Execute the below command from Primary Node (AUEMAXDB00) to rename the dbenv shell and c shell files according to Node 2.
host0=$(hostname);sudo ssh AUEMAXDB01 "find /home/sqdsdb/.*$host0.* -type f -exec rename -v $host0 AUEMAXDB01 {} \;"

Copy the DB instance specific config files from Source to target:
- Move the MaxDB instance specific DB configuration files Primary node (AUEMAXDB00) to secondary node (AUEMAXDB01) from the path /sapdb/SDB/data/config
Comparison of files between Primary and Secondary before movement of files:
| AUEMAXDB00 | AUEMAXDB01 |
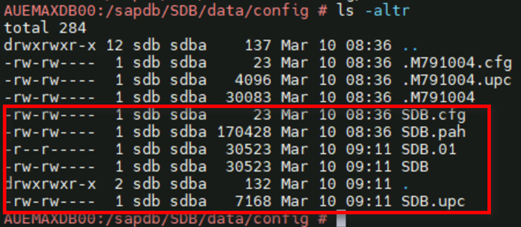 |  |
- [1] - Execute following command in Primary Node to move the required config files from source to target.
scp -rp SDB* AUEMAXDB01://sapdb/SDB/data/config

- [2] - Ensure the permissions of the config files moved to target is same as those ones in source.

- Perform DB instance registration on secondary node (AUEMAXDB01) using db_reg command or follow the below steps:
- Add the following line into Databases.ini file present in path: /sapdb/data/config
SDB= /sapdb/SDB/db
| Before | After |
 |  |
Note: This step is performed so that Database instance is accessible via dbmcli on failover from primary to secondary node.
[2] – Mount the ANF Volumes on Node 2 to test connectivity:
- Now, temporarily mount the ANF volumes on secondary node using following command:
mount -t nfs -o rw,hard,rsize=262144,wsize=262144,sec=sys,vers=4.1,tcp <<mount path from Azure NetApp Files Volumes>>
Example:
mount -t nfs -o rw,hard,rsize=262144,wsize=262144,sec=sys,vers=4.1,tcp 10.116.129.5:/sapdb-log /sapdb/SDB/saplog
mount -t nfs -o rw,hard,rsize=262144,wsize=262144,sec=sys,vers=4.1,tcp 10.116.129.4:/sapdb-data /sapdb/SDB/sapdata
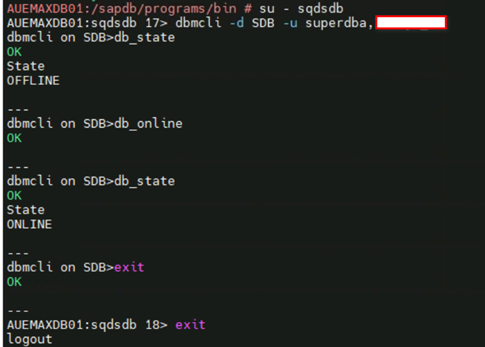
- Login as sqdsdb (sqd<<SID>>) user to access DB instance via dbmcli.
- Execute command dbmcli -d <<DBSID>> -u <<username>>,<<password>>
ex: dbmcli -d SDB -u superdba, *******
- Check the status of db by executing db_state command.
- Execute db_online command to bring the MaxDB database online on secondary node.
- Now, stop the MaxDB database by using command db_offline.

- Ensure MaxDB instance is in offline state by executing command db_state.

- Now, unmount the ANF volumes mounted on Primary Node using below command:
umount /sapdb/SDB/sapdata /sapdb/SDB/saplog
Cluster Configuration
- Perform SUSE pacemaker cluster basic setup as per MS docs. Contents of previously mentioned MS docs will guide you in performing below steps:
- Install the cluster.
- Add the secondary node to cluster.
- Create a fencing device on pacemaker cluster.
- Configure pacemaker for Azure Scheduled events.
- On completion of above steps, execute command crm status to check the status of cluster.

- Place the secondary node on standby by executing command below:
crm node standby AUEMAXDB01
- Place the cluster in maintenance mode by executing command crm configure property maintenance-mode="true”
- Configure cluster resource for SAP MaxDB database by running below cluster configuration commands.
# Create Pacemaker resources for mounting the ANF volumes via cluster

# Replace the bold string with your MaxDB database system ID & ANF Volume target IP Address


sudo crm configure primitive primitive rsc_fs_SDB_sapsdbdb Filesystem device='10.116.129.4:/sapdb-data' directory='/sapdb/SDB/sapdata' fstype='nfs4' options='rsize=262144,wsize=262144,hard,retrans=2,sec=sys,vers=4.1' \

op start timeout=60s interval=0 \

op stop timeout=60s interval=0 \

op monitor interval=20s timeout=40s


sudo crm configure primitive primitive rsc_fs1_SDB_sapsdbdb Filesystem device='10.116.129.5:/sapdb-log' directory='/sapdb/SDB/saplog' fstype='nfs4' options='rsize=262144,wsize=262144,hard,retrans=2,sec=sys,vers=4.1' \

op start timeout=60s interval=0 \

op stop timeout=60s interval=0 \

op monitor interval=20s timeout=40s
# Create Pacemaker resources for Virtual IP Address & Probe Port

# Replace the bold string with your ILB IP Address, Probe port


sudo crm configure primitive rsc_ip_SDB_sapsdbdb IPaddr2 \

params ip=10.116.96.20 \

op start interval=0 timeout=20 \

op stop interval=0 timeout=20 \

op monitor interval=10 timeout=20


sudo crm configure primitive rsc_nc_SDB_MDB azure-lb \

port=62503 \

meta resource-stickiness=0
# Create Pacemaker resources for SAP MaxDB database Startup


sudo crm configure primitive rsc_sabdb_SDB SAPDatabase \

params SID=SDB DBTYPE=ADA \

op start interval=0 timeout=1800 \

op stop interval=0 timeout=1800 \

op monitor interval=60 start-delay=180 timeout=60


# Group all the Pacemaker resources created above


sudo crm configure group grp_sapdb_SDB rsc_ip_SDB_sapsdbdb rsc_fs_SDB_sapsdbdb rsc_fs1_SDB_sapsdbdb rsc_sabdb_SDB rsc_nc_SDB_MDB \

meta target-role=Started
- Activate the cluster and monitor the cluster status:
crm configure property maintenance-mode="false”

crm node online AUEMAXDB01

crm status

[A] – Setting connect information for SAP HostAgent to access MaxDB
- Follow SAP Note 2018919 – SAP MaxDB/SAPHostagent: Setting connect information as SetDatabaseProperty function and configure SAP HostAgent to access SAP MaxDB database.
- Execute the below command to perform connection settings.
/usr/sap/hostctrl/exe/saphostctrl -host <<Virtual Hostname>> -user sapadm <<password>> -dbname <<DBSID>> -dbtype ada -function SetDatabaseProperty DBCredentials=SET -dboption User=SUPERDBA -dboption Password=<<password>>

- Use the GetDatabaseStatus command to ensure SAPHostAgent can access MaxDB database using the connect settings performed above.
Command:
GetDatabaseStatus [-dbname <DB name>] [-dbtype <ada>] [-dbhost <hostname>] [dbinstance <instance name>] [-dbuser <DB admin username>] [-dbpass <DB admin password>]

Note: Since the HostAgent registration must be performed using Virtual Hostname on both nodes, ensure DB is failed over to secondary Node and MaxDB instance is started before above steps are performed on secondary node.
Content Server Configuration
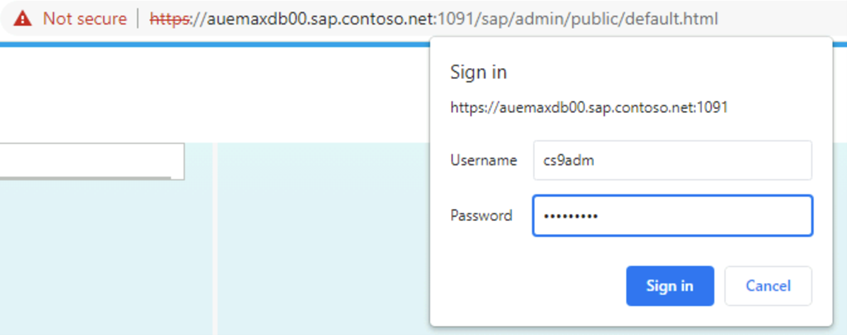
- Access the Web Admin UI of Content Server on both the nodes. Use SIDADM user to login.
https://auemaxdb00.sap.contoso.net:1091/sap/admin/public/default.html
https://auevmaxdb01.sap.contoso.net:1091/sap/admin/public/default.html

- Recreate the PSE with virtual host name and export it on both the VMs. Alternatively create SAPSSLS.pse in primary node and copy the SAPSSLS.pse file from primary to secondary node.


- Upload the certificates from both the content server node to S/4HANA or ECC system via STRUST tcode. Ensure that certs are uploaded to both SYSTEM.PSE and SAPSSLS.PSE

- Create/Modify Content Server Repository in S/4 HANA server. Go to transaction code OAC0. Add the HTTP server (use Virtual Hostname/ILB Hostname), HTTP Script, Port Number, SSL Port Number.

- Click on test connection button to ensure the connectivity to MaxDB is working fine.

- Use CSADMIN tcode to add the setting for repository. Make use of below parameter settings to create repositories.

- Click and activate the certificate that needs must be used for repository.

- Click on the details and overview tab to ensure repository is in running state.


- Now, navigate to profile directory (/usr/sap/CS9/SYS/profile) of content server on the primary node to copy the content server configuration to secondary node.

- Restart the content server on secondary node using sapcontrol commands after making necessary changes to config file.

Failover testing
- Check the status of the cluster node using crm status command.

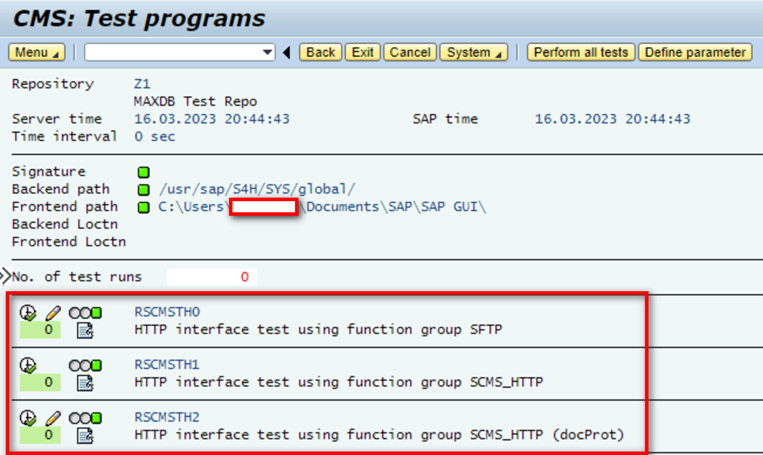
- Using RSCMST program in SAP System – SAP Note 2888195 – Content Server 7.53 and report RSCMST.
- Check the status/serverinfo of Content Server using the HTTP URL (use Virtual Hostname).
URL: https://auevmaxdb.sap.contoso.net:1091/sapcs?serverInfo

- Perform failover to secondary node by executing command:
crm node standby AUEMAXDB00


- After failover, again check the status/serverinfo of Content Server using the HTTP URL (use Virtual Hostname).
URL: https://auevmaxdb.sap.contoso.net:1091/sapcs?serverInfo

- CSADMIN TCODE status in SAP system post failover of MaxDB cluster

- After failover, run the RSCMST program to test the connectivity again from Node 2.

- At the end of failover testing, bring the other node online by executing the command
crm node online AUEMAXDB00

Disaster Recovery
Even though this blog does not concentrate on setting up Disaster Recovery, there are some of options listed below:
Option 1:
- Configure ASR (Azure Site Recovery) for the MaxDB database VM to the paired Azure region so that VM’s are replicated to required DR region.
- Configure Cross Region Restore (CRR) for the Azure NetApp Files that bears data and log volumes of MaxDB database using the MS Docs.
During DR failover, invoke ASR to bring VM on DR region and mount Azure NetApp Files that bears data and log volumes of MaxDB database into the VM.
Option 2:
- Setup MaxDB database VM on the DR region.
- Review SAP NOTE: 952783 and understand the concept of Standby database in MaxDB.
- Setup Standby database as per SAP documentation.
During DR failover, wait for the final batch of log files shipped from primary site to be applied before restarting the standby database for bringing MaxDB database into Operational state ONLINE from ADMIN.
Conclusion
In this blog, we have seen how to set up High Availability Architecture for SAP Content Server 7.53 using capability of Azure NetApp Files with the help of SUSE pacemaker cluster.
References
https://blogs.sap.com/2020/04/11/sap-on-azure-high-availability-setup-of-sap-content-server-7.53-wit...
SAP MaxDB: The SAP Database - Documentation
Directory - SAP Documentation
SAP MaxDB Directory Structure - MaxDB - Support Wiki
Description of the Content Server Configuration File (sap.com)
Description of the Content Server Configuration File - SAP Documentation
Creating New Content Repositories | SAP Help Portal
SAP Content Server 7.53 Installation and Connectivity with ERP using SSL | SAP Blogs
Troubleshooting Guide - How to troubleshoot the SSSLERR_PEER_CERT_UNTRUSTED (peer certificate (chain...
SAP NOTES
822271 - FAQ: SAP MaxDB client software - SAP ONE Support Launchpad
2786364 - SAP Content Server and Cache Server 7.5 (and higher) - SAP ONE Support Launchpad
2300026 - SAP MaxDB, SDBSETUP not supported for Linux SLES >=12 and RHEL >=7 - SAP ONE Support Launc...
1789865 - Database does not start due to wrong file permissions - SAP ONE Support Launchpad
1426645 - RTE_CallSdbStarter(): Must be called by root or ... - SAP ONE Support Launchpad
3134834 - Error "ContRep <repository name> or Storage entry not defined" occurred when accessing con...
2888195 - Content Server 7.53 and report RSCMST - SAP ONE Support Launchpad
2886931 - Error "403 forbidden (wrong port)" occurred when accessing the administration page (/sap/a...
2921967 - Logon pop-up in transaction CSADMIN - SAP Content Server 750 and higher - SAP ONE Support ...
2461900 - SSSLERR_PEER_CERT_UNTRUSTED error in dev_icm trace - SAP ONE Support Launchpad
2993920 - Error 401 Unauthorized, SsfVerify failed: rc=23, SSF_API_UNKNOWN_PROFILE occurred when acc...
2975420 - SsfVerify failed: rc=5, SSF_API_SIGNER_ERRORS, "signer r c=27", SSF_API_SIGNER_NOT_OK - SA...
2379764 - How to distribute a new certificate to the Content Server for the repository and activate ...
- SAP Managed Tags:
- Basis Technology
You must be a registered user to add a comment. If you've already registered, sign in. Otherwise, register and sign in.