
- SAP Community
- Products and Technology
- Product Lifecycle Management
- PLM Blogs by SAP
- EPD: Connected Product integration with GitHub for...
Product Lifecycle Management Blogs by SAP
Dive into product lifecycle management news, learn about digitalizing PLM for the digital supply chain, and stay informed with product updates from SAP.
Turn on suggestions
Auto-suggest helps you quickly narrow down your search results by suggesting possible matches as you type.
Showing results for
Advisor
Options
- Subscribe to RSS Feed
- Mark as New
- Mark as Read
- Bookmark
- Subscribe
- Printer Friendly Page
- Report Inappropriate Content
05-11-2023
3:36 PM
The Connected Products capability of SAP Enterprise Product Development enables real-time monitoring of products and faster product design based on actual data. To make this possible, products are digitized, which means that an IoT-enabled engineering model of a physical product is connected via sensors. OEMs create connected product models. Operators can then subscribe to the models (Digital-Product-as-a-Service) and use insights from the models for predictive maintenance.
The GitHub integration feature addresses a limitation of the Business Technology platform (BTP) related to uploading large simulation models for virus scanning. Prior to this integration, the platform was not equipped to handle files or models beyond a certain size due to security limitations imposed by virus scanning.
With the GitHub integration, users can now upload simulation models larger than 200 MB, with the added benefit of virus scanning through the GitHub platform. To utilize this feature, the user simply needs to provide the location of the GitHub repository and specify the model they wish to upload/store in the repository. The model can then be used at runtime and linked to the specific GitHub repository for that particular model. Once the model has been downloaded, it can be uploaded to the container for further processing, including virus scanning.
By leveraging the power of GitHub, the platform can now handle large simulation models with improved security measures, enhancing the overall functionality of the platform and providing users with a more streamlined and efficient workflow. This feature not only addresses a critical limitation of the BTP but also enhances the user experience by simplifying the process of uploading and processing large simulation models.
After the successful configuration of the Git destination, the next step is to verify the login credentials to the EPD Connected Product app. Upon successful login, the user should be able to view the Connected Products tiles, which are displayed in the screenshot below.
It is essential to check the login functionality and ensure that the user can access the Connected Products tiles as this is a critical step in the overall process. Any errors or issues with the login process could indicate a problem with the configuration or potential access restrictions, which could impact the user's ability to access and utilize the platform's features effectively.
By confirming that the user can access the Connected Products tiles, the application's functionality is validated, and the user can proceed with their work, confident that the configuration has been completed correctly.
Now Click on the template tile and click on the create button to create a new template as shown below, In this step, we are creating a Connected Product Template
In Figure 2, we can observe that a connected product template is being created, and upon completion, the user is redirected to the detail view of the template. In this view, the user is presented with an option to upload the simulation model, as depicted in the subsequent snapshot. To upload the simulation model, the user can choose to either upload it from their local desktop or select the GitHub download option, which allows the user to download the simulation model directly from the GitHub repository. The GitHub download option can be seen in the image below. This feature provides users with flexibility in uploading their simulation models and reduces the time and effort required to upload a file from a local machine. Additionally, by offering the option to download from a GitHub repository, users can easily access and utilize models that have already been created and shared on the platform.
As we focus on the process of uploading simulation models from GitHub, we will not cover the "From Local System" option. When selecting the "From GitHub" option, a popup window will appear where the user needs to provide specific details such as the organization, repository, branch, and file path where the simulation model is located. This information is crucial for the app to retrieve the model from the correct GitHub location. By providing this information, the user can access the simulation model from GitHub without having to upload it to the local system. This approach saves time and storage space on the local system.
As depicted in the pop-up shown in Figure 4, the user is required to select the Git organization, which will subsequently populate a list of repositories. Based on the selection of the revision type, the appropriate revision will be displayed. Next, the user needs to provide the folder path of the simulation model and provide a valid description of the model being referenced. The screenshot below provides a clear illustration of this process.
This step-by-step approach streamlines the process of selecting the appropriate Git organization and revision, reducing the likelihood of errors or confusion. Additionally, by requiring a folder path and description, the application can more easily identify and track the simulation model, improving organization.
The above figure (Fig-5) illustrates that the populated values in the Revision dropdown list may vary based on the selection made in the Revision Type dropdown. For instance, if the user selects the Revision Type as Tag, then the list of Tags would be populated in the next Revision dropdown. After providing the required information, the user can click on the Add button. In case the provided file path is incorrect, an error message will be displayed as shown below.
Now, as you see above in the snapshot the user won’t be able to add the simulation model until they provide the proper path.
The folder path after the repository must be correct and it even validates the folder path defined after appending the organization/repository/<folder-path> of the simulation model.
Hence, we need to check and provide the correct simulation model path to complete the successful download of the simulation model from GitHub and upload it to the system for simulation. As shown below.
As you observe in the above Fig-8, the simulation successfully downloads from GitHub after validation, and it is in the submitted state as highlighted in the snapshot. This is how a user can provide a larger model beyond 200 MB and helps the business to process the simulation model for further use cases.
The primary purpose of this application flow is to provide guidance to business users on how to upload and process large simulations while addressing security limitations and browser crashes that may occur when handling files beyond a certain size.
Uploading large files from a local machine or through the browser can be challenging and may not be allowed by security policies. Additionally, handling large files beyond a certain size can cause the browser to crash, leading to frustration and loss of time.
To overcome these issues, this approach involves downloading large simulation models from GitHub as a background process while allowing the user to continue working within the application. Once the download is complete, the file will be uploaded to the relevant services for further simulation processing, which can be executed in the background without disrupting the user's workflow.
By utilizing this approach, users can avoid the frustration of browser crashes and the need to wait for the file to upload before continuing to work within the application. Additionally, once the simulation process is complete, the application will display the results and update properties accordingly.
Overall, this application flow provides a more efficient and user-friendly way of handling large simulations and addresses common challenges related to file uploads and processing.
Suggestions and feedback are welcome !!!
Introduction
The GitHub integration feature addresses a limitation of the Business Technology platform (BTP) related to uploading large simulation models for virus scanning. Prior to this integration, the platform was not equipped to handle files or models beyond a certain size due to security limitations imposed by virus scanning.
With the GitHub integration, users can now upload simulation models larger than 200 MB, with the added benefit of virus scanning through the GitHub platform. To utilize this feature, the user simply needs to provide the location of the GitHub repository and specify the model they wish to upload/store in the repository. The model can then be used at runtime and linked to the specific GitHub repository for that particular model. Once the model has been downloaded, it can be uploaded to the container for further processing, including virus scanning.
By leveraging the power of GitHub, the platform can now handle large simulation models with improved security measures, enhancing the overall functionality of the platform and providing users with a more streamlined and efficient workflow. This feature not only addresses a critical limitation of the BTP but also enhances the user experience by simplifying the process of uploading and processing large simulation models.
Pre-Requisite
- Setup a git Organization
- Creation of technical user/business user with admin permission on the git Organization.
- Login to git with the created user and create a personal access token as mentioned in the git documentation.
- Store the created personal access token as this will be used as a password in the further sections.
- Creation of git repository and add the already created user as collaborator/write permission in the Repository settings Collaborators and teams Add People add the created user.
- Login to BTP cockpit and navigate to the Destinations section under Connectivity.
- To create a git destination, refer the documentation.
- Onboarding of Business User with the role collection template “TemplateAdmin”, “InstanceAdmin” and “BusinessUser” as per the documentation
Configuration and Simulation Upload Steps
After the successful configuration of the Git destination, the next step is to verify the login credentials to the EPD Connected Product app. Upon successful login, the user should be able to view the Connected Products tiles, which are displayed in the screenshot below.
It is essential to check the login functionality and ensure that the user can access the Connected Products tiles as this is a critical step in the overall process. Any errors or issues with the login process could indicate a problem with the configuration or potential access restrictions, which could impact the user's ability to access and utilize the platform's features effectively.
By confirming that the user can access the Connected Products tiles, the application's functionality is validated, and the user can proceed with their work, confident that the configuration has been completed correctly.

Fig-1: Snapshot of Connected-Product tiles.
Now Click on the template tile and click on the create button to create a new template as shown below, In this step, we are creating a Connected Product Template
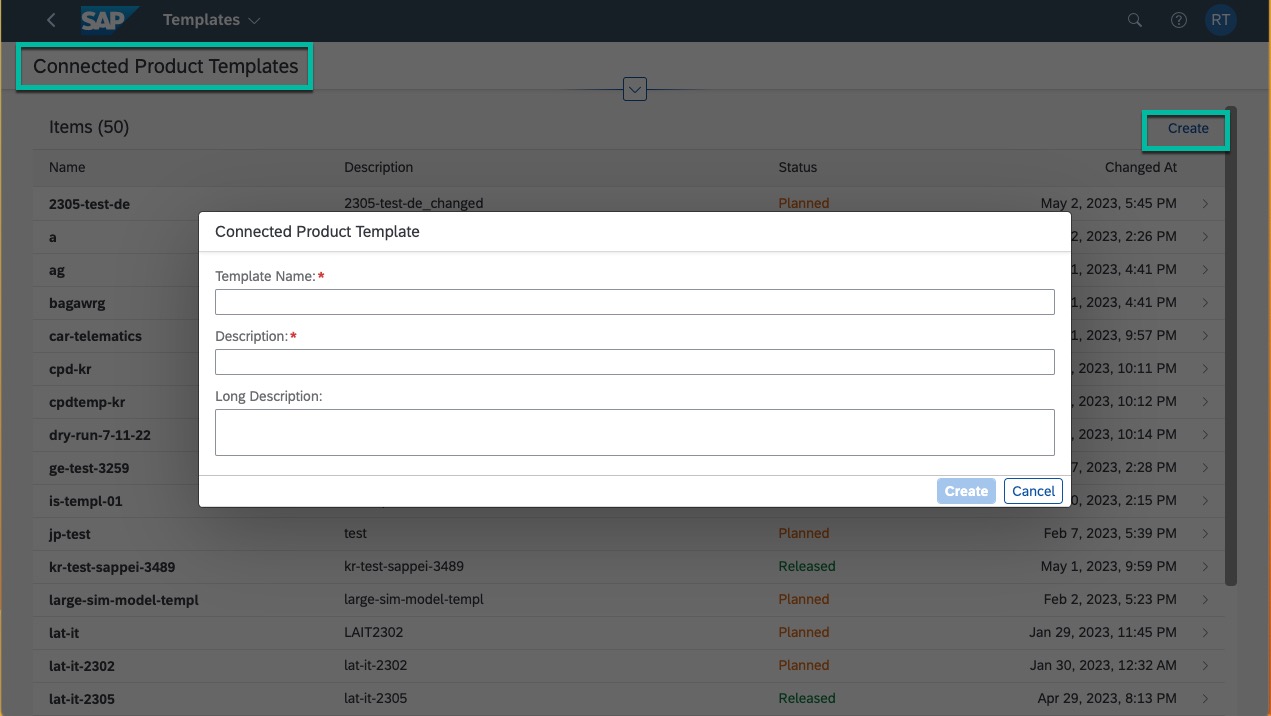
Fig-2: Snapshot of template creation
In Figure 2, we can observe that a connected product template is being created, and upon completion, the user is redirected to the detail view of the template. In this view, the user is presented with an option to upload the simulation model, as depicted in the subsequent snapshot. To upload the simulation model, the user can choose to either upload it from their local desktop or select the GitHub download option, which allows the user to download the simulation model directly from the GitHub repository. The GitHub download option can be seen in the image below. This feature provides users with flexibility in uploading their simulation models and reduces the time and effort required to upload a file from a local machine. Additionally, by offering the option to download from a GitHub repository, users can easily access and utilize models that have already been created and shared on the platform.

Fig-3: Snapshot of Simulation upload options
As we focus on the process of uploading simulation models from GitHub, we will not cover the "From Local System" option. When selecting the "From GitHub" option, a popup window will appear where the user needs to provide specific details such as the organization, repository, branch, and file path where the simulation model is located. This information is crucial for the app to retrieve the model from the correct GitHub location. By providing this information, the user can access the simulation model from GitHub without having to upload it to the local system. This approach saves time and storage space on the local system.

Fig-4: Snapshot of GitHub popup
As depicted in the pop-up shown in Figure 4, the user is required to select the Git organization, which will subsequently populate a list of repositories. Based on the selection of the revision type, the appropriate revision will be displayed. Next, the user needs to provide the folder path of the simulation model and provide a valid description of the model being referenced. The screenshot below provides a clear illustration of this process.
This step-by-step approach streamlines the process of selecting the appropriate Git organization and revision, reducing the likelihood of errors or confusion. Additionally, by requiring a folder path and description, the application can more easily identify and track the simulation model, improving organization.

Fig-5: Snapshot of simulation down from GitHub
The above figure (Fig-5) illustrates that the populated values in the Revision dropdown list may vary based on the selection made in the Revision Type dropdown. For instance, if the user selects the Revision Type as Tag, then the list of Tags would be populated in the next Revision dropdown. After providing the required information, the user can click on the Add button. In case the provided file path is incorrect, an error message will be displayed as shown below.

Fig-6: Snapshot of error, in case of not a valid path
Now, as you see above in the snapshot the user won’t be able to add the simulation model until they provide the proper path.
Now to find out the correct path, navigate to the GitHub repository and mentioned the correct folder path as shown below.

Fig-7: Snapshots of GitHub Repository of the uploaded simulation model
The folder path after the repository must be correct and it even validates the folder path defined after appending the organization/repository/<folder-path> of the simulation model.
Hence, we need to check and provide the correct simulation model path to complete the successful download of the simulation model from GitHub and upload it to the system for simulation. As shown below.

Fig-8: Snapshot of successful simulation model upload
As you observe in the above Fig-8, the simulation successfully downloads from GitHub after validation, and it is in the submitted state as highlighted in the snapshot. This is how a user can provide a larger model beyond 200 MB and helps the business to process the simulation model for further use cases.
Conclusion
The primary purpose of this application flow is to provide guidance to business users on how to upload and process large simulations while addressing security limitations and browser crashes that may occur when handling files beyond a certain size.
Uploading large files from a local machine or through the browser can be challenging and may not be allowed by security policies. Additionally, handling large files beyond a certain size can cause the browser to crash, leading to frustration and loss of time.
To overcome these issues, this approach involves downloading large simulation models from GitHub as a background process while allowing the user to continue working within the application. Once the download is complete, the file will be uploaded to the relevant services for further simulation processing, which can be executed in the background without disrupting the user's workflow.
By utilizing this approach, users can avoid the frustration of browser crashes and the need to wait for the file to upload before continuing to work within the application. Additionally, once the simulation process is complete, the application will display the results and update properties accordingly.
Overall, this application flow provides a more efficient and user-friendly way of handling large simulations and addresses common challenges related to file uploads and processing.
Suggestions and feedback are welcome !!!
Few of my other blogs:-
- ODATA implementation for IOT Applications on SAP HCP
- Logging in SCP with Java & Tomee using slf4j, logback, Jolokia
- CDS extension feature in HANA
- Database migration in SCP using Liquibase
- Binary content upload & download from HANA DB via Apache Olingo OData in SCP
- TypeScript: Templating using NestJS framework in SAP BTP
- SAP Managed Tags:
- SAP Enterprise Product Development,
- Cloud
Labels:
4 Comments
You must be a registered user to add a comment. If you've already registered, sign in. Otherwise, register and sign in.
Labels in this area
Related Content
- Implementation journey of SAP ECTR at OSG EX-CELL-O Coldforming Technologies in Product Lifecycle Management Blogs by SAP
- Meet PLM experts from SAP at Hannover Messe 2024 in Product Lifecycle Management Blogs by SAP
- Striking the Perfect Balance in Product Lifecycle Management Blogs by SAP
- A Comprehensive Breakdown: The Pros and Cons of Product Lifecycle Management in Product Lifecycle Management Blogs by SAP
- SAP Digital Manufacturing and SAP MII integration in Product Lifecycle Management Q&A
Top kudoed authors
| User | Count |
|---|---|
| 3 | |
| 2 | |
| 2 | |
| 1 | |
| 1 | |
| 1 | |
| 1 |