
- SAP Community
- Products and Technology
- Technology
- Technology Blogs by SAP
- Replicating Tables using SLT and Replication Flows...
Technology Blogs by SAP
Learn how to extend and personalize SAP applications. Follow the SAP technology blog for insights into SAP BTP, ABAP, SAP Analytics Cloud, SAP HANA, and more.
Turn on suggestions
Auto-suggest helps you quickly narrow down your search results by suggesting possible matches as you type.
Showing results for
Associate
Options
- Subscribe to RSS Feed
- Mark as New
- Mark as Read
- Bookmark
- Subscribe
- Printer Friendly Page
- Report Inappropriate Content
05-09-2023
3:03 PM
Introduction
Table replication using SAP Data Intelligence and SAP Landscape Transformation Replication Server (SLT) can be leveraged using Generation 1 SLT operator and Generation 2 Read Data from SAP operator. Blog by martin.boeckling and Replicating data using Gen2 operators blog by pranchal go into detail on how to setup pipelines for replicating data using the above-mentioned operators.
In addition to that, SAP Data Intelligence Cloud provides another functionality called Replication Management Service (RMS) where DI users can create replication flows to perform real-time or batch transfer of data, from source to a target using either full or delta load. RMS presents a user-friendly interface to setup a replication flow which does not involve creating pipelines using operators which is quite interesting.
Replication Management Service (RMS) can be used to access CDS views data, data exposed by ODP framework and data tables by using SLT. Please refer to the SAP note 2890171 for information on ABAP Integration functionality in SAP Data Intelligence.
This blog would focus on how to set up a simple replication flow in RMS by combining SAP Data Intelligence Cloud with SLT and replicate tables from an ECC system to an AWS S3 bucket.
Prerequisites
For this blog, we can either use a standalone DMIS system, S/4 HANA system or a source system with DMIS add-on. In additional to that, an instance of SAP Data Intelligence Cloud would be required with a connection established to the SLT system that is going to be used. To leverage the RMS functionality for table replication the minimum DMIS version for the SLT system needed is DMIS 2018 SP06 / DMIS 2020 SP04.
Creating SLT Configuration
Like what we have seen in the previous blogs dedicated to replicating data using SLT and DI, we start with creating a configuration in the SLT cockpit after running the LTRC transaction.
To create a SLT configuration click on the page icon and another window would open where the user needs to specify the configuration name, source system, target system and transfer settings.

Overview of LTRC Screen
While specifying the target system, check the option other and select scenario SAP Data Intelligence (Replication Management Service). For more information the blog demonstrates in depth on how to connect SAP Data Intelligence to SLT system.

Target Configuration in SLT
Once all the necessary information has been provided then clicking on the create button would create a new SLT configuration as shown below. This new SLT configuration would be associated with a Mass-transfer ID that would be used later while creating the replication flows in DI cloud.

SLT Configuration Overview
Creating Replication flow in SAP Data Intelligence Cloud
In this step, we would create a replication flow in SAP Data Intelligence Cloud and use the table SFLIGHT for replication purpose. The table has around 20K records and 14 columns. The structure of the table is shown in the image below.

SFLIGHT Table Overview
After logging into the DI cloud launchpad, navigate to Modeler and click on the Replications tab located on the left of the navigation pane as shown below.

Replication Tab in Modeler
Click on the + icon on the top to create a replication flow. In the next step a pop up would appear to provide a name for the flow.

Creating Replication flow
Defining Properties of the RMS Flow
After providing the flow name click on the OK button and this would lead us to the next screen where we need to define the properties of the replication flow.

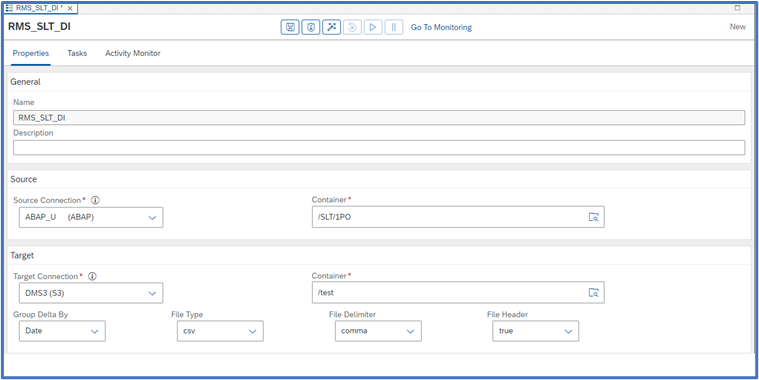
Defining Replication Flow Properties
For the Source Connection choose the SLT system we connected earlier to our DI instance from the drop-down menu. In the corresponding Container section navigate to the SLT folder then select the Mass transfer ID associated with the SLT configuration created previously and click OK.
Following the same process, select the connection created for S3 bucket as a target connection and in the corresponding Container section select the folder where the table should be replicated and click on OK button.
After we are done specifying the source and target details, RMS provides additional functionalities like specifying file type in the target (CSV/JSON/Parquet), how we want the Delta records to be grouped in the target (Group by Hour or Date)
The screen after specifying all the properties should look something like this:
Adding Tasks to the RMS flow
In this step we would add the SFLIGHT table to the replication flow by switching to the Task tab right next to Properties tab.
We can add more than one task under a single replication flow but to keep the blog simple we would only work with one task for now.
Click on the Create button on the top right corner under the Task tab and search for the name of SFLIGHT table in the search box and select the table from the list and click OK.

Adding SFLIGHT table to the Task
After adding the SFLIGHT table under the Task tab we can also define filters on the table and do some mappings but for now the focus would be on setting up a simple replication without any mapping or filters.
For the Target, the same name of source table is automatically picked but can be manually changed. In the Load Type we need to specify whether the load would contain both initial and delta or just the initial load. The Truncate functionality can be checked if the user wants to clear up the existing content of the chosen target. In this blog since the chosen target does not contain any content so we can leave the truncate functionality unchecked.
Hit the Save button to save the replication flow!

Configuring Tasks in Replication Flow
Validating the Replication Flow
After saving the flow click on the Validate button next to save. Validating the replication flow checks whether the configured replication flow satisfies the minimum requirements. The validation checks are shown in the image below that appears after the validation process completes.

Validating Replication Flow
Deploying the Replication Flow
If the validation check does not give out any errors, then the next step would be to deploy the replication flow by clicking the Deploy button next to Validate. Deploying the replication flow is a necessary step prior to running it.
After the replication flow is successfully deployed, the Activity Monitor tab would show that deployment has been successful without any errors.
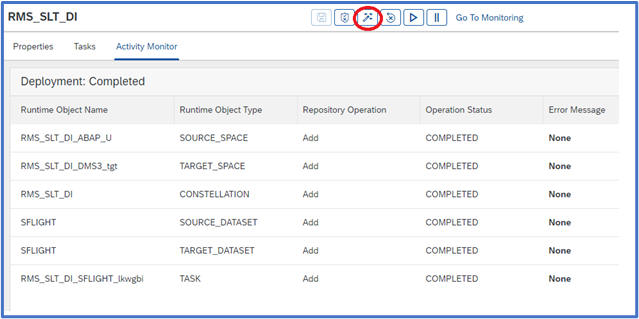
Deploying Replication Flow
Run the Replication Flow
The final step would be to run the flow by clicking the Run button. The current status can be seen in the Activity Monitor.

Running Replication Flow after deployment
Additionally, clicking on Go To Monitoring button would open Data Intelligence monitoring application where we can monitor the replication progress and see additional details. Below image shows that the initial load has been completed successfully, and the current status has changed to delta transfer.
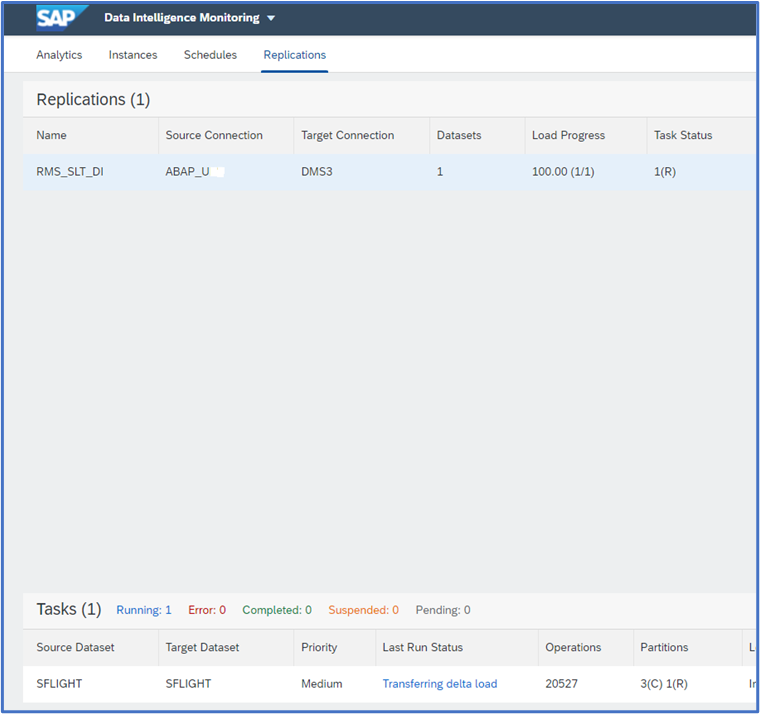
Replication Flow Status in SAP Data Intelligence Monitoring
Moreover, We can also navigate to the Metadata Explorer and browse the S3 bucket connection to preview the successfully replicated table. In metadata explorer we can see that RMS creates separate folders for initial load and Delta.

S3 Target in Metadata Explorer

Previewing SFLIGHT table data in S3 after Replication
Note: In order to do any changes to the configuration of the replication flow or to reset the entire process the flow needs to be undeployed by clicking on the Undeploy button.
Conclusion
This blog gives an overview in setting up a simple replication flow in SAP Data Intelligence Cloud. I hope the blog gave an idea on how easy it is to replicate data from a SLT system to an AWS S3 bucket in few simple steps via SAP Data Intelligence cloud RMS functionality.
As I only focused on the SLT replication in the blog, RMS offers a lot more, like configuring your replication flows with custom mappings, filters and supports variety of objects like CDS views ,ODP extractors and an easy to use user-interface as mentioned in the beginning. It can handle small to large datasets easily for replication scenarios.
Thank you for reading and feel free to share any thoughts or feedback into the comment section and follow my profile for related future posts.
Related Topics -
- SAP Data Intelligence Cloud Topic Page (https://community.sap.com/topics/data-intelligence)
- SAP Data Intelligence Cloud Help Page
- Ask questions about SAP Data Intelligence Cloud and follow (https://answers.sap.com/tags/73555000100800000791)
- Read other SAP Data Intelligence blog posts and follow (https://blogs.sap.com/tags/73555000100800000791/)
- SAP Managed Tags:
- SAP Data Intelligence,
- SAP Landscape Transformation replication server
Labels:
9 Comments
You must be a registered user to add a comment. If you've already registered, sign in. Otherwise, register and sign in.
Labels in this area
-
ABAP CDS Views - CDC (Change Data Capture)
2 -
AI
1 -
Analyze Workload Data
1 -
BTP
1 -
Business and IT Integration
2 -
Business application stu
1 -
Business Technology Platform
1 -
Business Trends
1,661 -
Business Trends
88 -
CAP
1 -
cf
1 -
Cloud Foundry
1 -
Confluent
1 -
Customer COE Basics and Fundamentals
1 -
Customer COE Latest and Greatest
3 -
Customer Data Browser app
1 -
Data Analysis Tool
1 -
data migration
1 -
data transfer
1 -
Datasphere
2 -
Event Information
1,400 -
Event Information
65 -
Expert
1 -
Expert Insights
178 -
Expert Insights
280 -
General
1 -
Google cloud
1 -
Google Next'24
1 -
Kafka
1 -
Life at SAP
784 -
Life at SAP
11 -
Migrate your Data App
1 -
MTA
1 -
Network Performance Analysis
1 -
NodeJS
1 -
PDF
1 -
POC
1 -
Product Updates
4,577 -
Product Updates
330 -
Replication Flow
1 -
RisewithSAP
1 -
SAP BTP
1 -
SAP BTP Cloud Foundry
1 -
SAP Cloud ALM
1 -
SAP Cloud Application Programming Model
1 -
SAP Datasphere
2 -
SAP S4HANA Cloud
1 -
SAP S4HANA Migration Cockpit
1 -
Technology Updates
6,886 -
Technology Updates
408 -
Workload Fluctuations
1
Related Content
- 10+ ways to reshape your SAP landscape with SAP Business Technology Platform – Blog 4 in Technology Blogs by SAP
- explore the business continuity recovery sap solutions on AWS DRS in Technology Blogs by Members
- SAP Datasphere: Using Replication Flows on Finance Foundation Business Content in Technology Q&A
- Replication flows: SAP Datasphere to Google BigQuery in Technology Blogs by Members
- Possible Use Cases Of ECC & S/4HANA Connection With SAP Datasphere. in Technology Q&A
Top kudoed authors
| User | Count |
|---|---|
| 13 | |
| 10 | |
| 10 | |
| 7 | |
| 6 | |
| 5 | |
| 5 | |
| 5 | |
| 5 | |
| 4 |