


- SAP Community
- Products and Technology
- Enterprise Resource Planning
- ERP Blogs by SAP
- Approval Workflow for Service Quotation
Enterprise Resource Planning Blogs by SAP
Get insights and updates about cloud ERP and RISE with SAP, SAP S/4HANA and SAP S/4HANA Cloud, and more enterprise management capabilities with SAP blog posts.
Turn on suggestions
Auto-suggest helps you quickly narrow down your search results by suggesting possible matches as you type.
Showing results for
sanju_joseph
Participant
Options
- Subscribe to RSS Feed
- Mark as New
- Mark as Read
- Bookmark
- Subscribe
- Printer Friendly Page
- Report Inappropriate Content
04-23-2023
4:56 PM
One of the key features of workflow is to enable an organization to automate and streamline their processes, however, sometimes it’s too rigid and do not meet specific business needs. In this blog, we will explore how to create a flexible workflow for Service Quotation that can adapt to changing business requirements.
The flexible workflow is a general function that allows you to define condition-based workflows for approval processes. The functionality is available with CE2302. The flexible workflow for a Service Quotation allows you to define Single Stage Approval Processes for Service Quotation according to your requirements. Approvers can then approve or reject their work items in the app My Inbox. The functionality supported by the approval process includes:
If you are setting up the approval workflow for the first time, there are some prerequisites. We will delve into the details of Prerequisite which includes configuring the agent, custom condition, email template and some initial setup.
Before we setup the workflow for the first time, there are some steps that may be relevant.

Once the above steps are completed, the status drop down will display the additional Approval Workflow statuses.
Also, the button 'Send for Approval' is enabled if the status of quotation is ‘Open’, ‘Under Review’ and the new assignment block ‘Approval Details’ is visible.
With the Manage Responsibility Rules app, customers can create custom/copy standard responsibility rule delivered by SAP to determine agents that are responsible for workflows and business scenarios and then customize it with business logic to suit business process requirements.
You can refer the blog, Steps are almost similar with few variation specific to service quotation scenario.
In this example we are trying to determine the Agent Responsible for the Processing the Approval workflow related to Service Quotation that is assigned to Sales Org ‘1710’.
Go to App Custom Logic.
Go to Top right corner of this APP and click on create and choose Business Context as ‘Service Header’.
You want to send an e-mail notification to the requester to let him know whether his request was approved or rejected or send an e-mail notification to the processors of a work item to inform them about a coming deadline violation.
Copy the Template in App: Maintain Email Templates.
By default when the system is set up for the first time, you only have ‘Predelivered workflow Content’ . The Predelivered content is triggered in a scenario when none of the process definitions the start conditions apply for example the scenario that is setup here is to trigger the workflow when the service quotation Sales org is '1710', but if the service quotation does not belong to Sales org '1710' then there is no process definition that start the condition and the default predelivered workflow is triggered which will initiate auto approval.
Now we will create the custom process definition.
Go to App “Manage workflow for Service Quotation” .
The App include the following key features.
Click on Create
Provide some meaningful description and start condition, the only Standard start condition delivered is ‘Service Quotation Type’, User can configure additional Custom Condition like for example ‘Sales Org’ or any use any other custom fields. Please check my next blog detailing the creation of custom condition for approval workflow.
So if the start condition is met the workflow is triggered.
In the next step , we define the steps, here we provide some step name and choose the step type ‘Release of Service Quotation’, The other option to select is ‘Automatic Release of Service Quotation’, this can be selected for Auto Approval Scenario but since we would like to determine the agent that was configured earlier in the steps above, we will go with the option Step type as ‘Release of Service Quotation’ , the Assignment By can Role or User based . If you choose User, the agent can be picked from a F4 help for Role Based the agent is determined based on BADI.
There are several options available that can be explored further.
Next step is to define the deadline, this is to define the action when certain threshold is crossed, it could be to mark step as overdue in MyInbox App or to notify the recipient(workflow Initiator or the Agent) via an email.
Exception handling is like a deadline, but certain actions are triggered which could be processed further in a workflow. With this release no special handling is carried out for each of these exceptions, so user can choose the option to cancel workflow.
The final step is the email notification and we have chosen the 'Initiator of the workflow' to be notified via an email when the workflow is approved or rejected.
It’s important to understand who is the 'Workflow Initiator', well in this parlance the initiator is the person who clicks on send for approval button.
And the final step is to activate the newly created process definition.
It’s a time to test our newly configured workflow, User navigate to app ‘Manage workflow for Service Quotation’, Select one of the quotation in status Open or Under Review and then click on button 'Send for Approval'. This will send the workflow to the agent that is configured above.
Agent can check the triggered workflow in app My Inbox and then can take necessary action like approve, reject. MyInbox app comes up with lots of features like attachment, comments,open task that help agent in taking decisive action.(The comments added in the notes section of service quoation is visible to Agent in MyInbox app).
Voila, you have configured the approval workflow for service quotation.Though the blog has not covered the aspect of the authorization, gateway setting which is beyond the scope of this blog but if you are stuck or facing some technical challenges, please drop your queries/comments. I will try my best to provide the answers.
Stay tuned for my next blog post where I will explain the steps to create custom condition for the approval workflow scenario.
help.sap.com
Introduction
The flexible workflow is a general function that allows you to define condition-based workflows for approval processes. The functionality is available with CE2302. The flexible workflow for a Service Quotation allows you to define Single Stage Approval Processes for Service Quotation according to your requirements. Approvers can then approve or reject their work items in the app My Inbox. The functionality supported by the approval process includes:
- Sending quote for Internal Approval before it's released to customer.
- Approval Withdrawal.
- Sending of quote for Internal Approval based on preconfigured condition e.g., based on service margin below or above certain percentage value.
- Email Notification
- Search and Filter the quotation in the Manage Service Quotation Application based on Approval Statuses.
If you are setting up the approval workflow for the first time, there are some prerequisites. We will delve into the details of Prerequisite which includes configuring the agent, custom condition, email template and some initial setup.
Prerequisites
| Workflow Scenario ID | WS04300018 |
| Status Profile | SERVQTWF |
| Responsibility Rule | SRV_QTAN_AGENT |
Before we setup the workflow for the first time, there are some steps that may be relevant.
- Activate the workflow ‘WS04300018’ ( tcode SWF_PROCESS_ADMIN ).

- Maintain Status Profile ‘SERVQTWF’ to One of the Service Quotation Transaction Type.

- Ensure Edit runtime environment is green(tcode: SWU3).
Once the above steps are completed, the status drop down will display the additional Approval Workflow statuses.
| Sent for Approval |
| Approval Released |
| Approval Rejected |

Approval Workflow Status
Also, the button 'Send for Approval' is enabled if the status of quotation is ‘Open’, ‘Under Review’ and the new assignment block ‘Approval Details’ is visible.

Approval Details Assignment Block and Send for Approval Button
Agent Determination.
With the Manage Responsibility Rules app, customers can create custom/copy standard responsibility rule delivered by SAP to determine agents that are responsible for workflows and business scenarios and then customize it with business logic to suit business process requirements.
Using the Responsibility Rule BAdI
Customers can implement business logic and associate it with a custom responsibility rule. This association is achieved by keeping the custom responsibility rule ID same as the BAdI filter value.
- Log on to SAP Fiori launchpad as an administrator (SAP_BR_ADMINISTRATOR role). Click on tile Manage Responsibility rules under group Extensibility for Responsibility Management. You will see a list of standard rules delivered by SAP and a list custom rule created by you under two separate tabs.

- Go to Custom Tab and Click on Create.
- Enter a rule ID and description (Prefix is populated automatically: For Cloud YY1_ Prefix is populated). BAdi filter gets populated automatically based on the ID you have assigned.

- Click on the create button for Parameters. This step is optional, for our scenario we keep it blank however if you choose to add the rule parameter then Enter a parameter name, description, type, CDS view, and field. If the parameter type is Element, you have to enter the CDS view and field. If the parameter type is Table or Structure select a CDS view. You can use only whitelisted CDS views.
- Save the Rule.
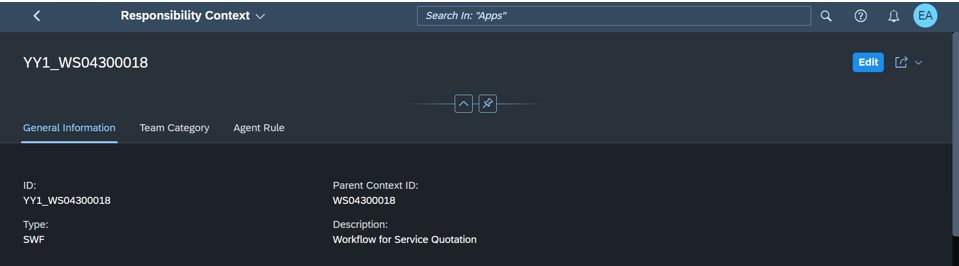
With the Manage Responsibility Contexts application.
- You or your customers can see the list of standard responsibility contexts delivered by SAP application teams for agent determination.
- Your customers can also extend a standard responsibility context by adding your custom agent rule to determine agents that are responsible for your business process tasks, objects, and situation handling.
- Your customers can also create custom responsibility contexts and map standard / custom team category and custom agent rules that are responsible for their business process tasks, objects and situation handling.
- Log on to SAP Fiori launchpad as an administrator (SAP_BR_ADMINISTRATOR role). Open app "Manage Responsibility Contexts".

- You will see a list of standard contexts delivered by SAP and extensions created by you under separate tabs. Context type SITU is for Situations and SWF is for Workflow.

- Select a standard responsibility context id ‘WS04300018’ and choose Extend.Please note that Extend button is only available if it is an extensibility dev system/clientThe Extend button is not available if a standard responsibility context has already been extended ie a standard context can be extended only once.If you want to make any change to an existing context extension, you can edit the context extension.
You navigate to the context details page that might have an assigned team category and standard agent rules.
- From the Agent Rule tab, choose Create.
You navigate to the agent rule details page where you can assign a custom responsibility rule to the agent rule.
- Select the value help for ‘Data source mapping’,Map the correct CDS field/value from the value help.

- Choose Apply and Save, the Agent rule is added and Responsibility Context Extension is Saved Successfully.
Custom fields and logic app
You can refer the blog, Steps are almost similar with few variation specific to service quotation scenario.
In this example we are trying to determine the Agent Responsible for the Processing the Approval workflow related to Service Quotation that is assigned to Sales Org ‘1710’.
Go to App Custom Logic.
Go to Top right corner of this APP and click on create and choose Business Context as ‘Service Header’.
- New pre conditions can be defined using custom BADI SWF_WORKFLOW_CONDITION_DEF.
 Assign the scenario ID : ‘WS04300018’
 Provide the implementation description,implementation id gets populated automatically based on the description you have assigned.
 Click on Review and Create.Open the code editor and write the logic to define the new precondition, Here we are defining the condition Sales Org with parameter value equals '1710'
* condition id - value to be changed
data : ls_condition like line of ct_condition.
data : ls_parameter like line of ct_parameter.
ls_condition-id = 1.
ls_condition-subject = 'Sales Org'.
ls_condition-type = if_swf_flex_ifs_condition_def=>cs_condtype-start_step.
append ls_condition to ct_condition.
ls_parameter-id = 1.
ls_parameter-name = '1710'.
ls_parameter-xsd_type = if_swf_flex_ifs_condition_def=>cs_xstype-string.
ls_parameter-mandatory = abap_false.
append ls_parameter to ct_parameter.

- Defined step condition that needs to be evaluated using BADI SWF_WORKFLOW_CONDITION_EVAL Repeat same steps as above to create the BADI implementation, but this time in BADI description select “Value evaluation of addition conditions for scenarios”.
 In this badi implementation we will read the value of the condition defined which is Sales Org = 1710 and then check if the Service Quotation Sales Org ID matches with Predefined Condition Sales Org ID, if true then pass CV_IS_TRUE = ‘X’ else false.CV_IS_TRUE is parameter to activate the workflow.
DATA:

      lv_org        TYPE VKORG.


SELECT SINGLE * INTO  @DATA(lS_service)

FROM I_ServiceDocumentEnhcd

WHERE ServiceDocument = @is_sap_object_node_type-sont_key_part_1.

IF sy-subrc <> 0.

      RAISE EXCEPTION TYPE cx_ble_runtime_error

        EXPORTING

          previous = NEW cx_swf_flex_lra( textid = cx_swf_flex_lra=>object_instance_not_found ).

    ENDIF.


READ TABLE it_parameter_value INTO DATA(ls_param_value) INDEX 1.

IF sy-subrc = 0.

      lv_org = ls_param_value-value.

    ENDIF.


IF lS_service-SALESORGANIZATION = ls_param_value-value.

cv_is_true = abap_true.

ELSE.

cv_is_true = abap_false.

ENDIF.

Now with all the steps above we will be able to activate the workflow for Service Quotation that is having Sales Org = 1710 assigned.
As a next step we would like to determine the agent responsible for processing the Service Quotation. - BADI: RSM_BADI_RESPONSIBILITY_RULE
 Assign the STATIC_RULE_FILTER = YY1_AGENT_DET_QTAN(The filter rule was created in step above).In the code editor we can assign the agent responsible for processing the workflow, Sample code can be refered and modified as per the business requirement.
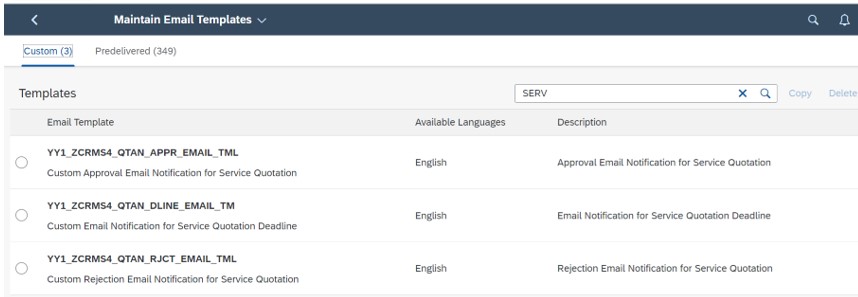
Flexible Workflow - E-Mail Templates
You want to send an e-mail notification to the requester to let him know whether his request was approved or rejected or send an e-mail notification to the processors of a work item to inform them about a coming deadline violation.
| Use Case | Template | Description |
| Workflow End | CRMS4_QTAN_APPR_EMAIL_TMPL | At the end of the workflow the workflow initiator shall be informed about the Approval of the approval. |
| Workflow End | CRMS4_QTAN_RJCT_EMAIL_TMPL | At the end of the workflow the initiator shall be informed about the Rejection of the approval. |
| Step Deadline | CRMS4_QTAN_DLINE_EMAIL_TMPL | When a deadline was reached the step is marked as Overdue. |
Copy the Template in App: Maintain Email Templates.
Manage workflow app for Service Quotation.
By default when the system is set up for the first time, you only have ‘Predelivered workflow Content’ . The Predelivered content is triggered in a scenario when none of the process definitions the start conditions apply for example the scenario that is setup here is to trigger the workflow when the service quotation Sales org is '1710', but if the service quotation does not belong to Sales org '1710' then there is no process definition that start the condition and the default predelivered workflow is triggered which will initiate auto approval.
Now we will create the custom process definition.
Go to App “Manage workflow for Service Quotation” .
The App include the following key features.
- View a list of available approval workflows
- Display approval workflow details
- Edit workflow details
- Name
- Start/End dates
- Validity dates
- Define order in which workflow start conditions will be evaluated
- Activate and deactivate workflows
- Make a copy of an existing approval workflow
- Delete a draft of an existing workflow
- Set start conditions for workflows
Click on Create
Provide some meaningful description and start condition, the only Standard start condition delivered is ‘Service Quotation Type’, User can configure additional Custom Condition like for example ‘Sales Org’ or any use any other custom fields. Please check my next blog detailing the creation of custom condition for approval workflow.
So if the start condition is met the workflow is triggered.

In the next step , we define the steps, here we provide some step name and choose the step type ‘Release of Service Quotation’, The other option to select is ‘Automatic Release of Service Quotation’, this can be selected for Auto Approval Scenario but since we would like to determine the agent that was configured earlier in the steps above, we will go with the option Step type as ‘Release of Service Quotation’ , the Assignment By can Role or User based . If you choose User, the agent can be picked from a F4 help for Role Based the agent is determined based on BADI.
There are several options available that can be explored further.
Next step is to define the deadline, this is to define the action when certain threshold is crossed, it could be to mark step as overdue in MyInbox App or to notify the recipient(workflow Initiator or the Agent) via an email.

Exception handling is like a deadline, but certain actions are triggered which could be processed further in a workflow. With this release no special handling is carried out for each of these exceptions, so user can choose the option to cancel workflow.

The final step is the email notification and we have chosen the 'Initiator of the workflow' to be notified via an email when the workflow is approved or rejected.

It’s important to understand who is the 'Workflow Initiator', well in this parlance the initiator is the person who clicks on send for approval button.
And the final step is to activate the newly created process definition.

Testing:
It’s a time to test our newly configured workflow, User navigate to app ‘Manage workflow for Service Quotation’, Select one of the quotation in status Open or Under Review and then click on button 'Send for Approval'. This will send the workflow to the agent that is configured above.
Agent can check the triggered workflow in app My Inbox and then can take necessary action like approve, reject. MyInbox app comes up with lots of features like attachment, comments,open task that help agent in taking decisive action.(The comments added in the notes section of service quoation is visible to Agent in MyInbox app).

Voila, you have configured the approval workflow for service quotation.Though the blog has not covered the aspect of the authorization, gateway setting which is beyond the scope of this blog but if you are stuck or facing some technical challenges, please drop your queries/comments. I will try my best to provide the answers.
Stay tuned for my next blog post where I will explain the steps to create custom condition for the approval workflow scenario.
help.sap.com
- SAP Managed Tags:
- SAP S/4HANA
Labels:
1 Comment
You must be a registered user to add a comment. If you've already registered, sign in. Otherwise, register and sign in.
Labels in this area
-
Artificial Intelligence (AI)
1 -
Business Trends
363 -
Business Trends
20 -
Customer COE Basics and Fundamentals
1 -
Digital Transformation with Cloud ERP (DT)
1 -
Event Information
461 -
Event Information
23 -
Expert Insights
114 -
Expert Insights
150 -
General
1 -
Governance and Organization
1 -
Introduction
1 -
Life at SAP
415 -
Life at SAP
2 -
Product Updates
4,687 -
Product Updates
202 -
Roadmap and Strategy
1 -
Technology Updates
1,502 -
Technology Updates
85
Related Content
- Time Constraints - Purchase order wprkflow approval in Enterprise Resource Planning Q&A
- How do I develop a reservation workflow that triggers cost center owner approval? in Enterprise Resource Planning Q&A
- workflow changes in Enterprise Resource Planning Q&A
- How to Set Up Approval Workflows for Supplier Down Payment Requests in Enterprise Resource Planning Blogs by SAP
- SAP WORKFLOW in Enterprise Resource Planning Q&A
Top kudoed authors
| User | Count |
|---|---|
| 5 | |
| 5 | |
| 4 | |
| 4 | |
| 3 | |
| 3 | |
| 3 | |
| 3 | |
| 2 | |
| 2 |