
- SAP Community
- Products and Technology
- Enterprise Resource Planning
- ERP Blogs by SAP
- Cancelation Prediction of Outbound Delivery in Mac...
Enterprise Resource Planning Blogs by SAP
Get insights and updates about cloud ERP and RISE with SAP, SAP S/4HANA and SAP S/4HANA Cloud, and more enterprise management capabilities with SAP blog posts.
Turn on suggestions
Auto-suggest helps you quickly narrow down your search results by suggesting possible matches as you type.
Showing results for
Employee
Options
- Subscribe to RSS Feed
- Mark as New
- Mark as Read
- Bookmark
- Subscribe
- Printer Friendly Page
- Report Inappropriate Content
04-18-2023
8:51 AM
Ahem, attention all business owners! Do you ever feel like Sherlock Holmes trying to solve the case of the missing delivery? Well, worry no more! Introducing the Machine Learning Cockpit in SAP Business ByDesign! This nifty tool predicts the risk of delivery cancellations and helps you avoid any potential disasters.
Just like how Sherlock uses his powers of deduction to solve mysteries, the Machine Learning Cockpit uses historical data to predict the status of outbound deliveries that are still in progress. And the best part? It displays the prediction results directly in the Outbound Deliveries document, allowing you to take action right then and there.
By using this solution, you can make proactive data-driven decisions, avoid the dreaded cancellation of deliveries and free up valuable resources. It's like having your own personal Watson to help you with your business processes!
So, say goodbye to unnecessary follow-ups and stress and hello to efficiency and customer satisfaction. With the Machine Learning Cockpit, you'll be able to deliver products like a true detective, solving the case of the missing delivery one successful delivery at a time.
On a different mission today, Sherlock? Check the links at the end to get your hands on my other blogs related to Machine Learning Cockpit use cases.
You must have the authorization to access the following work center / work center views:
In this blog, we'll go through all the steps to make predictions with the help of the Outbound Delivery Header Details data source where, predictions can be consumed in the General tab of the Outbound Deliveries document.
Alternatively, you can experiment and try to apply similar use cases for other data sources, such as:
In the above cases, predictions can be consumed in the Item tab of the Outbound Deliveries document.
Now to give you an overview, firstly we'll cover the creation of a scenario, which is a set of data and parameters that are used to create and train a machine learning model.
Next, we'll dive into the model building and training process. We'll walk through the steps to create and train your own model, so you can get accurate predictions.
Once you have your model, we'll see how to create and execute a prediction run. This will allow you to see your model in action, making predictions based on your specific data.
Finally, we'll look at how to view your predictions in the Outbound Logistics UI. This will give you a visual representation of your data, making it easy to understand and work with. By following these steps, you'll have a comprehensive understanding of how to implement the solution end-to-end.
So, let’s get started with steps to create a new Scenario in Machine Learning Cockpit.
To create a new scenario, navigate to the Machine Learning Cockpit work center and select the Scenario work center view. This is where you will find all existing scenarios and be able to create new or edit existing ones.
Once you're in the Scenario work center view, click the "New" button to create a new scenario. This will open a new window where you can enter the details for your new scenario. Name your scenario and make sure it starts with the letter Z, e.g., Z_OD_CANCEL_PREDICTION, otherwise the tool will throw out an error as By Design has this rule for all user defined scenarios.
You should now select the data source that you want to use for your scenario in the Data Source field. For this case select "Outbound Delivery Header Details"
Then you must select the field that you want to predict in the Target Field section, " Cancellation Status" in this case.
Next, from the list of work center views, select the Work Center View ID. For example, " Outbound Deliveries". If there are no work center views in the list, it means that there is either no report created for the “Outbound Delivery Header Details” data source or none of the reports have the work center view assigned.
Moreover, under Input Field Selection, you should select the fields to be included in the training which may contribute to decide the outcome of Target field. I recommend selecting more fields in scenarios and decide about final selection in the model, based on data distribution statistics. Make sure to avoid fields that contain either ID or data from past years which is not helpful for new items, or which have data for only one outcome and null values for others and so on. You may refer to Technical Specification | SAP Help Portal to read details about the fields for Outbound Delivery - Cancelation Prediction use case.
In order to restrict training data to items for which the business outcome is already known, add Filter Conditions. For this scenario, use Delivery Status = “Finished” and Release Status = “Not Released”.
Also, to use dates as the features for model learning, add Shipment Date with “Categorical” Date Representation and “Day in a week” as date part in Date Part Split under Data Pre-processing Settings tab.
Finally, Save, Release, and Close the scenario. Your scenario should look something like below image.
That’s all. You have completed the first step and now your scenario is ready to have models built up on it. Let’s go through the next section Model Management to understand how to build and train a model.
There are 3 sections here - model creation, data pre-processing and model training. Data pre-processing is a major step before model training. Raw data might contain many garbage values or no value at all which may lead to training failure or inefficient training and low accuracy. This is not we want.
We will start by navigating to the Model work center view and selecting the ‘New’ button. At this point, under General Information tab, you will be prompted to enter information like name and description of model, as well as the selection of the scenario that the model will be used for, Z_OD_CANCEL_PREDICTION, in this case. Once you’ve entered this information, in order to load the data in the model, you will have to click Load Data button. I will suggest checking the number of rows and columns in the loaded dataset to ensure there is no anomaly. You are now all set to move to the next tab by clicking Next button.
As we move to the Filtering Data tab, you can see all the fields which we selected in scenario to be included in training. Now you have to decide which columns to keep based on the data distribution information provided, like removing the fields which contains a large number of null values. The tool will by default, mark the fields to be removed based on the default settings from scenario. I would suggest to see the section Model - Filtering Data in online Help Portal for details. Do make sure to check the number of rows and columns to ensure you don’t end up removing a larger portion of data. Click the Apply Filters button to perform the filtering operation. We will then move to Nulls Removal tab by selecting Next button.

In Nulls Removal tab, we usually replace null values with -1 to avoid them influence the model training. To do so, click on the Remove Nulls button. The status will then be updated to Nulls removed once the operation is performed. Selecting Next now will take us to Outlier Removal tab.
Outlier removal is a crucial part of ensuring that your data is accurate and will produce reliable results. When you get to the Outliers Removal tab, make sure you activate the checkbox “Activation of Outlier Removal” to start the operation. You'll want to sort your table by the number of outliers so you can see which fields are causing the most problems. Keep an eye on fields with long-tail values, as they might be flagged as outliers even if they're legitimate data points.
If you find that too much data is being removed, you can try adjusting the threshold values for those specific fields. Select the "Remove Outliers" button to perform this operation. Just ensure that you click this button after each change to see how it affects your data. If you're happy with the results, hit "Next" and move on to the next step.
Don't forget to check out the Model – Outliers Removal section in online Help Portal for more information. With a little tweaking, you can ensure that your data is clean and ready to be used in your models.
Finally, we are ready to train our model. In the Training Settings tab, you can see the algorithm our model will use for learning. This is preselected while creating scenario. However, if you are not satisfied with the training results and wish to try different algorithm, you must create a new scenario or copy existing one and change the algorithm.
To start the training, select the Train button. Once the “Training in Progress” Status is shown, you can close the Model UI and check the model training status periodically in the Models work center view.
When model training is complete, you should check the Accuracy to determine the training quality. To see the extended model quality indicator, click the “Show Training Results” button and check Model Evaluation Indicators Per Class and Field Contributions. Just a tip, if you see failed training then check the error log by selecting the Results tab under “Show Log” link.
You should now check whether the model quality is acceptable, or you want to retrain the model with different settings. Some of the parameter that can help you take that decision are Accuracy and F1 score for each class. More the merrier, but a score of 100% is always suspicious of overfitting. In case of acceptable model quality, select the Activate button to activate the model.
Great job! Now our model is trained and tested. It’s the time to run predictions on unreleased outbound deliveries. Prediction Run Management section below explains that in detail.
This is the process for which we were preparing the data. To get started with Prediction Runs, you first need to create two extension fields in the Outbound Deliveries document: " Cancelation Prediction" and "Cancelation Probability", in business context Outbound Delivery - General Information. My recommendation would be to use field type ‘Extended Text’ and ‘Decimal Number’ respectively. Later, these fields will be used to map the prediction results to be able to view them in the Outbound Delivery UI. You can read more about creating an extension field in SAP online Help portal.
Once you've created these fields, navigate to Prediction Run and select New to create new prediction run. This is where you'll set the name and scenario for your prediction, for e.g., Z_OD_CANCEL_PREDICTION. Also, map the extension fields “Conversion Prediction” to Prediction Outcome and “Conversion Probability” to Prediction Probability: to the appropriate prediction outcomes. You'll also want to add a filter condition to restrict the training data to quote items for which the business outcome is not yet known, for e.g., Delivery Status = “Not Started”, “In Process”; Release Status = “Not Released”.
Once your Prediction Run is set up, you can activate it and schedule the background job by selecting the Schedule button or run it directly by selecting Start Immediately button. Be sure to check the execution details periodically in Execution Details tab to ensure that the processing status is "Finished". Once it is, you can check the execution status in the Application Log. You can also use the Prediction Results data source (MLSINFB) and filter by the scenario name you set earlier to see the results of your prediction.
That was it. All the unrelease outbound deliveries should now have a predicted business outcome assigned to them and the probability of that outcome being true.
Now comes the exciting part - checking the prediction results!
You did it! These predictions can be viewed in both business documents and Business Analytics.
To view them in business documents, let’s move to Outbound Deliveries work center under Outbound Logistics. Select an unreleased delivery and open it. Voila! The extension fields “Cancelation Prediction” and “Cancelation Probability” now displays ML predicted outcome and how confident the model is about the prediction.
In business analytics, you can consume predictions by navigating to the Prediction Results data source. This data source provides a list of all prediction scenarios in the form of Prediction Outcome, Prediction Probability, and key influencers. To view these predictions in the context of current scenario data, you will need to create a new join data source. You can do this by navigating to the Prediction Results data source, selecting “New -> Join Data Source”, entering a new name for the data source, for e.g., “Outbound Delivery – Cancelation Prediction” and selecting the Next button. You then select all the available fields before selecting Finish. Now switch to the Joined Data Sources tab and select the data source with you want to join Prediction Results by using Add option, "Outbound Delivery Header Details” in this case. In the Next tab, you should select the Key field in the Prediction Results data source and the Delivery UUID field in the Outbound Delivery Header Details data source. Create the join by selecting the Add button and move to the Next tab. Here, select all fields before finishing the process. Now, switch to Preview tab to make sure the join works, and finally Save and Close. This new join data source will provide you with a consolidated view of predictions for all unreleased outbound deliveries.
That’s how Machine Learning Cockpit can help by doing the analysis and prediction for you so that you can focus on important things like strategies, action items and customer relationship.
Feel free to post your questions or share your experience in comments about this use case of Machine Learning Cockpit for SAP Business ByDesign.
Do check out my other blog related to Machine Learning Cockpit use cases by clicking the link below and stay tuned for more.
Success Prediction of Sales Quote Item in Machine Learning Cockpit | SAP Blogs
Customer ABC Classification Proposal in Machine Learning Cockpit | SAP Blogs
Just like how Sherlock uses his powers of deduction to solve mysteries, the Machine Learning Cockpit uses historical data to predict the status of outbound deliveries that are still in progress. And the best part? It displays the prediction results directly in the Outbound Deliveries document, allowing you to take action right then and there.
By using this solution, you can make proactive data-driven decisions, avoid the dreaded cancellation of deliveries and free up valuable resources. It's like having your own personal Watson to help you with your business processes!
So, say goodbye to unnecessary follow-ups and stress and hello to efficiency and customer satisfaction. With the Machine Learning Cockpit, you'll be able to deliver products like a true detective, solving the case of the missing delivery one successful delivery at a time.
On a different mission today, Sherlock? Check the links at the end to get your hands on my other blogs related to Machine Learning Cockpit use cases.
Prerequisites
You must have the authorization to access the following work center / work center views:
- Business Analytics
- Machine Learning Cockpit
- Outbound Logistics
Step-by-Step Procedure
In this blog, we'll go through all the steps to make predictions with the help of the Outbound Delivery Header Details data source where, predictions can be consumed in the General tab of the Outbound Deliveries document.
Alternatively, you can experiment and try to apply similar use cases for other data sources, such as:
- Outbound Delivery Item Party Details - The benefit of using this data source is that it also contains information about the Product.
- Join data source created by joining Outbound Delivery Item Party Details and Outbound Delivery Header Details - The benefit of using this data source is that the resulting joined data source offers more fields that can be useful for model training.
- Join data source created by joining Outbound Delivery Item Party Details and Material Master Data - Using this data source also offers more fields in the resulting joined data source to enhance model training.
In the above cases, predictions can be consumed in the Item tab of the Outbound Deliveries document.
Now to give you an overview, firstly we'll cover the creation of a scenario, which is a set of data and parameters that are used to create and train a machine learning model.
Next, we'll dive into the model building and training process. We'll walk through the steps to create and train your own model, so you can get accurate predictions.
Once you have your model, we'll see how to create and execute a prediction run. This will allow you to see your model in action, making predictions based on your specific data.
Finally, we'll look at how to view your predictions in the Outbound Logistics UI. This will give you a visual representation of your data, making it easy to understand and work with. By following these steps, you'll have a comprehensive understanding of how to implement the solution end-to-end.
So, let’s get started with steps to create a new Scenario in Machine Learning Cockpit.
Scenario Management
To create a new scenario, navigate to the Machine Learning Cockpit work center and select the Scenario work center view. This is where you will find all existing scenarios and be able to create new or edit existing ones.
Once you're in the Scenario work center view, click the "New" button to create a new scenario. This will open a new window where you can enter the details for your new scenario. Name your scenario and make sure it starts with the letter Z, e.g., Z_OD_CANCEL_PREDICTION, otherwise the tool will throw out an error as By Design has this rule for all user defined scenarios.
You should now select the data source that you want to use for your scenario in the Data Source field. For this case select "Outbound Delivery Header Details"
Then you must select the field that you want to predict in the Target Field section, " Cancellation Status" in this case.
Next, from the list of work center views, select the Work Center View ID. For example, " Outbound Deliveries". If there are no work center views in the list, it means that there is either no report created for the “Outbound Delivery Header Details” data source or none of the reports have the work center view assigned.
Moreover, under Input Field Selection, you should select the fields to be included in the training which may contribute to decide the outcome of Target field. I recommend selecting more fields in scenarios and decide about final selection in the model, based on data distribution statistics. Make sure to avoid fields that contain either ID or data from past years which is not helpful for new items, or which have data for only one outcome and null values for others and so on. You may refer to Technical Specification | SAP Help Portal to read details about the fields for Outbound Delivery - Cancelation Prediction use case.
In order to restrict training data to items for which the business outcome is already known, add Filter Conditions. For this scenario, use Delivery Status = “Finished” and Release Status = “Not Released”.

Also, to use dates as the features for model learning, add Shipment Date with “Categorical” Date Representation and “Day in a week” as date part in Date Part Split under Data Pre-processing Settings tab.
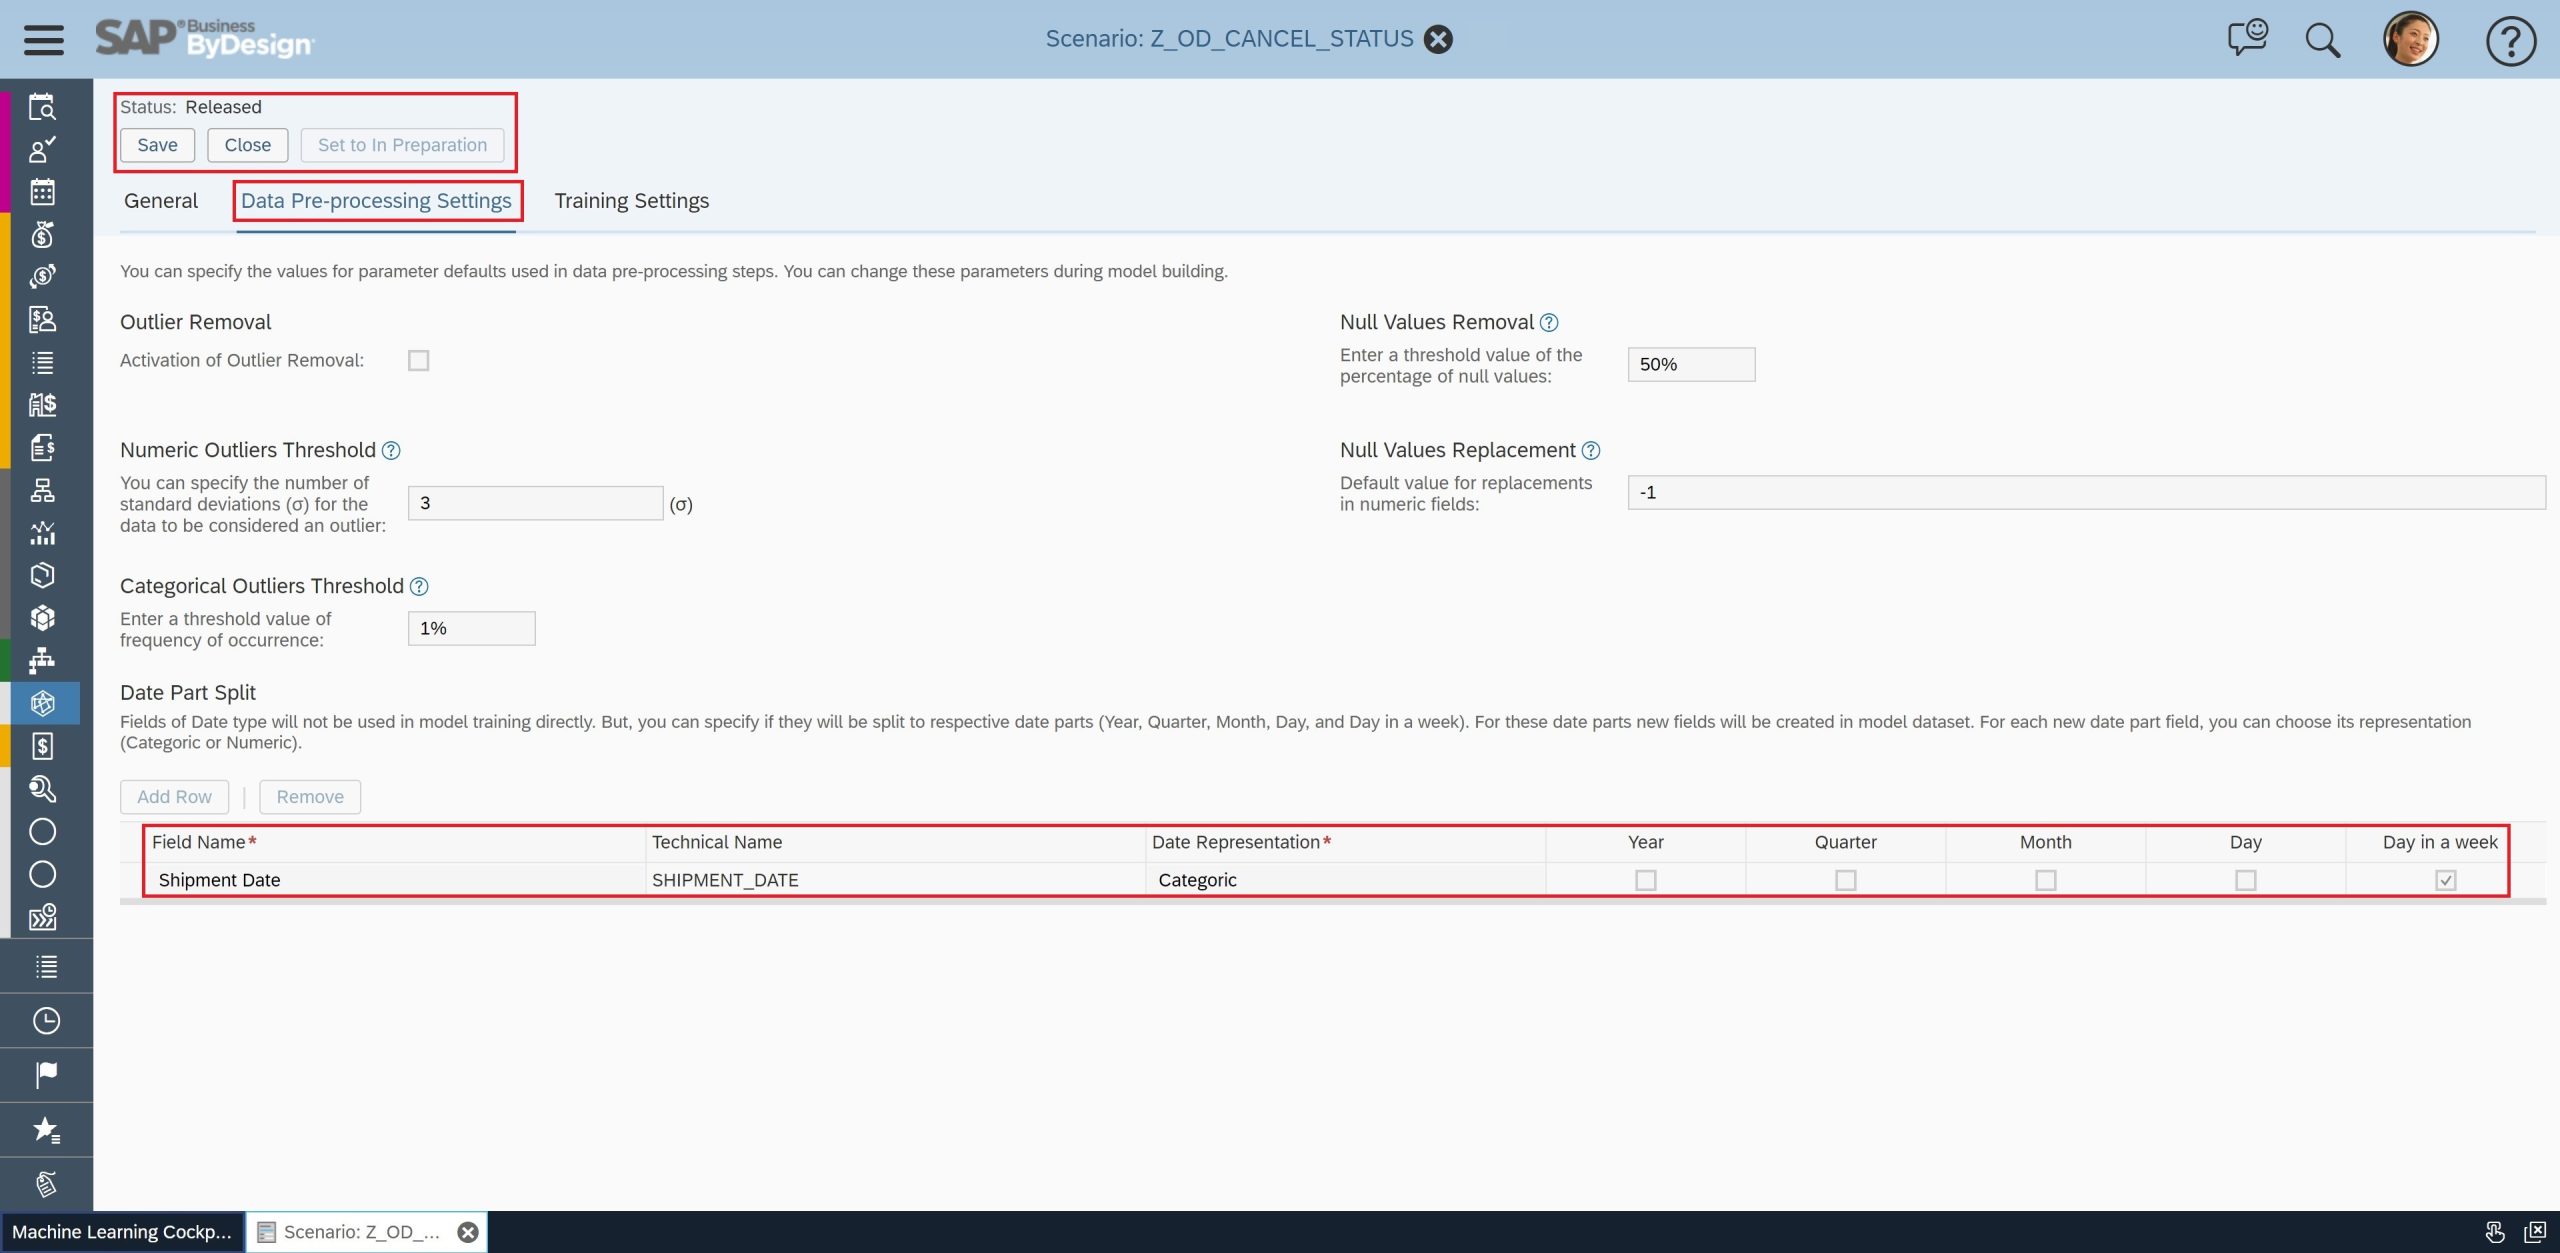
Finally, Save, Release, and Close the scenario. Your scenario should look something like below image.
That’s all. You have completed the first step and now your scenario is ready to have models built up on it. Let’s go through the next section Model Management to understand how to build and train a model.
Model Management
There are 3 sections here - model creation, data pre-processing and model training. Data pre-processing is a major step before model training. Raw data might contain many garbage values or no value at all which may lead to training failure or inefficient training and low accuracy. This is not we want.
We will start by navigating to the Model work center view and selecting the ‘New’ button. At this point, under General Information tab, you will be prompted to enter information like name and description of model, as well as the selection of the scenario that the model will be used for, Z_OD_CANCEL_PREDICTION, in this case. Once you’ve entered this information, in order to load the data in the model, you will have to click Load Data button. I will suggest checking the number of rows and columns in the loaded dataset to ensure there is no anomaly. You are now all set to move to the next tab by clicking Next button.

As we move to the Filtering Data tab, you can see all the fields which we selected in scenario to be included in training. Now you have to decide which columns to keep based on the data distribution information provided, like removing the fields which contains a large number of null values. The tool will by default, mark the fields to be removed based on the default settings from scenario. I would suggest to see the section Model - Filtering Data in online Help Portal for details. Do make sure to check the number of rows and columns to ensure you don’t end up removing a larger portion of data. Click the Apply Filters button to perform the filtering operation. We will then move to Nulls Removal tab by selecting Next button.
In Nulls Removal tab, we usually replace null values with -1 to avoid them influence the model training. To do so, click on the Remove Nulls button. The status will then be updated to Nulls removed once the operation is performed. Selecting Next now will take us to Outlier Removal tab.

Outlier removal is a crucial part of ensuring that your data is accurate and will produce reliable results. When you get to the Outliers Removal tab, make sure you activate the checkbox “Activation of Outlier Removal” to start the operation. You'll want to sort your table by the number of outliers so you can see which fields are causing the most problems. Keep an eye on fields with long-tail values, as they might be flagged as outliers even if they're legitimate data points.
If you find that too much data is being removed, you can try adjusting the threshold values for those specific fields. Select the "Remove Outliers" button to perform this operation. Just ensure that you click this button after each change to see how it affects your data. If you're happy with the results, hit "Next" and move on to the next step.
Don't forget to check out the Model – Outliers Removal section in online Help Portal for more information. With a little tweaking, you can ensure that your data is clean and ready to be used in your models.

Finally, we are ready to train our model. In the Training Settings tab, you can see the algorithm our model will use for learning. This is preselected while creating scenario. However, if you are not satisfied with the training results and wish to try different algorithm, you must create a new scenario or copy existing one and change the algorithm.
To start the training, select the Train button. Once the “Training in Progress” Status is shown, you can close the Model UI and check the model training status periodically in the Models work center view.

When model training is complete, you should check the Accuracy to determine the training quality. To see the extended model quality indicator, click the “Show Training Results” button and check Model Evaluation Indicators Per Class and Field Contributions. Just a tip, if you see failed training then check the error log by selecting the Results tab under “Show Log” link.

You should now check whether the model quality is acceptable, or you want to retrain the model with different settings. Some of the parameter that can help you take that decision are Accuracy and F1 score for each class. More the merrier, but a score of 100% is always suspicious of overfitting. In case of acceptable model quality, select the Activate button to activate the model.
Great job! Now our model is trained and tested. It’s the time to run predictions on unreleased outbound deliveries. Prediction Run Management section below explains that in detail.
Prediction Run Management
This is the process for which we were preparing the data. To get started with Prediction Runs, you first need to create two extension fields in the Outbound Deliveries document: " Cancelation Prediction" and "Cancelation Probability", in business context Outbound Delivery - General Information. My recommendation would be to use field type ‘Extended Text’ and ‘Decimal Number’ respectively. Later, these fields will be used to map the prediction results to be able to view them in the Outbound Delivery UI. You can read more about creating an extension field in SAP online Help portal.

Once you've created these fields, navigate to Prediction Run and select New to create new prediction run. This is where you'll set the name and scenario for your prediction, for e.g., Z_OD_CANCEL_PREDICTION. Also, map the extension fields “Conversion Prediction” to Prediction Outcome and “Conversion Probability” to Prediction Probability: to the appropriate prediction outcomes. You'll also want to add a filter condition to restrict the training data to quote items for which the business outcome is not yet known, for e.g., Delivery Status = “Not Started”, “In Process”; Release Status = “Not Released”.
Once your Prediction Run is set up, you can activate it and schedule the background job by selecting the Schedule button or run it directly by selecting Start Immediately button. Be sure to check the execution details periodically in Execution Details tab to ensure that the processing status is "Finished". Once it is, you can check the execution status in the Application Log. You can also use the Prediction Results data source (MLSINFB) and filter by the scenario name you set earlier to see the results of your prediction.

That was it. All the unrelease outbound deliveries should now have a predicted business outcome assigned to them and the probability of that outcome being true.
Now comes the exciting part - checking the prediction results!
Prediction Consumption
You did it! These predictions can be viewed in both business documents and Business Analytics.
To view them in business documents, let’s move to Outbound Deliveries work center under Outbound Logistics. Select an unreleased delivery and open it. Voila! The extension fields “Cancelation Prediction” and “Cancelation Probability” now displays ML predicted outcome and how confident the model is about the prediction.

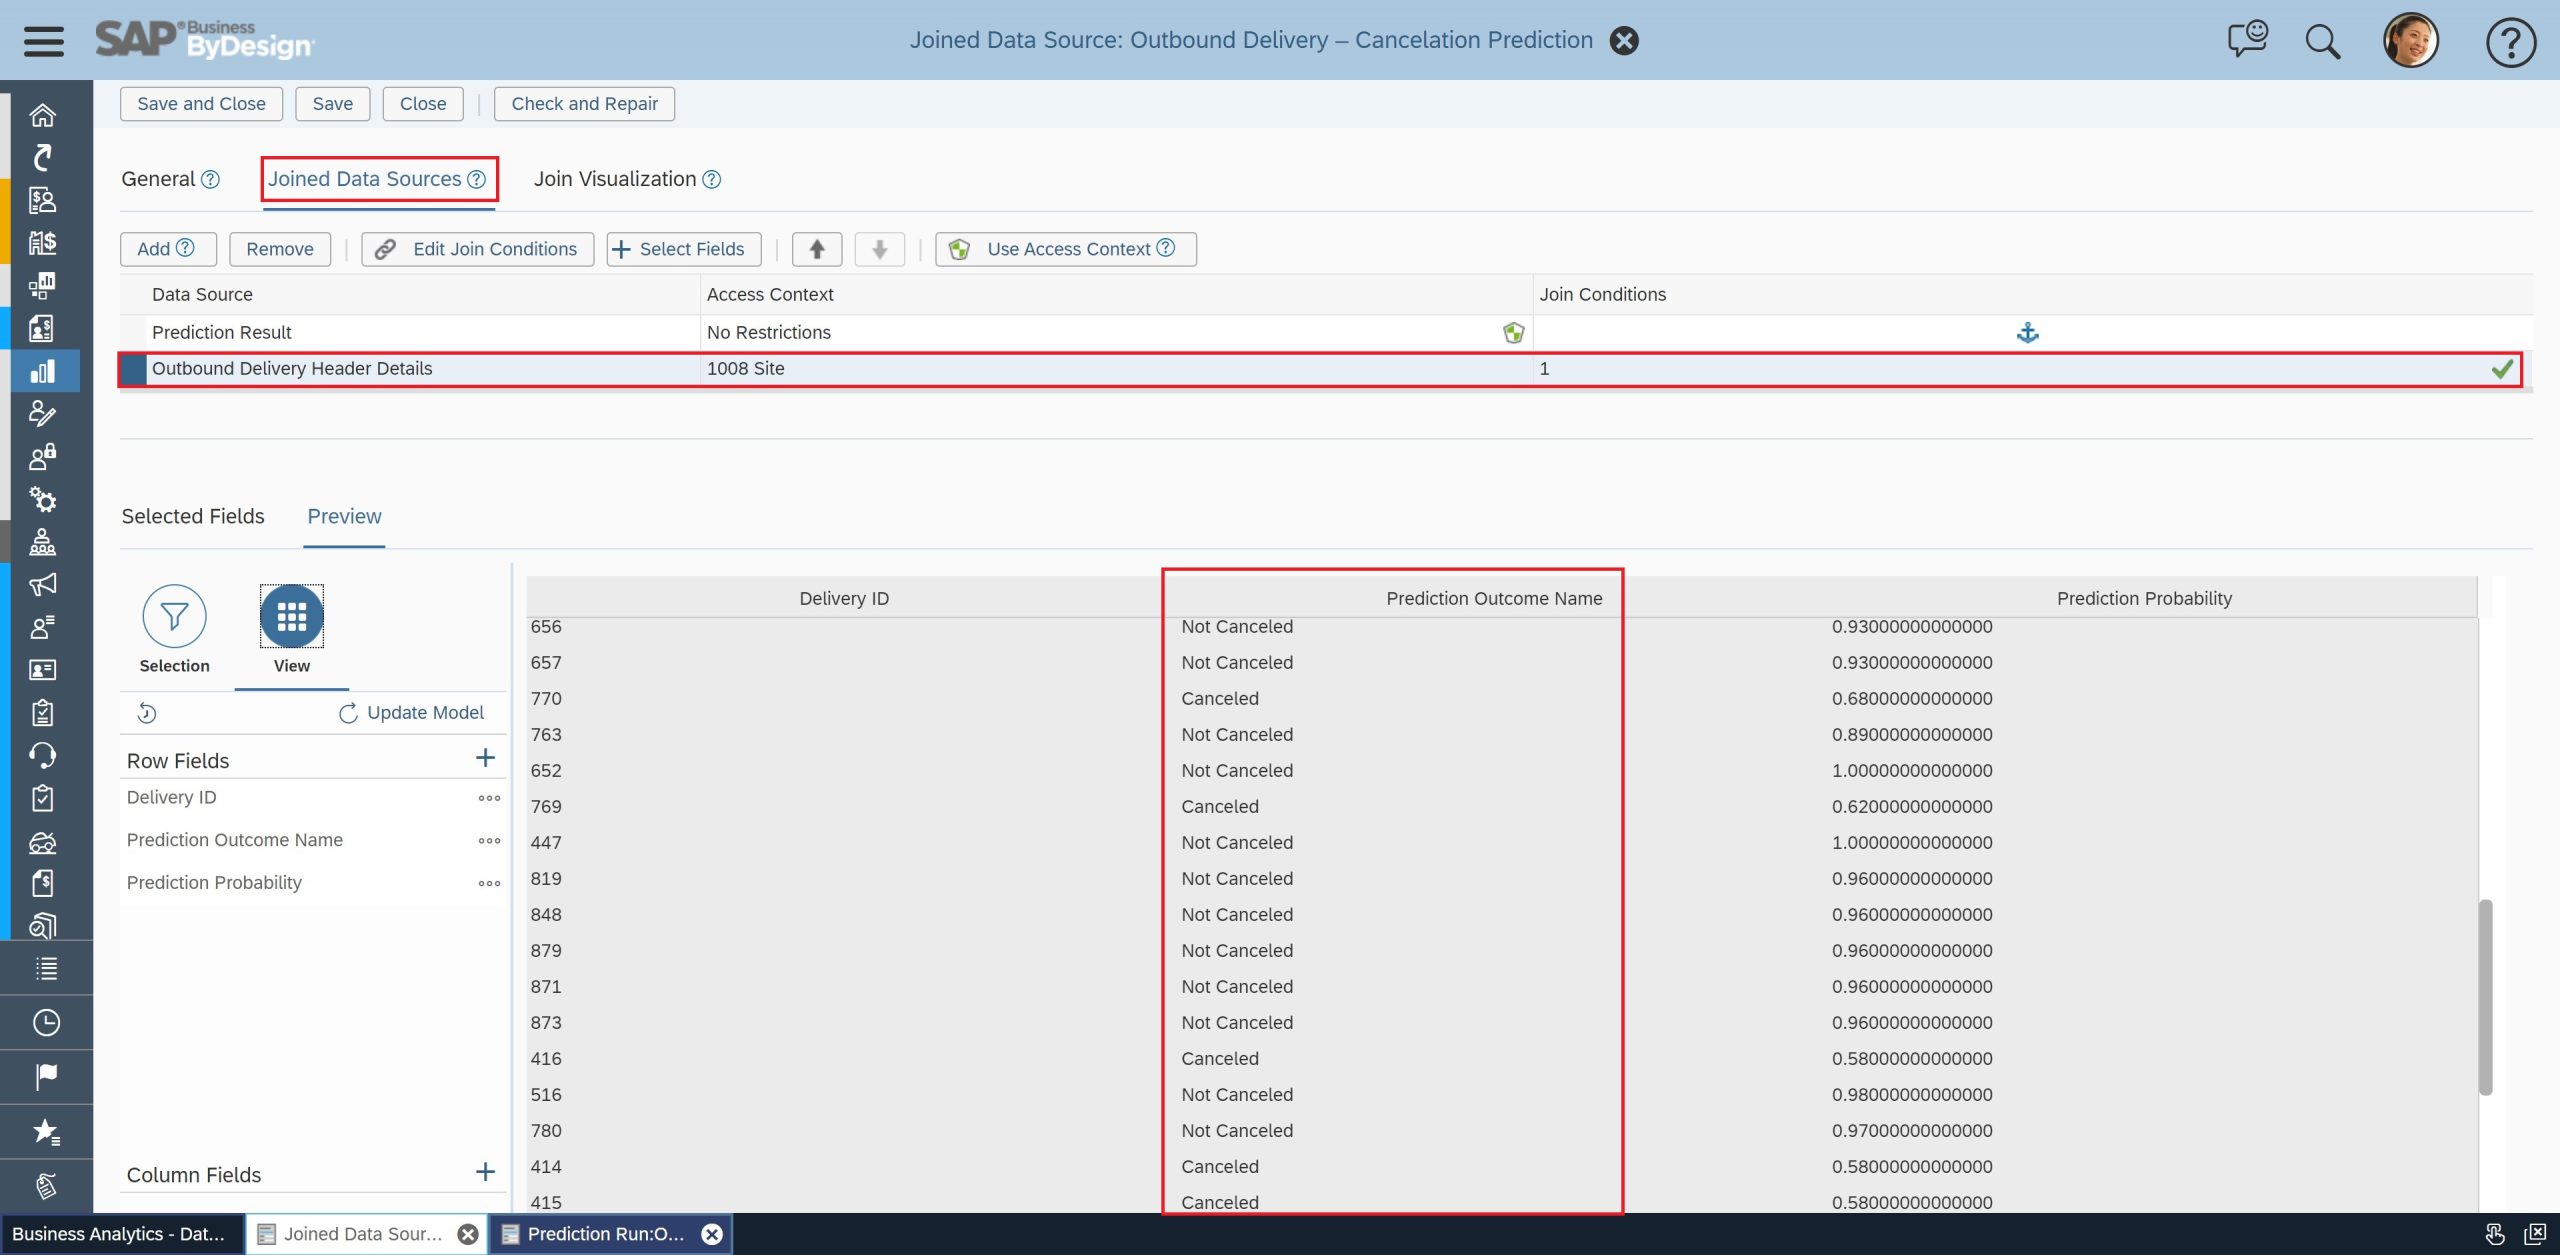
In business analytics, you can consume predictions by navigating to the Prediction Results data source. This data source provides a list of all prediction scenarios in the form of Prediction Outcome, Prediction Probability, and key influencers. To view these predictions in the context of current scenario data, you will need to create a new join data source. You can do this by navigating to the Prediction Results data source, selecting “New -> Join Data Source”, entering a new name for the data source, for e.g., “Outbound Delivery – Cancelation Prediction” and selecting the Next button. You then select all the available fields before selecting Finish. Now switch to the Joined Data Sources tab and select the data source with you want to join Prediction Results by using Add option, "Outbound Delivery Header Details” in this case. In the Next tab, you should select the Key field in the Prediction Results data source and the Delivery UUID field in the Outbound Delivery Header Details data source. Create the join by selecting the Add button and move to the Next tab. Here, select all fields before finishing the process. Now, switch to Preview tab to make sure the join works, and finally Save and Close. This new join data source will provide you with a consolidated view of predictions for all unreleased outbound deliveries.
That’s how Machine Learning Cockpit can help by doing the analysis and prediction for you so that you can focus on important things like strategies, action items and customer relationship.
Feel free to post your questions or share your experience in comments about this use case of Machine Learning Cockpit for SAP Business ByDesign.
Do check out my other blog related to Machine Learning Cockpit use cases by clicking the link below and stay tuned for more.
Success Prediction of Sales Quote Item in Machine Learning Cockpit | SAP Blogs
Customer ABC Classification Proposal in Machine Learning Cockpit | SAP Blogs
- SAP Managed Tags:
- Machine Learning,
- SAP Business ByDesign
Labels:
You must be a registered user to add a comment. If you've already registered, sign in. Otherwise, register and sign in.
Labels in this area
-
Artificial Intelligence (AI)
1 -
Business Trends
363 -
Business Trends
21 -
Customer COE Basics and Fundamentals
1 -
Digital Transformation with Cloud ERP (DT)
1 -
Event Information
461 -
Event Information
23 -
Expert Insights
114 -
Expert Insights
151 -
General
1 -
Governance and Organization
1 -
Introduction
1 -
Life at SAP
415 -
Life at SAP
2 -
Product Updates
4,686 -
Product Updates
205 -
Roadmap and Strategy
1 -
Technology Updates
1,502 -
Technology Updates
85
Related Content
- The Role of SAP Business AI in the Chemical Industry. Overview in Enterprise Resource Planning Blogs by SAP
- SAP Business ByDesign 2023 year-end review and outlook 2024 in Enterprise Resource Planning Blogs by SAP
- Discrete Industries in SAP S/4HANA Cloud Public Edition 2402 in Enterprise Resource Planning Blogs by SAP
- What's new with SAP S/4HANA Cloud 2308 and S/4HANA 2023 in Finance in Enterprise Resource Planning Blogs by SAP
- Maximizing SAP Analytics in S/4 HANA Public Cloud with M/L in Enterprise Resource Planning Blogs by SAP
Top kudoed authors
| User | Count |
|---|---|
| 5 | |
| 5 | |
| 4 | |
| 3 | |
| 3 | |
| 3 | |
| 3 | |
| 2 | |
| 2 | |
| 2 |