
- SAP Community
- Products and Technology
- Supply Chain Management
- SCM Blogs by SAP
- External Forecasting in SAP IBP using Facebook Pro...
Supply Chain Management Blogs by SAP
Expand your SAP SCM knowledge and stay informed about supply chain management technology and solutions with blog posts by SAP. Follow and stay connected.
Turn on suggestions
Auto-suggest helps you quickly narrow down your search results by suggesting possible matches as you type.
Showing results for
Advisor
Options
- Subscribe to RSS Feed
- Mark as New
- Mark as Read
- Bookmark
- Subscribe
- Printer Friendly Page
- Report Inappropriate Content
04-05-2023
10:08 PM
Last year, SAP released a feature to call custom forecasting algorithms running on external systems and receive the results in real-time in SAP IBP. This feature brings great help in integrating the results of your custom algorithms with SAP IBP in real-time. Before this, planners had to manually download history from IBP, use it with their custom algorithms, generate forecasts, and then upload the results to IBP manually.
Please note that using this feature requires an 'IBP for Demand' License.
Laura Tozzo's blog provides great insights about the functionality and also detailed steps for easily implementing the same in one's IBP system.
SAP Note 3170544 also provides the code in both Python and R for the basic implementation of the functionality. I have used the Python code provided in this OSS note and have enhanced it to run Facebook's Prophet Algorithm
In this blog, I will elucidate steps for executing the custom algorithms(Prophet in particular) on an AWS server and then calling them from SAP IBP.
- Run one EC2 instance on AWSAlthough we can create HTTPS Server in Python on our local machines as well, it may not be accessible to the internet because the local ISP may not have provided unique IP to each user. Instead, he would have used an internal subnet configuration to redistribute one IP to many customers.
Hence, it would be beneficial to create one AWS Free tier account and run an EC2 instance on the same. That way, we could get one public IP that can be given to SAP IBP for calling custom algorithms. Here is how you run an EC2 instance.
- Follow this help document to create an EC2 instance on AWS Free Tier.
- Among the options to choose Machine Image (AMI), choose 'Amazon Linux'.

- Set up 'Security Group' rules to allow inbound traffic on port 443.

- Once your setup configuration is complete, start the instance

- Leverage AWS Cloud IDE for running HTTP Server on PythonOnce the EC2 instance has been configured and started, we need one AWS Cloud IDE to start HTTP Server on Python.
Again, a detailed help document has been provided by AWS on how to open an environment on AWS Cloud9 - Install Python and other required packages on Linux IDE
- Linux EC2 comes up with the latest version of Python preinstalled. Hence check the version of installed python using the command mentioned below in the terminal window.python --versionIf the python version is not the latest one, install the latest version by taking help from the document.
- Install 'Pandas' and 'Request' packagespython -m pip install requests
python -m pip install pandas
- Generate a Self-Signed SSL Certificate for the IP Address of your instanceBefore you can call custom forecast algorithms from SAP IBP, your IBP server needs to trust the external system on which HTTP Server is running. For that reason, a Self Signed certificate needs to be generated for the IP Address on your EC2 instance and then it must be uploaded in your IBP system
Follow the steps below to generate the SSL certificate.
- Copy the Public IP Address of your EC2 Instance by going into the instance details.

- Paste the copied IP address in below mentioned command and execute the same in the terminal window
openssl req -x509 -newkey rsa:4096 -keyout "key.pem" -out "cert.pem" -sha256 -days 365 -nodes -subj /CN=<Your IP Address>
After the successful execution of the command, a certificate with the name 'cert.pem' will be generated in the working folder. Download the same on your local machine and upload it in the 'Maintain Certificate Trust list' Fiori application in your SAP IBP Server.
Important: Every time that you restart your EC2 instance, you need to generate and upload in IBP a new certificate. Because the IP address assigned to your instance would have changed.
- Copy the Public IP Address of your EC2 Instance by going into the instance details.
- Work with the files provided in OSS Note 3170544.In the OSS note, 4 sample files have been provided. These have python code which proves to be a great starting point for your learning journey.
Please note that SAP has strongly recommended to not use this code for your productive environments. Their usage should be kept limited to learning purposes only.
- Server.py: This file contains the python code which on execution, binds itself to the IP address and the port provided in the configuration file and starts the HTTP Server.
- ForecastRequestProcessor.py: This file has the code to request and submit data in JSON format from and to the SAP IBP server. This is done with the help of OData API created for external forecasting.
This file will be enhanced to extract the Time Period Information from IBP. Time Period details are a prerequisite input for calling the Prophet algorithm. Please refer to the SAP help document for details. - Algorithms.py: This one holds the algorithms as well as the 'Calculate_Forecast' method which receives data from ForecastRequestProcessor.py and calls specific algorithms.
We can add another method definition to the same file which will call the Prophet Algorithm. - Server.cfg: The file contains the details of the servers as well as the authorization credentials.
Please ensure to keep it in the same working folder where other files(including generated certificates) have been kept.
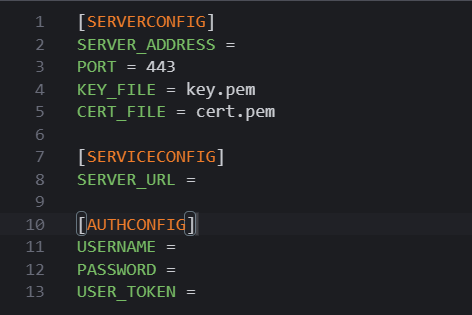
SERVER_ADDRESS: Leave it blank because the server will bind itself to the IP address of the EC2 instance.(Localhost)
PORT: Always to be kept as 443 because IBP only supports HTTPS communications
KEY_FILE: Name of the key file generated using SSL certificate generation.
CERT_FILE: Name of the key file generated using SSL certificate generation.
SERVER_URL: URL of IBP System
USERNAME and PASSWORD
Put Username and Password created in 'Users for Inbound Communications' for calling 0830 Communication Arrangement.
USER_TOKEN: Basic Authentication Header for IBP Outbound Communication. you can generate it using utilities available online for the Username and password used in 'Users for Outbound Communication'.
Tip: You can use the same username and password for both Inbound and Outbound Communication.
- Upload all 4 four files to the working folder in your Cloud9 Environment
- Enhance ForecastRequestProcessor.py to extract TimePeriod Information from IBPTo extract the required time period information from IBP in JSON format and convert it into a list, add to the file, the code shown in the snapshot below. This will get the start time period of each bucket for the full horizon (history as well as forecast)

TASK_URL holds the SERVER_URL along with the path for calling the ODATA API

- Pass the timestamp_list to the CALCULATE_FORECAST method in the same file

- Import additional packages for DateTime calculation in ForecastRequestProcess.py

- Optional: I have commented out the Code to populate Expost Values in JSON Output as I am not sending any values in EX-POST back to IBP. If we don't pass values in it and the string is sent as empty, then IBP terms the result as Invalid. If you want to calculate and send expost values back to IBP, you can uncomment this piece of code

- Pass the timestamp_list to the CALCULATE_FORECAST method in the same file
- Enhance method definition of CALCULATE_FORECAST in Algorithms.py to add Method calling for Prophet.

- Write the method definition of 'Prophet' in Algorithms.Py

Also import additional packages by adding code snippets at the start of the code
- Write the method definition of 'Prophet' in Algorithms.Py
- The code enhancement is now complete. We can start the HTTPS server now.
But before you start it, ensure log in as the Root user of the EC2 because the normal user does not have the authorization to start the server on the SSL port.
We do that by typing in the following command.
- Once you receive, root user privileges, call the Server.Py program to start the server

- Now in your SAP IBP Server, While setting up Communication Systems, provide the IP address of the EC2 instance under the Host Name. Choose port 443.

Important: Every time that you restart your EC2 instance, you need to update the IP address in the Communication System App as your EC2 instance would have received a new IP address.
- Create both Inbound and Outbound Communication users with Authentication method Username and Password and attach that to the created communication system.
- Create a Communication Arrangement for 0830 External Forecasting Service and provide the communication system and users created for that service.
- Open the 'Manage Forecast models' Fiori application, create a new forecast model, and choose 'External Algorithm' in the Algorithms Selection pop-up.
Please ensure to give the 'Prophet' in the Algorithm Name field. You can pass additional algorithm parameters but ensure to receive and process them accordingly in your external environment.
- Execute Statistical Forecasting Application Job and Choose your Forecast Model in the Selection Parameters. Execute the job

- Once the forecast execution is in progress, you should see messages as seen in the snapshot below in your Linux instance,

- Check the logs of your Statistical Forecast Job.


- Check the Forecast values in the Forecast key figure specified in your Model. It should be populated for the selected planning objects in IBP.
Above, I have shared my learning experience of working with Linux, Python, OData APIs, and Facebook Prophet's algorithm and interacting with them using SAP Integrated Business Planning. It did not seem an easy task at the beginning and it has taken me some time to get here.
You can use the same approach or pick a different one for calling an algorithm different from Prophet. If you have any questions or are stuck somewhere with this approach, I will be happy to help.
You can find more details about Facebook's Prophet algorithm on their website.
I will be glad to receive some thoughts and feedback on this from the strong IBP community.
Regards
Gaurav Guglani
Labels:
5 Comments
You must be a registered user to add a comment. If you've already registered, sign in. Otherwise, register and sign in.
Labels in this area
-
Business Trends
169 -
Business Trends
24 -
Catalog Enablement
1 -
Event Information
47 -
Event Information
4 -
Expert Insights
12 -
Expert Insights
38 -
intelligent asset management
1 -
Life at SAP
63 -
Product Updates
500 -
Product Updates
66 -
Release Announcement
1 -
SAP Digital Manufacturing for execution
1 -
Super Bowl
1 -
Supply Chain
1 -
Sustainability
1 -
Swifties
1 -
Technology Updates
187 -
Technology Updates
17
Related Content
- Gen AI capabilities of IBP in Supply Chain Management Q&A
- SAP IBP: Enhancing Forecast Accuracy with Time Series Analysis and Change Point Detection in Supply Chain Management Blogs by SAP
- SAP Integrated Business Planning for Supply Chain (SAP IBP) 2402 - Available Now! in Supply Chain Management Blogs by SAP
- SAP Best Practices for SAP Integrated Business Planning for Supply Chain – 2402 in Supply Chain Management Blogs by SAP
- Return quantity for demand sensing and forecasting in Supply Chain Management Q&A
Top kudoed authors
| User | Count |
|---|---|
| 10 | |
| 8 | |
| 5 | |
| 4 | |
| 3 | |
| 3 | |
| 3 | |
| 3 | |
| 3 | |
| 2 |