
- SAP Community
- Products and Technology
- Financial Management
- Financial Management Blogs by SAP
- UI Data Protection - How Enhanced Reveal method wo...
Financial Management Blogs by SAP
Get financial management insights from blog posts by SAP experts. Find and share tips on how to increase efficiency, reduce risk, and optimize working capital.
Turn on suggestions
Auto-suggest helps you quickly narrow down your search results by suggesting possible matches as you type.
Showing results for
Advisor
Options
- Subscribe to RSS Feed
- Mark as New
- Mark as Read
- Bookmark
- Subscribe
- Printer Friendly Page
- Report Inappropriate Content
03-24-2023
5:27 AM
Introduction
In this blog post, we will learn how the “Self Service" Reveal type of Enhanced Reveal method works in SAPUI5 and Fiori application. We will explore the configuration process by masking the “City” field of Business Partner record in Manage Business Partner Master Data application.
A PFCG Role will be used for the authorization check which will allow users with the specified role to view the field value. If a user does not have this role, it means the user is not authorized and data will be protected either through masking, clearing, or disabling the field.
The result for unauthorized users will look like below:

Reveal on Demand
UI Data Protection Masking introduces an intercept point for a user’s access to data based on a determination of authorization. Reveal on Demand constitutes a second intercept, refining and basing authorization on additional conditions. This feature provides an additional level of data protection in SAP GUI by masking the field value by default, irrespective of whether the user is authorized to view the original field value. The authorized user then explicitly chooses the option to reveal the field value on the user interface.
In the case of Self Service Reveal type, the user can choose the option "Reveal Data" to reveal the field value. When the authorized user reveals the data, a dialog box (which can be configured to display a confirmation message, reason code, and free text) is displayed. The user can view the data by specifying a reason for revealing. The revealed data is masked again once the timeout takes effect or when the user switches off the reveal using "Hide Data" option.
- To unmask the City field information using Reveal on Demand feature, click on “Eye” icon and then click on “Reveal Data” option

- On Reveal on Demand wizard in Field Selection (Step 1), select “City” field by clicking on “Select” checkbox, and click on “Next Step” button.

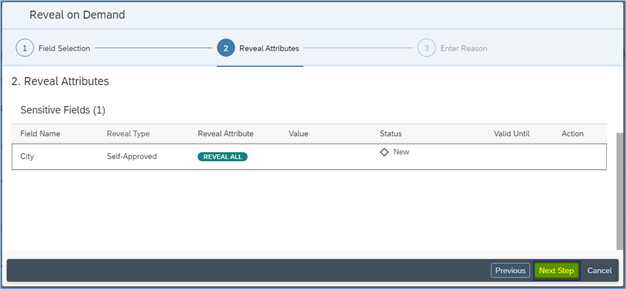
- On Reveal on Demand wizard in Reveal Attribute (Step 2), click on “Next Step” button.
- On Reveal on Demand wizard in Enter Reason (Step 3), select “Reason” as “DVA Data Verification”, enter “Comments for Reveal” as “Unmask to view values”, and click on “Submit” button.

- On Reveal on Demand wizard in Summary (Step 4), click on “OK” button

- Field value will get unmasked for “City” field.

- To Again, mask the Field values, click on “Eye” icon, and then click on “Hide Data” option.

- On Reveal on Demand wizard in Hide Sensitive Data screen, select “City” field by clicking on “Select” checkbox, and click on “Hide Data” button.

- On Warning pop-up, click on “OK” button.

- “City” field will again appear as masked.

Prerequisite
UI data protection masking for SAP S/4HANA is a solution for selective masking of sensitive data on SAP S/4HANA user interfaces – SAP GUI, SAPUI5/SAP Fiori, Web Dynpro for ABAP, and Web Client UI. Data can be protected at field level, either by masking the content (replacing original characters with generic characters, such as asterisks) or by clearing or disabling the field.
The solution uses both role-based and attribute-based authorizations, affording customers a high degree of control.
Requirement
Here, we want to configure masking for City field of Business Partner record in Manage Business Partner Master Data application using Role-based authorization concept with Self Service Reveal type based on Enhanced Reveal method.
Product “UI data protection masking for SAP S/4HANA 2011” is used in this scenario to protect sensitive data at field level and must be installed in the S/4HANA system.
We will configure masking through Manage Sensitive Attributes app provided by UI Data Protection Masking for SAP S/4HANA 2011 solution based on Role Based Authorization Control (RBAC) concept.
Manage Sensitive Attributes app
The Manage Sensitive Attributes application allows you to maintain configuration for UI data protection in an SAP Fiori-based UI.
This application brings together several individual transactions, simplifying the maintenance of masking configuration and presenting a holistic picture to the end user. With this app, you can:
- Create, update and delete sensitive attributes
- Define masking and blocking configurations
- Manage technical attribute mappings
- Create and assign context attributes
- Create and assign derived attributes and lists of values
You can use the app on your desktop, tablet, or smartphone.
Let’s begin!
Basic Settings for Reveal on Demand
To enable the Reveal on Demand feature, follow the below given path
SPRO -> SAP NetWeaver -> UI Data Protection Masking for SAP S/4HANA -> Basic Settings -> Enable UI Data Protection Masking -> Maintain Global Flags
- Select the “Reveal on Demand” checkbox to enable the Reveal on Demand functionality.
- Once you have enabled Reveal on Demand, set the Reveal Method as Enhanced Reveal.

Maintain Reveal on Demand Configuration
If Reveal Method is set as Enhanced Reveal, following settings need to be performed –
Timeout Period: Applies to Self Service scenarios and specifies how long, in minutes, the requesting user will be allowed to access the revealed data.
Validity Period: Applies to Workflow scenarios and specifies how long, in days, the requesting user will be allowed to access the revealed data. This default value can be changed by the requesting user and the approver as needed.
Follow the below given path –
SPRO -> SAP NetWeaver -> UI Data Protection Masking for SAP S/4HANA -> Basic Settings -> Reveal on Demand Configuration -> Maintain Reveal on Demand Configuration

Maintain Reason Codes
Reason Codes need to be maintained which will appear in the Reason field and these Reason Codes need to be selected by the user when data of the UI fields configured for masking is revealed.
SPRO -> SAP NetWeaver -> UI Data Protection Masking for SAP S/4HANA -> Basic Settings -> Reveal on Demand Configuration -> Maintain Reason Codes

Configuration to achieve masking for City field
Login to Fiori Launchpad and click on “Manage Sensitive Attributes” app available under “UI data protection masking” catalog.


Maintain Sensitive Attributes
A Sensitive Attribute is a type of logical attribute that define a field which needs to be configured for UI data protection.
- Click on Add icon

- Enter “LA_BP_City” in Sensitive Attribute field
- Enter “BP City Information” in Description field
- Click on “Create” button

- Sensitive Attribute with specified details will be created.

Maintain Mapping to Technical Addresses
In the Manage Sensitive Attributes application, you can link technical addresses of fields to sensitive attributes. A technical address describes the exact technical path or technical information which is used by the solution to process the field for UI data protection masking.
To find the technical address of a field on a UI5 screen, do the following:
- Right-click the field and choose Inspect.
- Select the Network tab and refresh the application.
- Find the relevant request that fetches data from the backend.
- Select the request and find the field to be masked in the response of the call.
Under Technical Mapping > SAP Fiori, choose the Add icon.

Use the value help to select the service name, entity name, and property name. Entering the name of the UI5 applications in the Comments field will provide useful information by which to identify the mappings.


Masking Configuration
In the Manage Sensitive Attributes application, you can configure masking for a sensitive attribute to define in detail how it is to be protected in the system. Masking configuration defines which fields are to be masked for unauthorized users and in which contexts.
To configure masking for a sensitive attribute, under Configuration > Masking Configuration, choose Edit.
- Enable
- Select Role-Based authorization concept. For role-based authorization, use the value help to select a PFCG Role. Selected Role must be assigned to the logged-in user.
- Select a field-level action to determine what should be visible to unauthorized users. Users with this PFCG role will have access to the original values.
- Check “Reveal on Demand” checkbox.
- Select “Reveal Type” as “Self Service “
- Save the configuration.

Conclusion
In this blog post, we have learnt how Role-based masking with Reveal on Demand of Self Service Reveal type based on Enhanced Reveal method is configured for “City” field of Business Partner record in Manage Business Partner Master Data application.
Labels:
3 Comments
You must be a registered user to add a comment. If you've already registered, sign in. Otherwise, register and sign in.
Labels in this area
Related Content
- SAP ECC Conversion to S/4HANA - Focus in CO-PA Costing-Based to Margin Analysis in Financial Management Blogs by SAP
- Margin Analysis: Substitution/Validation in Financial Management Blogs by SAP
- GRC Tuesdays: What’s New in SAP solutions for Three Lines, Q3 2023 to Q1 2024 in Financial Management Blogs by SAP
- Security by Default vs Security by Design in Financial Management Blogs by Members
- Application Blocking – How to block SAPUI and Fiori Applications from Starting using Application Blocking Configuration in Financial Management Blogs by SAP
Top kudoed authors
| User | Count |
|---|---|
| 6 | |
| 3 | |
| 2 | |
| 2 | |
| 1 | |
| 1 | |
| 1 | |
| 1 | |
| 1 | |
| 1 |