
- SAP Community
- Products and Technology
- CRM and Customer Experience
- CRM and CX Blogs by Members
- Using SAP Build Apps, create a Web app that simula...
CRM and CX Blogs by Members
Find insights on SAP customer relationship management and customer experience products in blog posts from community members. Post your own perspective today!
Turn on suggestions
Auto-suggest helps you quickly narrow down your search results by suggesting possible matches as you type.
Showing results for
adeya
Explorer
Options
- Subscribe to RSS Feed
- Mark as New
- Mark as Read
- Bookmark
- Subscribe
- Printer Friendly Page
- Report Inappropriate Content
03-20-2023
8:23 PM
Use Case: Suppose a Utility company wants to provide you an offer with a quote on electricity. You go to their website; enter how much electricity you usually consume and click “request more information” after providing name and email address. Afterwards automatically a C4C lead will be created in sales cloud and a sales rep will contact you.
Business Requirement: The purpose of this demonstration is to show that a web form with required fields can be used to send data directly to the C4C (Sales cloud).
How-to-Approach: Send an automatic message ID for lead creation from SAP Build App to C4C, and search for the same lead with synchronized fields.
Landscape used:
SAP Build Apps: Source system
SAP BTP: Middleware
SAP C4C: Target system
Steps:
1.1. Access the SAP Build App link and login using credentials under Email and PW.
Note: Please follow the steps below to register and raise access if you do not have an SAP Build App link:
SAP Build request steps
1.2. Please Click on Create-->Select Build an application tile under SAP Build page.
1.3. Select Web & mobile application.

Note: Appgyver Classic is the older version of SAP Build App (Appgyver)that will migrate any project created under this version to an application that runs on mobile devices and the web.
1.4. Please enter Project name and Description and click on Create button.
1.5. Go to Lobby you can manually type or Filter with My project and check your newly created project available in the list. Check application type as well.
1.6. Click on add new page from landing page to create template.
1.7. Go to Auth--> Enable Authentication--> SAP BTP Authentication and select Ok for pop-up.

1.8. To design the layout, select the layout type in Full Screen mode.
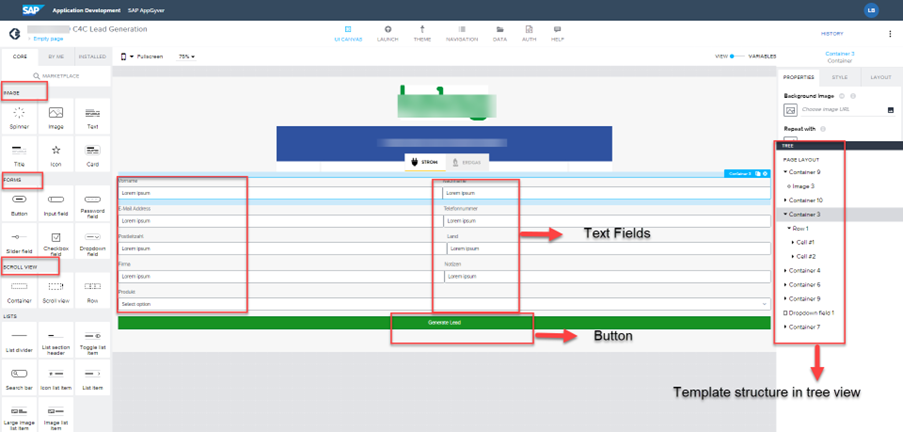
1.9.Create the required fields and buttons using drag-and-drop functionality.
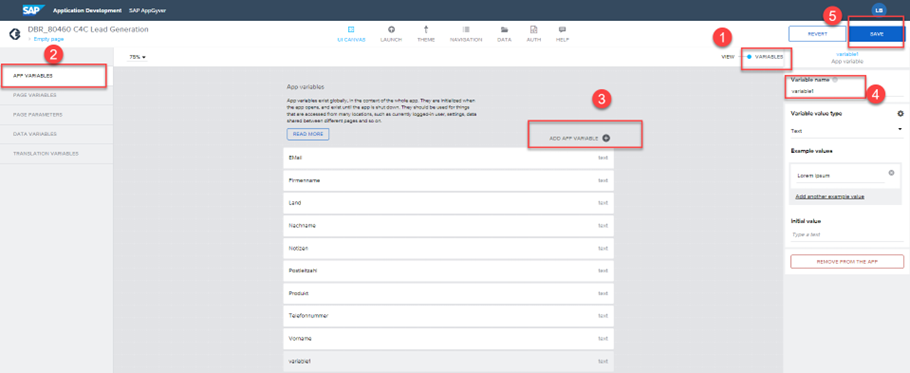
1.10. Go-to Variables and create the App variable manually, rename and save it.
1.11.Go to Data--> Click Enable more data entities--> Select the Data Entity -->Add Integration.
1.13. Under UI canvas -->Select Variable -->Data Variables--> Add data Variables--> Select the data entity (Lead Collection) which was enabled in previous step
1.14. Click on the field and try to do data binding for Vorname field under value with app variable (which you have defined in Check Step 1.10)
Note: Please follow the same steps for each field and complete the value mapping
1.15. Click and expand the button (Generate Lead) to map all the fields in the template to C4C.
1.16. From the left-hand side of the screen, select Data and drag and drop the Create Record.
1.17. Click on the Data record and on right hand side under:
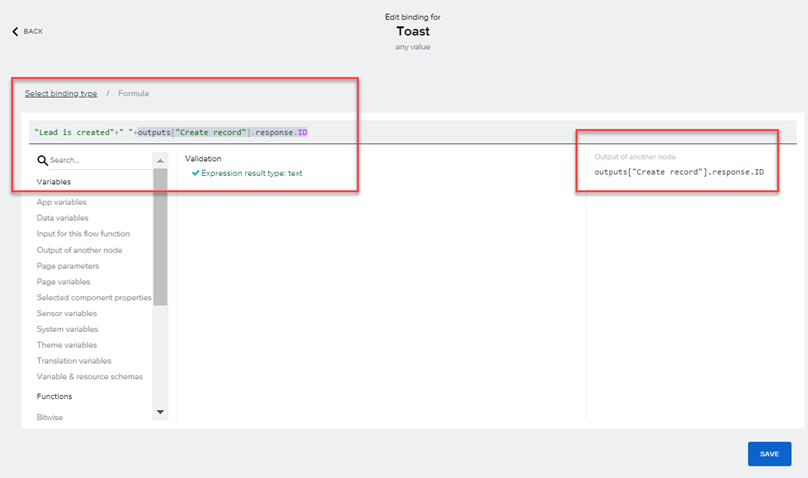
1.18. Under Dialog--> select Toast -->Drag and drop and -->select Toast Message to write expression:
1.19. Go to Launch--> Distribute--> Click Open Build Service.
1.20. A new link will open in Browser. Select Web App--> Configure--> Build-->save and download the latest MTAR file after the status is changed to Delivered

1.21. How to Upload Mtar File in SAP Build App Deployment system.
Please create a yaml file with below details:
2. Create Destination in sap BTP:
Destinations are created from the application development lobby. To access this lobby from the SAP BTP Cockpit-->Click Destinations -->Enter below information--> Save.
3. Create C4C ODATA user for communication system and select OData Service for Business Object as communication system
3.1. Go-to Admin WC-->General setting -->Comm user--> Activate and select Communication arrangement.
3.2. Under Communication system add Lead under OData service. Save and close.
4. Generate Lead ID in SAP Build App and check the record in C4C.
4.1. Go to Launch->Preview --> Open App preview Portal.
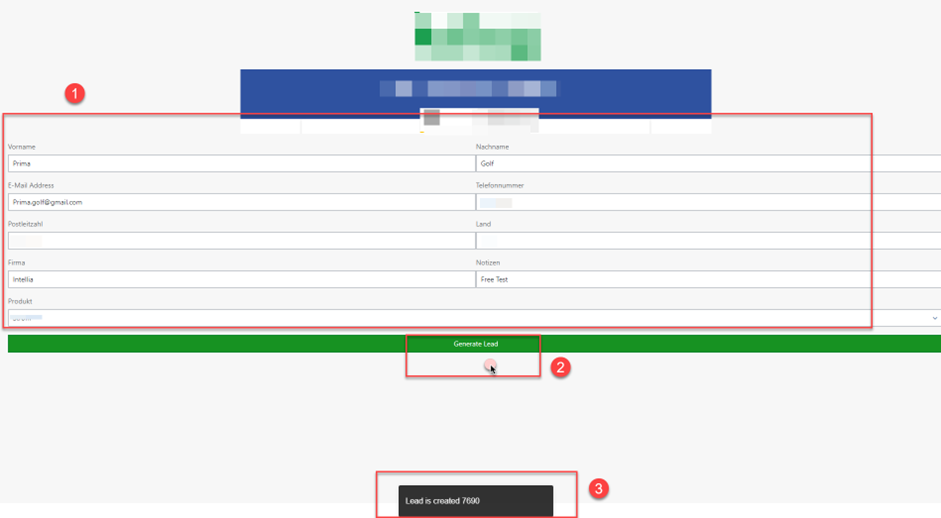
4.2. Go to Template and fill all the information. Click on Generate Lead Button. Wait for few second to get the lead ID in the screen.
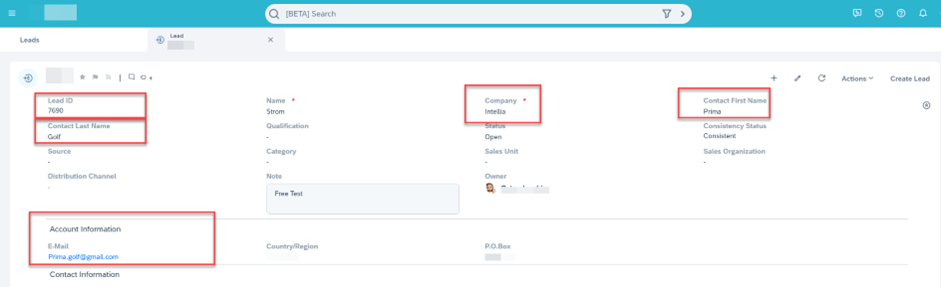
4.3. Go to C4C under Sales lead Search with same ID (7690)
4.4. Open the Lead to ensure that every detail from the template is properly mapped to C4C.
For more information refer to the help document below:
SAP Build Apps- Service Guide
Summary: Hence, using this no-code tool, which enables users to create business apps without the need for coding knowledge, sales representatives can generate direct sales leads in C4C by simply clicking one button through web app after gathering marketing data from various sources (webinars, campaigns, roadshows, etc.).
Business Requirement: The purpose of this demonstration is to show that a web form with required fields can be used to send data directly to the C4C (Sales cloud).
How-to-Approach: Send an automatic message ID for lead creation from SAP Build App to C4C, and search for the same lead with synchronized fields.
Landscape used:
SAP Build Apps: Source system
SAP BTP: Middleware
SAP C4C: Target system

Steps:
- How to Create web Application with SAP Build App:
1.1. Access the SAP Build App link and login using credentials under Email and PW.

Note: Please follow the steps below to register and raise access if you do not have an SAP Build App link:
SAP Build request steps
1.2. Please Click on Create-->Select Build an application tile under SAP Build page.

1.3. Select Web & mobile application.
Note: Appgyver Classic is the older version of SAP Build App (Appgyver)that will migrate any project created under this version to an application that runs on mobile devices and the web.
1.4. Please enter Project name and Description and click on Create button.

1.5. Go to Lobby you can manually type or Filter with My project and check your newly created project available in the list. Check application type as well.

1.6. Click on add new page from landing page to create template.

1.7. Go to Auth--> Enable Authentication--> SAP BTP Authentication and select Ok for pop-up.

1.8. To design the layout, select the layout type in Full Screen mode.
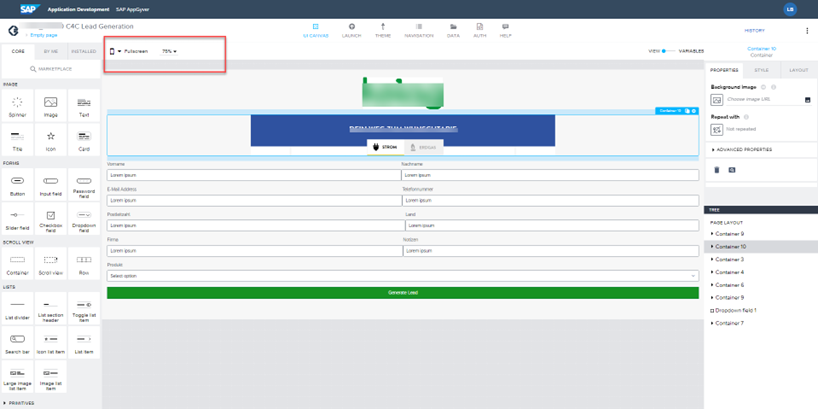
1.9.Create the required fields and buttons using drag-and-drop functionality.
1.10. Go-to Variables and create the App variable manually, rename and save it.
1.11.Go to Data--> Click Enable more data entities--> Select the Data Entity -->Add Integration.

1.12. Select Data -->Under Data Entities -->Search Lead Collection -->Select Enable more data entities-->Add the Lead collection.

1.13. Under UI canvas -->Select Variable -->Data Variables--> Add data Variables--> Select the data entity (Lead Collection) which was enabled in previous step

1.14. Click on the field and try to do data binding for Vorname field under value with app variable (which you have defined in Check Step 1.10)

- Click Value select Data and Variables.
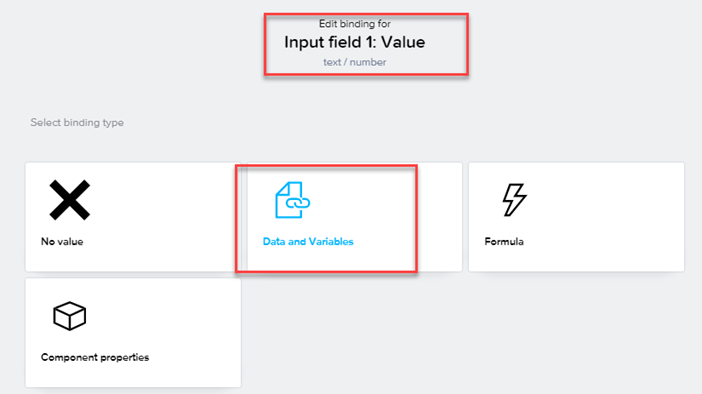
- Select App Variable.

- Click on Vorname from the list to do the binding.

Note: Please follow the same steps for each field and complete the value mapping
1.15. Click and expand the button (Generate Lead) to map all the fields in the template to C4C.

1.16. From the left-hand side of the screen, select Data and drag and drop the Create Record.

1.17. Click on the Data record and on right hand side under:
- Resource name: Select Lead Collection(App Variable).

- Record: From the SAP Build App Template map the relevant fields to C4C you want to display.

- Authentication: Enter Your C4C OData communication user Details and select authentication type as Basic, Save.

1.18. Under Dialog--> select Toast -->Drag and drop and -->select Toast Message to write expression:

- Output Record (Success message):
- Output Record (Error message):

1.19. Go to Launch--> Distribute--> Click Open Build Service.

1.20. A new link will open in Browser. Select Web App--> Configure--> Build-->save and download the latest MTAR file after the status is changed to Delivered
1.21. How to Upload Mtar File in SAP Build App Deployment system.
Please create a yaml file with below details:
Manifest:
---
applications:
- name: dynamic-s4-so
host: dynamic-so
memory: 128M
buildpack: staticfile_buildpack
Please create a static file without any extension
Staticfile:
root: src
Please push the zip extension file to BTP using CF deploy
2. Create Destination in sap BTP:
Destinations are created from the application development lobby. To access this lobby from the SAP BTP Cockpit-->Click Destinations -->Enter below information--> Save.
- Under Additional Properties enable all
- Under Destination Configuration: Enter Name, URL (C4C URL), User(C4C Odata User and PW)

3. Create C4C ODATA user for communication system and select OData Service for Business Object as communication system
3.1. Go-to Admin WC-->General setting -->Comm user--> Activate and select Communication arrangement.

3.2. Under Communication system add Lead under OData service. Save and close.

4. Generate Lead ID in SAP Build App and check the record in C4C.
4.1. Go to Launch->Preview --> Open App preview Portal.

4.2. Go to Template and fill all the information. Click on Generate Lead Button. Wait for few second to get the lead ID in the screen.
4.3. Go to C4C under Sales lead Search with same ID (7690)

4.4. Open the Lead to ensure that every detail from the template is properly mapped to C4C.
For more information refer to the help document below:
SAP Build Apps- Service Guide
Summary: Hence, using this no-code tool, which enables users to create business apps without the need for coding knowledge, sales representatives can generate direct sales leads in C4C by simply clicking one button through web app after gathering marketing data from various sources (webinars, campaigns, roadshows, etc.).
- SAP Managed Tags:
- C4C Sales,
- SAP Build Apps
1 Comment
You must be a registered user to add a comment. If you've already registered, sign in. Otherwise, register and sign in.
Labels in this area
-
ABAP
1 -
API Rules
1 -
c4c
1 -
CRM
1 -
Custom Key Metrics
1 -
Customer Data
1 -
Determination
1 -
Determinations
1 -
Introduction
1 -
KYMA
1 -
Kyma Functions
1 -
open SAP
1 -
Sales and Service Cloud Version 2
1 -
Sales Cloud
1 -
Sales Cloud v2
1 -
SAP
1 -
SAP Community
1 -
SAP CPQ
1 -
SAP CRM Web UI
1 -
SAP Customer Data Cloud
1 -
SAP Customer Experience
1 -
SAP Integration Suite
1 -
SAP Sales Cloud v2
1 -
SAP Service Cloud v2
1 -
SAP Service Cloud Version 2
1 -
Service Cloud v2
1 -
Validation
1 -
Validations
1
Related Content
- SAP Commerce Cloud Q1 ‘24 Release Highlights in CRM and CX Blogs by SAP
- SAP Inside Track 2024 – Bangalore – February 17 !!My experience as a Speaker in CRM and CX Blogs by Members
- The Future of Customer Relationship Management: Building a Composable Customer Data Architecture in CRM and CX Blogs by SAP
- Reuse attachment block in Contract account page in CRM and CX Blogs by Members
- What is planned for the 2402 release of SAP Variant Configuration and Pricing? in CRM and CX Blogs by SAP