
- SAP Community
- Products and Technology
- Technology
- Technology Blogs by SAP
- How-to: Combine SAP Build Process Automation with ...
Technology Blogs by SAP
Learn how to extend and personalize SAP applications. Follow the SAP technology blog for insights into SAP BTP, ABAP, SAP Analytics Cloud, SAP HANA, and more.
Turn on suggestions
Auto-suggest helps you quickly narrow down your search results by suggesting possible matches as you type.
Showing results for
Product and Topic Expert
Options
- Subscribe to RSS Feed
- Mark as New
- Mark as Read
- Bookmark
- Subscribe
- Printer Friendly Page
- Report Inappropriate Content
02-28-2023
11:36 AM
Hello SAP Build community 😊
Last year I have created a Guide on how to Integrate SAP Build Apps and SAP Build Process Automation. I have decided to create a second version of it which is much easier and intuitive (in my opinion). As some of you remember we where actually using AppGyver Classic and consumed an Workflow-API which was exposed via API Management. In this Blog I am going to show you how you can use BTP Destination in order connect both SAP Build Apps and SAP Build Process automation together. It is not only easier, but also more secure and scalable.
Motivation
SAP Build Process Automation is one of the latest members of SAP’s LCNC portfolio and is the central building-platform for process-development, -enhancements and -automation. SAP Build Process Automation combines the capabilities of SAP Workflow Management and SAP Intelligent Robotic Process Automation in an easy-to-use, no-code AI-powered experience. The new solution enables organizations of all sizes to:
In this blog I am going you show you, how you can combine both worlds of process automation and application composition. We are going to build a simple Build Apps application for creating business partners. A workflow instance build on SAP Process Automation is going to take care of process activities such as getting approval steps and posting in backend-systems. This app can be used by business personas to generate simple approval request for any type of business area or industry.
Please note, that the complexity of the scenario is reduced in this blog, to demonstrate the integration between both components.
Prerequisites:
Getting started:
In order to rebuild this tutorial, you need a SPA service instance and a corresponding service key. You can find the service instance in the Instances and Subscriptions section of your BTP subaccount.
You can either manually generate a service instance or use the booster to activate SAP Build Process Automation. If you have already the service instance or just created it, check if you have also created a service key.
All information to call the API trigger are available in the service key. Therefore open the service key and use the following information:
After you created a service instance and a service key you can start by generating you first workflow inside SPA. I kept it very simple and used a simple approval-form that appears in my inbox to approve the creation of business partner. If you want you can extend your workflow with additional activities, business-rules and even RPA-Bots. Here you can see a screenshot of my process:
We are not going to use the Form-Trigger but instead the API to initiate the workflow. Click on the blank canvas and add the necessary input parameters that we need for our business logic. Here you can see an example of my process inputs for business partner. We are going to use this information later in the tutorial to specify the payload from AppGyver:
I added all input values in my approval form afterwards. You have to make sure to map the output-data from the API to the input data of the approval form. If you don’t do it Process Automation will give you an error:
If everything is setup correctly you can start deploying the workflow. Click on the Release button top-right and define a project version. Click on the Deploy button afterwards and the process can be used productively. If done correctly you can see the deployed workflow in your Monitoring Application. Go to the process lobby and navigate to the Monitoring tab, navigate to Manage and select Processes and Workflows. Search for your workflow and copy your process ID, because we need it later on to trigger the API.
For this demo you require the post-request for starting a workflow instance in combination with a bearer-token request. As usual, the workflow API’s are protected by OAuth, hence you need to pass an Authorization Bearer as header. I always recommend testing the API’s in Postman before trying to implement them. Here you can see an example of my API services including the necessary authorization, query params, request headers and payload:
API for retrieving the Bearer Token for Authentication (for eu10)
GET-request:
https://<your_subaccount_domain>.authentication.us10.hana.ondemand.com/oauth/token?grant_type=client...
Authorization: Basic Auth
Username<your_clientID_as_the_username>
Password<your_clientSecret_as_the_password>
Query Params: grant_type client_credentials
API for starting the Workflow-Instance (for eu10)
Post-request:
https://spa-api-gateway-bpi-eu-prod.cfapps.eu10.hana.ondemand.com/workflow/rest/v1/workflow-instance...
Request Headers:
Request Body:
Create the Destination
Now we can start using the RESTful-API to create your own destination inside the BTP Subaccount. Destinations are key building blocks in SAP BTP and are used to define connections for outbound communication from your application to remote systems. These remote systems can be on-premises or in the cloud. We will use this fundamental concept to integrate both Build Apps and Build Process Automation.
Navigate to your Subaccount and click on Destination on the left tab and create a New Destination.
Once the blank Destination is available you need to enter necessary information in order to invoke the API-Call:
Name: <Could be any name you like>
Type: HTTP
URL: https://spa-api-gateway-bpi-eu-prod.cfapps.eu10.hana.ondemand.com/workflow/rest/v1/workflow-instance...
Authentication: OAuth2ClientCredentials
Client ID: <your_clientID_from_the_key>
Client Secret: <your_clientSecret_from_the_key>
Token Service URL: https://<your_subaccount_domain>.authentication.eu10.hana.ondemand.com/oauth/token
Additional Properties:
AppgyverEnabled: true
HTML5.DynamicDestination: true
sap.processautomation.enabled: true
WebIDEEnabled: true
If you have entered all the relevant data you can click on Save. If you test the connection directly inside the Subaccount it can happen, that you will receive an authentication error – but don’t worry, its not a problem and the Destination will appear later in Build Apps.
Building the app:
Now it’s about time to build the app. For this purpose, we are going to use SAP Build Apps. Build Apps is a visual programming environment on the BTP where citizen developers and professional developers alike can build enterprise-ready custom software without writing code. Here you can learn more about the service itself. Once you have setup your account (either enterprise-edition or trial) you can start working on your own application projects. For this you need to click on the Create New Button, give your project a name and you are good to go. Your application workspace opens, and you get access to Composer Pro.
Working with the Composer Pro, most of your time will be spent in the app builder.
It allows you to:
The first thing you need to do is to setup the data structure and backend integration. For this you have to click on Data on the upper pane and click on SAP AppGyver classic data entities and select SAP BTP destination REST API integration.
When you click on ADD NEW at the resource schema you can add all the relevant payload data that is expected by the workflow. Click on this field and enter the Field Name for every data entity that we have created in Build Process Automation and select any as the Field type.
Please be aware that the editor will convert camelCase - so be careful! Once you have done it for all the six entities your data source should look like this:
You should now go to the create tab on the lefthand side and activate it. Here you need to click on the X-Button of Request headers to add some information:
Select list of values:
Click on add a value and define a new header specification. This header would be necessary to invoke the API-Call:
Header name: Content-Type
Header value: application/json
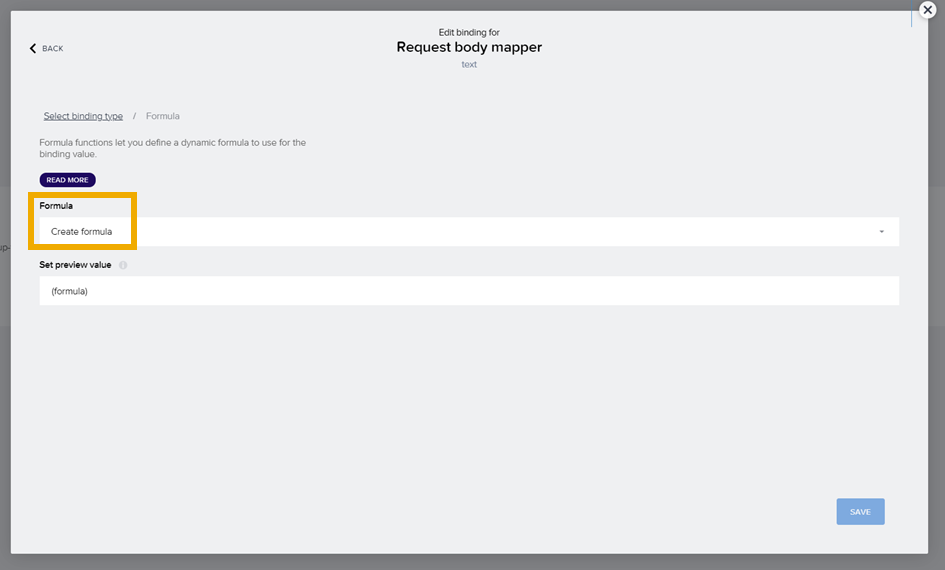
After clicking on safe you need to select request body mapper:
Click on Formula and then click on Create Formula:
In the Formula designer you need to enter following value
And click on save.
Once that is finished your data resource should look like this and you can click on the Test tab:
Enter some test-data and you can check if the integration is working:
Now, after you finished the data integration part, you can go back to the application and change the layout from View to Variables where you can start adding data variables to the application logic. Go to the tab Data Variables and add two variables from your already existing data schema. Add Workflow Integration1 as a data resource and define it as a new data record. Save it and now you can start working on the user interface of the application:
Here is an example of how I created my user interface. It’s very simple since it only servers the purpose to create business partners. I have selected input fields as a UI-component from the marketplace and added it five times inside a container. I have also added a dropdown field for pre-selected values to increase the user experience.
As the last step you have to add a button from the UI-components and add it to the bottom of your application. I named my button Submit Business Partner and added some logic to it by clicking on show logic for BUTTON 1. In the Flow Function Market, I have added the function Get record to my flow. Afterwards you have to add the function Create record to the flow. Here it can get a little bit tricky. Define Workflow Integration as the Resource name.
Now you can add the record properties where you need to do the mapping between data variables and input fields. It’s really important here that you select Object with properties --> component properties --> another component property or output value as the binding type and connect every attribute to the corresponding UI-element in the same way as you can see in the screenshot.
Test your workflow:
If that’s finished and you have saved your project you can start testing it and see if it works. Click on Launch at the upper pane and select open app preview portal where you can open your app inside your browser.
The workflow activity created by AppGyver should be now available in your MyInbox app, ready for you to approve. SAP Process Automation uses the standard Fiori Launchpad Service for system access. Depending on how you created the forms UI, all the context data is now available in your inbox.
As I mentioned already this is a very basic example how both worlds of process automation and application composing can be combined. You can create much more extensive and complex scenarios with both LCNC-tools from our platform.
To see LCNC in action, check out the SAP Low-Code/No-Code Learning Journey – designed to increase low-code/no-code skills and teach citizen developers the basic concepts of software development and learn how to build mobile apps for free. Check out LCNC and Discover BTP plus much more free learning at SAP Learning site:
Stay tuned!
Thank you joaquin.reciohuertas for your support!
Last year I have created a Guide on how to Integrate SAP Build Apps and SAP Build Process Automation. I have decided to create a second version of it which is much easier and intuitive (in my opinion). As some of you remember we where actually using AppGyver Classic and consumed an Workflow-API which was exposed via API Management. In this Blog I am going to show you how you can use BTP Destination in order connect both SAP Build Apps and SAP Build Process automation together. It is not only easier, but also more secure and scalable.
Motivation
SAP Build Process Automation is one of the latest members of SAP’s LCNC portfolio and is the central building-platform for process-development, -enhancements and -automation. SAP Build Process Automation combines the capabilities of SAP Workflow Management and SAP Intelligent Robotic Process Automation in an easy-to-use, no-code AI-powered experience. The new solution enables organizations of all sizes to:
- Simplify automation with visual drag-and-drop tools and industry specific content
- Automate faster with business context in a unified AI-powered workflow management and robotic process automation solution
- Manage processes and automations with confidence on a trusted, enterprise grade, multi-cloud platform

In this blog I am going you show you, how you can combine both worlds of process automation and application composition. We are going to build a simple Build Apps application for creating business partners. A workflow instance build on SAP Process Automation is going to take care of process activities such as getting approval steps and posting in backend-systems. This app can be used by business personas to generate simple approval request for any type of business area or industry.
Please note, that the complexity of the scenario is reduced in this blog, to demonstrate the integration between both components.
Prerequisites:
- Access to SAP Build Apps (Trial can be accessed here)
- Access to SAP Process Automation (either Free-Tier or enterprise edition)
- Access to SPA-Workflow including service instance with a service key in your sub-account where you are using SAP Build Process Automation
- Postman for testing purposes and basic understanding of API services
Getting started:
In order to rebuild this tutorial, you need a SPA service instance and a corresponding service key. You can find the service instance in the Instances and Subscriptions section of your BTP subaccount.
You can either manually generate a service instance or use the booster to activate SAP Build Process Automation. If you have already the service instance or just created it, check if you have also created a service key.

All information to call the API trigger are available in the service key. Therefore open the service key and use the following information:
- endpoints api url
- clientid
- clientsecret
- uaa url
After you created a service instance and a service key you can start by generating you first workflow inside SPA. I kept it very simple and used a simple approval-form that appears in my inbox to approve the creation of business partner. If you want you can extend your workflow with additional activities, business-rules and even RPA-Bots. Here you can see a screenshot of my process:

We are not going to use the Form-Trigger but instead the API to initiate the workflow. Click on the blank canvas and add the necessary input parameters that we need for our business logic. Here you can see an example of my process inputs for business partner. We are going to use this information later in the tutorial to specify the payload from AppGyver:

I added all input values in my approval form afterwards. You have to make sure to map the output-data from the API to the input data of the approval form. If you don’t do it Process Automation will give you an error:


If everything is setup correctly you can start deploying the workflow. Click on the Release button top-right and define a project version. Click on the Deploy button afterwards and the process can be used productively. If done correctly you can see the deployed workflow in your Monitoring Application. Go to the process lobby and navigate to the Monitoring tab, navigate to Manage and select Processes and Workflows. Search for your workflow and copy your process ID, because we need it later on to trigger the API.

For this demo you require the post-request for starting a workflow instance in combination with a bearer-token request. As usual, the workflow API’s are protected by OAuth, hence you need to pass an Authorization Bearer as header. I always recommend testing the API’s in Postman before trying to implement them. Here you can see an example of my API services including the necessary authorization, query params, request headers and payload:
API for retrieving the Bearer Token for Authentication (for eu10)
GET-request:
https://<your_subaccount_domain>.authentication.us10.hana.ondemand.com/oauth/token?grant_type=client...
Authorization: Basic Auth
Username<your_clientID_as_the_username>
Password<your_clientSecret_as_the_password>
Query Params: grant_type client_credentials
API for starting the Workflow-Instance (for eu10)
Post-request:
https://spa-api-gateway-bpi-eu-prod.cfapps.eu10.hana.ondemand.com/workflow/rest/v1/workflow-instance...
Request Headers:
- Authorization: Bearer <your bearer token>
- Content-Type: application/json’
Request Body:
{  "definitionId": " eu10.scpsubaccount.bpworkflow.businessPartnerWorkflow",  "context": {


"country": "DE",


"bpcat": "2",


"city": "Walldorf",


"pcode": "69190",


"street": "Dietmar-Hopp-Allee 16",


"organization": "SAP"


}


}
Create the Destination
Now we can start using the RESTful-API to create your own destination inside the BTP Subaccount. Destinations are key building blocks in SAP BTP and are used to define connections for outbound communication from your application to remote systems. These remote systems can be on-premises or in the cloud. We will use this fundamental concept to integrate both Build Apps and Build Process Automation.
Navigate to your Subaccount and click on Destination on the left tab and create a New Destination.

Once the blank Destination is available you need to enter necessary information in order to invoke the API-Call:
Name: <Could be any name you like>
Type: HTTP
URL: https://spa-api-gateway-bpi-eu-prod.cfapps.eu10.hana.ondemand.com/workflow/rest/v1/workflow-instance...
Authentication: OAuth2ClientCredentials
Client ID: <your_clientID_from_the_key>
Client Secret: <your_clientSecret_from_the_key>
Token Service URL: https://<your_subaccount_domain>.authentication.eu10.hana.ondemand.com/oauth/token
Additional Properties:
AppgyverEnabled: true
HTML5.DynamicDestination: true
sap.processautomation.enabled: true
WebIDEEnabled: true
If you have entered all the relevant data you can click on Save. If you test the connection directly inside the Subaccount it can happen, that you will receive an authentication error – but don’t worry, its not a problem and the Destination will appear later in Build Apps.

Building the app:
Now it’s about time to build the app. For this purpose, we are going to use SAP Build Apps. Build Apps is a visual programming environment on the BTP where citizen developers and professional developers alike can build enterprise-ready custom software without writing code. Here you can learn more about the service itself. Once you have setup your account (either enterprise-edition or trial) you can start working on your own application projects. For this you need to click on the Create New Button, give your project a name and you are good to go. Your application workspace opens, and you get access to Composer Pro.
Working with the Composer Pro, most of your time will be spent in the app builder.
It allows you to:
- define your app’s structure and navigation logic
- build pixel-perfect user interfaces
- create complex logic with visual programming
- integrate with external data resources
- bind data to your components to create dynamic views, and more.
The first thing you need to do is to setup the data structure and backend integration. For this you have to click on Data on the upper pane and click on SAP AppGyver classic data entities and select SAP BTP destination REST API integration.

Here you have the possibility to add the Data resource name, this can be any name you prefer. And you have to select the Destination that you have created beforehand in the dropdown menu.

When you click on ADD NEW at the resource schema you can add all the relevant payload data that is expected by the workflow. Click on this field and enter the Field Name for every data entity that we have created in Build Process Automation and select any as the Field type.
- bpcat
- city
- country
- organization
- pcode
- street

Please be aware that the editor will convert camelCase - so be careful! Once you have done it for all the six entities your data source should look like this:

You should now go to the create tab on the lefthand side and activate it. Here you need to click on the X-Button of Request headers to add some information:

Select list of values:

Click on add a value and define a new header specification. This header would be necessary to invoke the API-Call:
Header name: Content-Type
Header value: application/json

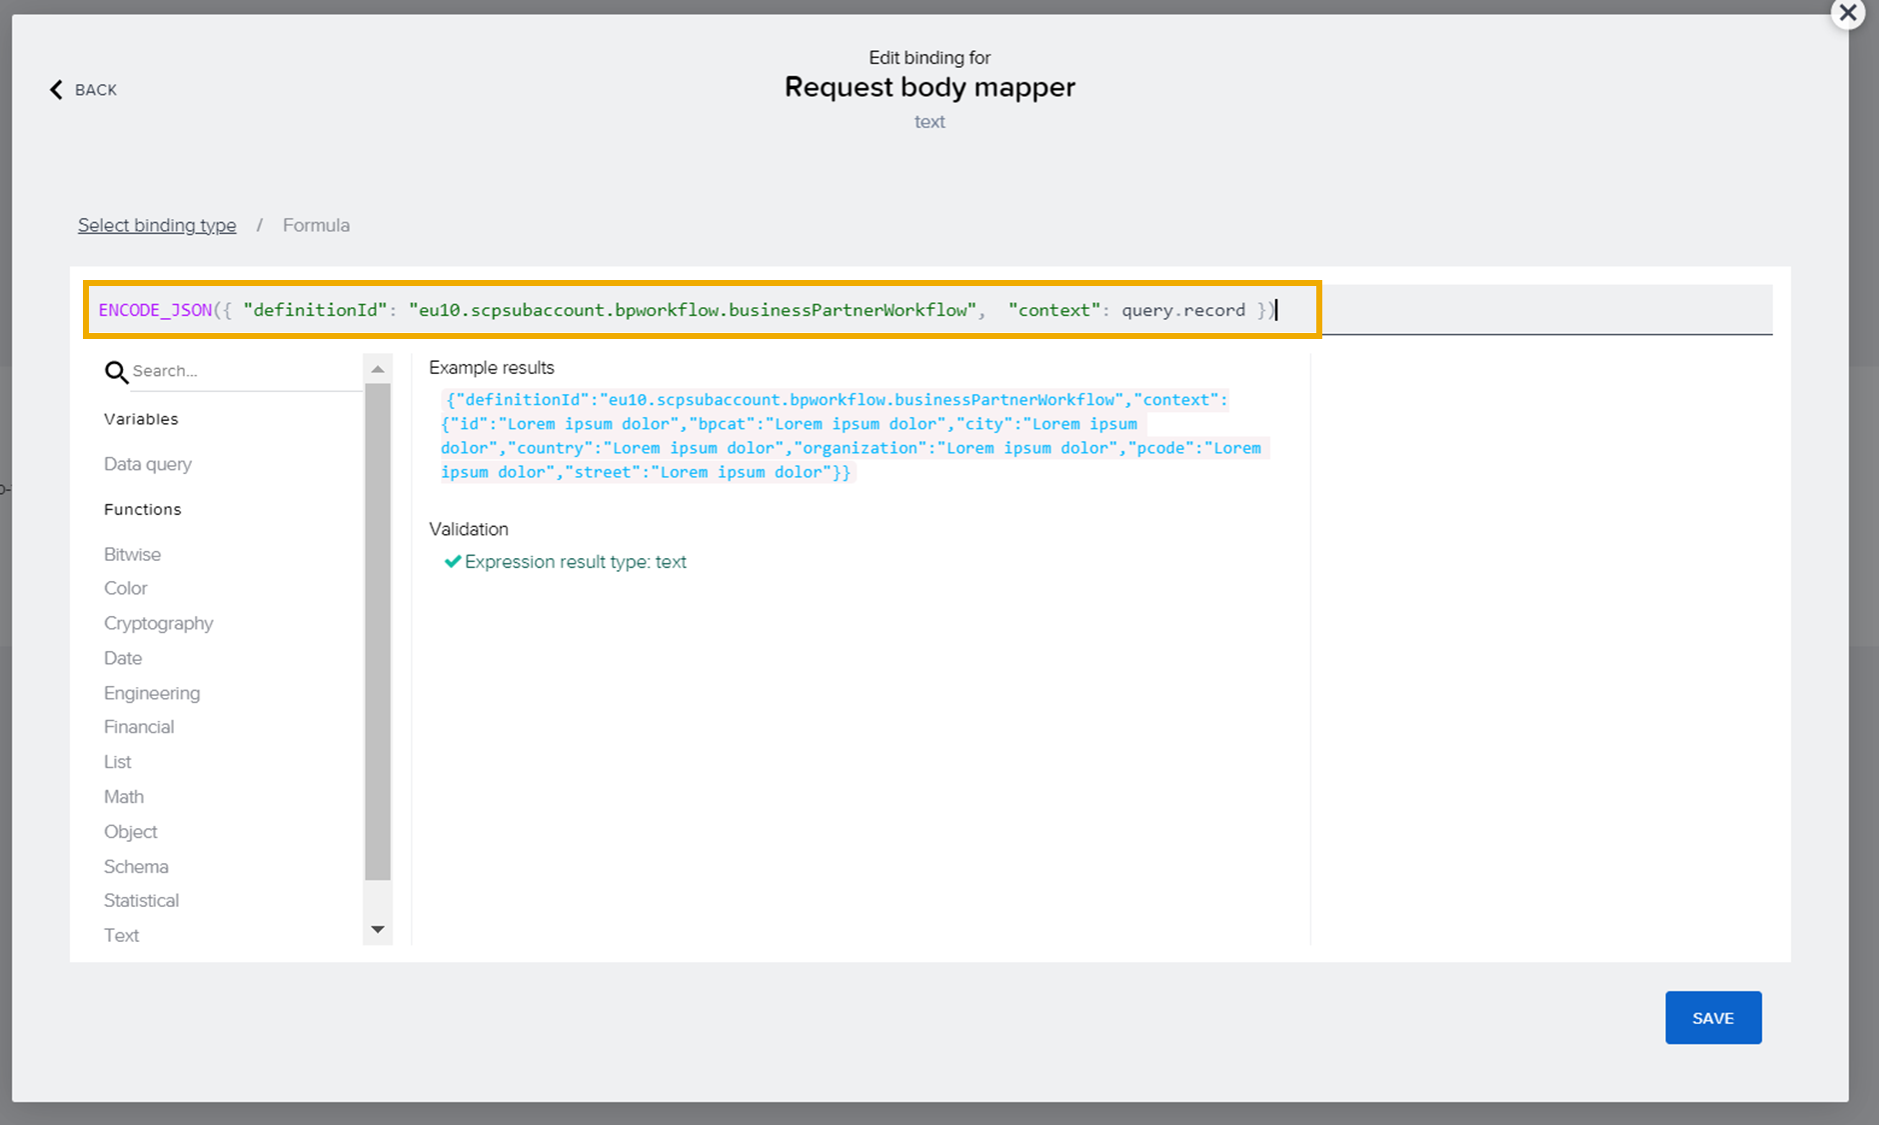
After clicking on safe you need to select request body mapper:

Click on Formula and then click on Create Formula:
In the Formula designer you need to enter following value
ENCODE_JSON({ "definitionId": "<your_workflow_definitionID ", "context": query.record })And click on save.
Once that is finished your data resource should look like this and you can click on the Test tab:

Enter some test-data and you can check if the integration is working:

Now, after you finished the data integration part, you can go back to the application and change the layout from View to Variables where you can start adding data variables to the application logic. Go to the tab Data Variables and add two variables from your already existing data schema. Add Workflow Integration1 as a data resource and define it as a new data record. Save it and now you can start working on the user interface of the application:

Here is an example of how I created my user interface. It’s very simple since it only servers the purpose to create business partners. I have selected input fields as a UI-component from the marketplace and added it five times inside a container. I have also added a dropdown field for pre-selected values to increase the user experience.

As the last step you have to add a button from the UI-components and add it to the bottom of your application. I named my button Submit Business Partner and added some logic to it by clicking on show logic for BUTTON 1. In the Flow Function Market, I have added the function Get record to my flow. Afterwards you have to add the function Create record to the flow. Here it can get a little bit tricky. Define Workflow Integration as the Resource name.

Now you can add the record properties where you need to do the mapping between data variables and input fields. It’s really important here that you select Object with properties --> component properties --> another component property or output value as the binding type and connect every attribute to the corresponding UI-element in the same way as you can see in the screenshot.

Test your workflow:
If that’s finished and you have saved your project you can start testing it and see if it works. Click on Launch at the upper pane and select open app preview portal where you can open your app inside your browser.

The workflow activity created by AppGyver should be now available in your MyInbox app, ready for you to approve. SAP Process Automation uses the standard Fiori Launchpad Service for system access. Depending on how you created the forms UI, all the context data is now available in your inbox.


As I mentioned already this is a very basic example how both worlds of process automation and application composing can be combined. You can create much more extensive and complex scenarios with both LCNC-tools from our platform.
To see LCNC in action, check out the SAP Low-Code/No-Code Learning Journey – designed to increase low-code/no-code skills and teach citizen developers the basic concepts of software development and learn how to build mobile apps for free. Check out LCNC and Discover BTP plus much more free learning at SAP Learning site:
Stay tuned!
Thank you joaquin.reciohuertas for your support!
Labels:
8 Comments
You must be a registered user to add a comment. If you've already registered, sign in. Otherwise, register and sign in.
Labels in this area
-
ABAP CDS Views - CDC (Change Data Capture)
2 -
AI
1 -
Analyze Workload Data
1 -
BTP
1 -
Business and IT Integration
2 -
Business application stu
1 -
Business Technology Platform
1 -
Business Trends
1,661 -
Business Trends
88 -
CAP
1 -
cf
1 -
Cloud Foundry
1 -
Confluent
1 -
Customer COE Basics and Fundamentals
1 -
Customer COE Latest and Greatest
3 -
Customer Data Browser app
1 -
Data Analysis Tool
1 -
data migration
1 -
data transfer
1 -
Datasphere
2 -
Event Information
1,400 -
Event Information
65 -
Expert
1 -
Expert Insights
178 -
Expert Insights
280 -
General
1 -
Google cloud
1 -
Google Next'24
1 -
Kafka
1 -
Life at SAP
784 -
Life at SAP
11 -
Migrate your Data App
1 -
MTA
1 -
Network Performance Analysis
1 -
NodeJS
1 -
PDF
1 -
POC
1 -
Product Updates
4,577 -
Product Updates
330 -
Replication Flow
1 -
RisewithSAP
1 -
SAP BTP
1 -
SAP BTP Cloud Foundry
1 -
SAP Cloud ALM
1 -
SAP Cloud Application Programming Model
1 -
SAP Datasphere
2 -
SAP S4HANA Cloud
1 -
SAP S4HANA Migration Cockpit
1 -
Technology Updates
6,886 -
Technology Updates
408 -
Workload Fluctuations
1
Related Content
- Convert multiple xml's into single Xlsx(MS Excel) using groovy script in Technology Blogs by Members
- Introducing Blog Series of SAP Signavio Process Insights, discovery edition – An in-depth exploratio in Technology Blogs by SAP
- CF Deployment Error: Error getting tenant t0 in Technology Q&A
- Switch on gCTS (for existing packages) in Technology Blogs by SAP
- When to Use Multi-Off in 3SL in Technology Blogs by SAP
Top kudoed authors
| User | Count |
|---|---|
| 13 | |
| 11 | |
| 10 | |
| 9 | |
| 9 | |
| 7 | |
| 6 | |
| 5 | |
| 5 | |
| 5 |