Introduction
In this blog post, we will learn how to mask “
Gross Weight” and “
Net Weight” fields in
MARA table in transactions
SE16 and
MM03 for materials of Sensitive Material Group "
300".
Attribute based authorizations are dynamic determination mechanism which determines whether a user is authorized to access specific data sets which can be based on the context attributes of the user and data (for example, price of certain sensitive materials are masked).
The result will appear as:


Prerequisite
Product “
UI data protection masking for SAP S/4HANA” is used in this scenario to protect sensitive data at field level and must be installed in the S/4HANA system.
The product is a cross-application product which can be used to mask/protect any field in SAP GUI, SAPUI5/SAP Fiori, CRM Web Client UI, and Web Dynpro ABAP.
Let’s begin
Configuration to achieve masking
Logical Attribute is a functional modelling of how any attribute such as Social Security Number, Bank Account Number, Amounts, Pricing information, Quantity etc. should behave with masking.
Configure Logical Attribute
Follow the given path:
SPRO -> SAP NetWeaver -> UI Data Protection Masking for SAP S/4HANA -> Sensitive Attribute Configuration -> Maintain Metadata Configuration -> Maintain Logical Attributes
Gross Weight

Net Weight

Material Group

Configure Value Range
Value Ranges are a set of pre-populated values which can be used to derive the context under which an action should be executed.
Follow the given path:
SPRO -> SAP NetWeaver -> UI Data Protection Masking for SAP S/4HANA -> Sensitive Attribute Configuration -> Maintain Metadata Configuration -> Maintain Attributes and Ranges for Policy – Follow below mentioned steps:
Range for Material Group
- Click on “New Entries” button
- Enter “Value Range” as “VR_MATGROUP”
- Select “Application Module” as “* Cross-Application”
- Enter “Description” as “Range for Material Group”
- Click on “Save” button

Enter entries in “
VR_MATGROUP” Value Range
- Execute Transaction Code “/UISM/V_RANGE”
- Click on “VR_MATGROUP” Value Range
- Click on “Display<- -> Change” button
- Click on “Add New Entry” button
- Add Value as “300” and Description as “Aircrafts” under “Include Value” tab
- Click on “Save” button


Maintain Technical Address
In this step, we will associate the Technical Address of the fields to be masked with the Logical Attributes.
You can get the Technical Address of a GUI field by pressing “
F1” on the field.

Follow the given path:
SPRO -> SAP NetWeaver -> UI Data Protection Masking for SAP S/4HANA -> Sensitive Attribute Configuration -> Maintain Metadata Configuration -> Maintain Technical Address
Follow below mentioned steps:
Under “
GUI Table Field Mapping”, maintain technical address for following fields.
Gross Weight
- Click on “New Entries” button
- Enter “Table Name” as “MARA”
- Enter “Field Number” as “BRGEW”
- Enter “Logical Attribute” as “LA_BRWEIGHT”
- Enter “Description” as “Material Gross Weight”
- Click on “Save” button

Net Weight
- Click on “New Entries” button
- Enter “Table Name” as “MARA”
- Enter “Field Number” as “NTGEW”
- Enter “Logical Attribute” as “LA_NTWEIGHT”
- Enter “Description” as “Material Net Weight”
- Click on “Save” button

Material Group
- Click on “New Entries” button
- Enter “Table Name” as “MARA”
- Enter “Field Number” as “MATKL”
- Enter “Logical Attribute” as “LA_MATGROUP”
- Enter “Description” as “Material Group”
- Click on “Save” button

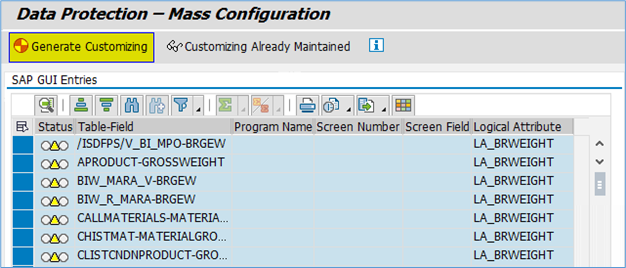
Mass Configuration
For all the above entries, “
Mass Configuration” report should be executed which is required to generate technical addresses.
Follow below mentioned steps:
- Select the entries in GUI Table Field Mapping
- Click on “Mass Configuration” button
- Click on “Select All” button
- Click on “Generate Customizing” button
- Save the information


Policy Configuration
A
Policy is a combination of rules and actions which are defined in one or more blocks. The actions are executed on a sensitive entity (field to be protected) which has to be assigned to a Policy. The conditions are based on contextual attributes which help derive the context.
Context Attributes are logical attributes which are used in designing the rules of a policy. They are mapped to fields which are used to derive the context under which an action is to be executed on a sensitive entity.
Sensitive Entities are logical attributes which are sensitive and need to be protected from unauthorized access.
Follow the given path:
SPRO -> SAP NetWeaver -> UI Data Protection Masking for SAP S/4HANA -> Sensitive Attribute Configuration -> Masking and Blocking Configuration -> Maintain Policy Details for Attribute based Authorizations – Follow below mentioned steps:
- Click on “New Entries” button
- Enter “Policy Name” as “POL_SENSITIVE_MAT”
- Select “Type” as “Field Level Masking”
- Select “Application Module” as “* Cross-Application”
- Enter “Description” as “Mask Sensitive Attributes of Material”
- Click on “Save” button

Write following logic into Policy

Maintain Field Level Security and Masking Configuration
Here, we will define how masking will behave with the logical attribute that we created in above step.
Follow the given path:
SPRO -> SAP NetWeaver -> UI Data Protection Masking for SAP S/4HANA -> Sensitive Attribute Configuration -> Masking and Blocking Configuration -> Maintain Field Level Security and Masking Configuration
Follow below mentioned steps:
- Click on “New Entries” button
- Enter “Sensitive Entity” as “LA_BRWEIGHT” and press “Enter” key. “Description” and “Application Module” will get populated in corresponding fields
- Check “Enable Configuration” check-box
- Select “Attribute Based Authorization” option
- Enter “Policy Name” as “POL_SENSITIVE_MAT”
- Click on “Save” button

- Click on “New Entries” button
- Enter “Sensitive Entity” as “LA_NTWEIGHT” and press “Enter” key. “Description” and “Application Module” will get populated in corresponding fields
- Check “Enable Configuration” check-box
- Select “Attribute Based Authorization” option
- Enter “Policy Name” as “POL_SENSITIVE_MAT”
- Click on “Save” button

Conclusion
In this blog post, we have learnt how
Attribute-based masking is achieved in transactions
SE16 and
MM03 for masking “
Gross Weight” and “
Net Weight” fields for materials of Material Group "
300".
