
- SAP Community
- Products and Technology
- Technology
- Technology Blogs by SAP
- SAP Build Apps consuming employee data from Succes...
Technology Blogs by SAP
Learn how to extend and personalize SAP applications. Follow the SAP technology blog for insights into SAP BTP, ABAP, SAP Analytics Cloud, SAP HANA, and more.
Turn on suggestions
Auto-suggest helps you quickly narrow down your search results by suggesting possible matches as you type.
Showing results for
Product and Topic Expert
Options
- Subscribe to RSS Feed
- Mark as New
- Mark as Read
- Bookmark
- Subscribe
- Printer Friendly Page
- Report Inappropriate Content
02-23-2023
5:49 PM
In this Blog post, I'll dive into the technical details behind the SAP SuccessFactors and SAP Build use case explained in my previous Blog: Extend SAP SuccessFactors with SAP Build. Today, I will be showing you step-by-step how to create the application. The goal is to help you better understand the integration and extension capabilities of SAP Build Apps & SAP SuccessFactors and inspire you to start building your own applications.
To get started, you'll need to create a project in the SAP Build Lobby. This can be done quickly and easily using the pre-built UI components and templates available in the service:
Once you have created the project, the first thing is to enable the data section:
To start pulling data for your application, it's important to know which APIs are available and which one best fits your use case. I recommend familiarizing yourself with the API Business Hub for SuccessFactors to explore the APIs and their capabilities.
For this use case, I decided to use the User Management API to consume employee data from SuccessFactors. With this API, we were able to show and filter the data as I needed:
By understanding the available APIs and selecting the appropriate one for your use case, you can ensure the success of your custom application with SAP SuccessFactors.
As explained in the Blog Post: Configuring access to an SAP SuccessFactors API in SAP Build Apps by my colleague Antonio Maradiaga, we have two options when integrating SAP Build with SAP SFSF:
For this example, I have decided to use SAP API Management in order to overcome the CORS Issue but I have tested the BTP Destination and it works fine as you can see:
As I mentioned, I’m going to be using SAP API Management. Please review Antonio’s Blog to configure the API and overcome the CORS Issue. Once you have done so, please come back and configure the Rest API Call in Build Apps:
It’s very important that you add the response Key path “d.results” in order to be able to access the results for all employees located from the Madrid office as it’s filtered in the query parameter. Feel free to explore other options to filter the API.
Let's setup another API for the User Details screen, so we can pull all data for a specific user:
In this case, as the API only recovers one employee you only need to add in the Response key path “d” as we don’t have more results.
Let’s go back to the UI Canvas and let’s start defining the variables that we need for the project: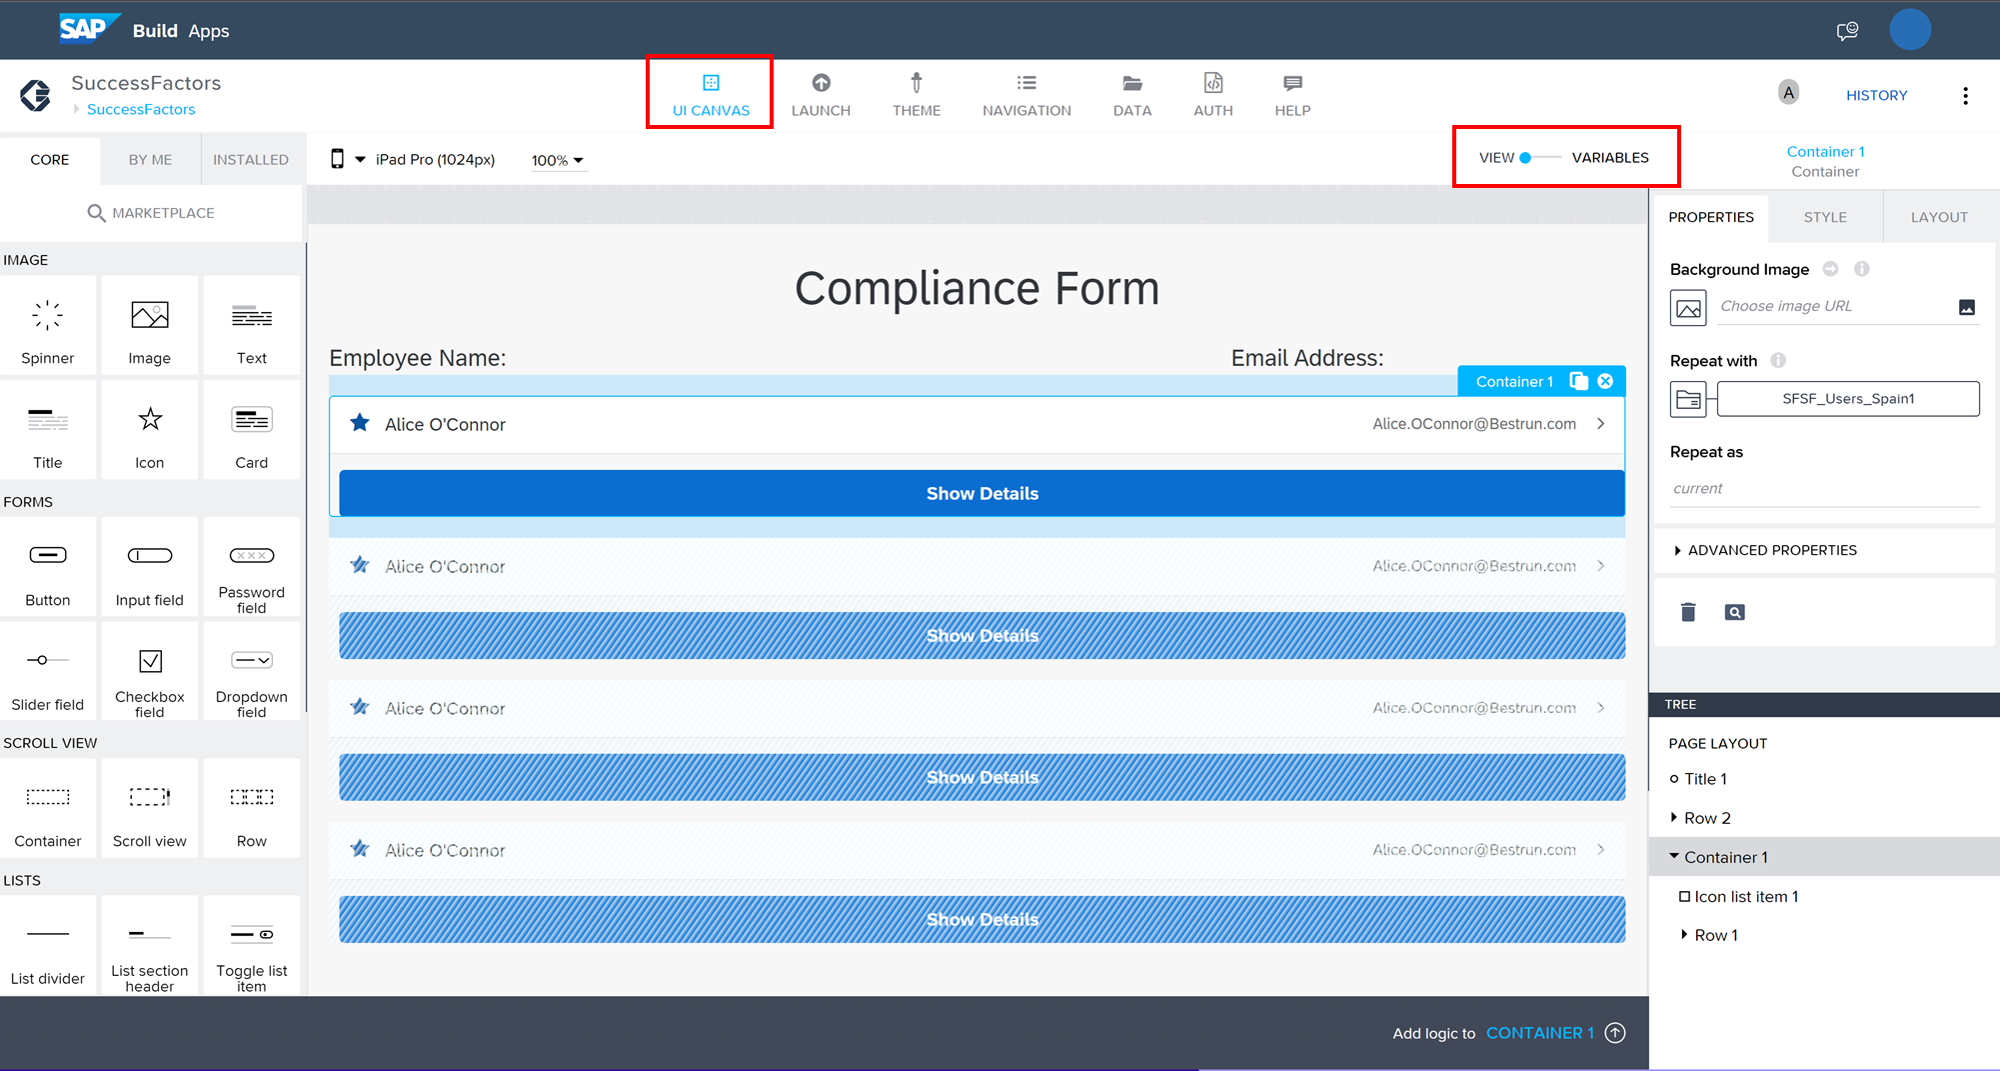
Let’s go back to the UI Canvas and start building up the UI Interface. I have used the following elements:
Next, we are going to define the container as an item that repeats with any result that bring the API “SFSF_Users_Spain” that we have created in the Data section:
Select the container > Repeat with icon > Data and Variables > Data Variable > SFSF_Users_Spain
Now, let’s display the employee information in the UI. In this example, I’m going to show the employee's full name and email address. Please repeat the following steps for the Secondary Label as well:
Great Job so far! We are almost done!!
In this example, I’m going to add the logic to enable the user to click on an employee and move to the next page of the application, once the user clicks it will save all the relevant variables (the variables we have created before):
Select the Icon List Item > Click “Add logic to Icon List Item” > Set App Variable
Add the “Open Page” as well so the application moves to the next page where the end user will fulfil all the information about the incident. At the end it should look like this:
While the previous steps are enough to create a basic employee search functionality, we can take it further by adding an optional section to display more detailed information about the selected employee. This not only enhances the user experience but also showcases all information that can be retrieved from SAP SuccessFactors APIs.
Before navigating to the User Details Screen, you have to add logic into the “Show Details” button. When the end user clicks the button, the userId variable must be saved and the application should move to the User Details Screen. For that you need to add “Set the app variable2 and “Open Page”: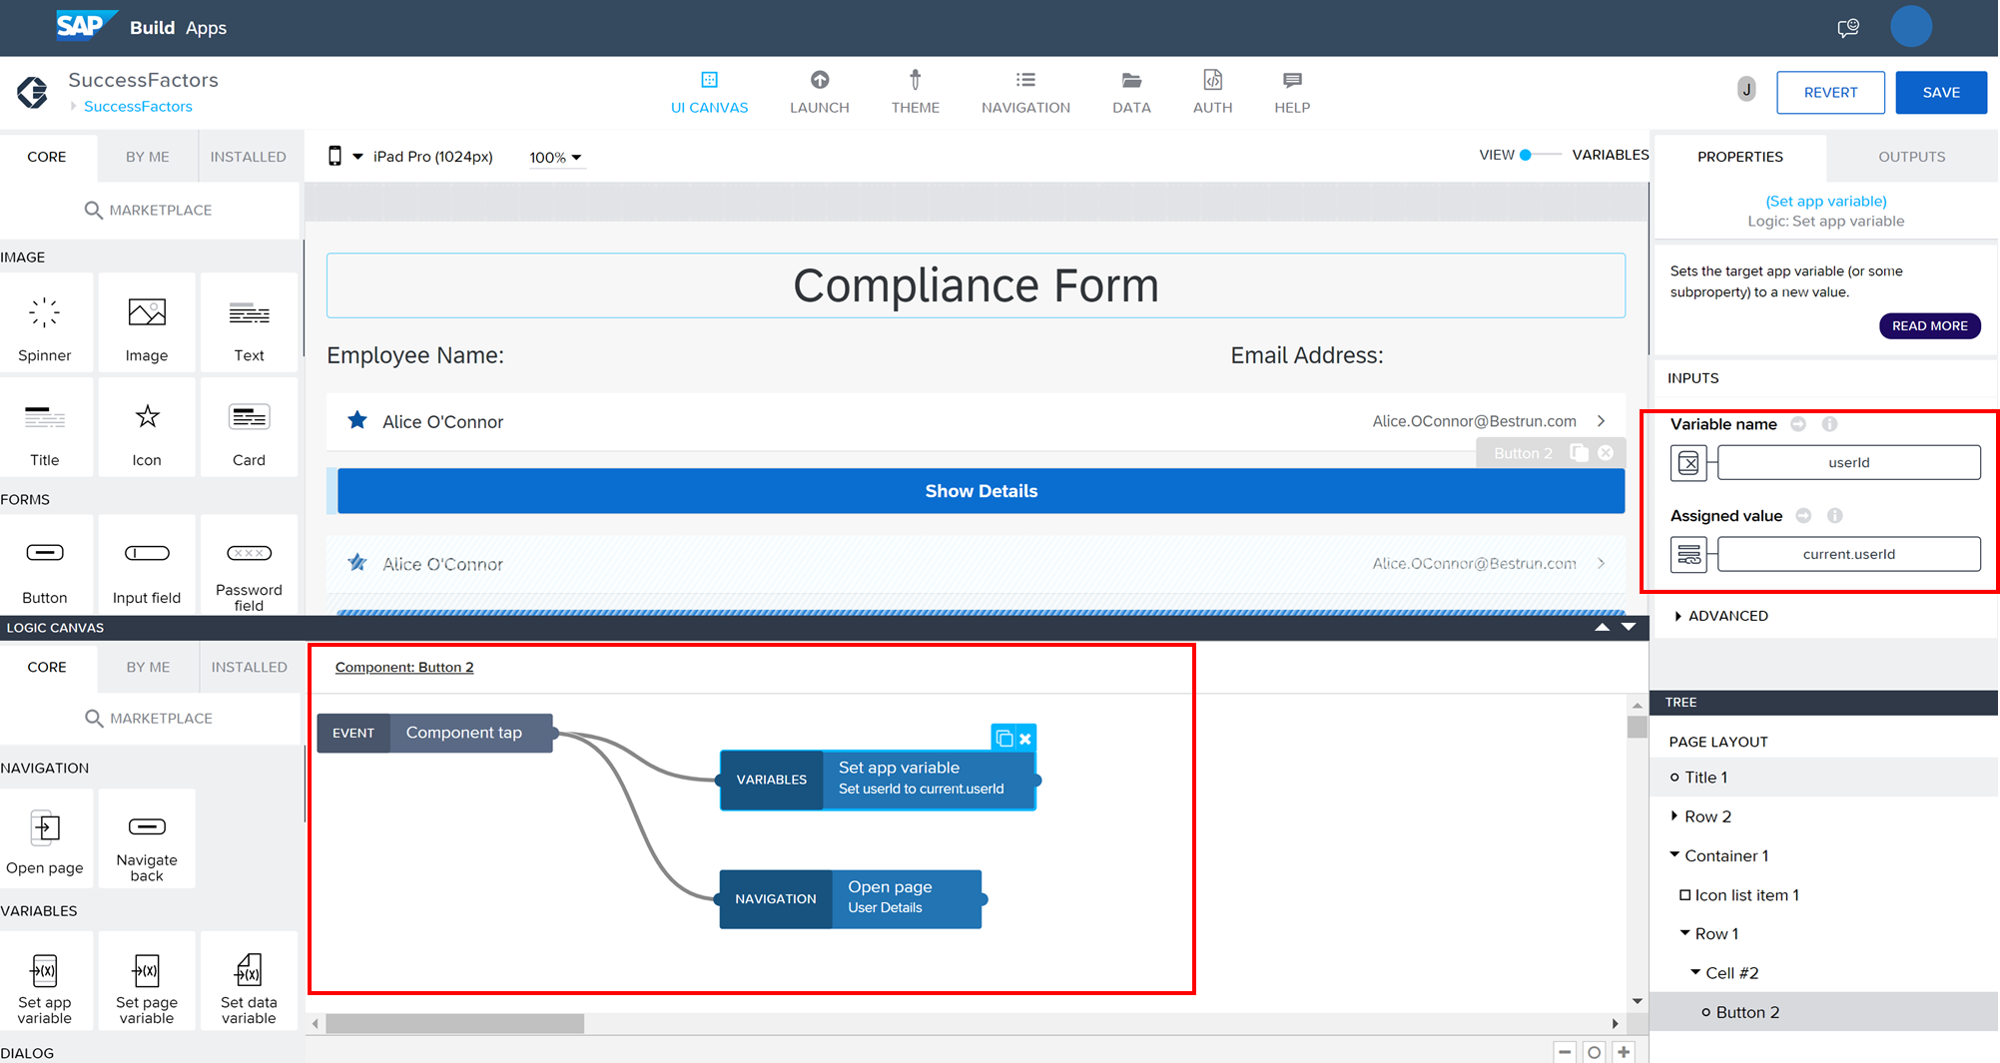
In the new User Details Page, a new data variable must be declared because this time we will be calling the “SFSF_UserId” Rest Api that we created at the beginning: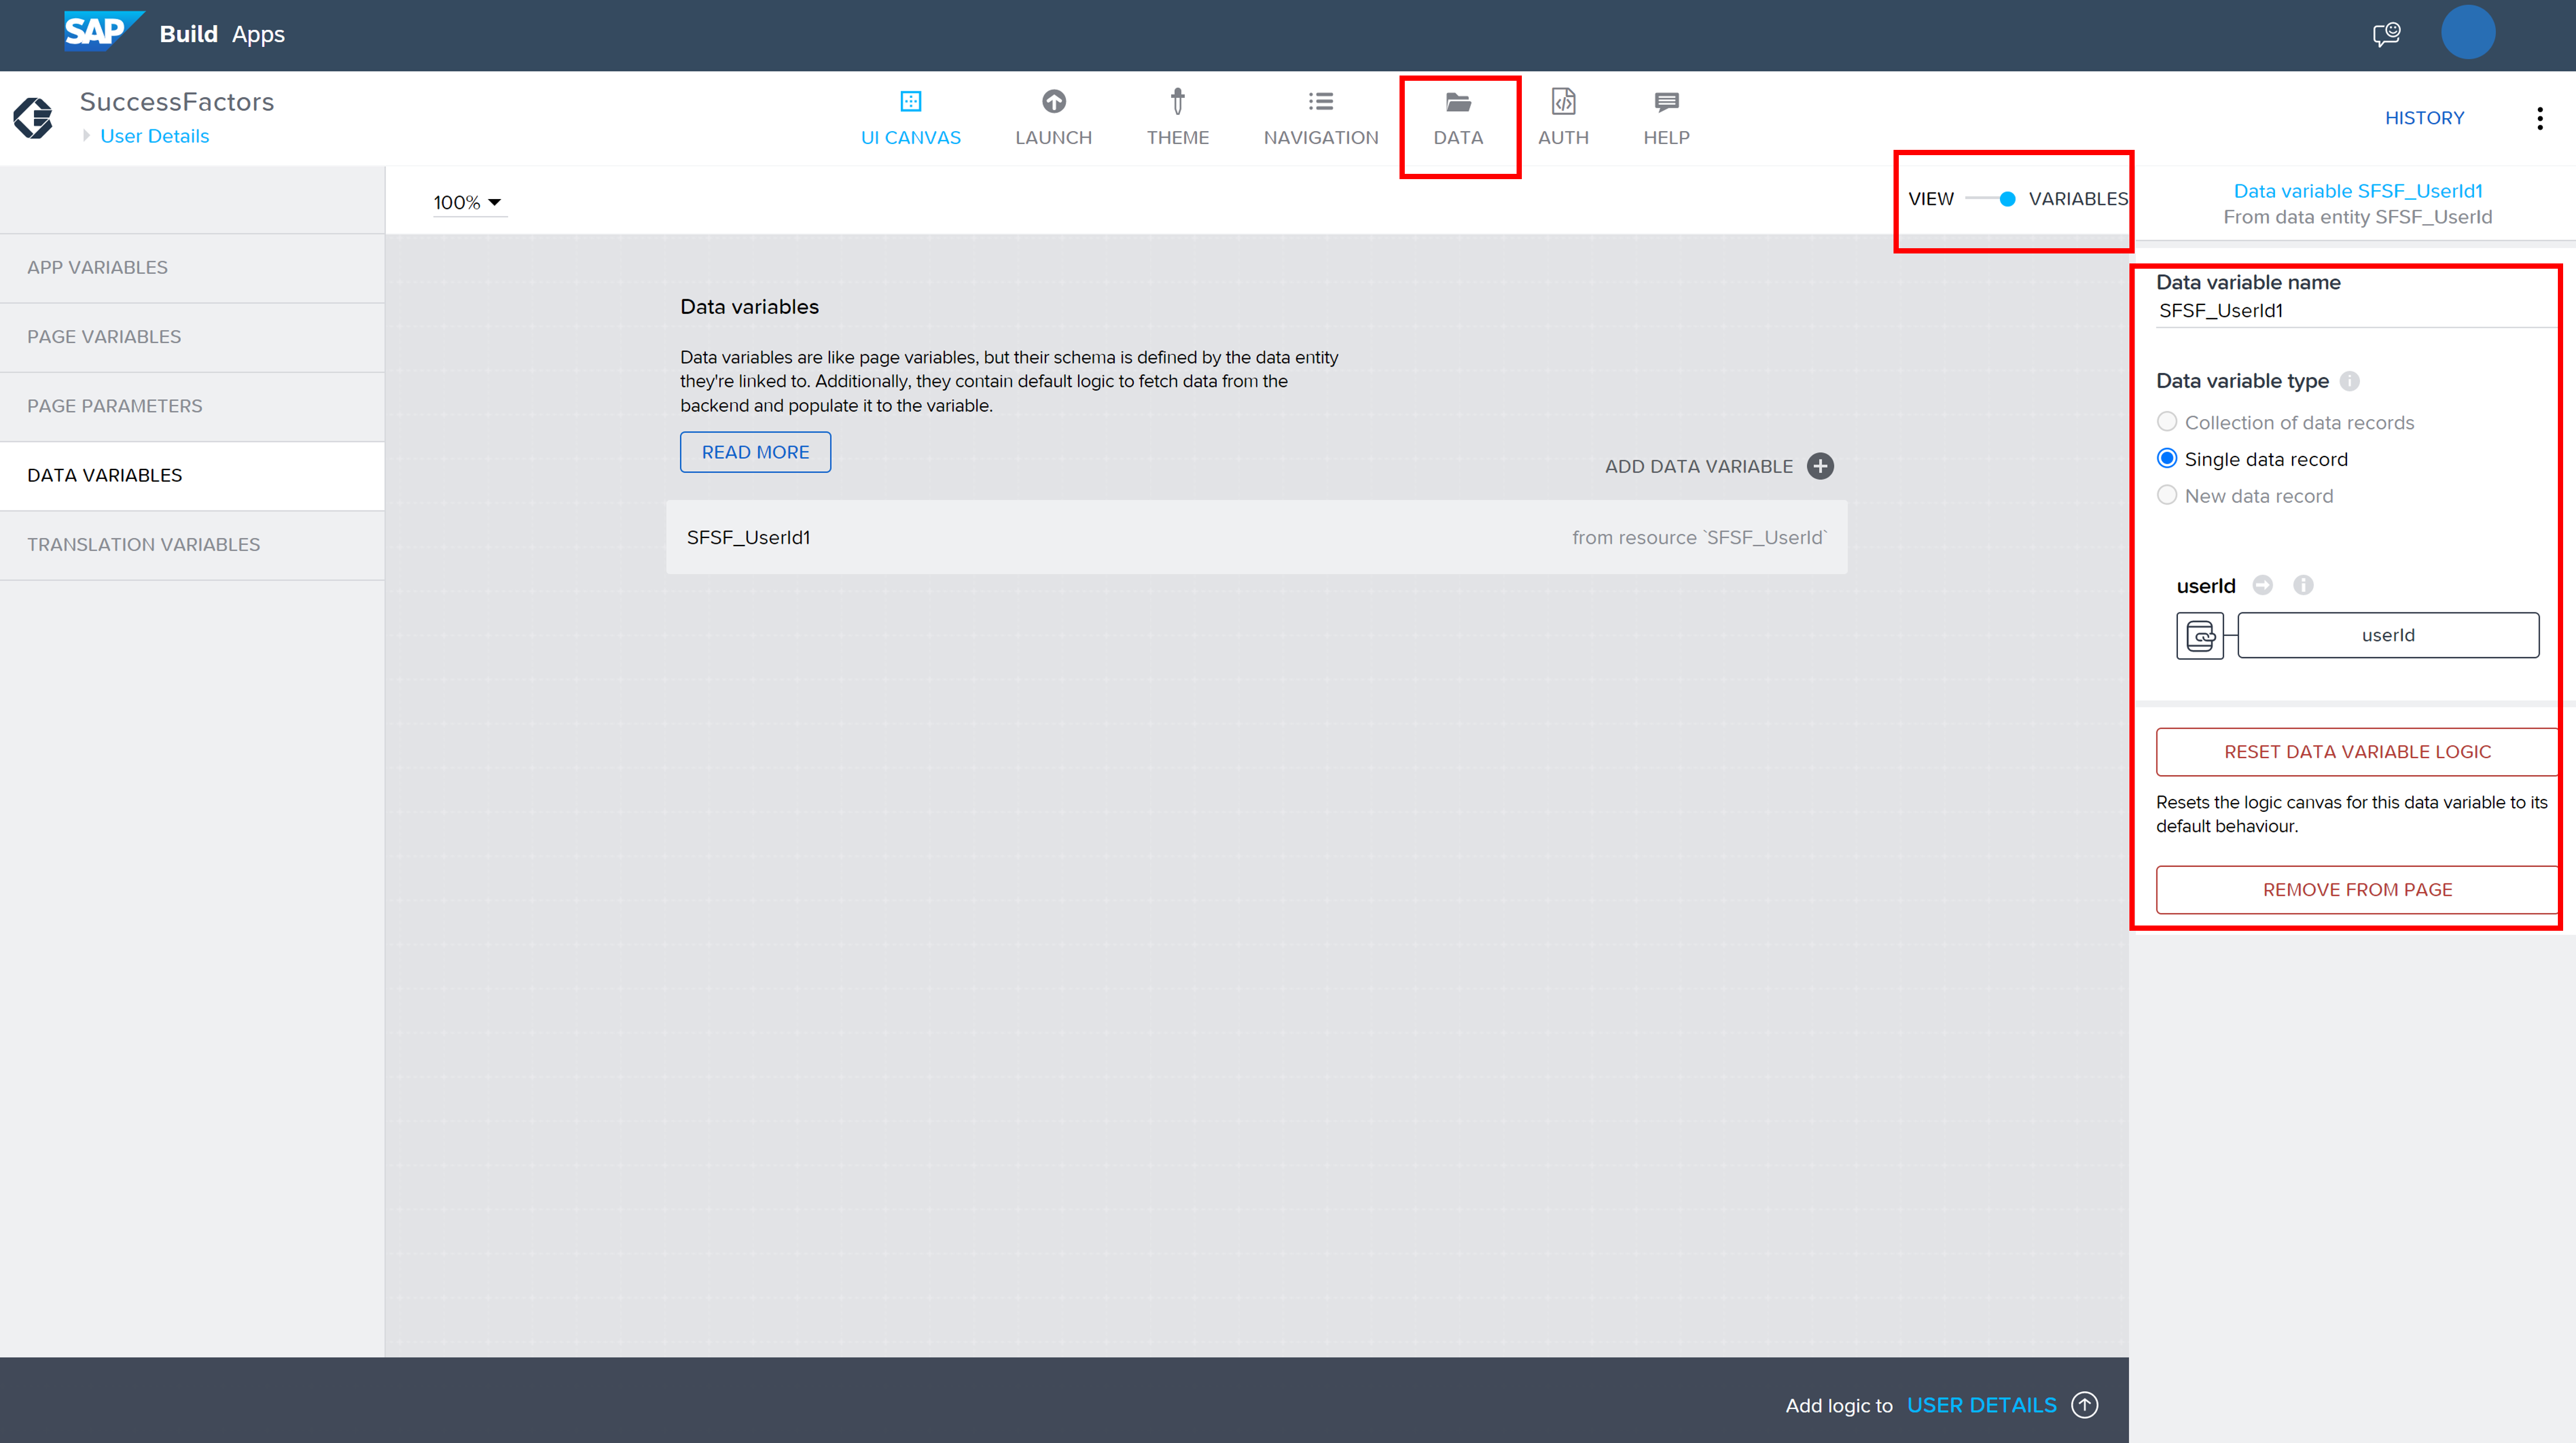
Consider using a Single Data Record as the Data Variable Type this time. Additionally, ensure to set the userID variable to select the specific employee for whom you require additional information.
On the User Details page, I've designed a simple and intuitive UI. I've added a "Container" element as a title for both the "Employee Details" and "Position Details" sections, with each section containing multiple "Row" elements. Inside each "Row" element, we've added a "Title" element to display the relevant information.
Additionally, I've added a "Button" element at the end to allow users to easily navigate back to the previous page.
As for the image below, it showcases the User Details page with the UI design I've described above:
Once the data variable and the UI elements are defined, the next step is to select the specific data fields from the API response that you want to display on the screen. For instance the “Department”:
At the moment, the button we added at the end of the page is just a static element with no functionality. If you want to enable navigation back to the employee list, you'll need to add some logic to the button. One approach is to use the Navigate back. This will allow the end user to easily go back to the list of employees:
You can find them under the Tree information. I'm confident that with this information, you'll be able to create the screen yourself. Feel free to reach out if you have any questions or need further guidance.
I want to encourage you to recreate the screen on your own, you can find all information needed under the Tree: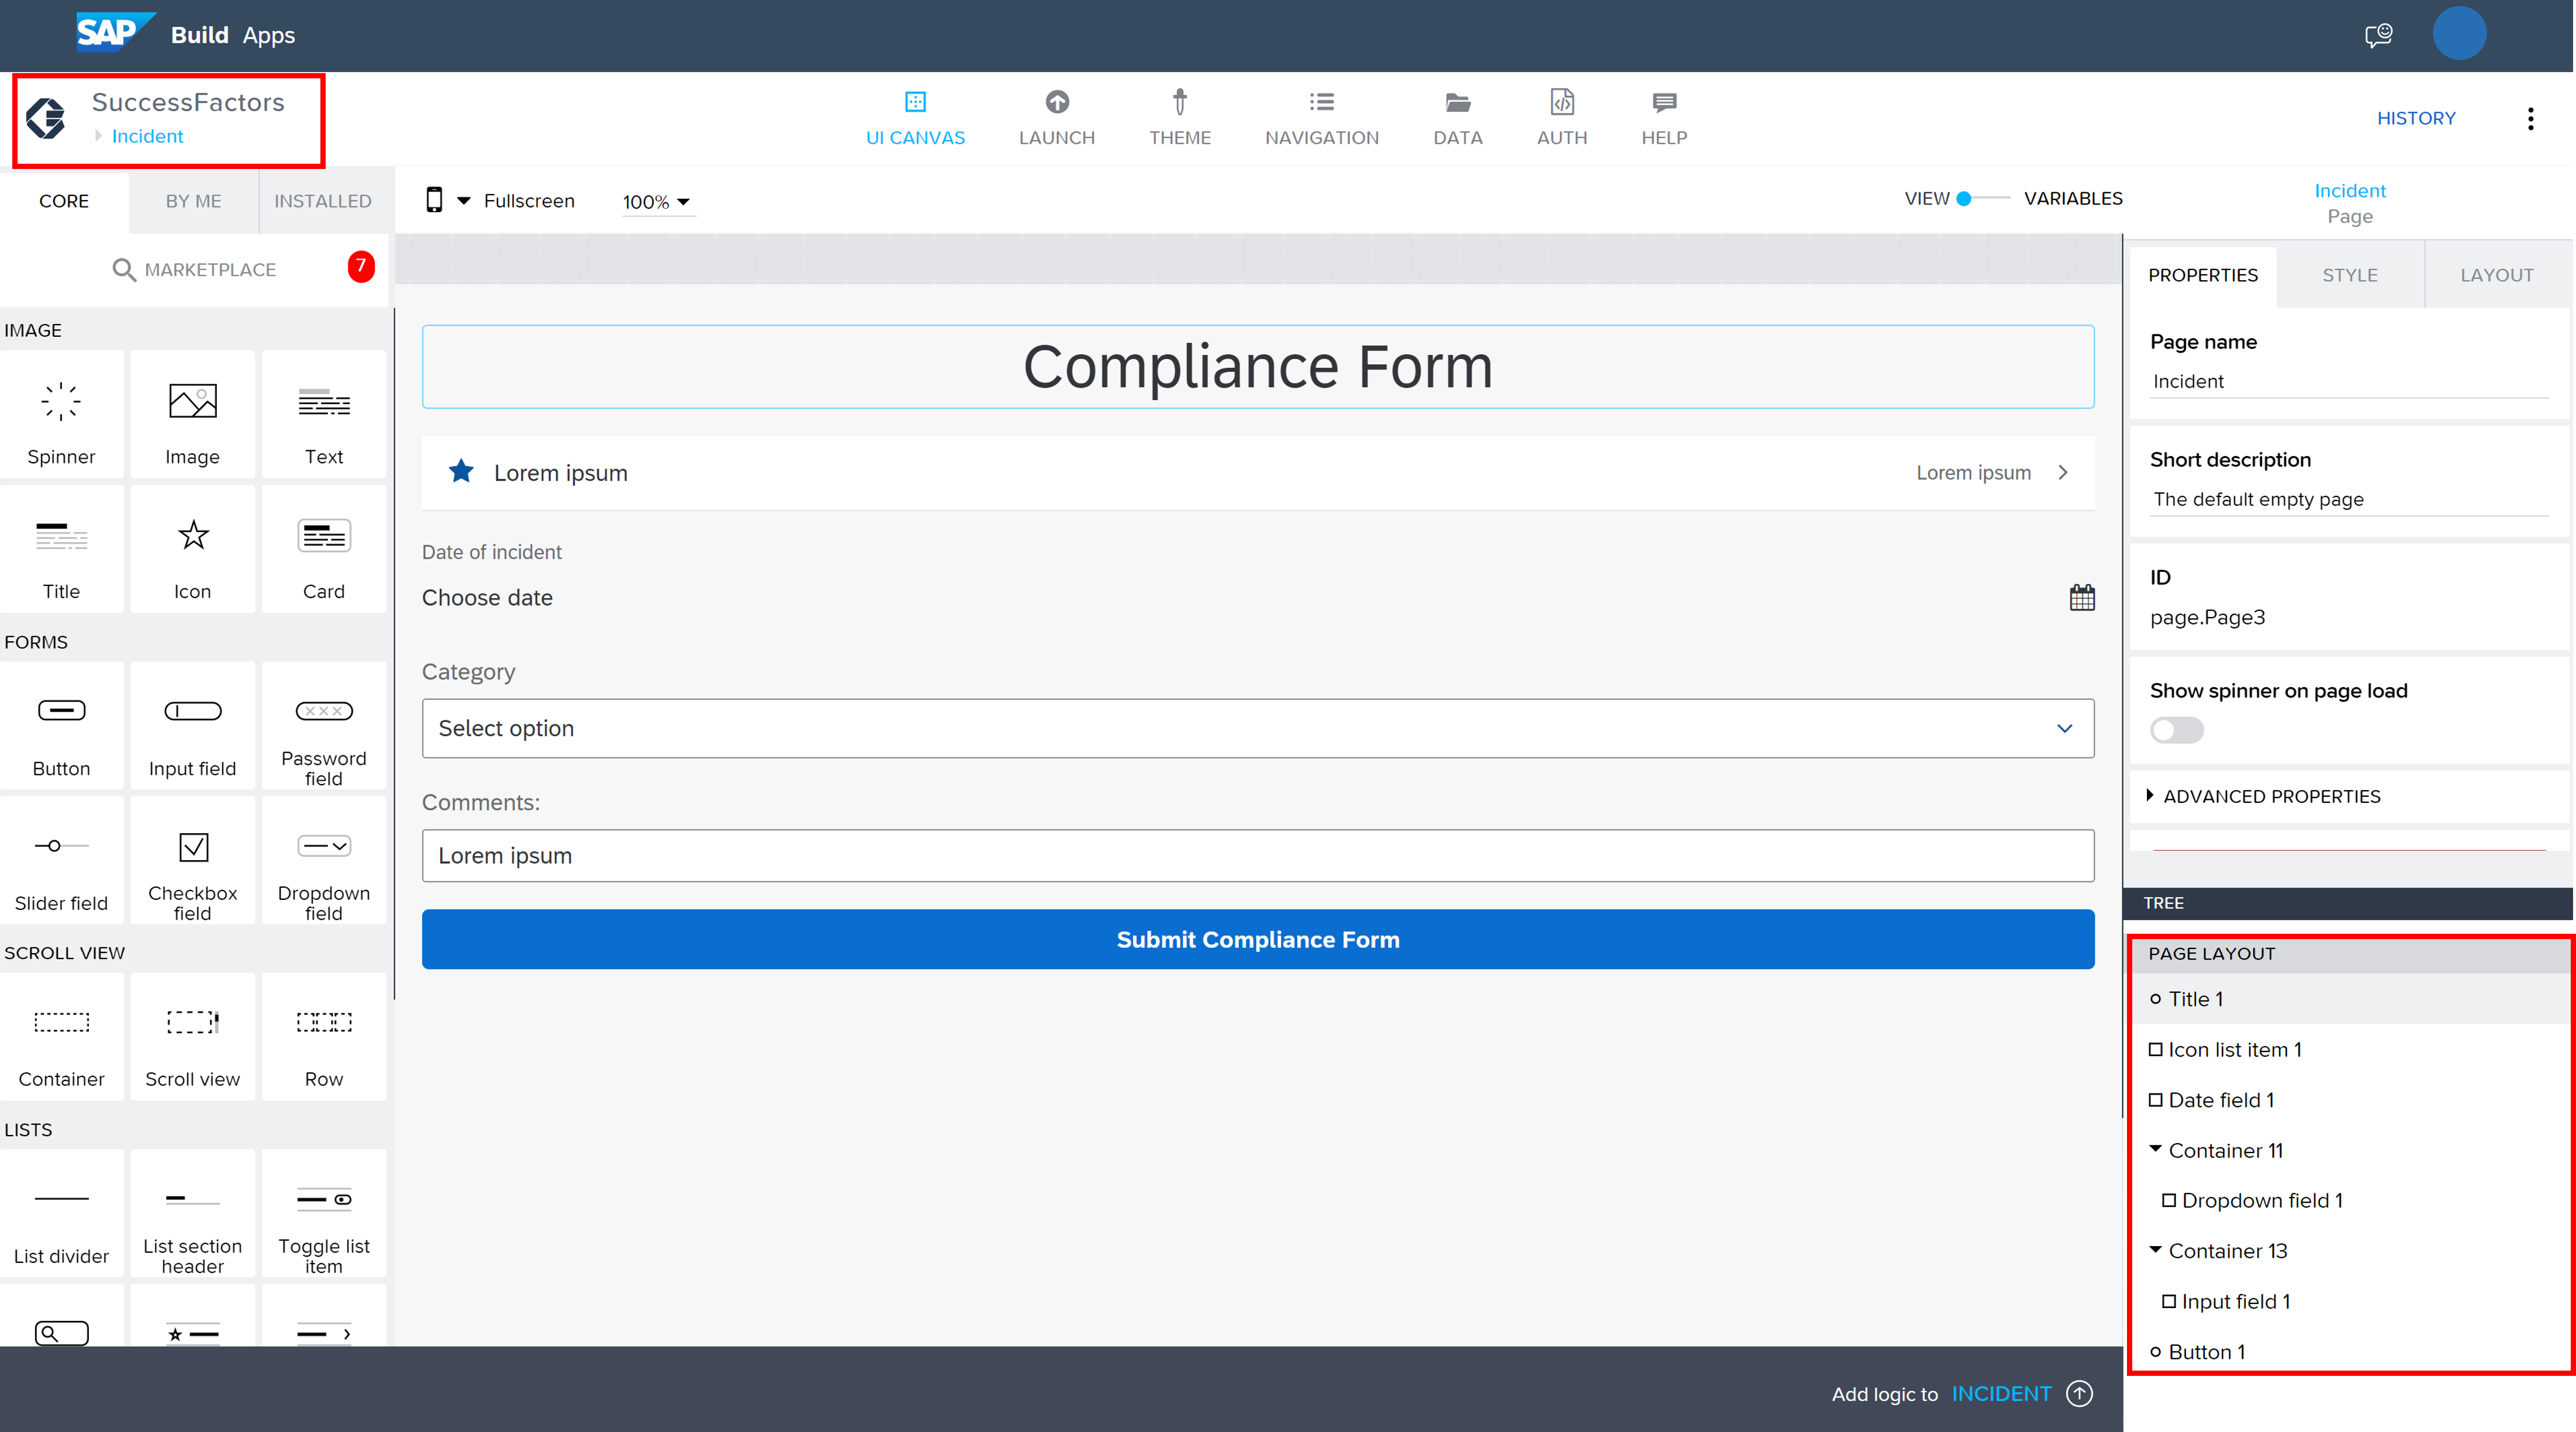
While I won't go into as much detail this time, I'm confident that you have the necessary knowledge and skills to use the information provided and build the screen successfully. Feel free to reach out if you have any questions or need further guidance.
To learn how to trigger the process on SAP Build Process Automation, I would recommend checking out the following SAP Blogs:
If you believe a more detailed guide is required for the SAP Build Process Automation, let me know in the comments and I will work on a technical article that walks you through the configuration step-by-step.
In this blog post, I have demonstrated how to build a simple application using SAP Build Apps that communicates with SAP SuccessFactors. I have covered various technical details including API integration, data modeling, and UI design. By following the step-by-step instructions, you should be able to create the same application, or a similar application tailored to your specific use case.
I hope that you have found this blog informative and helpful in showcasing the capabilities of SAP Build Apps. If you have any questions, doubts, or concerns, don’t hesitate to post them in the comments or reach out to the community. We’re always here to help you make the most of SAP BTP!
Thank you for reading and happy building!

Architecture - SAP Build Apps
To get started, you'll need to create a project in the SAP Build Lobby. This can be done quickly and easily using the pre-built UI components and templates available in the service:

Data
Once you have created the project, the first thing is to enable the data section:
To start pulling data for your application, it's important to know which APIs are available and which one best fits your use case. I recommend familiarizing yourself with the API Business Hub for SuccessFactors to explore the APIs and their capabilities.
For this use case, I decided to use the User Management API to consume employee data from SuccessFactors. With this API, we were able to show and filter the data as I needed:
By understanding the available APIs and selecting the appropriate one for your use case, you can ensure the success of your custom application with SAP SuccessFactors.
As explained in the Blog Post: Configuring access to an SAP SuccessFactors API in SAP Build Apps by my colleague Antonio Maradiaga, we have two options when integrating SAP Build with SAP SFSF:
- SAP BTP Destinations
- SAP API Management
For this example, I have decided to use SAP API Management in order to overcome the CORS Issue but I have tested the BTP Destination and it works fine as you can see:

As I mentioned, I’m going to be using SAP API Management. Please review Antonio’s Blog to configure the API and overcome the CORS Issue. Once you have done so, please come back and configure the Rest API Call in Build Apps:

It’s very important that you add the response Key path “d.results” in order to be able to access the results for all employees located from the Madrid office as it’s filtered in the query parameter. Feel free to explore other options to filter the API.
Let's setup another API for the User Details screen, so we can pull all data for a specific user:

In this case, as the API only recovers one employee you only need to add in the Response key path “d” as we don’t have more results.
Variables
Let’s go back to the UI Canvas and let’s start defining the variables that we need for the project:


UI Interface for the initial Screen
Let’s go back to the UI Canvas and start building up the UI Interface. I have used the following elements:
- “Title” for adding Compliance Form text as a header.
- “Row” below the Title so I can add two “Text” (Employee Name and Email Addres).
- “Container” below the Row with the text and inside the container we add “Icon List Item” and a “Button”
Next, we are going to define the container as an item that repeats with any result that bring the API “SFSF_Users_Spain” that we have created in the Data section:
Select the container > Repeat with icon > Data and Variables > Data Variable > SFSF_Users_Spain

Now, let’s display the employee information in the UI. In this example, I’m going to show the employee's full name and email address. Please repeat the following steps for the Secondary Label as well:
Great Job so far! We are almost done!!
In this example, I’m going to add the logic to enable the user to click on an employee and move to the next page of the application, once the user clicks it will save all the relevant variables (the variables we have created before):
Select the Icon List Item > Click “Add logic to Icon List Item” > Set App Variable


Add the “Open Page” as well so the application moves to the next page where the end user will fulfil all the information about the incident. At the end it should look like this:
UI Interface for the User Details
While the previous steps are enough to create a basic employee search functionality, we can take it further by adding an optional section to display more detailed information about the selected employee. This not only enhances the user experience but also showcases all information that can be retrieved from SAP SuccessFactors APIs.
Before navigating to the User Details Screen, you have to add logic into the “Show Details” button. When the end user clicks the button, the userId variable must be saved and the application should move to the User Details Screen. For that you need to add “Set the app variable2 and “Open Page”:
In the new User Details Page, a new data variable must be declared because this time we will be calling the “SFSF_UserId” Rest Api that we created at the beginning:
Consider using a Single Data Record as the Data Variable Type this time. Additionally, ensure to set the userID variable to select the specific employee for whom you require additional information.
UI Canvas
On the User Details page, I've designed a simple and intuitive UI. I've added a "Container" element as a title for both the "Employee Details" and "Position Details" sections, with each section containing multiple "Row" elements. Inside each "Row" element, we've added a "Title" element to display the relevant information.
Additionally, I've added a "Button" element at the end to allow users to easily navigate back to the previous page.
As for the image below, it showcases the User Details page with the UI design I've described above:
Once the data variable and the UI elements are defined, the next step is to select the specific data fields from the API response that you want to display on the screen. For instance the “Department”:
At the moment, the button we added at the end of the page is just a static element with no functionality. If you want to enable navigation back to the employee list, you'll need to add some logic to the button. One approach is to use the Navigate back. This will allow the end user to easily go back to the list of employees:
UI Interface for the Incident Screen
You can find them under the Tree information. I'm confident that with this information, you'll be able to create the screen yourself. Feel free to reach out if you have any questions or need further guidance.
I want to encourage you to recreate the screen on your own, you can find all information needed under the Tree:
TIP: This time we don’t need to call the API as we already have the information stored in the app variables.
While I won't go into as much detail this time, I'm confident that you have the necessary knowledge and skills to use the information provided and build the screen successfully. Feel free to reach out if you have any questions or need further guidance.
To learn how to trigger the process on SAP Build Process Automation, I would recommend checking out the following SAP Blogs:
- Integrate SAP Build Apps and SAP Build Process Automation using SAP BTP Destinations by Chaitanya Priya Puvvada
- Start Process from SAP Build Apps using APIs by Archana Shukla
If you believe a more detailed guide is required for the SAP Build Process Automation, let me know in the comments and I will work on a technical article that walks you through the configuration step-by-step.
Conclusion
In this blog post, I have demonstrated how to build a simple application using SAP Build Apps that communicates with SAP SuccessFactors. I have covered various technical details including API integration, data modeling, and UI design. By following the step-by-step instructions, you should be able to create the same application, or a similar application tailored to your specific use case.
I hope that you have found this blog informative and helpful in showcasing the capabilities of SAP Build Apps. If you have any questions, doubts, or concerns, don’t hesitate to post them in the comments or reach out to the community. We’re always here to help you make the most of SAP BTP!
Thank you for reading and happy building!
- SAP Managed Tags:
- SAP SuccessFactors platform,
- SAP Build Apps,
- SAP Build,
- SAP Business Technology Platform
Labels:
10 Comments
You must be a registered user to add a comment. If you've already registered, sign in. Otherwise, register and sign in.
Labels in this area
-
ABAP CDS Views - CDC (Change Data Capture)
2 -
AI
1 -
Analyze Workload Data
1 -
BTP
1 -
Business and IT Integration
2 -
Business application stu
1 -
Business Technology Platform
1 -
Business Trends
1,658 -
Business Trends
93 -
CAP
1 -
cf
1 -
Cloud Foundry
1 -
Confluent
1 -
Customer COE Basics and Fundamentals
1 -
Customer COE Latest and Greatest
3 -
Customer Data Browser app
1 -
Data Analysis Tool
1 -
data migration
1 -
data transfer
1 -
Datasphere
2 -
Event Information
1,400 -
Event Information
66 -
Expert
1 -
Expert Insights
177 -
Expert Insights
299 -
General
1 -
Google cloud
1 -
Google Next'24
1 -
Kafka
1 -
Life at SAP
780 -
Life at SAP
13 -
Migrate your Data App
1 -
MTA
1 -
Network Performance Analysis
1 -
NodeJS
1 -
PDF
1 -
POC
1 -
Product Updates
4,577 -
Product Updates
345 -
Replication Flow
1 -
RisewithSAP
1 -
SAP BTP
1 -
SAP BTP Cloud Foundry
1 -
SAP Cloud ALM
1 -
SAP Cloud Application Programming Model
1 -
SAP Datasphere
2 -
SAP S4HANA Cloud
1 -
SAP S4HANA Migration Cockpit
1 -
Technology Updates
6,873 -
Technology Updates
427 -
Workload Fluctuations
1
Related Content
- Demystifying the Common Super Domain for SAP Mobile Start in Technology Blogs by SAP
- what is the standard page to display employee Username in SuccessFactors : IAS or Spotlight? in Technology Q&A
- Streamlining Time Sheet Approvals in SuccessFactors: Time Sheet Approval Center in Technology Blogs by Members
- Unify your process and task mining insights: How SAP UEM by Knoa integrates with SAP Signavio in Technology Blogs by SAP
- Strategic Workforce Planning in SAC in Technology Q&A
Top kudoed authors
| User | Count |
|---|---|
| 41 | |
| 25 | |
| 17 | |
| 14 | |
| 9 | |
| 7 | |
| 6 | |
| 6 | |
| 6 | |
| 6 |