
- SAP Community
- Products and Technology
- Technology
- Technology Blogs by SAP
- Replication of data using SLT and SAP Data Intelli...
Technology Blogs by SAP
Learn how to extend and personalize SAP applications. Follow the SAP technology blog for insights into SAP BTP, ABAP, SAP Analytics Cloud, SAP HANA, and more.
Turn on suggestions
Auto-suggest helps you quickly narrow down your search results by suggesting possible matches as you type.
Showing results for
Employee
Options
- Subscribe to RSS Feed
- Mark as New
- Mark as Read
- Bookmark
- Subscribe
- Printer Friendly Page
- Report Inappropriate Content
02-17-2023
4:52 PM
Introduction
SAP Landscape Transformation Replication Server (SLT) is a product that allows users to replicate data between systems. While there are a lot of blogs out there covering SLT in general, I will focus on how SLT can be used with SAP Data Intelligence (DI) for replication.
SAP Data Intelligence is a product that is used to organize a heterogenous data system landscape from SAP systems and third-party systems. It is the main tool that I work with on the Data Management Team in Ireland. Within DI you have the option to build pipelines using Generation 1 Operators or Generation 2 Operators.
If you are using Generation 1 Operators, please have a look at this excellent blog by Martin Boeckling (https://blogs.sap.com/2021/07/20/replication-and-filtering-of-data-by-using-slt-and-sap-data-intelli...).
In this blog, I will give you a step-by-step walkthrough of how you can build a pipeline in DI to replicate data from an SLT table and store it in any target using Generation 2 Operators.
Prerequisites
To follow this blog, you will need a SLT system (either a standalone DMIS system or a SLT version on an SAP S/4HANA system) and a DI system (on-prem or cloud) with an ABAP connection to the SLT system you wish to use. This SAP Note (https://launchpad.support.sap.com/#/notes/2835207) contains details of how to connect the two systems.
SLT
Create your configuration
In order to connect a SLT system to a DI system you must create a configuration within SLT using the SLT cockpit which can be accessed with the LTRC transaction. By clicking the paper icon (in the red square below), you can create the configuration in the pop-up window that follows.

SLT Paper Icon
Follow this blog (https://blogs.sap.com/2019/10/29/abap-integration-replicating-tables-into-sap-data-hub-via-sap-lt-re...) to create the connection. At the end be sure to check you have configured everything correctly in the review screen. If everything is as necessary, click create to create the configuration.

SLT Create Button
Once the configuration has been created, you can access an overview and any current replications related to it using the glasses icon.

SLT Replication Details
Table replication
For this blog, we will use the SFLIGHT table to demonstrate this replication scenario. The table appears as follows within SLT:

SFLIGHT Table
SAP Data Intelligence
Integrate SLT configuration within SAP Data Intelligence
Now that we have our SLT Configuration made, let’s look at building the replication pipeline in DI. For this, we are required to use the Modeler tile from the Launchpad. In order to use this tile and to be able to view the replication results, we must have the following policies assigned to the user we wish to use: app.datahub-app-data.fullAccess, sap.dh.member, sap.dh.developer. (https://launchpad.support.sap.com/#/notes/2981615)

Data Intelligence Launchpad
We will now connect to the SLT system, replicate the data to a file in DI and view the results.
Build your pipeline
For this, we will use the Read Data from SAP System Operator which can be accessed from the “Operators” tab on the left, under the ABAP category. By right clicking the operator and selecting the view documentation option, you can read the details of the operator and its parameters.
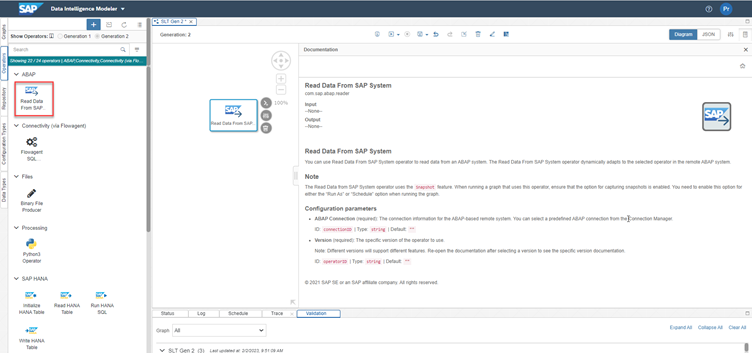
Read Data from SAP System Operator
Now to configure the operator. To do this you can either right click and choose the open configuration option or you can use the shortcut that appears when you select the operator.

Open Configuration of Operator
This will open the configuration panel where we must specify the ABAP connection to be used to connect to out SLT system and choose the version of operator we wish to use.

ABAP Connection for SLT

Specify Operator Version
Once this has been specified, we will be able to see additional fields in the configuration panel. Namely, Object Name and Transfer Mode. When specifying the Object Name, we will need to select the Mass Transfer ID we previously created and once we select that, we can search for the SFLIGHT table within it.

Selecting the Table
Next, we must specify the Transfer Mode we wish to use for our pipeline. Here we have three options: Initial Load, Delta Load and Replication. These determine what data gets replicated when the pipeline is run. Initial Load will only replicate the table and not look for changes, Delta will only replicate over the changes that occur in the table. Additionally, Delta will add a flag to show what change occurred (I - insert, U - update and D - delete). Lastly, Replication is the Transfer Mode that does both. It first does the Initial load and then any changes that are made to the table also get replicated over.
![]()
Three Transfer Modes
You may notice that an output port is automatically added by DI for the table we are going to read.

Output Port Added
Since we want to write our table data into a file, we will have to firstly convert the table. To use the Binary file producer, our output from the Read Data Operator must be compatible with the input for the Binary File Producer. If we try to connect the two operators, we will see an error due to incompatible port types.

Incompatible Port Types
To fix this, we will use the Table to Binary operator to convert the table to binary before producing the file from it. We connect the output port labelled binary to the input port of the binary file producer as follows:

Converting Table to Binary
Now that we have matching ports, we just need to configure the Binary File Producer Operator using the Open Configuration shortcut as before.

Open Configuration

Binary File Producer Configuration
Firstly, we must specify which connection we wish to use for our target system. Let’s use the S3 connection for our example.

S3 Target
Next, choose the path mode you want to give and select your path to the target. If you wish for a new file to be created, just select the folder and add the file_name.csv at the end. After this the mode must be selected, this is what happens to the file. We have three options here, Overwrite (if the file already exists, its contents will be deleted and the new contents will replace them), Append (if the file already exists, the new data will be added to the bottom and old data will be kept too) and Create Only (no changes occur if the file already exists).
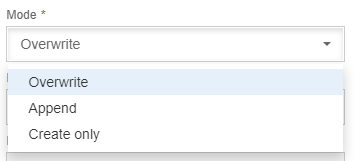
Write File Modes
That completes our pipeline!
Just for convenience though, we can add the Wiretap operator to the end to be able to view the records as they come in. This will display the traffic to the browser window.
Our completed pipeline should look like this:

Generation 2 Pipeline for SLT Replication
You can now save and run the pipeline using the controls highlighted in red above.
Note that you must specify the time to capture snapshots for the Read Data from SAP Operator to work. You do this by clicking the arrow beside the run button and choosing the Run As option from the dropdown menu.

Capturing Snapshots
For errors regarding the same Mass Transfer ID being used multiple times, this SAP Note may be helpful: https://me.sap.com/notes/0003204663
Once your graph is running, you will be able to see it in the status tab:

Running Graph Status
To see the records coming in, open the UI for the wiretap. This will open in a new tab. Your results should look similar to this:

Open Wiretap UI

Wiretap Results
And if you browse the connections using the Metadata Explorer, you should be able to see the new file in the location you specified. The catalog will only contain the published files and folders.
Using the glasses icon, you can view the data that has been replicated.

View Factsheet
The data should be visible to you under the data preview tab.

Data Preview
Conclusion
Congratulations! You now have a pipeline that allows you to replicate data from SLT to DI using Generation 2 Operators.
If you have any further questions, feel free to comment down below. Feedback is also welcome.
- SAP Managed Tags:
- SAP Data Intelligence,
- SAP Landscape Transformation replication server
Labels:
12 Comments
You must be a registered user to add a comment. If you've already registered, sign in. Otherwise, register and sign in.
Labels in this area
-
ABAP CDS Views - CDC (Change Data Capture)
2 -
AI
1 -
Analyze Workload Data
1 -
BTP
1 -
Business and IT Integration
2 -
Business application stu
1 -
Business Technology Platform
1 -
Business Trends
1,661 -
Business Trends
87 -
CAP
1 -
cf
1 -
Cloud Foundry
1 -
Confluent
1 -
Customer COE Basics and Fundamentals
1 -
Customer COE Latest and Greatest
3 -
Customer Data Browser app
1 -
Data Analysis Tool
1 -
data migration
1 -
data transfer
1 -
Datasphere
2 -
Event Information
1,400 -
Event Information
64 -
Expert
1 -
Expert Insights
178 -
Expert Insights
276 -
General
1 -
Google cloud
1 -
Google Next'24
1 -
Kafka
1 -
Life at SAP
784 -
Life at SAP
11 -
Migrate your Data App
1 -
MTA
1 -
Network Performance Analysis
1 -
NodeJS
1 -
PDF
1 -
POC
1 -
Product Updates
4,577 -
Product Updates
329 -
Replication Flow
1 -
RisewithSAP
1 -
SAP BTP
1 -
SAP BTP Cloud Foundry
1 -
SAP Cloud ALM
1 -
SAP Cloud Application Programming Model
1 -
SAP Datasphere
2 -
SAP S4HANA Cloud
1 -
SAP S4HANA Migration Cockpit
1 -
Technology Updates
6,886 -
Technology Updates
407 -
Workload Fluctuations
1
Related Content
- 10+ ways to reshape your SAP landscape with SAP BTP - Blog 4 Interview in Technology Blogs by SAP
- 10+ ways to reshape your SAP landscape with SAP Business Technology Platform – Blog 4 in Technology Blogs by SAP
- Top Picks: Innovations Highlights from SAP Business Technology Platform (Q1/2024) in Technology Blogs by SAP
- Harnessing the Power of SAP HANA Cloud Vector Engine for Context-Aware LLM Architecture in Technology Blogs by SAP
- Trustable AI thanks to - SAP AI Core & SAP HANA Cloud & SAP S/4HANA & Enterprise Blockchain 🚀 in Technology Blogs by Members
Top kudoed authors
| User | Count |
|---|---|
| 13 | |
| 10 | |
| 10 | |
| 7 | |
| 7 | |
| 6 | |
| 5 | |
| 5 | |
| 5 | |
| 4 |