

- SAP Community
- Products and Technology
- Enterprise Resource Planning
- ERP Blogs by Members
- Credit Limit Request Configuration - SAP S4Hana Cr...
Enterprise Resource Planning Blogs by Members
Gain new perspectives and knowledge about enterprise resource planning in blog posts from community members. Share your own comments and ERP insights today!
Turn on suggestions
Auto-suggest helps you quickly narrow down your search results by suggesting possible matches as you type.
Showing results for
GOWRESHANHARAN
Explorer
Options
- Subscribe to RSS Feed
- Mark as New
- Mark as Read
- Bookmark
- Subscribe
- Printer Friendly Page
- Report Inappropriate Content
02-13-2023
9:35 PM
Introduction:
Credit Management is a process in which Company sells a product/service to customers on a credit basis. The company collects payments from customers at a later time, after the sale of the product. The amount of credit fixed by a company for a customer is called a credit limit. The customer can purchase the product from a company within the credit limit, and when the credit limit is crossed, the order is blocked by the system.
The creditworthiness and payment behavior of your business partners have an immediate effect on the business results of your company. Efficient receivables and credit management reduce the risk of financial losses and help you to optimize business relationships with your business partners. SAP Credit Management (FIN-FSCM-CR) supports your company in determining the risk of losses on receivables from your business partners early and in making credit decisions efficiently and in some cases automated. With SAP Credit Management (FIN-FSCM-CR) you can operate centralized credit management. The business systems connected (for example Sales and Distribution, Logistics Execution, and Financial Accounting) report the commitment of a business partner to SAP Credit Management.
Credit Limit Request:
Request for a change to the credit limit of a business partner in a credit segment.
You use the credit limit request if the credit limit is not to be changed immediately in the master data and requires a decision or approval process first. In most business cases customers need to apply for approval if any user increased the credit limit, this function will allow the financial manager to check and review the credit limit before it effects in the BP and will enable him to approve or reject the limit requested
Process Flow:
When you create a credit limit request, the system transfers some master data that exists for the business partner in SAP Credit Management to the credit limit request. This includes the score, risk class, and credit limit.
When you create or change a credit limit request, you can carry out the following actions:
- Enter the credit limit requested.
- Enter notes.
- Link documents
Forward credit limit requests to another processor for approval, whereby this processor can enter an approved credit limit that is different from the limit requested.
If a processor closes the credit limit request, this corresponds to a refusal. If he confirms the credit limit request, this is approval and triggers the update of the approved credit limit in the master data of the business partner.
Prerequisite:
| Transaction Code: SU01 |
Before activating this function, you should first make sure that the Workflow user: SAP_WFRT is active and have the required standard authorizations

Click on Display. There You can find the user which was active.

Configuration Steps for Case Management Component:
SAP Credit Management uses the component Case Management as a technical basis for the processing of the following objects:
- Documented Credit Decision
- Credit Limit Request
In this Customizing activity, you can find a summary of the activities that you have to execute for this in the Case Management component.
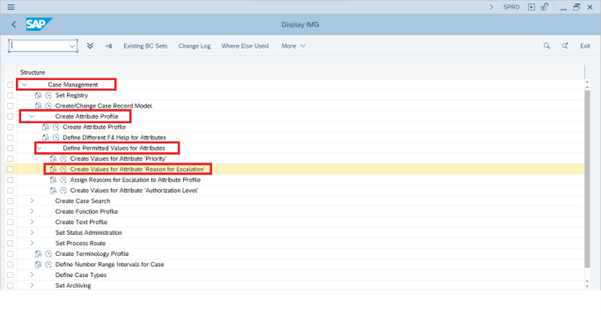
Path => SAP NetWeaver under Application Server -> Basis Services -> Case Management. |
Step 1: Attribute profile
In this activity, you define which attributes you want to use for the credit limit request. You also define the display and maintenance properties of the individual attributes. If you also want to use customer-specific attributes for the documented credit decision in addition to the standard attributes.
Create Attribute Profile:
| Path => SAP NetWeaver under Application Server -> Basis Services -> Case Management ->Create Attribute Profile. |
Execute Create attribute profile.

Click on New Entries to create a new attribute profile for the Credit Limit request.

Fill in the following data shown in the below image. And click on save.
| Attribute Profile | FIN_CRED |
| Description | SAP Credit Management |
| Table Name | UKMCASEATTR00 |

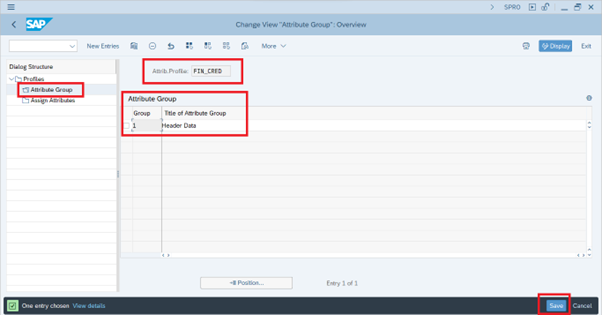
Click on Attribute Group and fill in the following data shown in the below image and click on save.
Click on Assign Attribute and fill in the following data shown below table and click on save.
| Attribute Profile | Case Attribute | Group | Row | Column | required | Invisible | Drop | Check Box | Not Modifiable | Modifiable only on new | log |
| FIN_CRED | CASE_TITLE | 1 | 1 | 1 | |||||||
| FIN_CRED | CASE_TYPE | 1 | 2 | 1 | X | X | |||||
| FIN_CRED | CATEGORY | 1 | 3 | 1 | X | X | |||||
| FIN_CRED | CHANGED_BY | 1 | 18 | 1 | X | ||||||
| FIN_CRED | CHANGE_TIME | 1 | 18 | 2 | X | ||||||
| FIN_CRED | CLOSED_BY | 1 | 19 | 1 | X | ||||||
| FIN_CRED | CLOSING_TIME | 1 | 19 | 2 | X | X | |||||
| FIN_CRED | CREATED_BY | 1 | 17 | 1 | X | ||||||
| FIN_CRED | CREATE_TIME | 1 | 17 | 2 | X | ||||||
| FIN_CRED | ESCAL_REASON | 1 | 6 | 2 | X | X | |||||
| FIN_CRED | EXT_KEY | 1 | 1 | 2 | X | ||||||
| FIN_CRED | EXT_REF | 1 | 2 | 2 | X | ||||||
| FIN_CRED | FCR_APP_LIMIT | 1 | 13 | 1 | |||||||
| FIN_CRED | FCR_CURRENCY | 1 | 11 | 2 | X | ||||||
| FIN_CRED | FCR_CURR_LIMIT | 1 | 11 | 1 | X | ||||||
| FIN_CRED | FCR_EXPOSURE | 1 | 14 | 1 | X | ||||||
| FIN_CRED | FCR_EXP_VOLUME | 1 | 15 | 1 | |||||||
| FIN_CRED | FCR_PARTNER | 1 | 9 | 1 | X | X | |||||
| FIN_CRED | FCR_PERC_USAGE | 1 | 14 | 2 | X | ||||||
| FIN_CRED | FCR_REQ_LIMIT | 1 | 12 | 1 | |||||||
| FIN_CRED | FCR_RISK_CLASS | 1 | 10 | 2 | X | X | |||||
| FIN_CRED | FCR_SCORING | 1 | 10 | 1 | X | ||||||
| FIN_CRED | FCR_SEGMENT | 1 | 9 | 2 | X | X | X | ||||
| FIN_CRED | PLAN_END_DATE | 1 | 7 | 1 | |||||||
| FIN_CRED | PRIORITY | 1 | 5 | 1 | X | X | |||||
| FIN_CRED | PROCESSOR | 1 | 7 | 2 | X | ||||||
| FIN_CRED | REASON_CODE | 1 | 3 | 2 | X | X | |||||
| FIN_CRED | STAT_ORDERNO | 1 | 6 | 1 | X | X |
Click on the save Button.

Create Values for the Attribute "Priority"
| Path => SAP NetWeaver under Application Server -> Basis Services -> Case Management ->Create Attribute Profile => Define Permitted Values for Attributes => Create Values for Attribute 'Priority' |

Fill in the following value shown in the image and click on save. The following value helps us to indicate the priority of the case created for the Credit Limit Request.

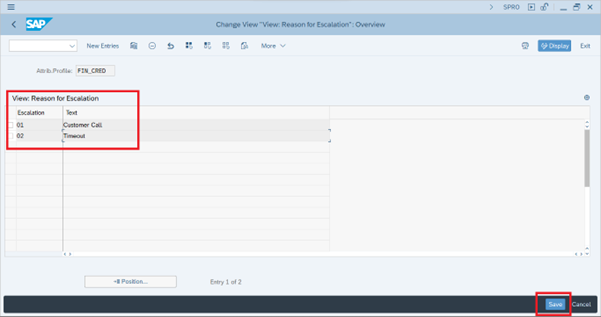
Create Values for the Attribute "Reason for Escalation"
| Path => SAP NetWeaver under Application Server -> Basis Services -> Case Management ->Create Attribute Profile => Define Permitted Values for Attributes => Create Values for the Attribute "Reason for Escalation" |
Fill in the following value shown in the image and click on save.The following value helps us to indicate the escalation reason of the case created for the Credit Limit Request.

Assign Reasons for Escalation to an Attribute Profile:
| Path => SAP NetWeaver under Application Server -> Basis Services -> Case Management ->Create Attribute Profile => Define Permitted Values for Attributes => Assign Reasons for Escalation to an Attribute Profile. |

Fill in the Attribute Profile Created in the above step and click on the Tick button.

Add the escalation Reason created in the previous step and click on save.
Step 2: Status profile
In this activity, you can define the various status forms and the changes from one status to another that you require for documented credit decisions and credit limit requests.
| Path => SAP NetWeaver under Application Server -> Basis Services -> Case Management -> Set Status Administration -> Create Status Profile. |

Click on New Entries and Create a new Status Profile and click save.

Navigate to Status Value.
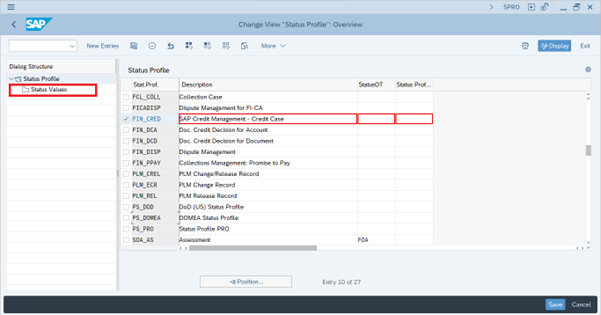
Click on Status Value and fill in the following data shown in the table and click on save.
| Status Profile | Status | Status Description | System Status | System Status Descr. | Lowest Status | Highest Status | Automatic | Event for Case |
| FIN_CRED | 10 | New | 001 | Open/New | 0 | 10 | false | |
| FIN_CRED | 20 | Being Processed | 002 | In Process | 0 | 40 | false | |
| FIN_CRED | 30 | Approved | 008 | Confirmed | 20 | 30 | false | |
| FIN_CRED | 40 | Rejected | 006 | Rejected | 20 | 30 | false | |
| FIN_CRED | 50 | Closed | 007 | Closed | 25 | 40 | false |
After adding the value. click on save. The below value will act as a status for the Credit limit request. The responsible person will change the Credit Limit Request Status based on the business need.

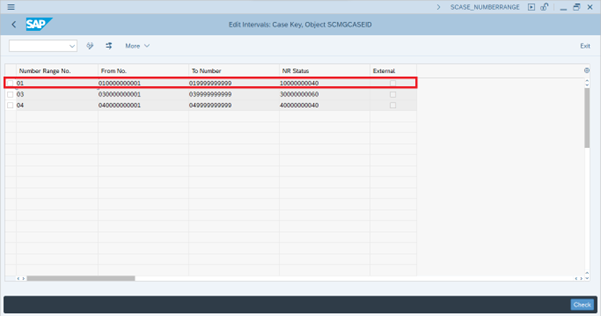
Step 3: Number range
| Path => SAP NetWeaver under Application Server -> Basis Services -> Case Management -> Define Number Range Intervals for Case |

Click on Intervals to define the intervals for the Credit limit request Case.

Define the interval and NR Status for the Credit limit request Case.
Step 4: Case Types
The following case types are contained in the standard system for SAP Credit Management: Credit Limit Request (F_CR).
Define Case Types
| Path => SAP NetWeaver under Application Server -> Basis Services -> Case Management -> Define Case Types-> Define Case Types. |

Fill in the following data to create a case type for a Credit limit Request and click on save.

Assign the number range which was created in the previous steps.

Navigate to Customizing for Case Copy and fill in the following data shown in the image and click save.
| Case Type | Function (Case Component) | Copy | Merge | Split |
| F_CR | ATTRIBUTES | true | false | false |
| F_CR | CASE_LOG_SUB | true | false | false |
| F_CR | SUBCOMPONENT_NOTES | true | false | false |
| F_CR | SUBCOMPONENT_RECORD | true | false | false |

Create Values for Attribute "Category".
| Path => SAP NetWeaver under Application Server -> Basis Services -> Case Management -> Define Case Types-> Create Values for Attribute "Category". |

Create an Attribute Category and map it to the case type and save it.
| Case Type | Category | Text |
| F_CR | 1 | Category 1 |
| F_CR | 2 | Category 2 |
| F_CR | 3 | Category 3 |

Create Values for the Attribute "Reason".
| Path => SAP NetWeaver under Application Server -> Basis Services -> Case Management -> Define Case Types-> Create Values for Attribute "Reason". |

Create an Attribute reason and map it to the case type and save it.
| Case Type | Reason | Text |
| F_CR | 0001 | First Credit Limit Set |
| F_CR | 0002 | Additional Service Contracts |
| F_CR | 0003 | Seasonal Adjustment |
| F_CR | 0004 | Limit Exceeded Due to Increased Order Volume |

Configuration Steps For Credit Limit Request:
1. Create a Profile for Case Search
| Path: SPRO -> SAP Customizing Implementation Guide → Financial Supply Chain Management → Credit Management → Credit Risk Monitoring → Credit Limit Request → Create Profile for Case Search. |

Create a New Profile for Credit Limit Requests.
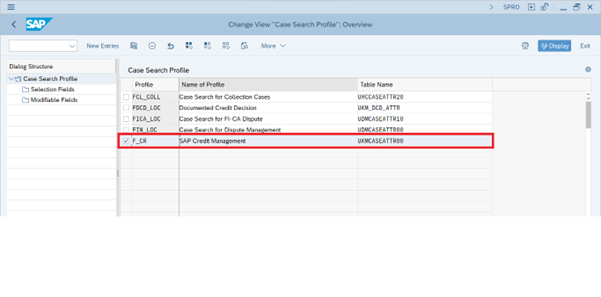 Navigate to Selection Fields:
 Fill in the following data shown in the below image and save it.
| Case Search Profile | Row Number | Column Number | Case Attrib. | Selection Options |
| F_CR | 1 | 1 | EXT_KEY | false |
| F_CR | 1 | 2 | PROCESSOR | false |
| F_CR | 2 | 1 | FCR_PARTNER | false |
| F_CR | 2 | 2 | FCR_SEGMENT | true |
| F_CR | 4 | 1 | CREATED_BY | false |
| F_CR | 4 | 2 | CREATE_TIME | true |
| F_CR | 5 | 1 | STAT_ORDERNO | false |
| F_CR | 5 | 2 | CATEGORY | false |
| F_CR | 6 | 1 | PRIORITY | false |
| F_CR | 6 | 2 | CASE_TITLE | false |

2. Define Document Class:
| Path: SPRO-> SAP Customizing Implementation Guide → Financial Supply Chain Management → Credit Management → Credit Risk Monitoring → Credit Limit Request → Enterprise Services→Define Document Class for Attachments to Credit Limit Requests |

3. Activation supporting BAdI.
| Path: SPRO-> SAP Customizing Implementation Guide → Financial Supply Chain Management → Credit Management → Credit Risk Monitoring → Credit Limit Request → Enterprise Services→ Mapping BAdIs for Service Provider. |

Make sure the below BAdI is activated.

4. Define Events and Follow-On Processes
| Path => SAP Customizing Implementation Guide → Financial Supply Chain Management → Credit Management → Credit Risk Monitoring → Processes → Define Events and Follow-On Processes. |

In the activity Define Events and Follow-On Processes, define the activities in which event type Credit Limit Change Requested is to be dealt with; enter the follow-on processes Check Request for Limit Change and Start Workflow for this event type.


Step 5 : Configuring Approvals for Credit Limit Changes
Path => SAP Menu→ Tools → Business Workflow → Development → Administration → Event Manager → Type Linkage Transaction Code: SWETYPV |

Make sure that, under Event Manager → Type Linkages, the following settings are defined for the object type CL_UKM_ACCOUNT:

Step 6: Workflow Builder
Path => SAP Menu→ Tools → Business Workflow → Development → Definition Tools → Workflow Builder → Workflow Builder Transaction Code: SWDD |

Choose Goto → Basic Data
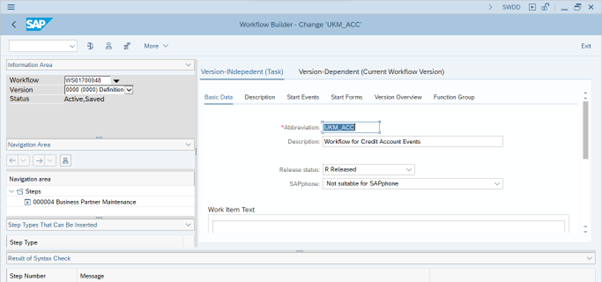
Then Goto → Agent Assignment for Task. Make sure that the task is identified as a general task.

Result:
If the credit limit of a credit account is increased, manually or via an automatic process (for example, mass change), by more than the percentage rate defined in the rule, the increased value is not transferred to the Credit Limit field immediately; instead, it is entered in the Credit Limit Requested field. At the same time, a workflow item is generated that provides information about this request and offers access to the business partner maintenance. If the user has the relevant authorization, he can accept the limit requested (it is included in the credit limit) or reject it.
Test Case:
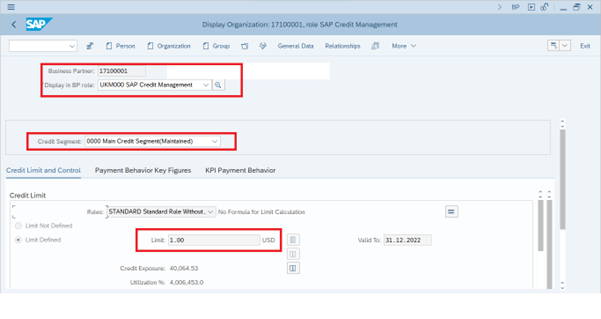
Transaction Code: BP Role: UKM000 Sap Credit Management. |
Note the credit limit of the Business Partner.
Credit Limit Request :
Transaction Code: UKM_CASE Fiori Application: Manage Credit Cases |
S/4HANA transitions from using VKM3 transactions to UKM_CASE transactions for releasing credit-blocked documents. UKM_CASE transaction is a typical ERP mega transaction that has a lot of functionality and an over-complicated user interface. The latter makes it complicated to use UKM_CASE transaction for S/4HANA insight to action. In my blog, I will explain how to apply the Fiori Simplify strategy to the UKM_CASE transaction. As you can see, UKM_CASE has an organizer panel (on the left) for activities switching RMS and menu navigation.
Create a credit limit request.

Go to Credit Limit Request – Search.

After approving the request, the Credit limit will be updated in the BP Master.

| Go to transaction Code: BP |
Role: UKM000 Sap Credit Management. Check the credit limit.

Conclusion:
By following the above steps you can activate approvals for credit limit change in the business partner screen with simple configurations.
- SAP Managed Tags:
- ABAP Development,
- SAP S/4HANA,
- FIN (Finance)
4 Comments
You must be a registered user to add a comment. If you've already registered, sign in. Otherwise, register and sign in.
Labels in this area
-
"mm02"
1 -
A_PurchaseOrderItem additional fields
1 -
ABAP
1 -
ABAP Extensibility
1 -
ACCOSTRATE
1 -
ACDOCP
1 -
Adding your country in SPRO - Project Administration
1 -
Advance Return Management
1 -
AI and RPA in SAP Upgrades
1 -
Approval Workflows
1 -
ARM
1 -
ASN
1 -
Asset Management
1 -
Associations in CDS Views
1 -
auditlog
1 -
Authorization
1 -
Availability date
1 -
Azure Center for SAP Solutions
1 -
AzureSentinel
2 -
Bank
1 -
BAPI_SALESORDER_CREATEFROMDAT2
1 -
BRF+
1 -
BRFPLUS
1 -
Bundled Cloud Services
1 -
business participation
1 -
Business Processes
1 -
CAPM
1 -
Carbon
1 -
Cental Finance
1 -
CFIN
1 -
CFIN Document Splitting
1 -
Cloud ALM
1 -
Cloud Integration
1 -
condition contract management
1 -
Connection - The default connection string cannot be used.
1 -
Custom Table Creation
1 -
Customer Screen in Production Order
1 -
Data Quality Management
1 -
Date required
1 -
Decisions
1 -
desafios4hana
1 -
Developing with SAP Integration Suite
1 -
Direct Outbound Delivery
1 -
DMOVE2S4
1 -
EAM
1 -
EDI
2 -
EDI 850
1 -
EDI 856
1 -
EHS Product Structure
1 -
Emergency Access Management
1 -
Energy
1 -
EPC
1 -
Find
1 -
FINSSKF
1 -
Fiori
1 -
Flexible Workflow
1 -
Gas
1 -
Gen AI enabled SAP Upgrades
1 -
General
1 -
generate_xlsx_file
1 -
Getting Started
1 -
HomogeneousDMO
1 -
IDOC
2 -
Integration
1 -
Learning Content
2 -
LogicApps
2 -
low touchproject
1 -
Maintenance
1 -
management
1 -
Material creation
1 -
Material Management
1 -
MD04
1 -
MD61
1 -
methodology
1 -
Microsoft
2 -
MicrosoftSentinel
2 -
Migration
1 -
MRP
1 -
MS Teams
2 -
MT940
1 -
Newcomer
1 -
Notifications
1 -
Oil
1 -
open connectors
1 -
Order Change Log
1 -
ORDERS
2 -
OSS Note 390635
1 -
outbound delivery
1 -
outsourcing
1 -
PCE
1 -
Permit to Work
1 -
PIR Consumption Mode
1 -
PIR's
1 -
PIRs
1 -
PIRs Consumption
1 -
PIRs Reduction
1 -
Plan Independent Requirement
1 -
Premium Plus
1 -
pricing
1 -
Primavera P6
1 -
Process Excellence
1 -
Process Management
1 -
Process Order Change Log
1 -
Process purchase requisitions
1 -
Product Information
1 -
Production Order Change Log
1 -
Purchase requisition
1 -
Purchasing Lead Time
1 -
Redwood for SAP Job execution Setup
1 -
RISE with SAP
1 -
RisewithSAP
1 -
Rizing
1 -
S4 Cost Center Planning
1 -
S4 HANA
1 -
S4HANA
3 -
Sales and Distribution
1 -
Sales Commission
1 -
sales order
1 -
SAP
2 -
SAP Best Practices
1 -
SAP Build
1 -
SAP Build apps
1 -
SAP Cloud ALM
1 -
SAP Data Quality Management
1 -
SAP Maintenance resource scheduling
2 -
SAP Note 390635
1 -
SAP S4HANA
2 -
SAP S4HANA Cloud private edition
1 -
SAP Upgrade Automation
1 -
SAP WCM
1 -
SAP Work Clearance Management
1 -
Schedule Agreement
1 -
SDM
1 -
security
2 -
Settlement Management
1 -
soar
2 -
SSIS
1 -
SU01
1 -
SUM2.0SP17
1 -
SUMDMO
1 -
Teams
2 -
User Administration
1 -
User Participation
1 -
Utilities
1 -
va01
1 -
vendor
1 -
vl01n
1 -
vl02n
1 -
WCM
1 -
X12 850
1 -
xlsx_file_abap
1 -
YTD|MTD|QTD in CDs views using Date Function
1
- « Previous
- Next »
Related Content
- Manage Supply Shortage and Excess Supply with MRP Material Coverage Apps in Enterprise Resource Planning Blogs by SAP
- Quick Start guide for PLM system integration 3.0 Implementation/Installation in Enterprise Resource Planning Blogs by SAP
- Business Rule Framework Plus(BRF+) in Enterprise Resource Planning Blogs by Members
- Cruising through Compliance: Test the Regulatory Change Manager at DSAG-SAP Globalization Symposium in Enterprise Resource Planning Blogs by SAP
- In the Recent Version(2402), SAP S/4 Hana Cloud, Is there provision for Configuring Funds Management in Enterprise Resource Planning Q&A
Top kudoed authors
| User | Count |
|---|---|
| 2 | |
| 2 | |
| 2 | |
| 2 | |
| 2 | |
| 2 | |
| 1 | |
| 1 | |
| 1 | |
| 1 |